

CHAPTER 15 | Metaphors to Photography
15-minute read

Light and material
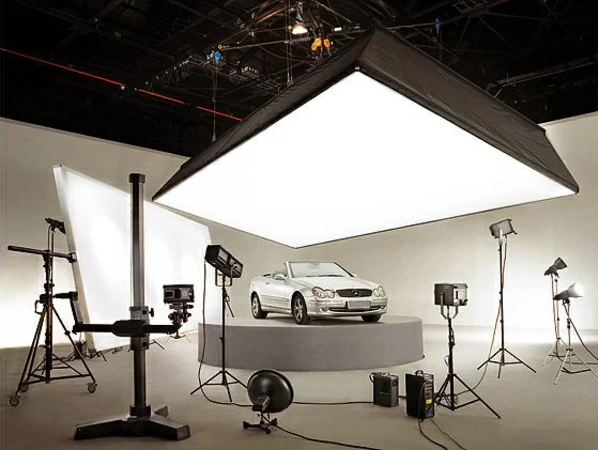
Still or single-frame rendering treats the output from the program much like a still photograph. If you’ve ever set yourself up for a photo shoot, you know several things already about setting this up in modeling software. The amount and direction of light, control of the background, and where you place your camera are among the variables a photographer accounts for in the photo studio. Here, the software will act as your virtual photo set.
However, people who work with 3D modeling may have limited experience with photography. So, if you are one of those, the metaphor to the photo studio set-up will be better understood after reading this title. But even if you know photography, it’s good to see how the metaphor works.
Light as subject and object
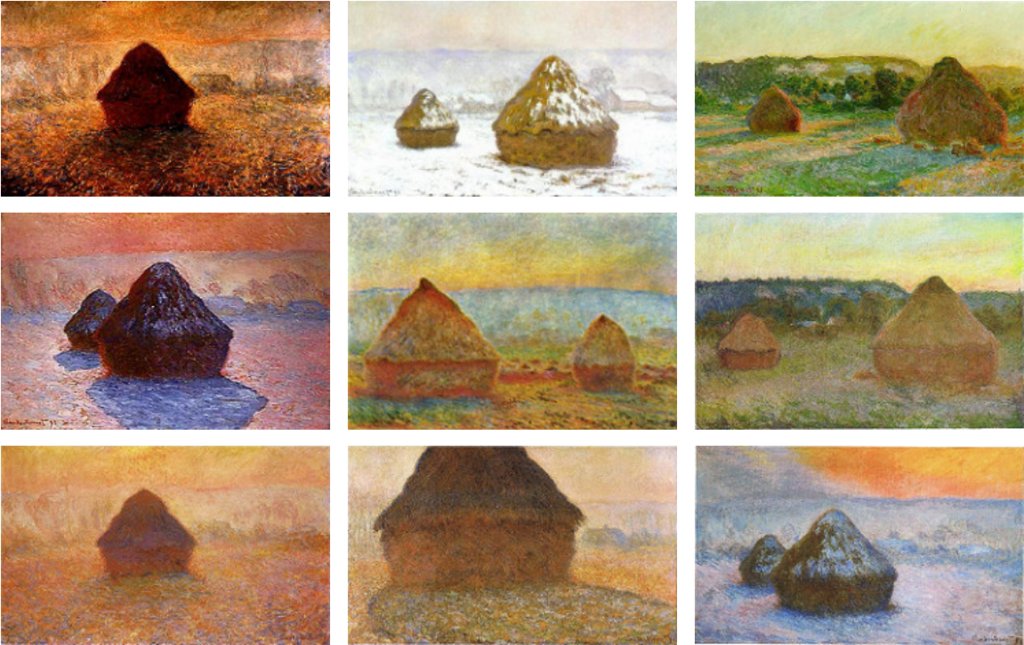
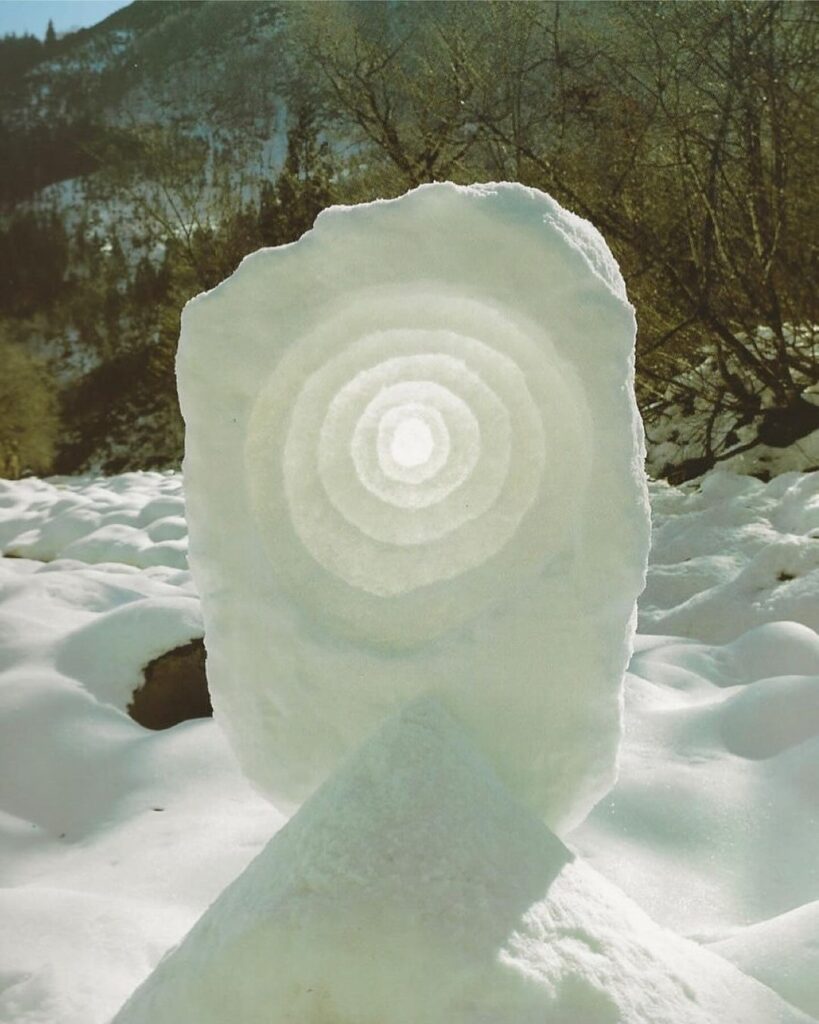
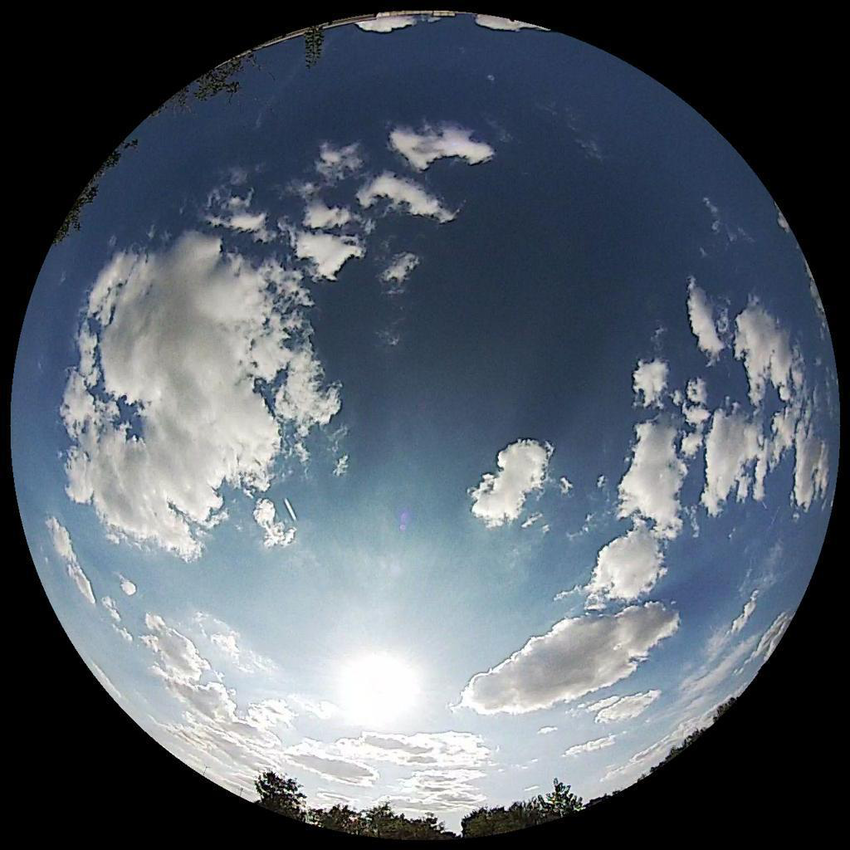
In nature, light is something you find as a given phenomenon, rather than something to control. A long tradition of artists, from the Impressionists to contemporary artists like Andy Goldsworthy, have explored the relationship of natural light to art.
The most consummate light artist is James Turrell, for whom light is both subject and object.
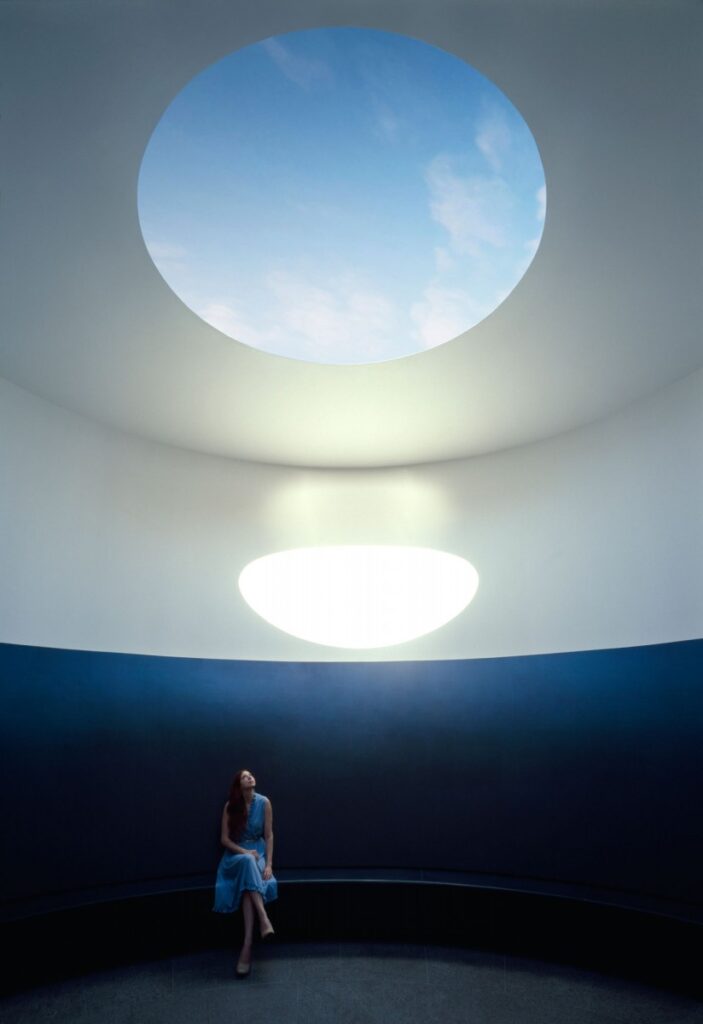
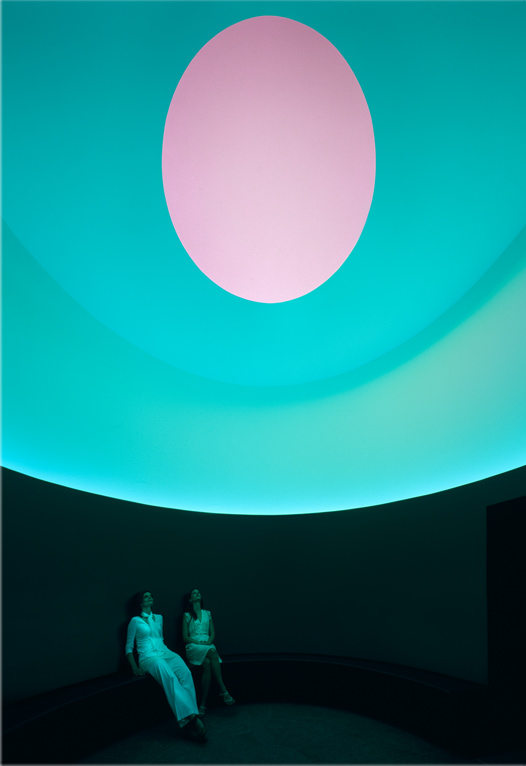

Our modeled light reveals our modeled object. In our software, we may find a default, ambient light present so we can quickly dash off a test rendering without thinking. However, as our models become more sophisticated and deliberate, light as a modeled condition begins to factor into our compositions. Of course, unlike the sun in Turrell’s Skyspace, you are in complete control of when and how light is presented in our setup. When we create a light setup, the light becomes an object or objects to model. There is no rendering without there being light first!
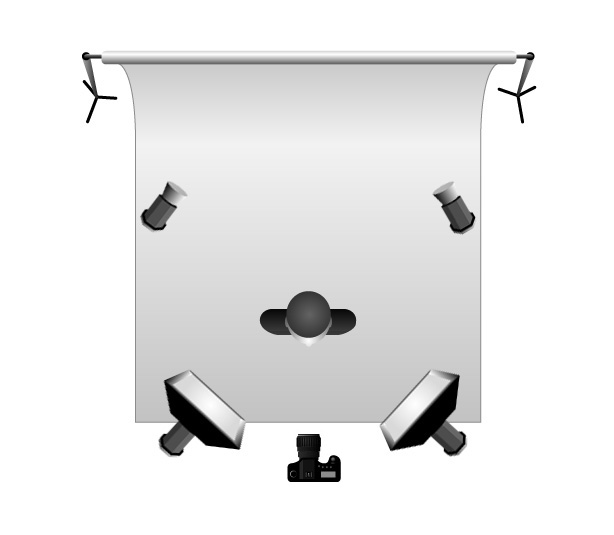
As in a photo studio, you’ll want light that gives your subject a proper sense of depth and context. In a typical setup, there are usually a number of lights. Generally there are two lights to either side. These indirectly emphasize the form or texture of a subject through light bouncing in the background. A third light, called a key light, emphasizes the subject. Sometimes a diffuse fourth light known as a fill light is added to keep shadows from losing detail. The spot lights directly on the subject are fairly direct and powerful lighting. The fill and background lights are usually diffuse and less intense.
Kinds of lighting
Modeling software has several different kinds of lights to employ. Typically, we can find:
- An ambient light, which acts like an all-over background illlumination
- A directional light, which acts like the sun
- A point light, which is a bit like the “bare bulb” in the room
- Spot lights, which focus light in a conic manner
- Area lights, which act like a fluorescent fixture with a diffuser in the classroom or office ceiling
Rules of thumb: a minimum of two light sources will help to generate realism. However, pay attention to the number of light sources you can see in a given room. This will include incidental sources like windows and computer monitors. More often, you’ll see quite more than two light sources are in a typical scene. However, remember that increasing light sources increases processing time, especially as you begin to render using radiosity.
Arnold case studies
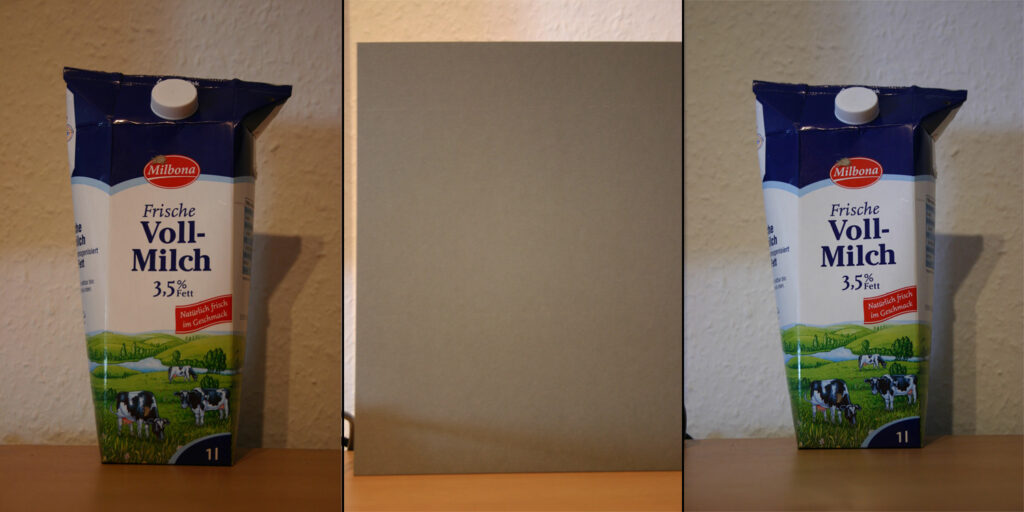
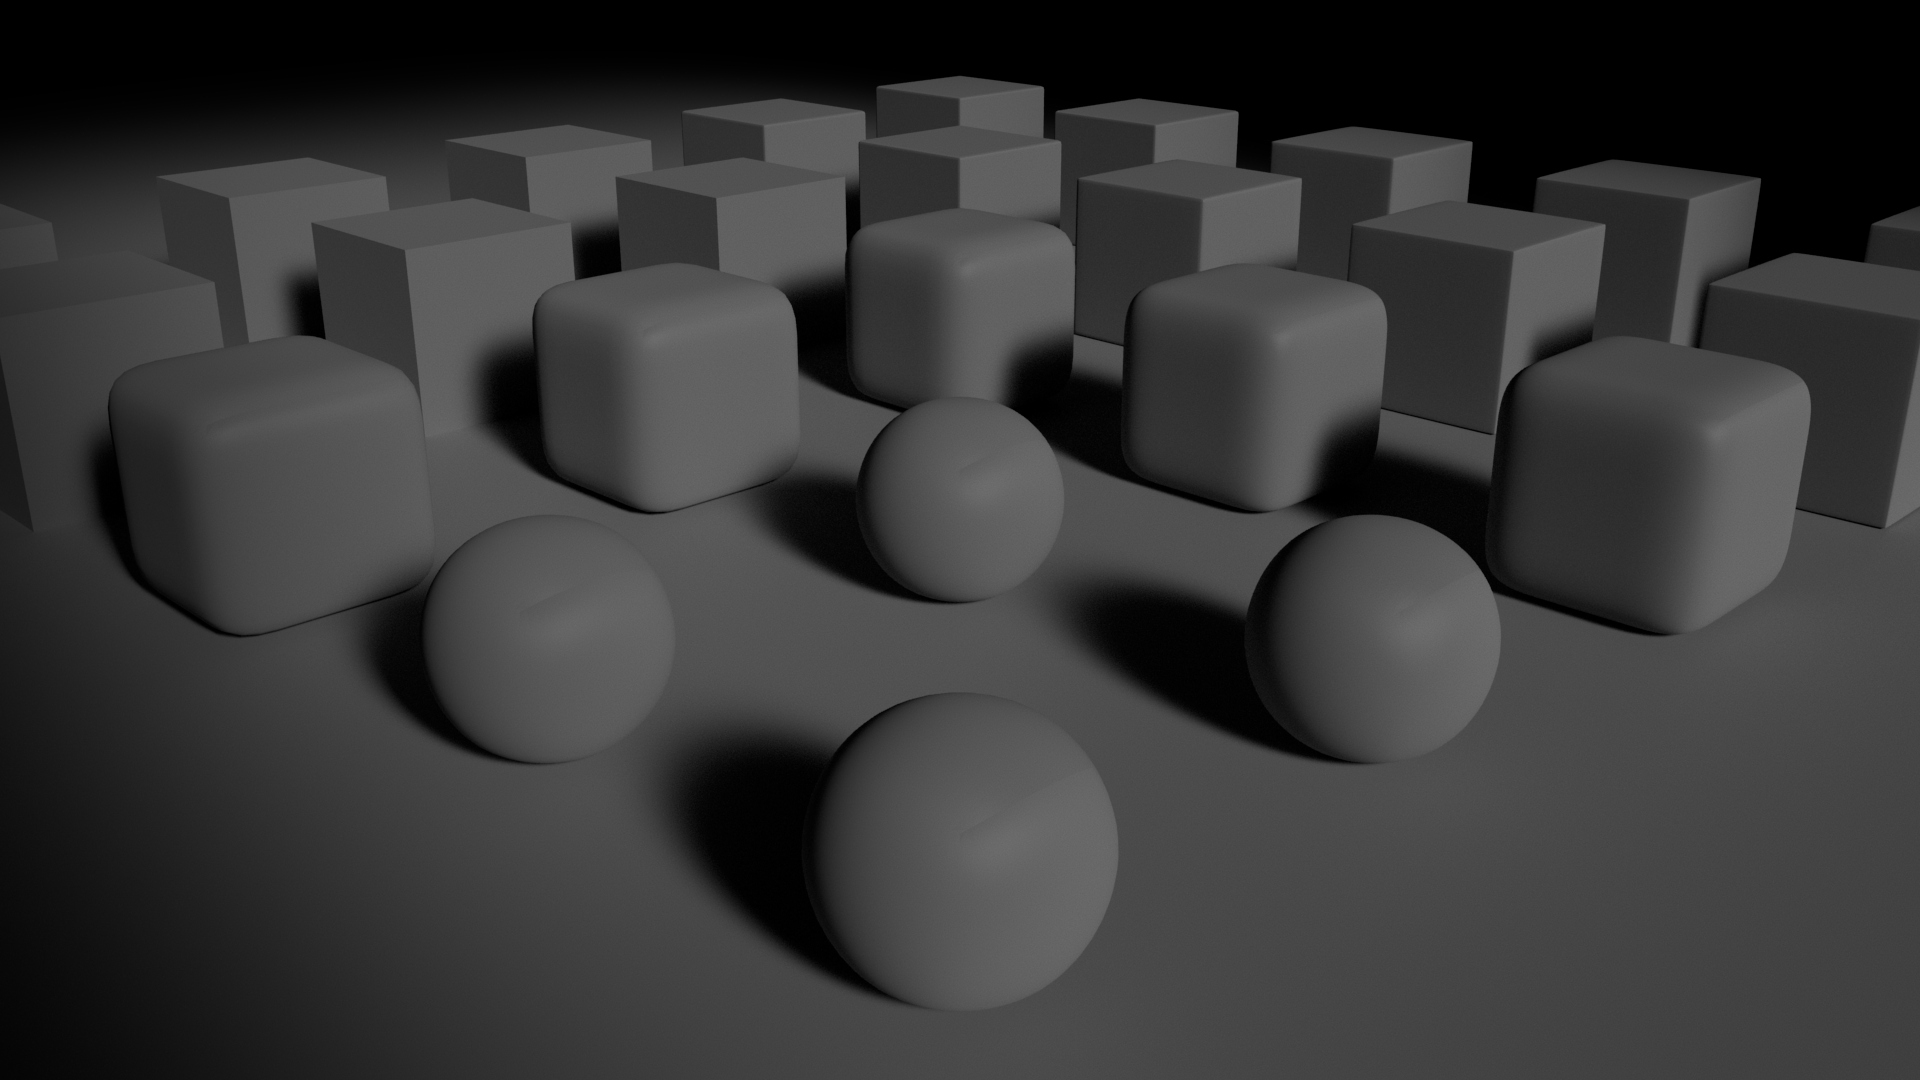
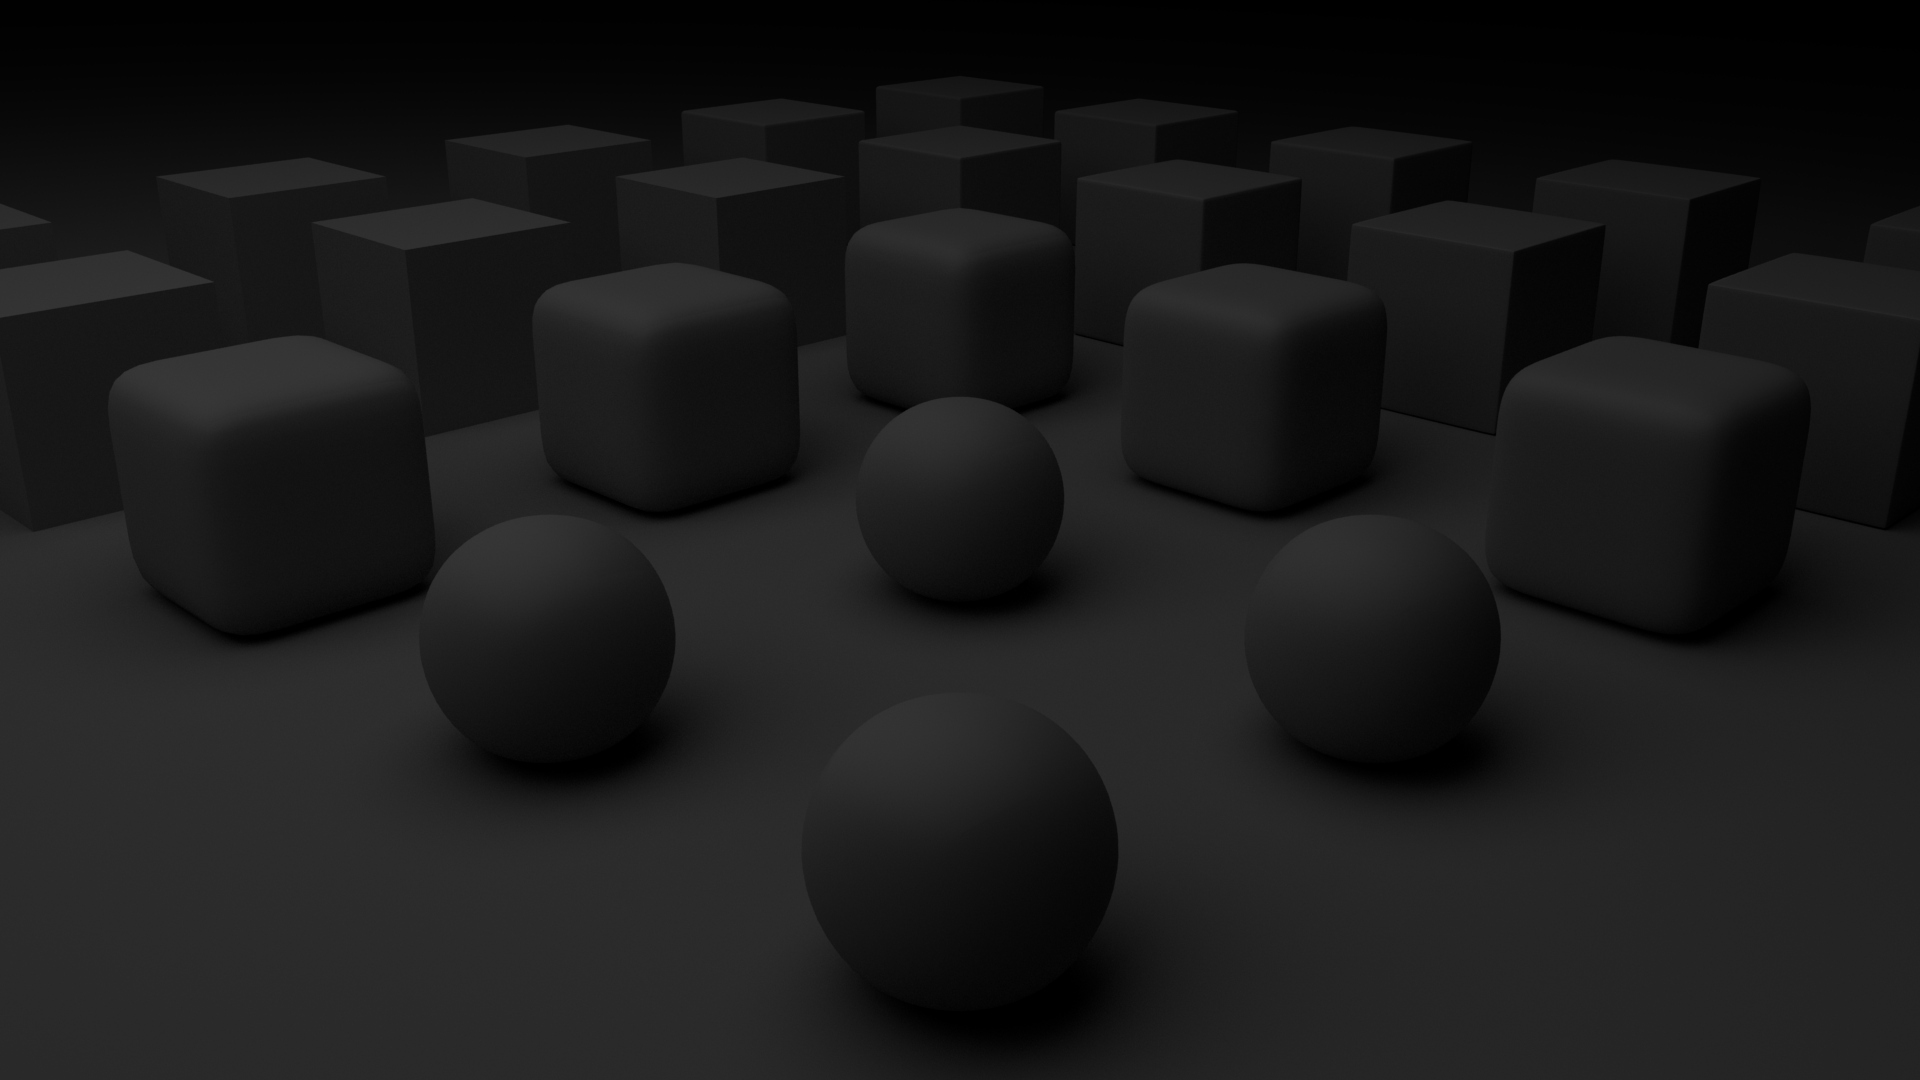
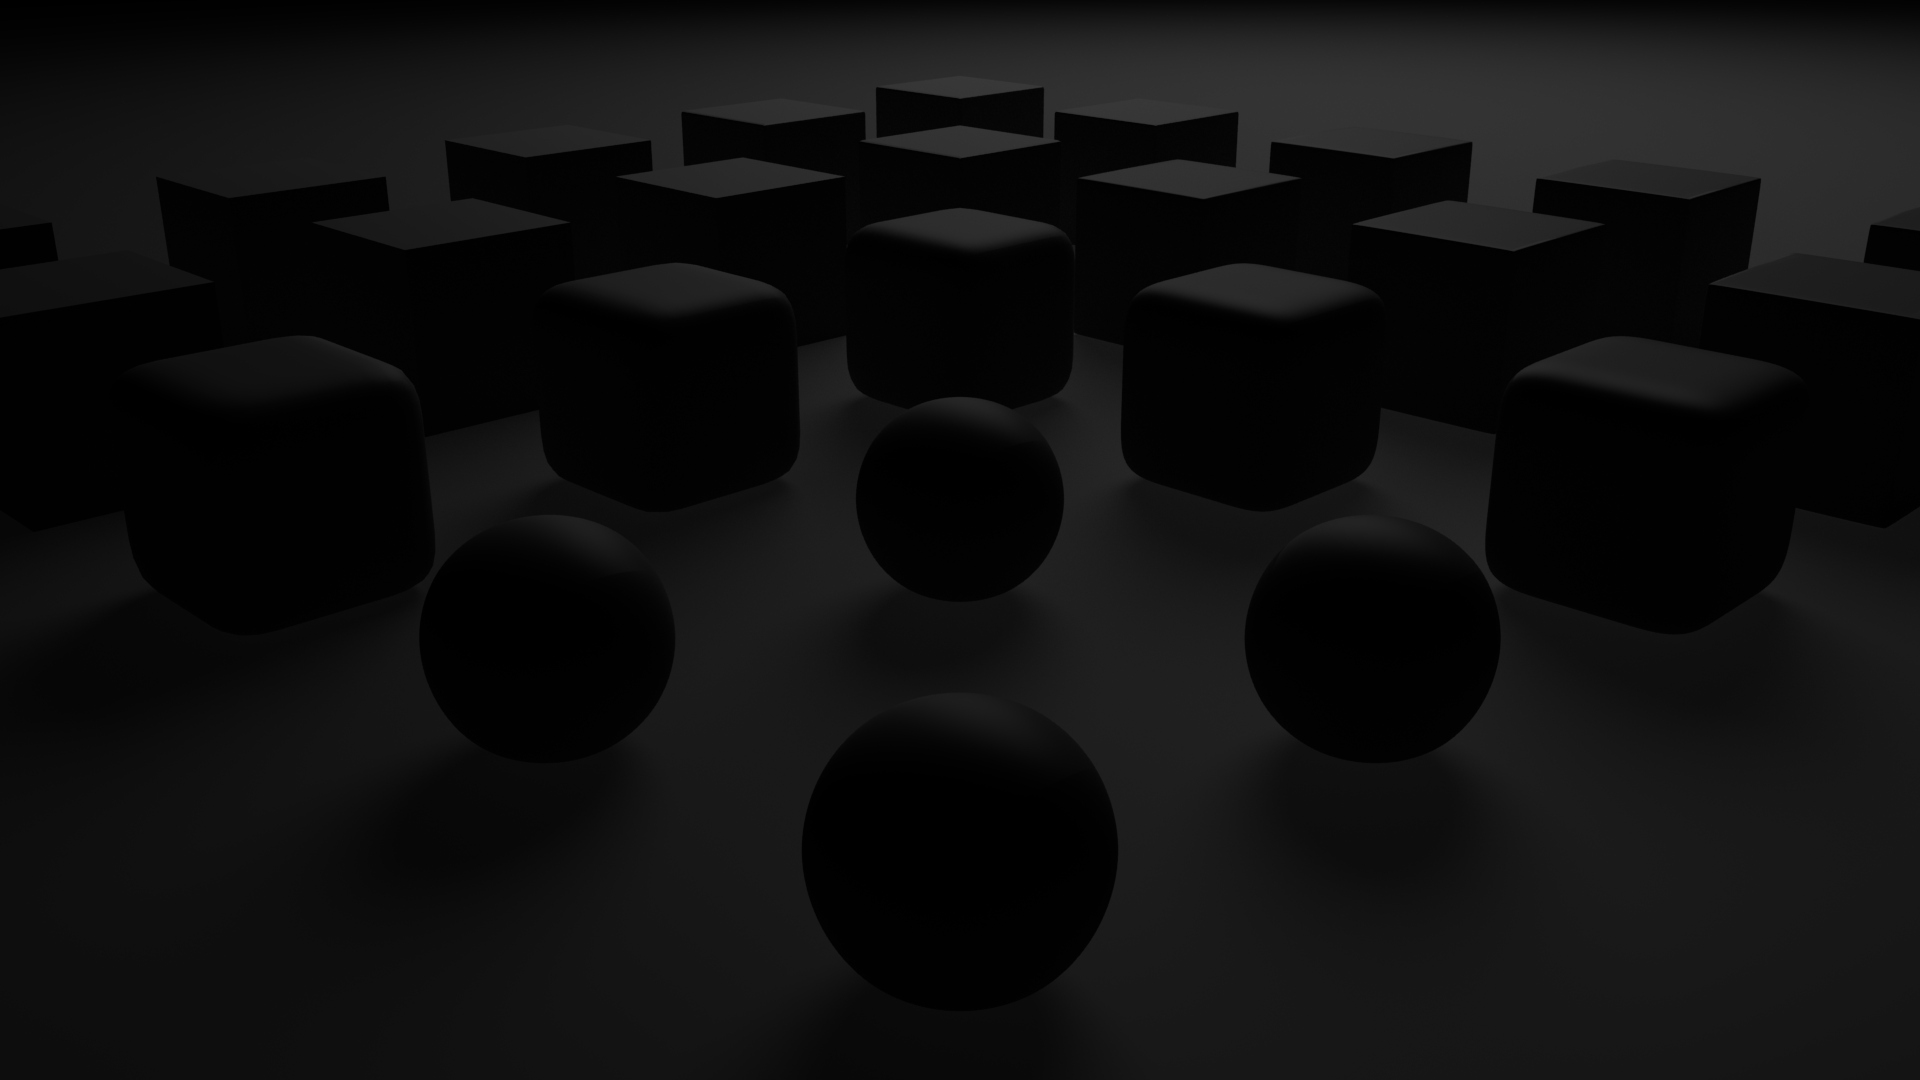
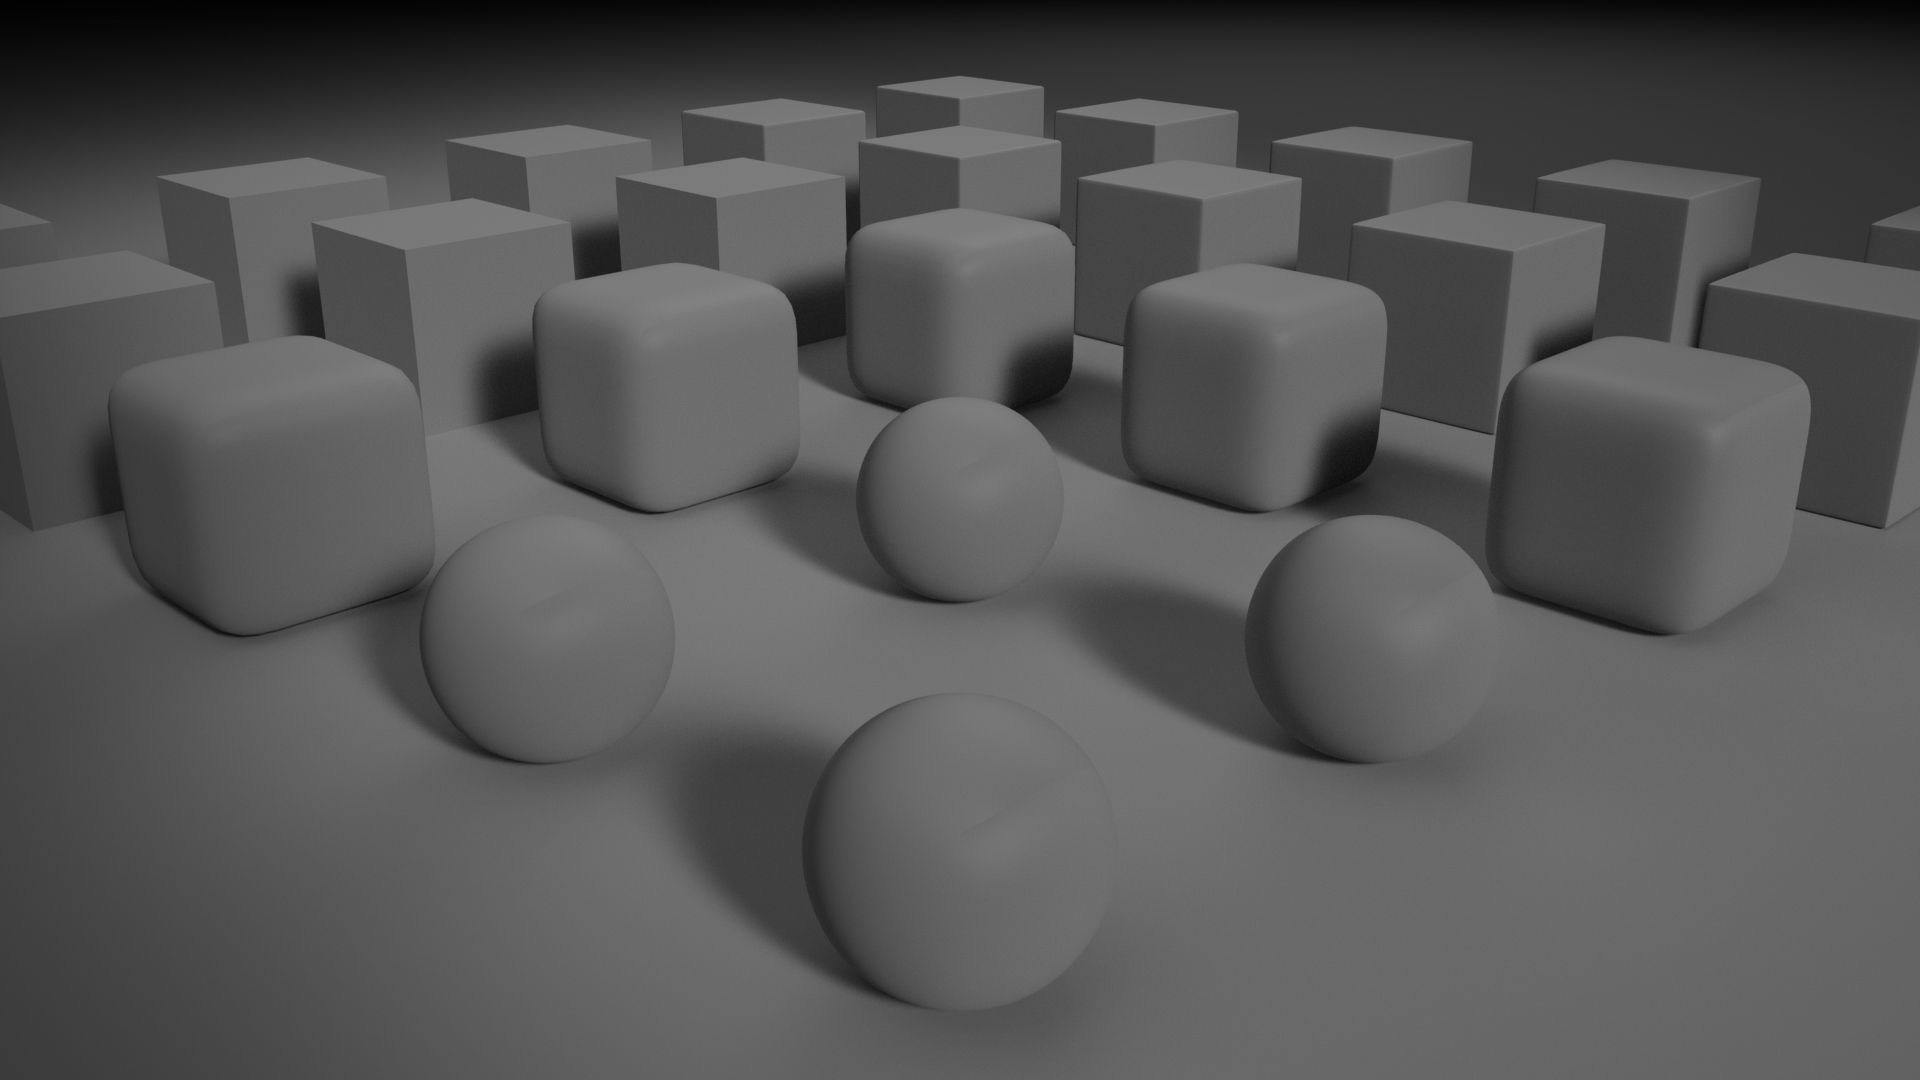
In the Arnold rendering system used in Autodesk Maya, a Physical Sky can be used for an ambient light. A Skydome Light can be set as a directional source. Area Lights can function as spot or area lights — this single light object can be set up in the Attribute Editor to function many ways. Below we developed a simple scene and lit it for exterior and interior scene case studies. In both, the material we used is the Arnold Standard Shader set to a matte-finish Rubber preset and a middle-value (18%) gray, like a photographer’s gray card.
Outdoor: Sky and Sun
This is pretty simple: we use the Arnold Skydome Light to create a sun and Physical Sky for the ambient light in the scene. Annoyingly, these come in with identical names, so we rename them in the Outliner: aiSkyDomeLightSun and aiSydomeLightSky respectively. To keep it simple we’re accepting default values wherever they work. In this case, we’re careful to modify only these parameters in the Attribute Editor for both objects:
- Intensity = 1
- Resolution = 1000
- Samples = 3
The Skydome Light and Physical Sky work together to create convincing shadows with an ambient, bounced light.
The Skydome Light alone creates sun-sharp shadows, but notice how they appear to be like shadows without atmosphere like one finds on the Moon! This sun has a default angle and a slight warmth, either of which can be adjusted to evoke any time of day.
The Physical Sky takes on the ambient role, filling in those shadows and generally acting like a radiosity light model.
We can see that, by themselves, they each look underexposed, but when rendered together they resolve into a decent exposure — remember, everything in this scene is a middle-value gray.
Indoor: three-point light setup with ambient Sky
We’ve modeled our interior scene to emulate a professional photo studio using a three-point light system: a key light, a fill light, and a back light. To enhance the overall ambient effect, we’re still using a Physical Sky, but we’ve dialed the Intensity down below 0.5. The overall scene looks like this:

This has about the same level of illumination as our outdoor scene. To achieve this with 4 light sources instead of 2, we used a range of parameters for Area lights with different values. Details are seen as we unpack each light below.
The three-point setup
Observe the modeling of our light objects in the top and front views below. All three are quite large, which permits the diffuse character seen in the rendering. We’ve moved, rotated, and scaled them into the configuration that gives the desired result, positioning them in a manner analogous to a photographer moving physical lights in a studio.
Key light
This is an Area light set at an Intensity of 50. We’ve set it as a quad shape with a Spread of 0.5 and a Resolution of 1000. We’ve also set Samples for 3. Size-wise, it was scaled by about 480% and set away from the scene by about 8 units, elevated by about 8 units, and angled by about 60˚.
Fill light
This Area light is set an an Intensity of 200, which seems strange! That’s because we’ve shaped it as a cylinder, which diffuses light as appropriate for fill. The Samples were set at 3. It was scaled irregularly, between about 600 and 800% in different orientations. It is nearly on top of the scene at a shallow angle.
Back light
This Area light is also strong at 200 because its shape is defined as a disk. Spread is set to 1. As with the others, Samples are set at 3. We’ve also reduced the Shadow Density to 0.5. It’s scaled about 700%, and positioned about 13 units behind the scene, with a very shallow angle of about 15˚.
Integration
The three-point system together, but without the ambient Physical Sky.
Point of View
The arrow in the eye
Controlling the background and thinking about your point of view are two reciprocal and intertwining variables. While we’ll focus more on the technical aspect of POV (point of view) below, it’s impossible to talk about context and composition without at least acknowledging the role POV plays. In many ways, the photographic camera is a metaphor for the human eye. Then we find that software’s virtual camera is a metaphor for a real camera. In other words, we’re talking about a metaphor twice removed when discussing the software’s viewing apparatus.
Although it is a discussion beyond our scope, human optics, drawn perspective, photographic perspective and digital perspective all express the appearance of the world in reasonably similar ways. Of course, the human eye is a little busy-body. It darts back and forth around a spherical visual field, quickly focusing in and out from detail to panorama. The distinction between the active eye and the still painting, photographic composition or rendering is clear. What relates those last items is the idea of composition in relationship to perspective.
Perspective and composition
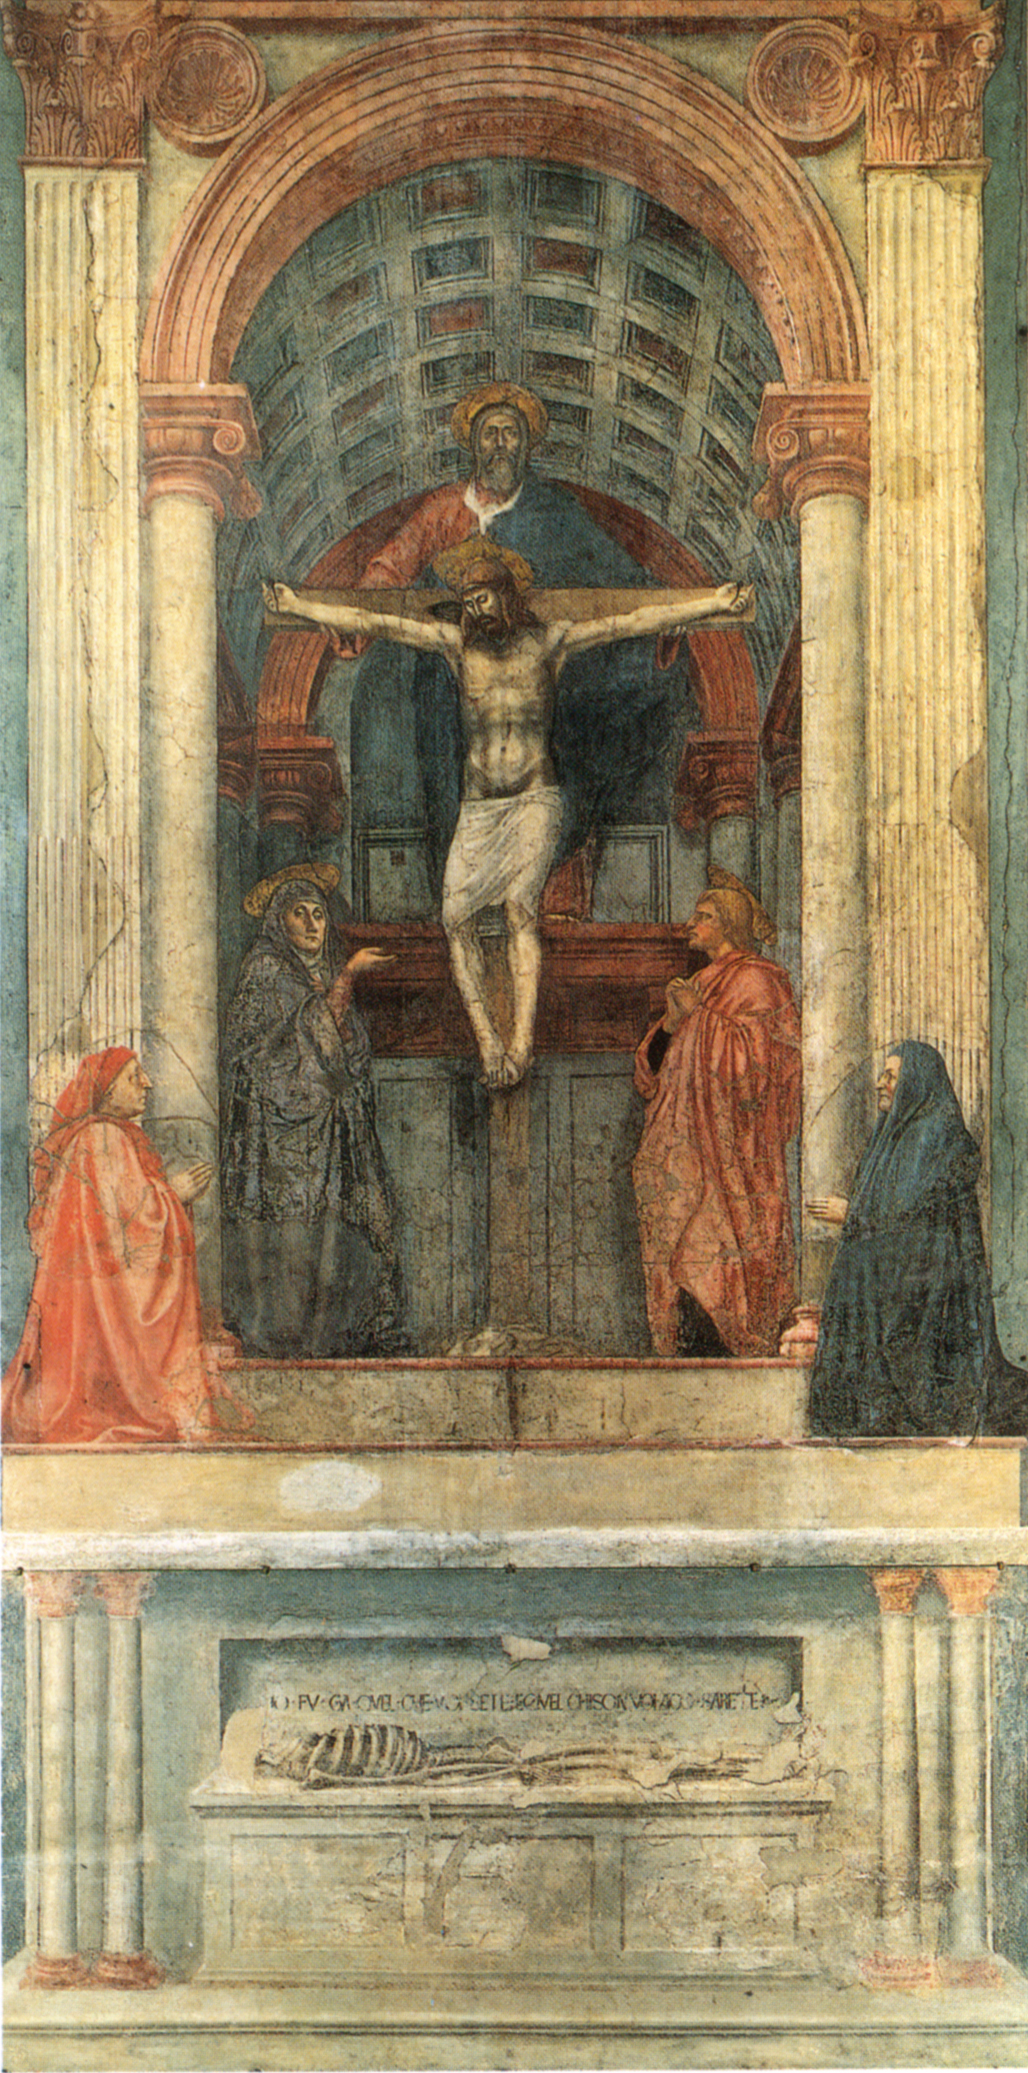
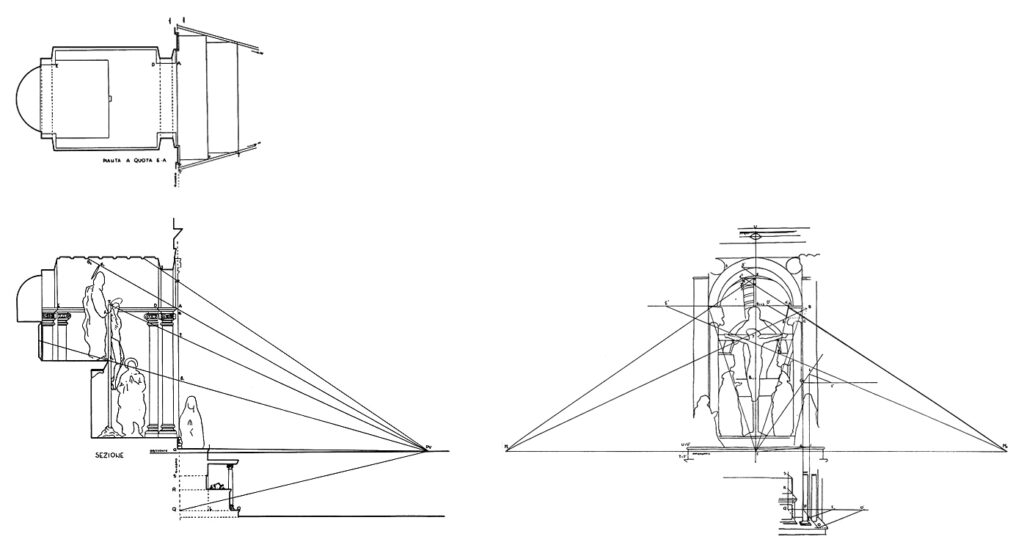
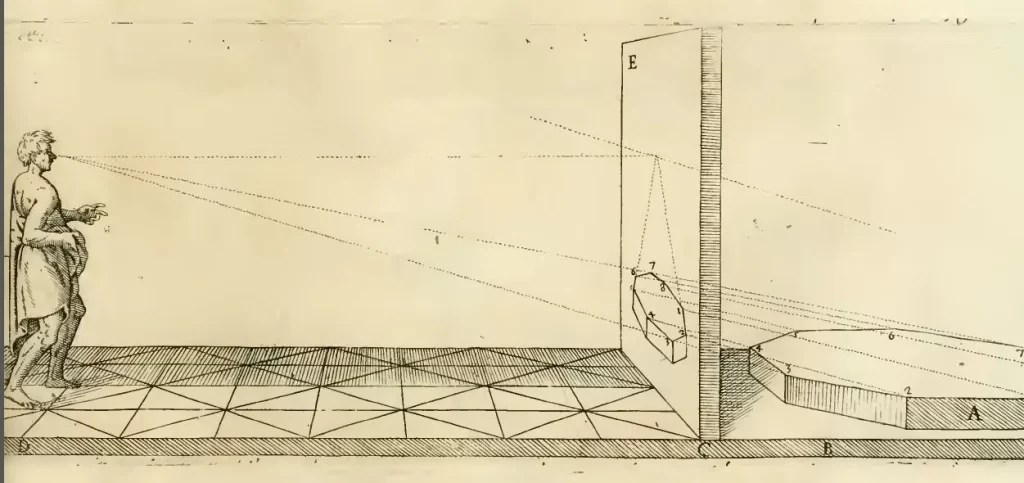
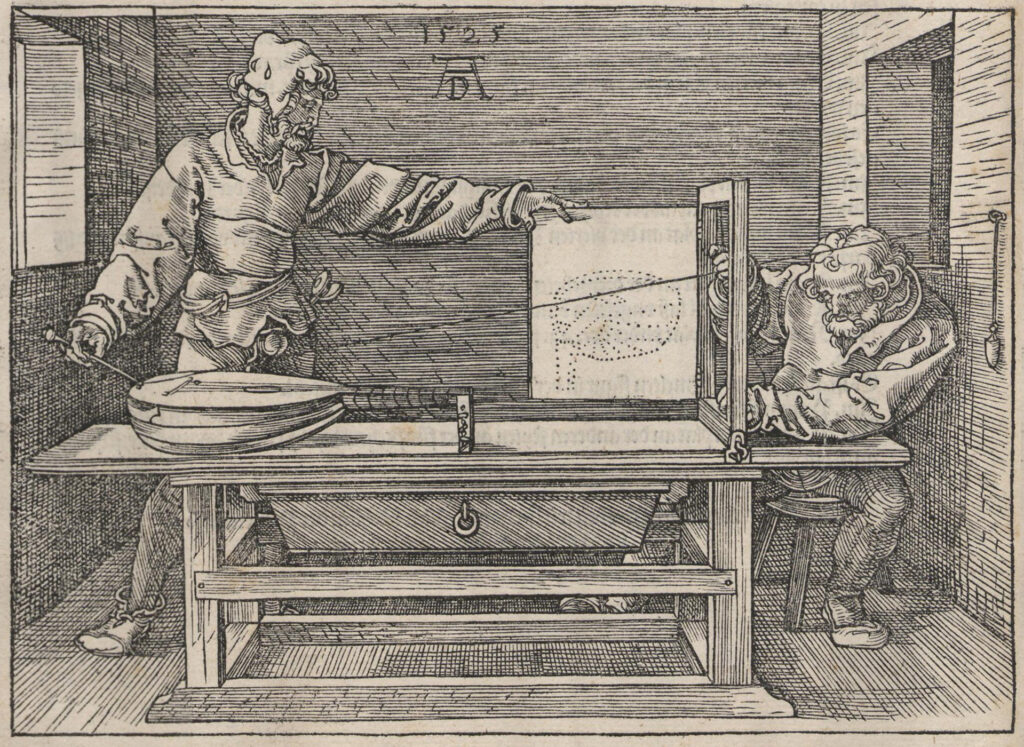
Perspective as a pictorial, compositional tool has its first full expression in Masaccio’s fresco The Holy Trinity. The perspective was calculated so that, at standing height and upon entering the chapel, the spectator would feel as if the fresco were an extension of the architectural space, in an early trompe l’oeil tour-de-force. Indeed, while there are inaccuracies, it is mathematically accurate enough that one can construct a hypothetical space beyond the wall. This is a data set that can be used to generate a 3D model. A decade later, Leon Battista Alberti encoded the device of perspective in De Pictura, illustrated later by Giacomo da Vignola. It was also explored by Albrecht Dürer in one of several devices he built and used for perspective drawing.
Perspective and meaning
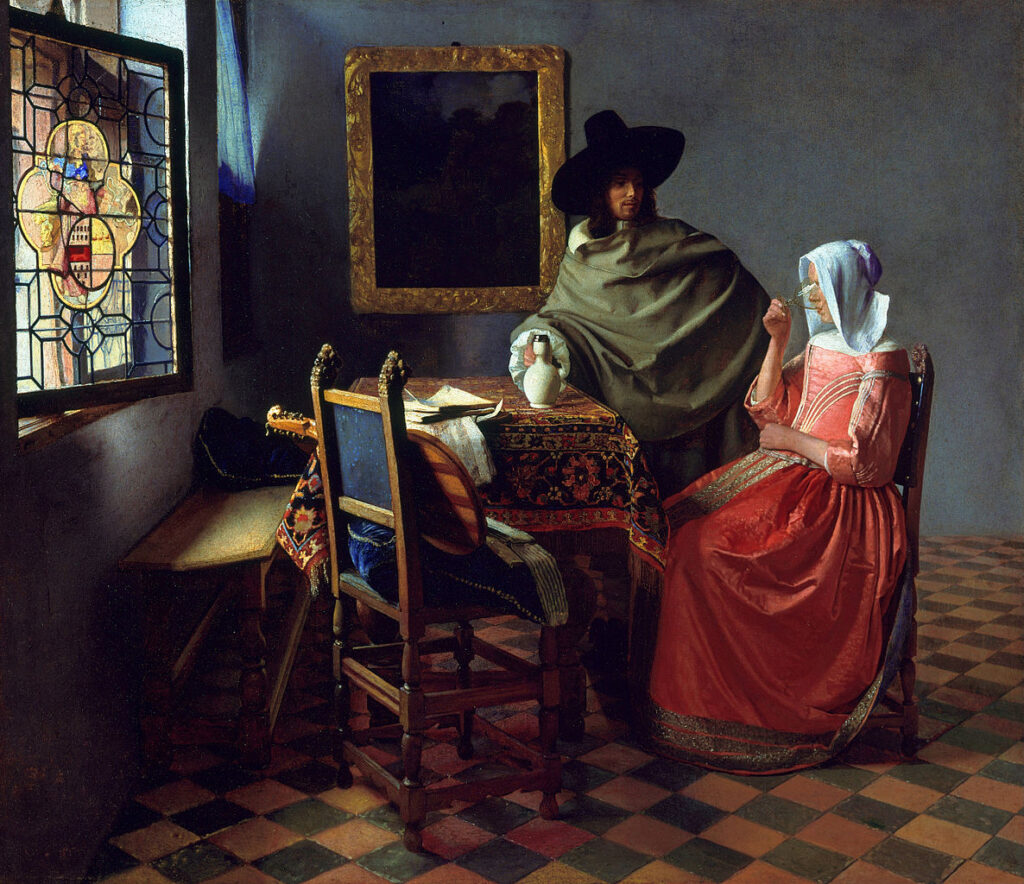
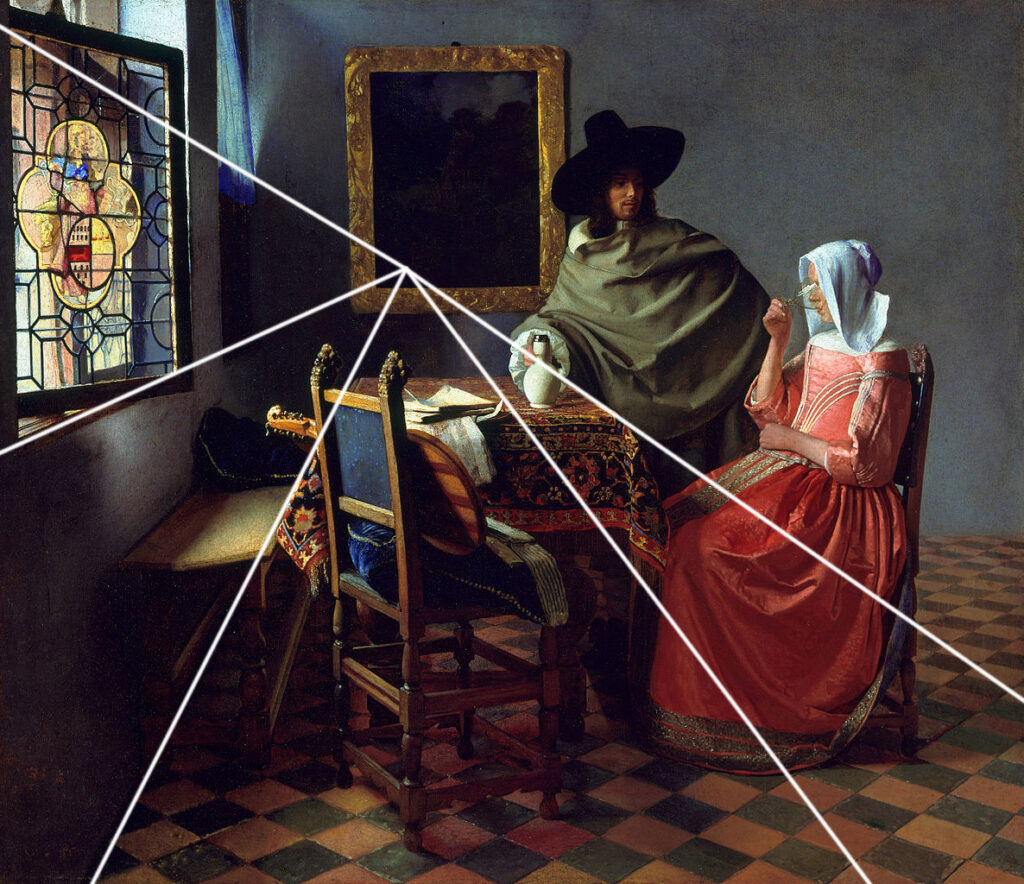
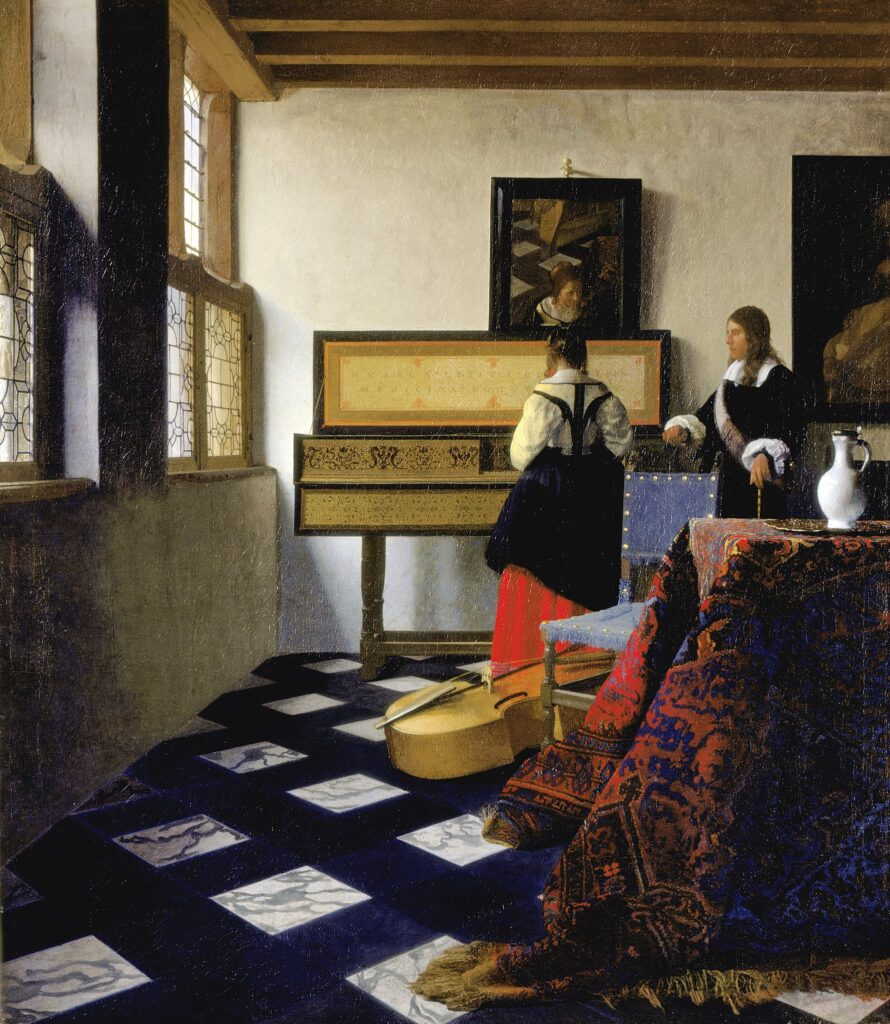
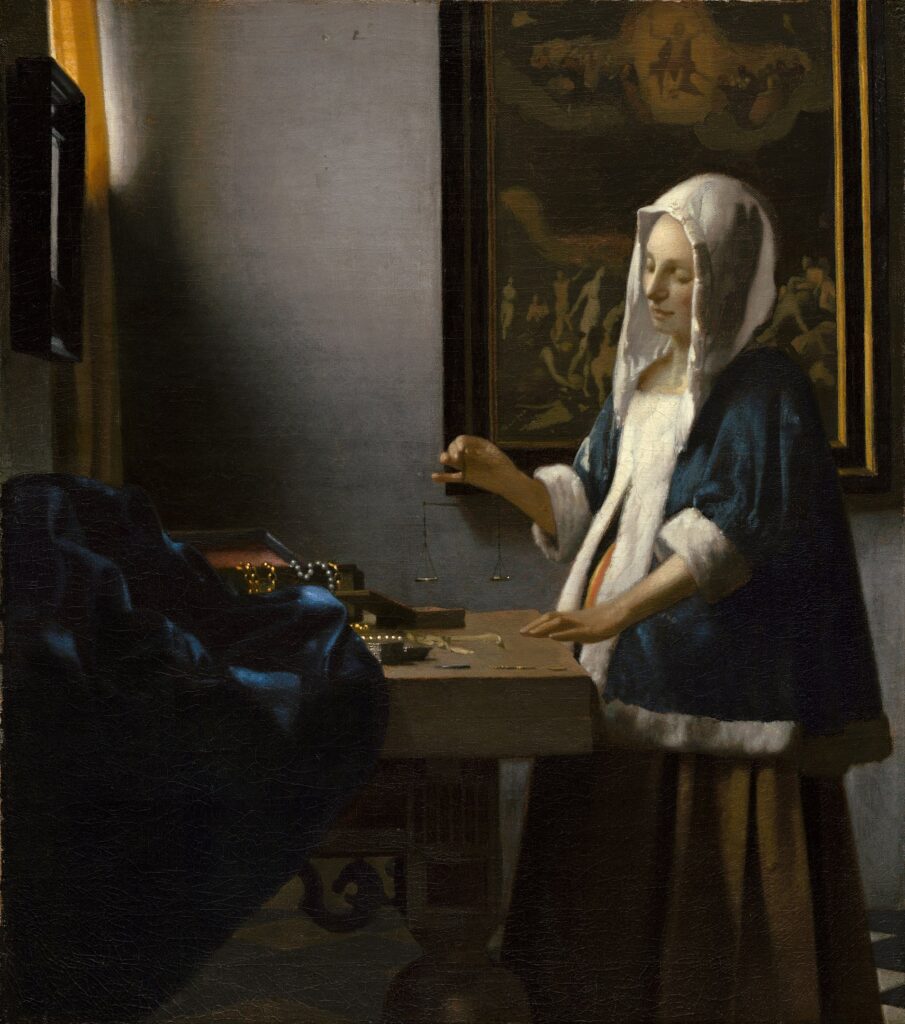
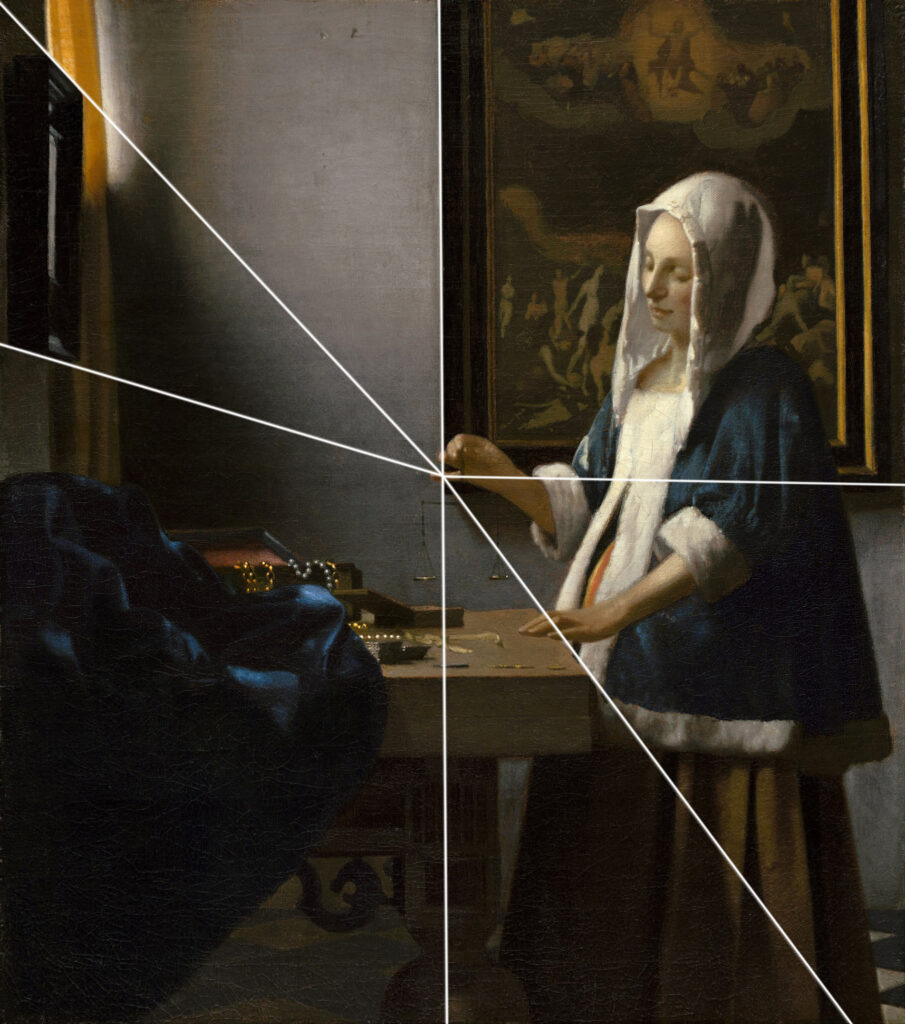
The upshot of the development of perspective is that it gave artists not only a way to imitate nature but also a way to control composition, both formally and metaphorically. In the work of Jan Vermeer, geometry, perspective, composition, and meaning become intertwined. The subject or focal point is often congruent with or adjacent to a vanishing point. In The Glass of Wine, a particularly interesting absence of a figure at the focal point suggests a metaphorical projection of the artist’s eye into a position appropriate to that of a sitter in the empty chair. In The Astronomer, he places the vanishing point between the observer and the observed, at the very center of the canvas.

Like Vermeer, a photographer, by the nature of their craft, works with the compositional possibilities inherent in a perspectival space. Let’s explore the optics of the camera and how this relates to the virtual camera of our software.
Model as camera, camera as eye
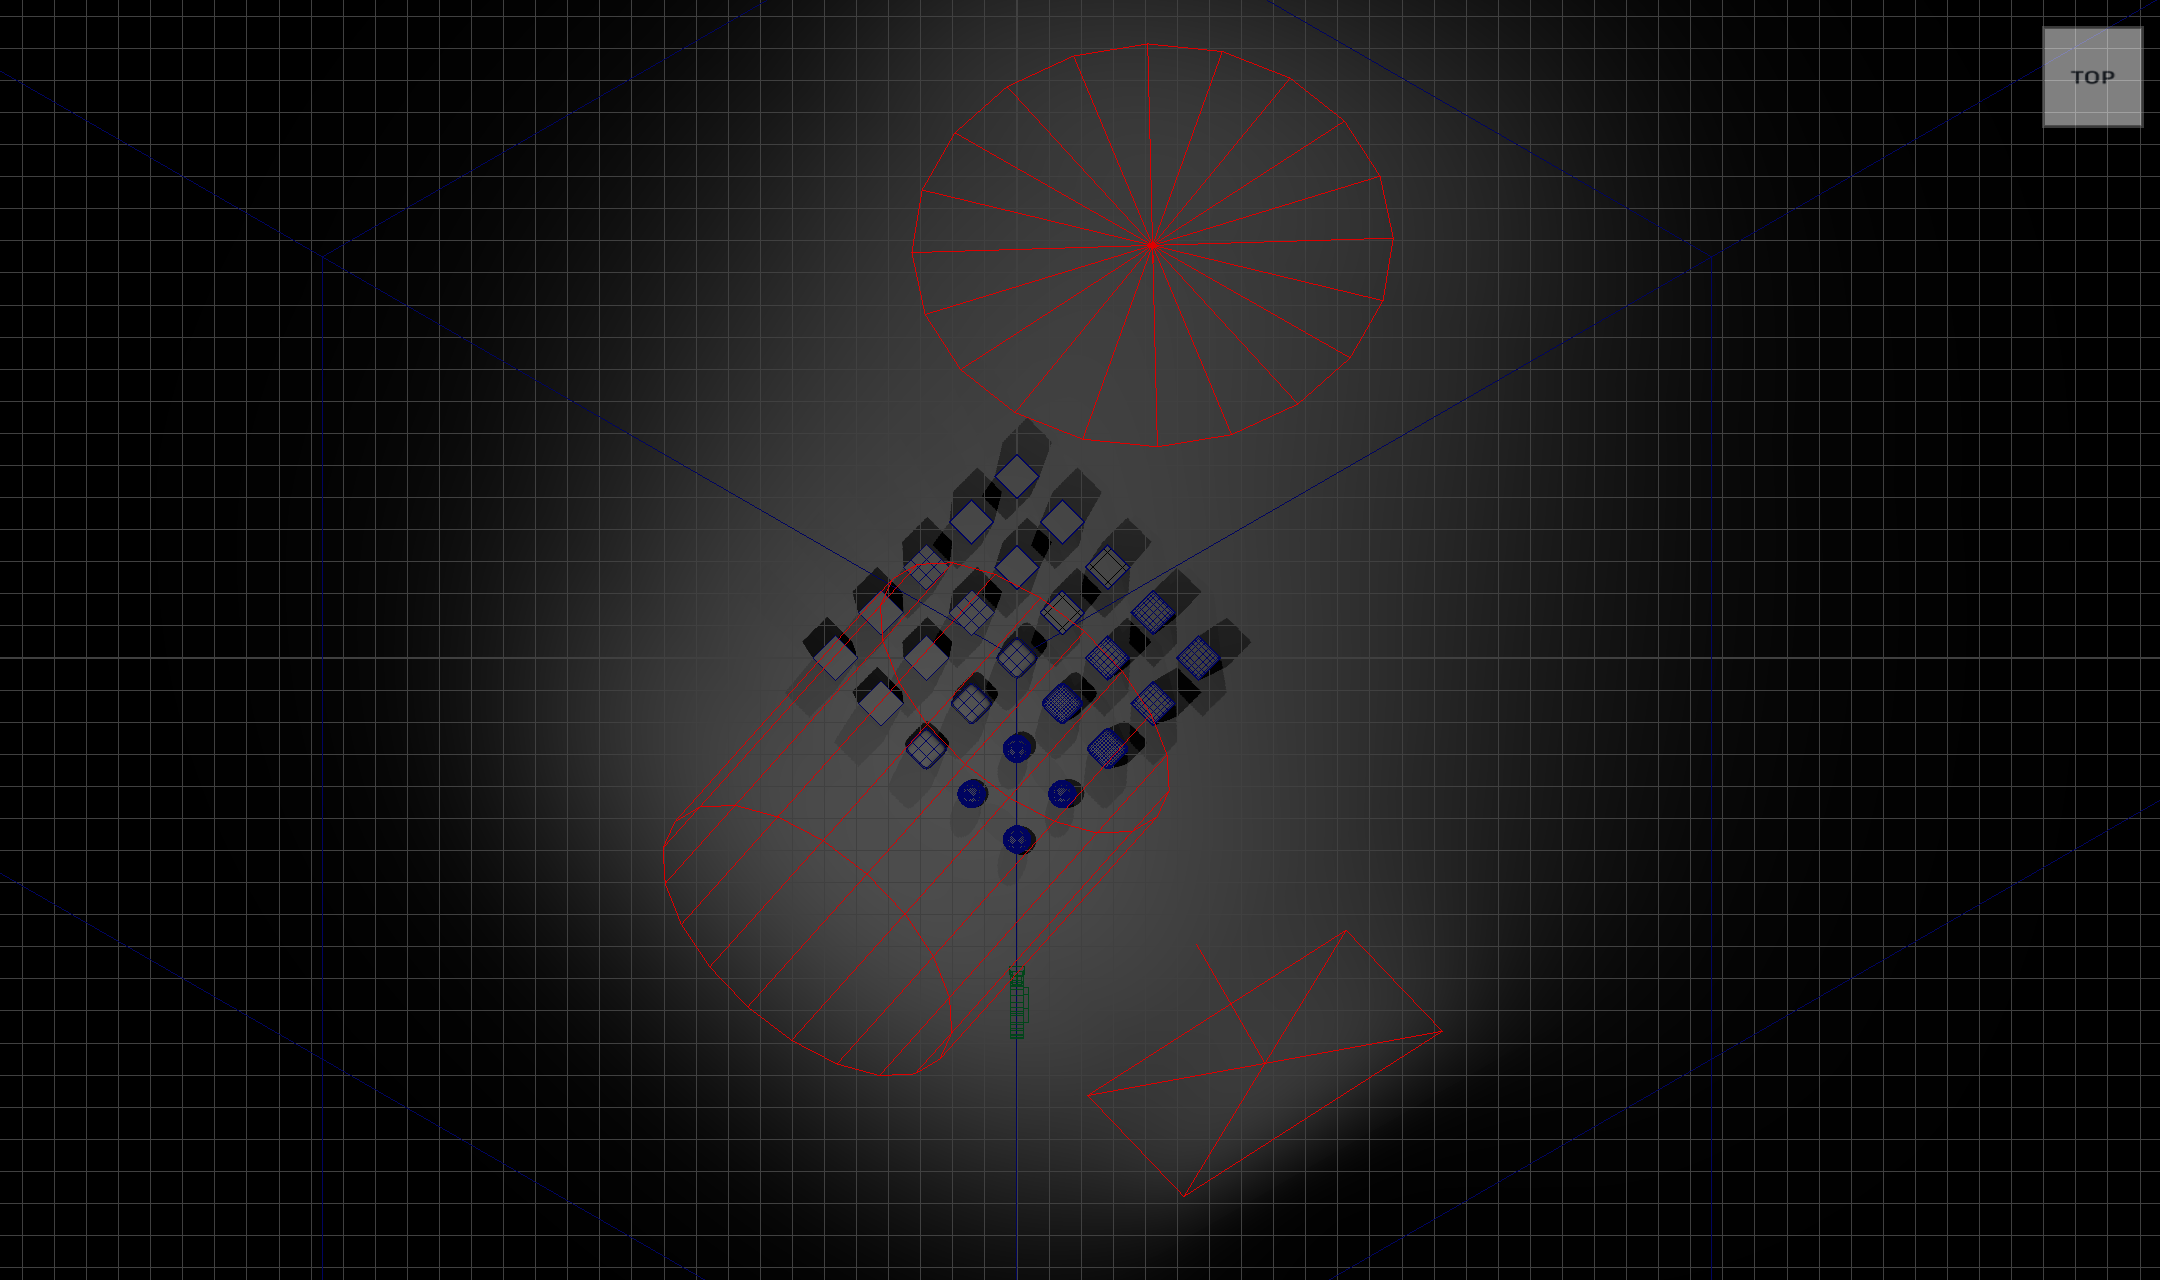
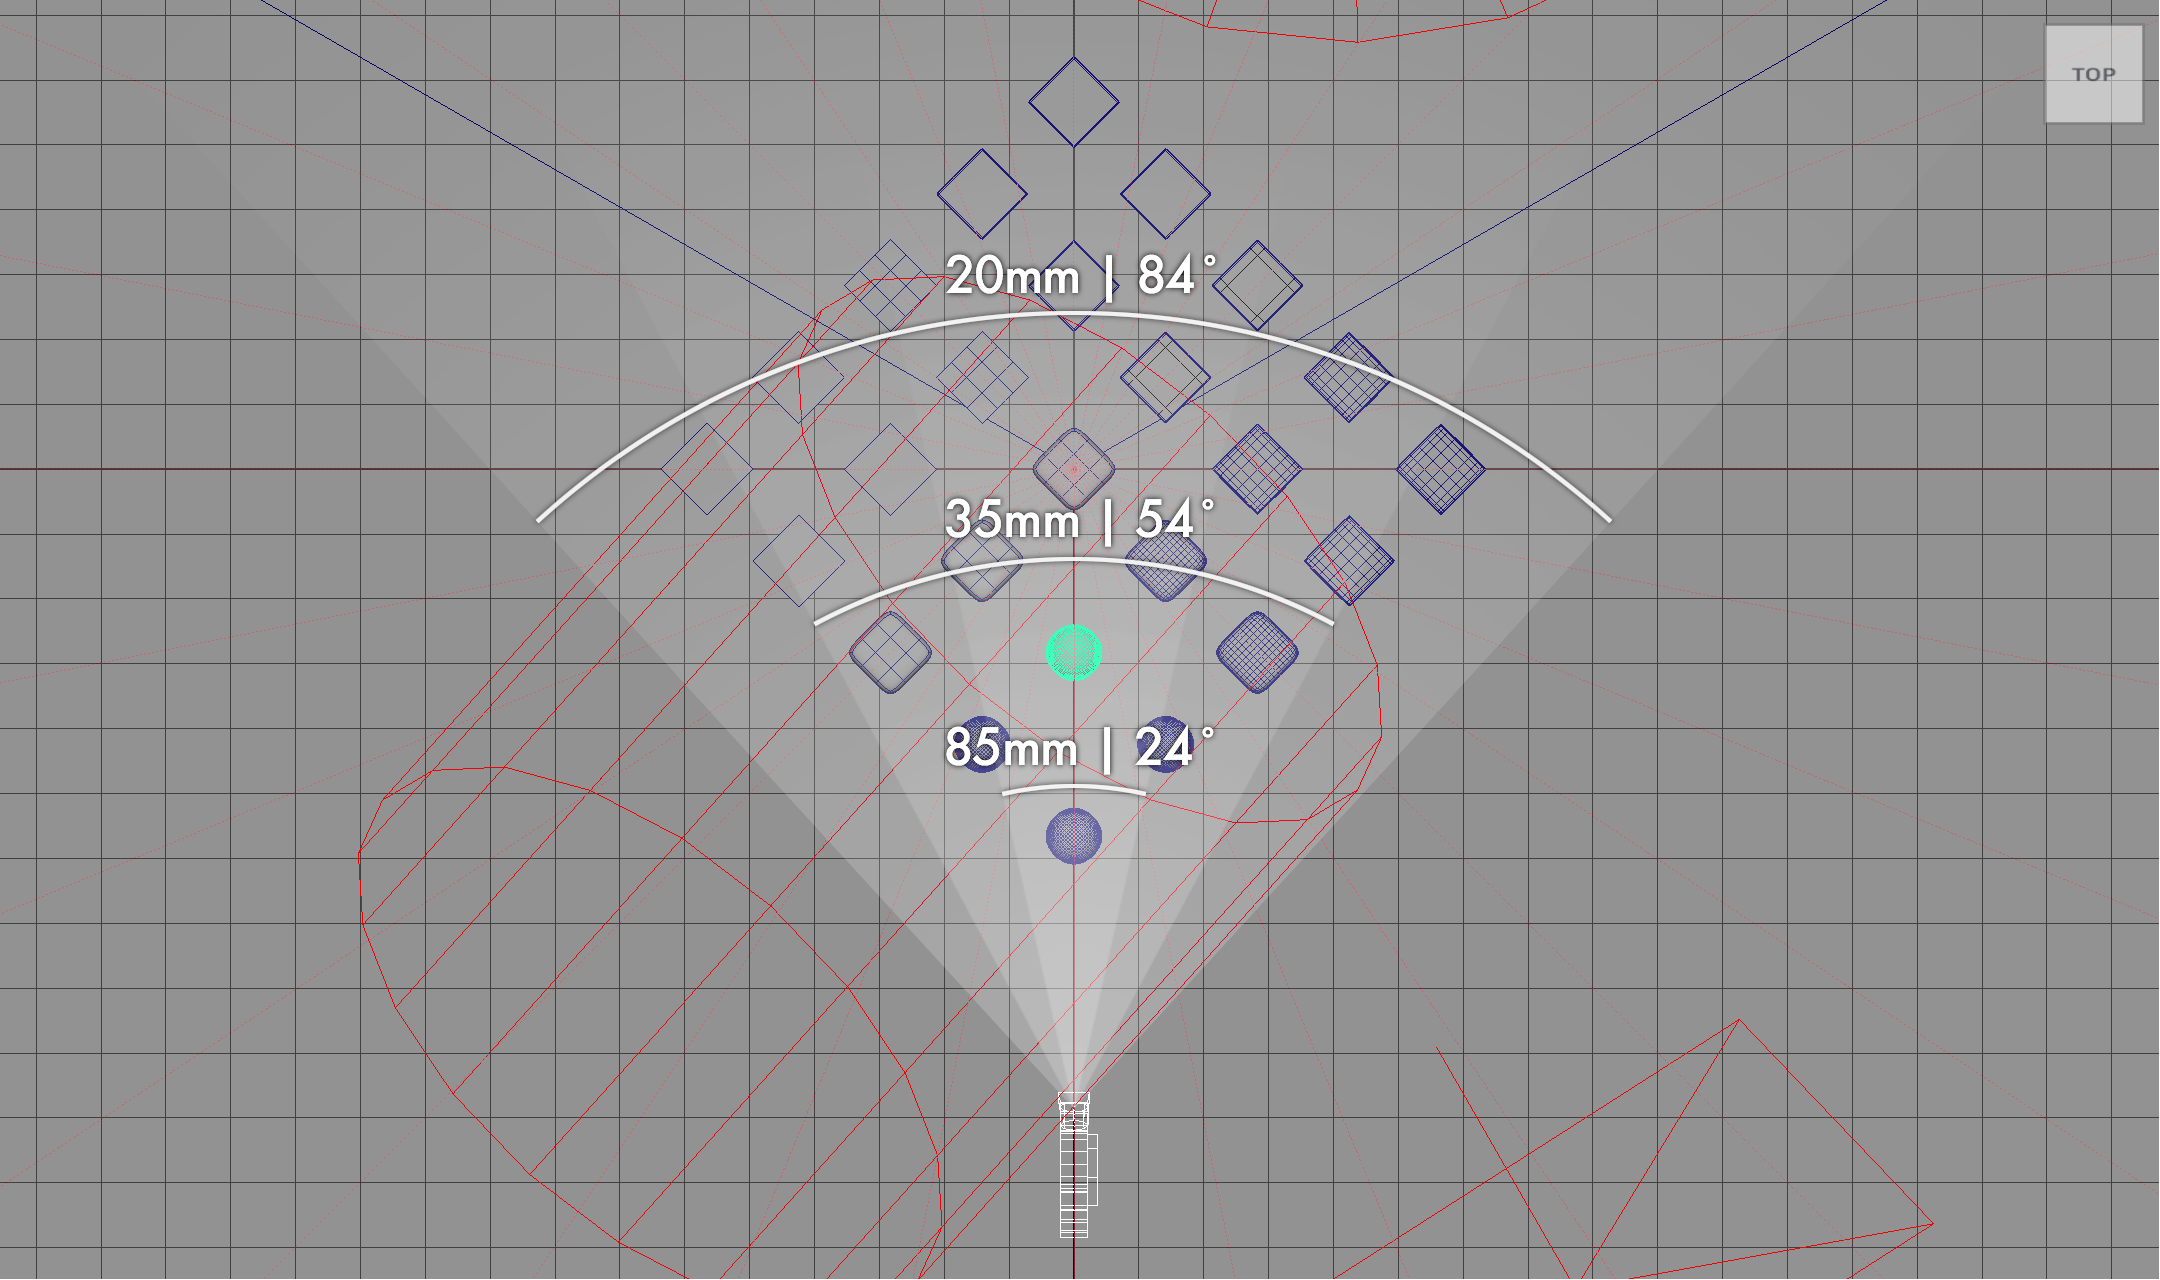
The camera is not as neat a metaphor for human perception as we might think. For one thing, we carry two “cameras” in our head, not one. The brain resolves information from this binocular situation into one coherent image. The stereoscopic nature of our vision is what gives us a sense of depth. This occurs in a cone of vision that radiates approximately 60 degrees from the average of our two eyes, as determined by the overlap of the field of view captured by each eye, limited by the bridge of the nose.
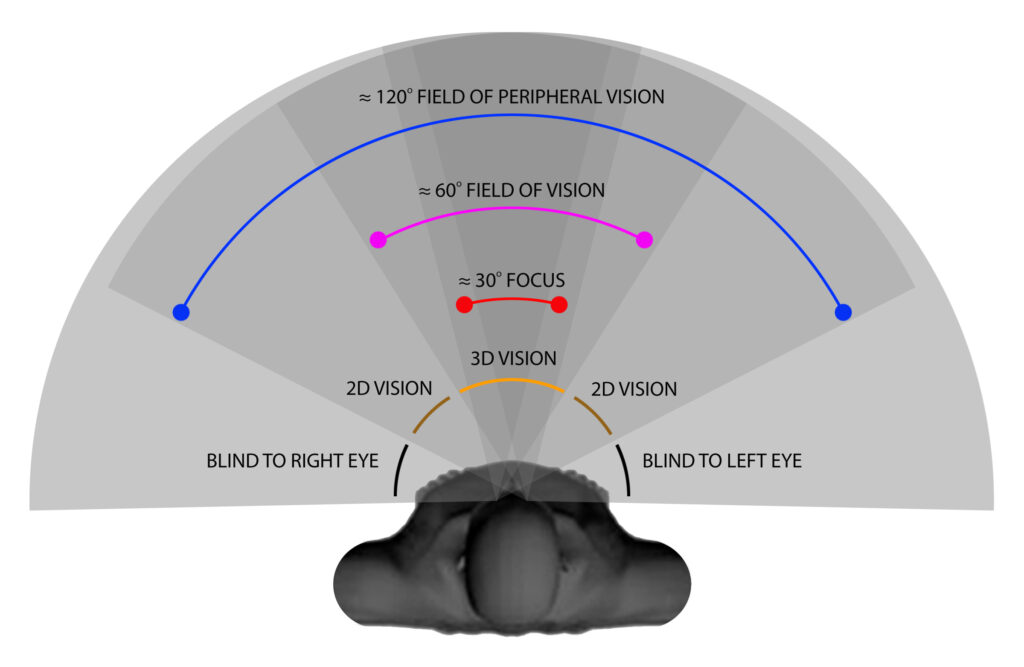
Within that field of vision (shown in purple), a narrower 30-degree cone gives us the perception of focused detail (shown in red). Beyond that extends an area of peripheral vision (shown in blue). This is good for seeing shape and color, but not so useful for perceiving depth. Beyond that 120-degree cone, we can detect movement best, but not much else, in the remaining area that’s blind to opposing eyes. Compare these different cones of vision to what the different focal lengths of lenses on a camera can see.
Angle of view and focal length
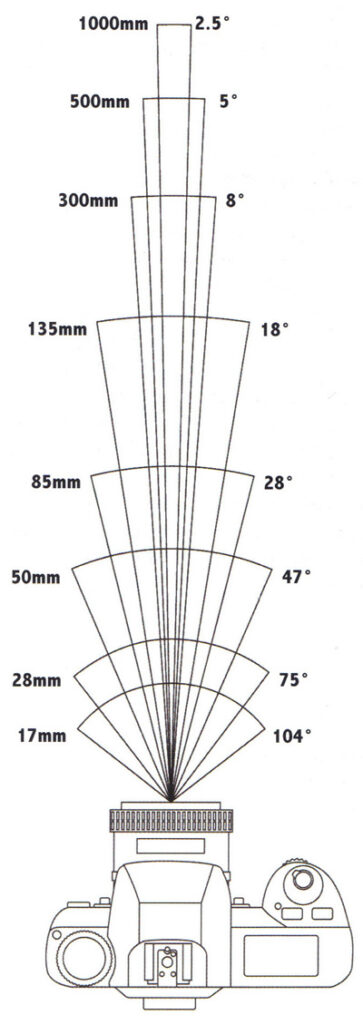
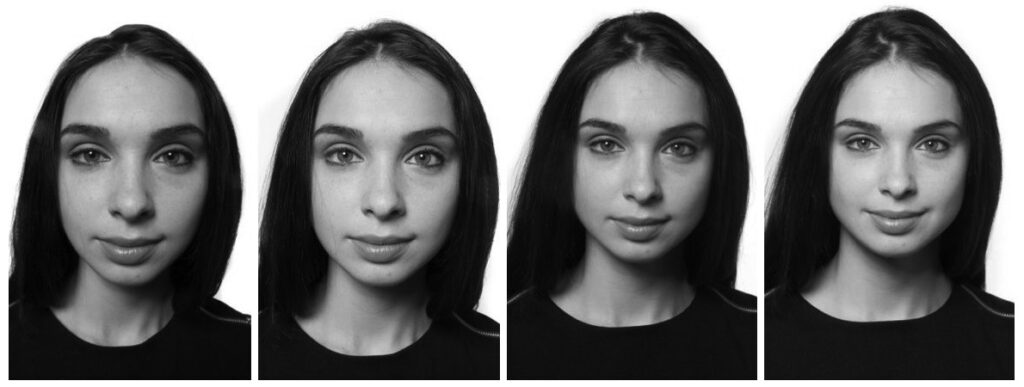
Camera models provide an angle of view or a more camera-centric focal length to control what we see. Sometimes, as with Maya, we get both. Changing this angle is one way to affect the composition of your renderings. It’s as if the camera stays in one location, while the photographer does nothing but change lenses. Note, however, that a sense of depth gets lost as the focal length gets longer and the angle of view narrows. These same effects will be observable in your virtual software camera.
Same location, shot with different focal lengths, changing the angle of view, amount of detail, and sense of depth. Adapted from illustrations in Photography by Barbara London and John Upton, 1981 edition.
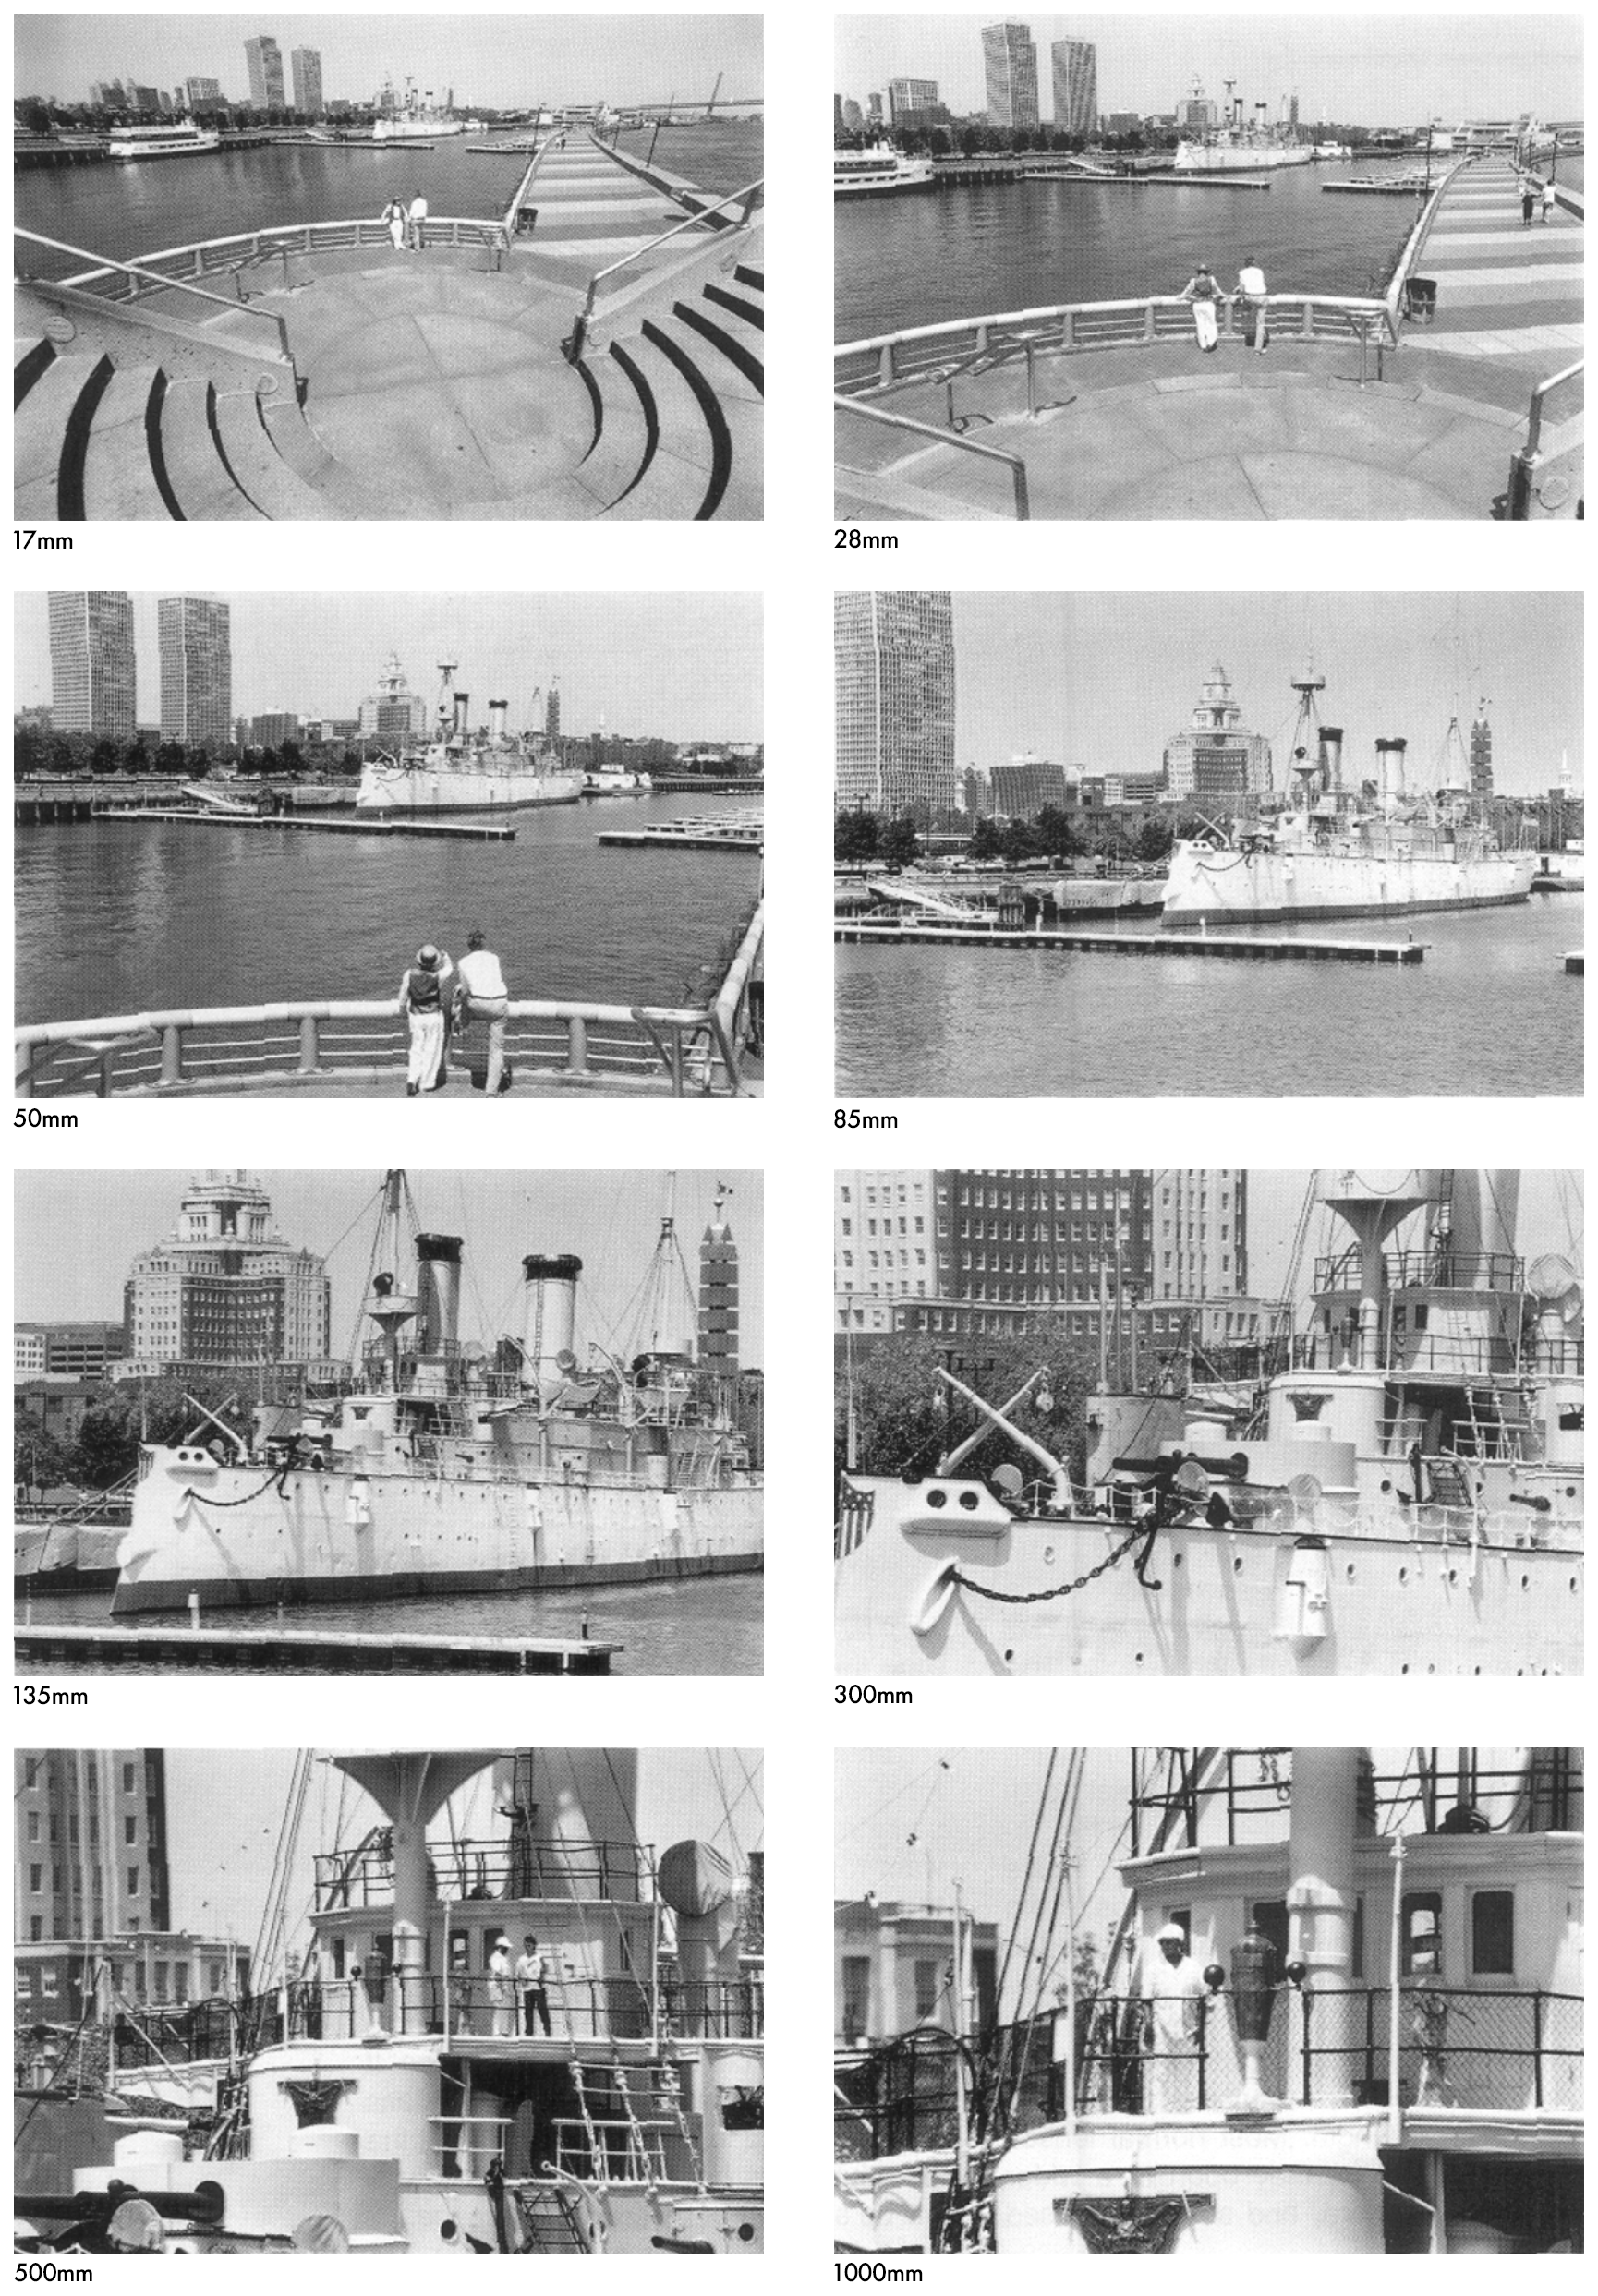
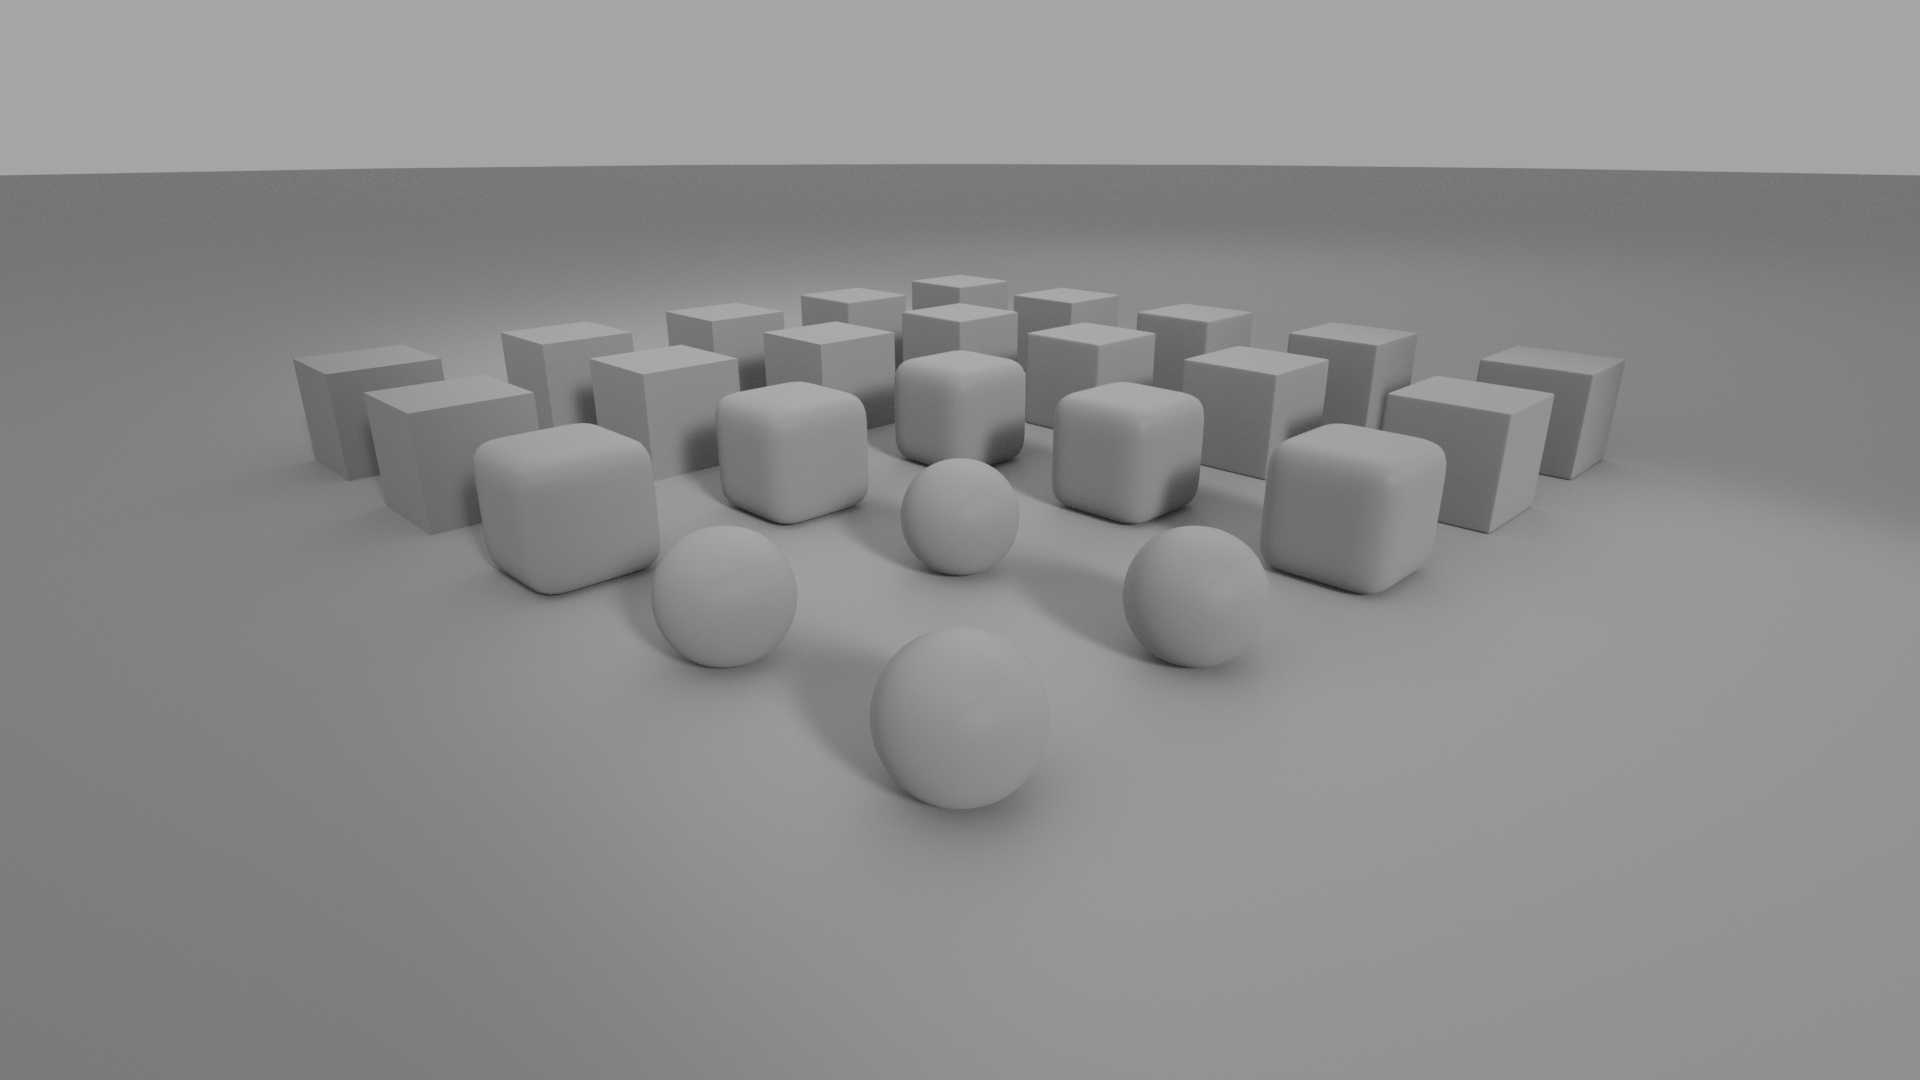
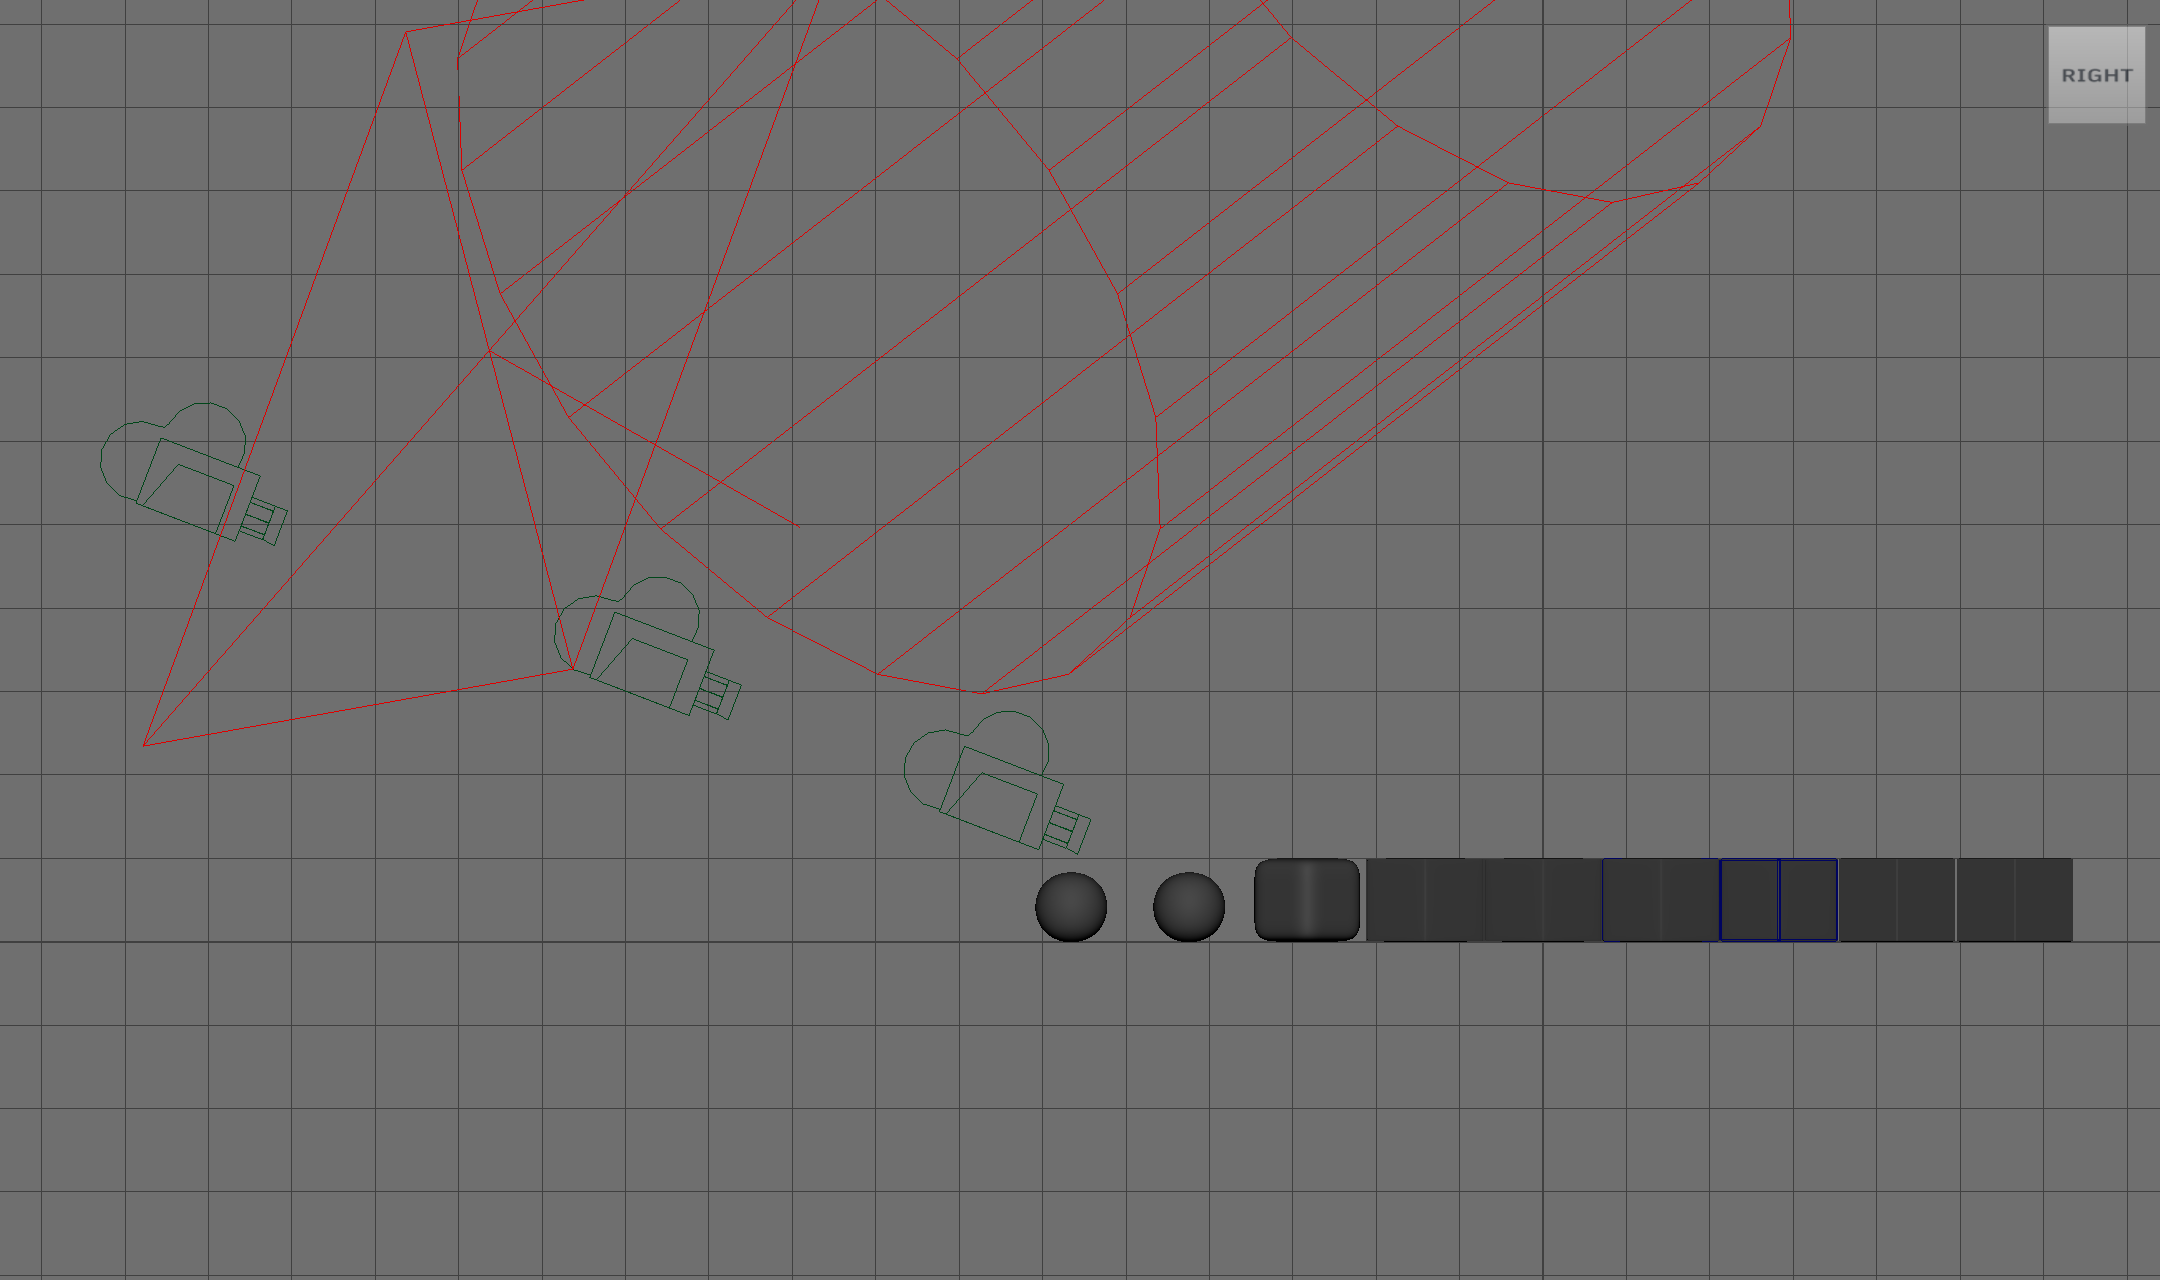
Arnold case study: focal length
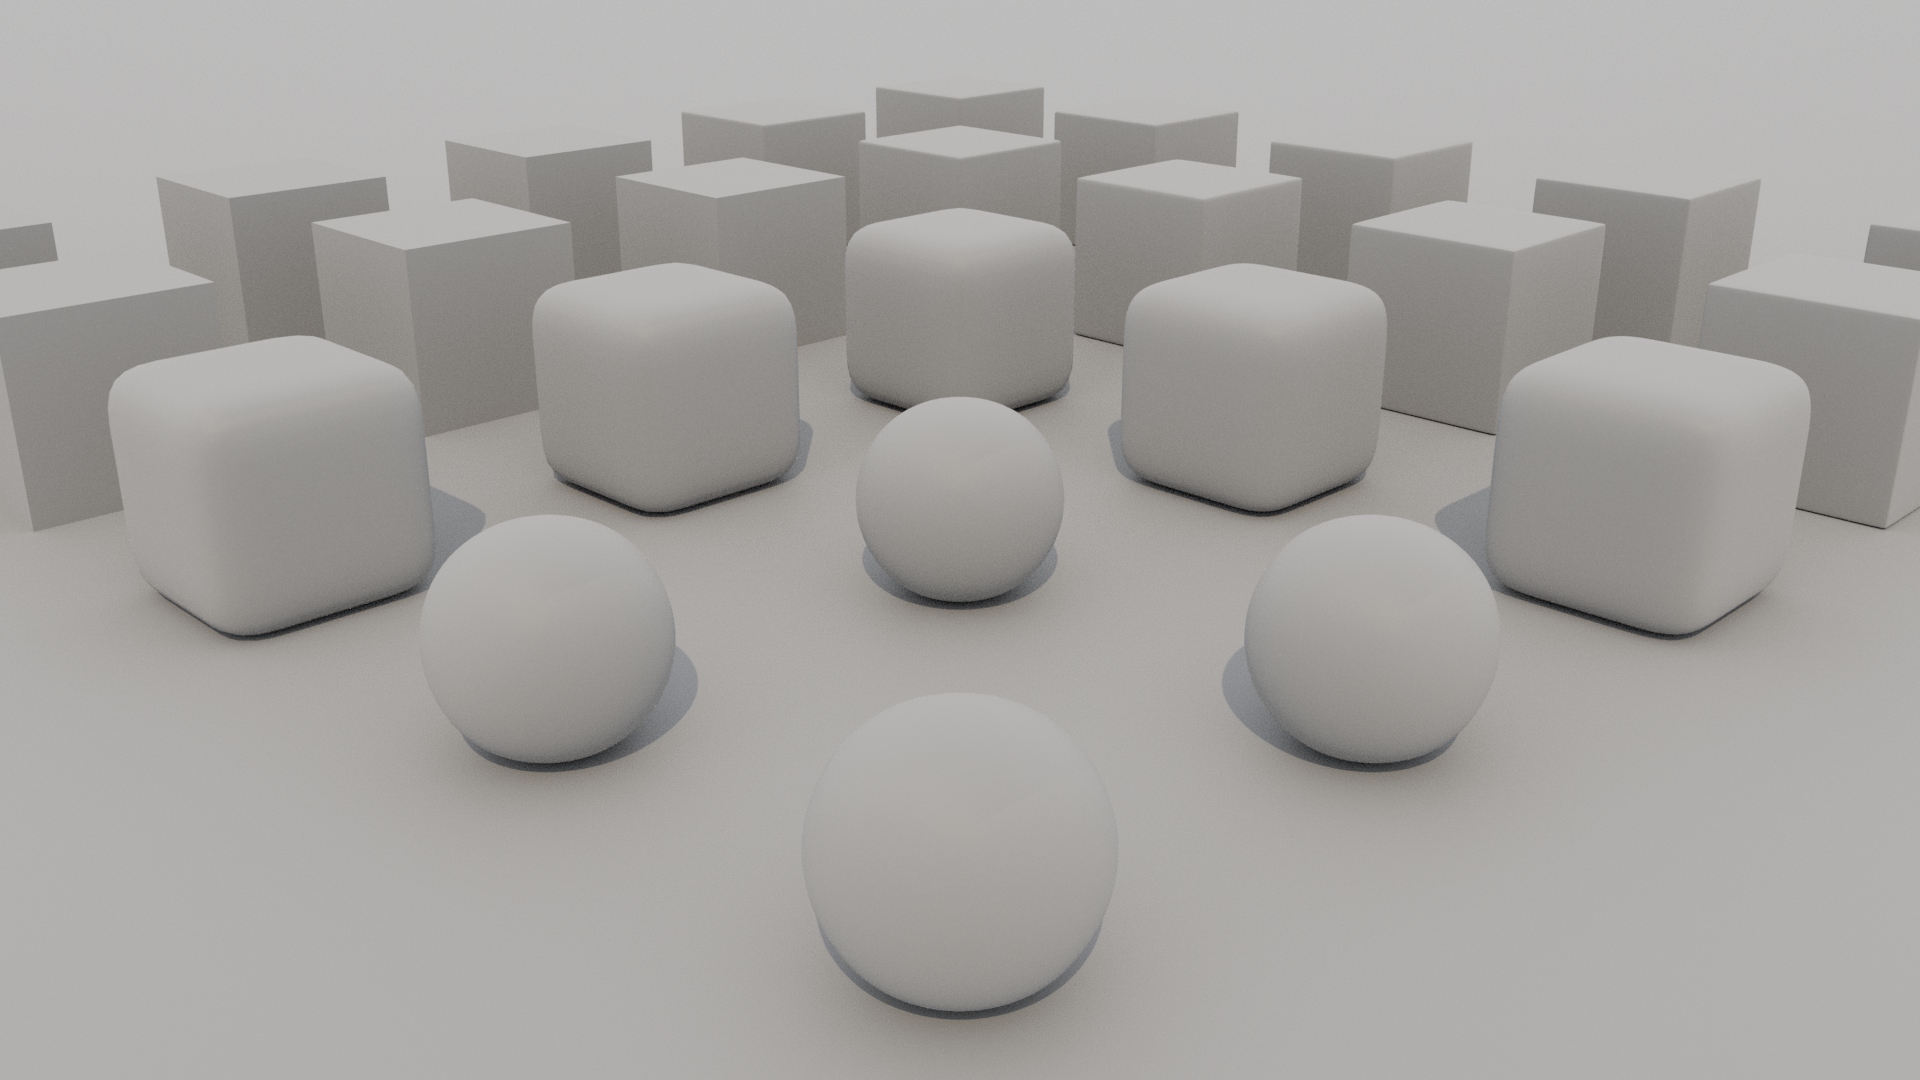
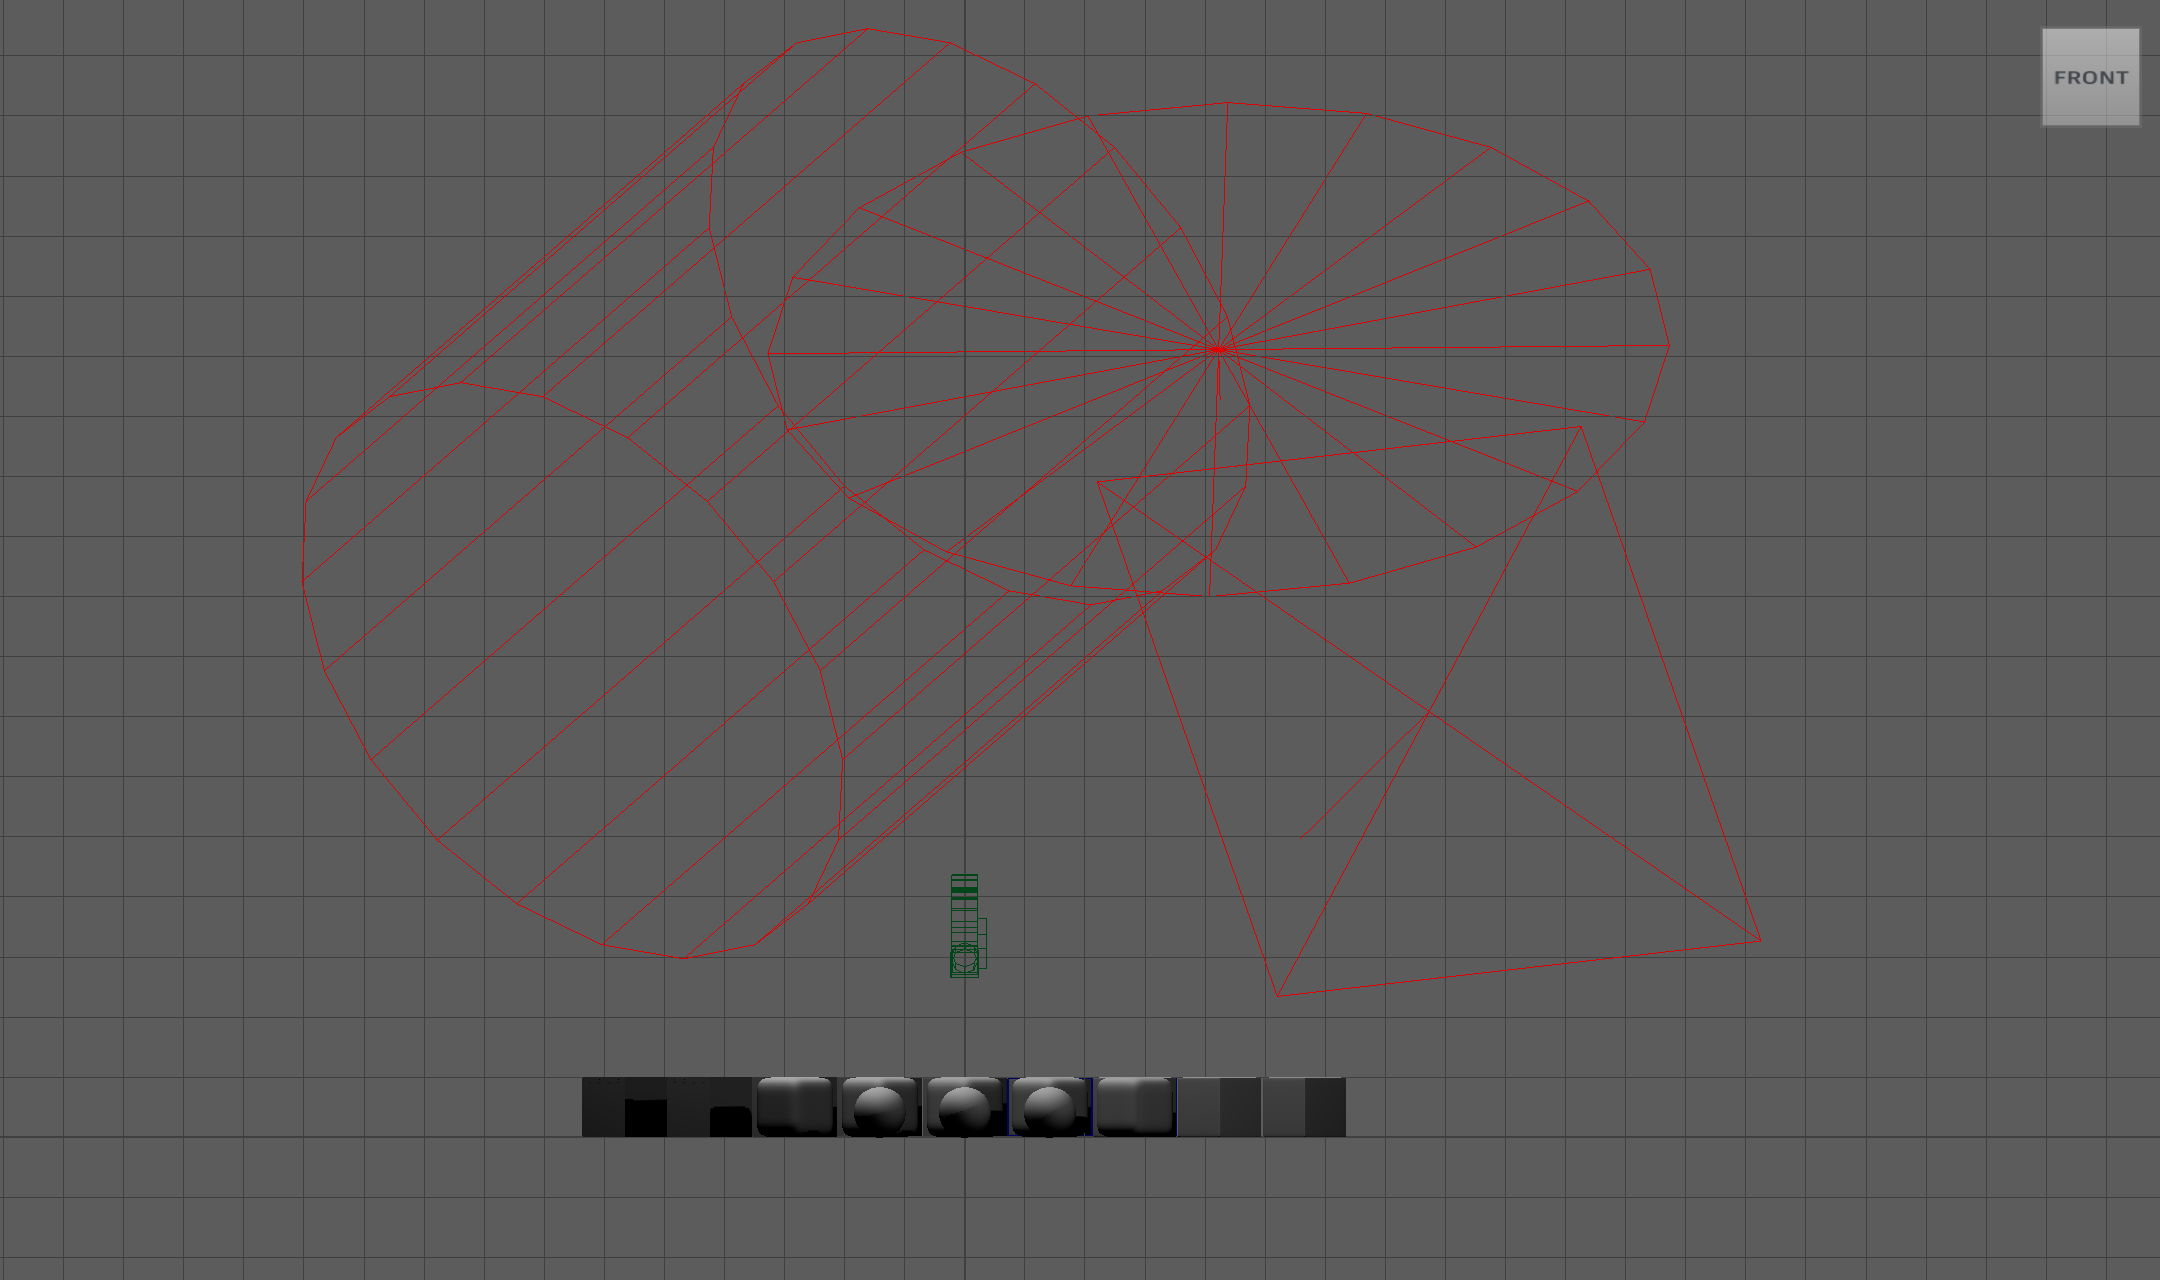
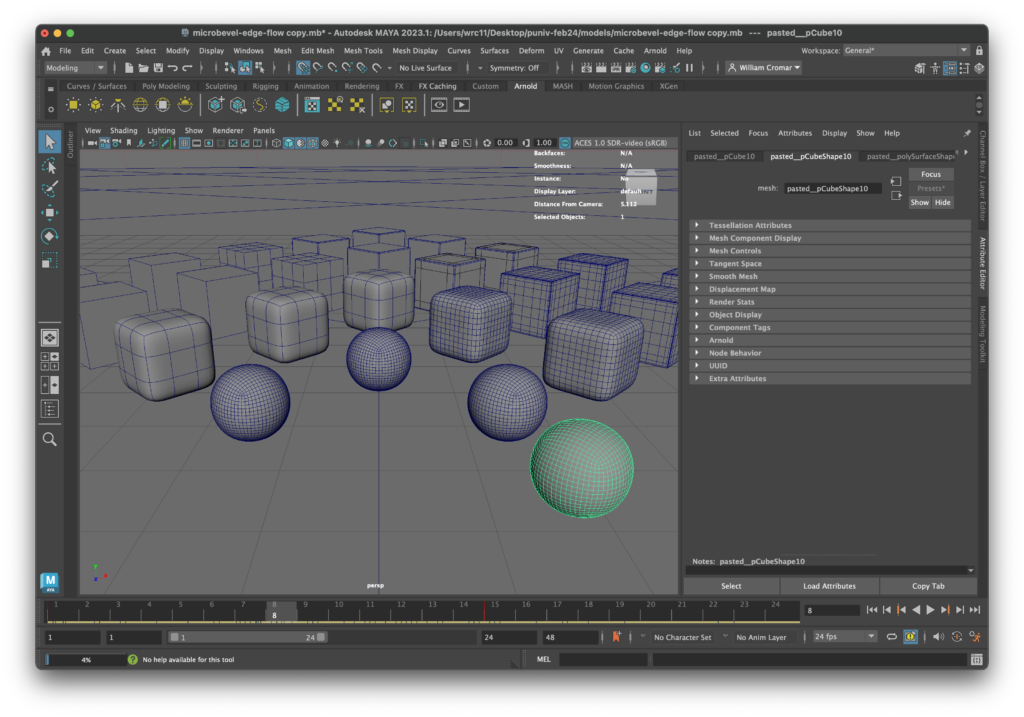
Compare this camera phenomenon to the modeled camera in software. We keep the distance constant, and in the attributes, we assign a focal length of 20mm, 35mm, and 85mm for three renders.

Camera distance
Changing focal length is NOT the same thing as moving closer or farther away, however! The diagram shows you the camera is doing much the same thing as it’s doing in the image. It’s staying in one place and changing focal length. In the bottom row, we replace changing lenses with changing positions. The diagram at the bottom left shows you the camera dollying in toward the subject. The compositional results are remarkably different.

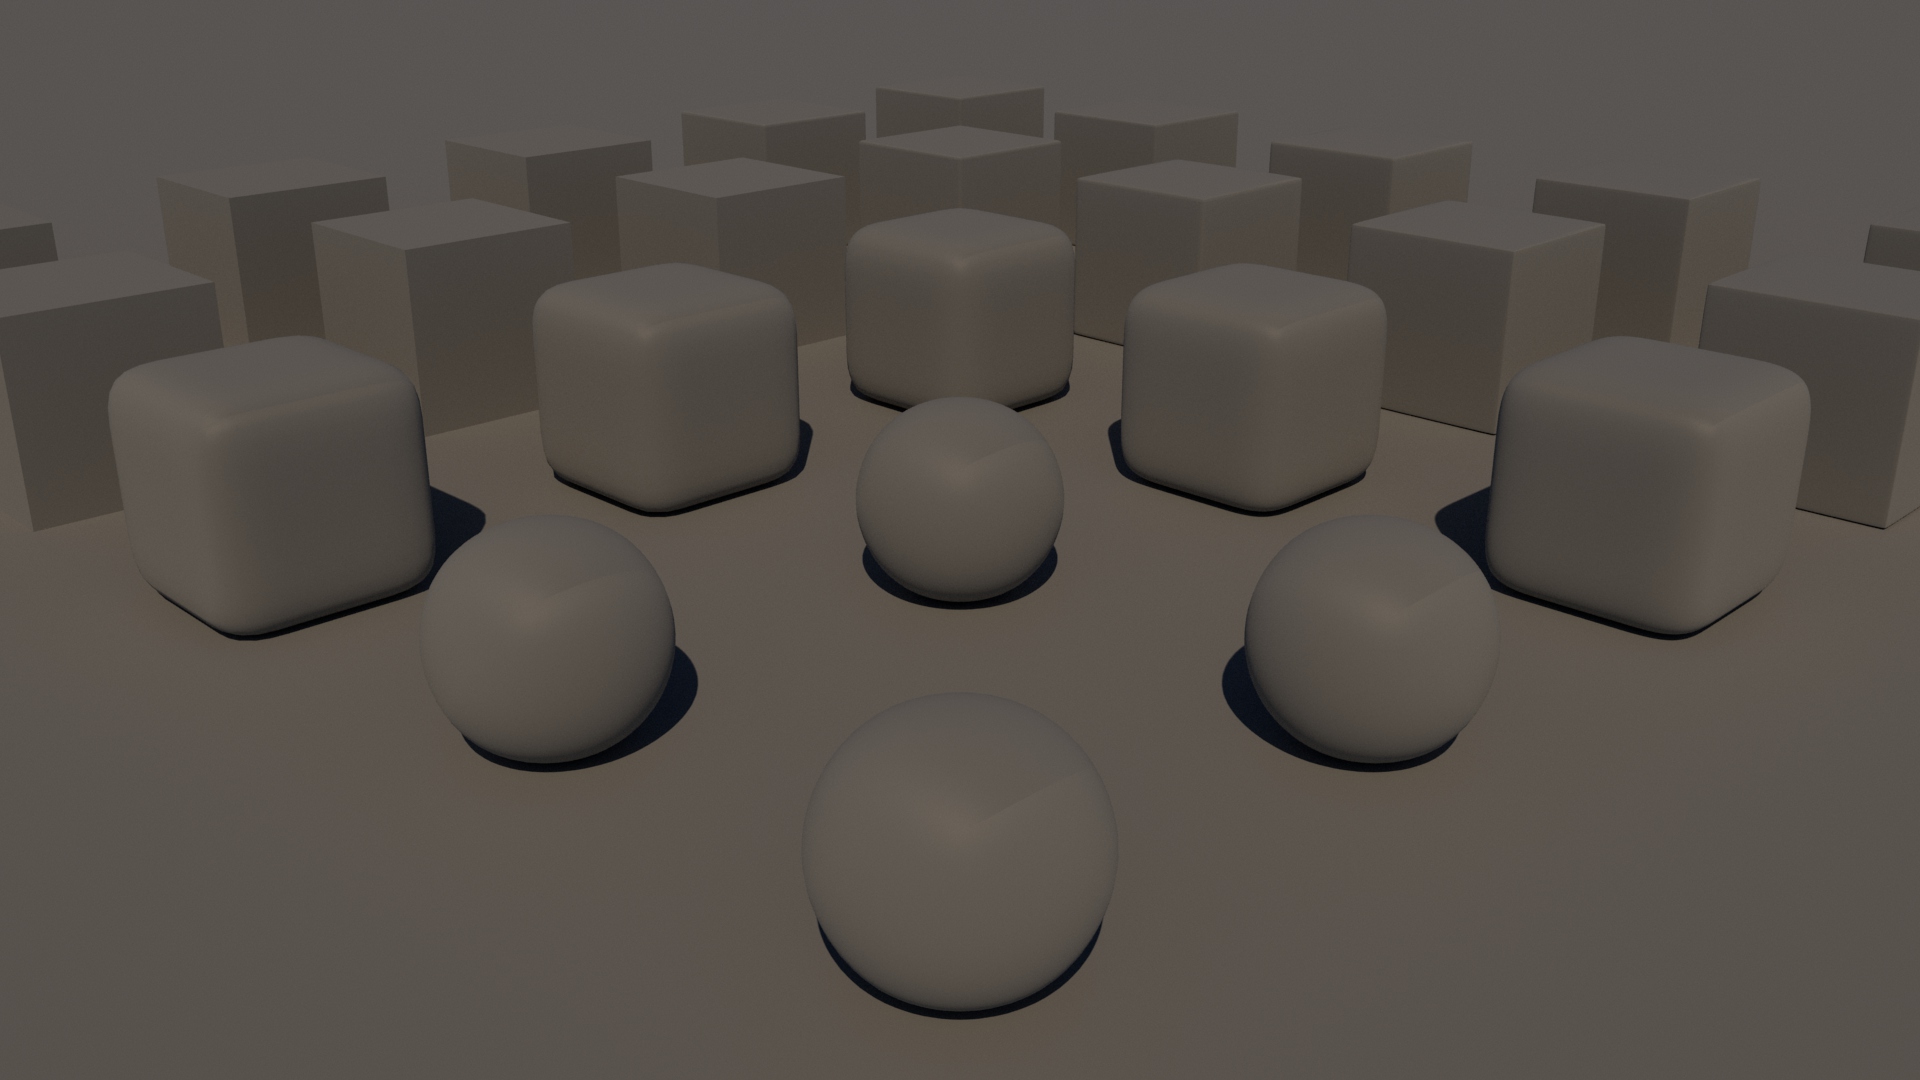
Arnold case study: distance
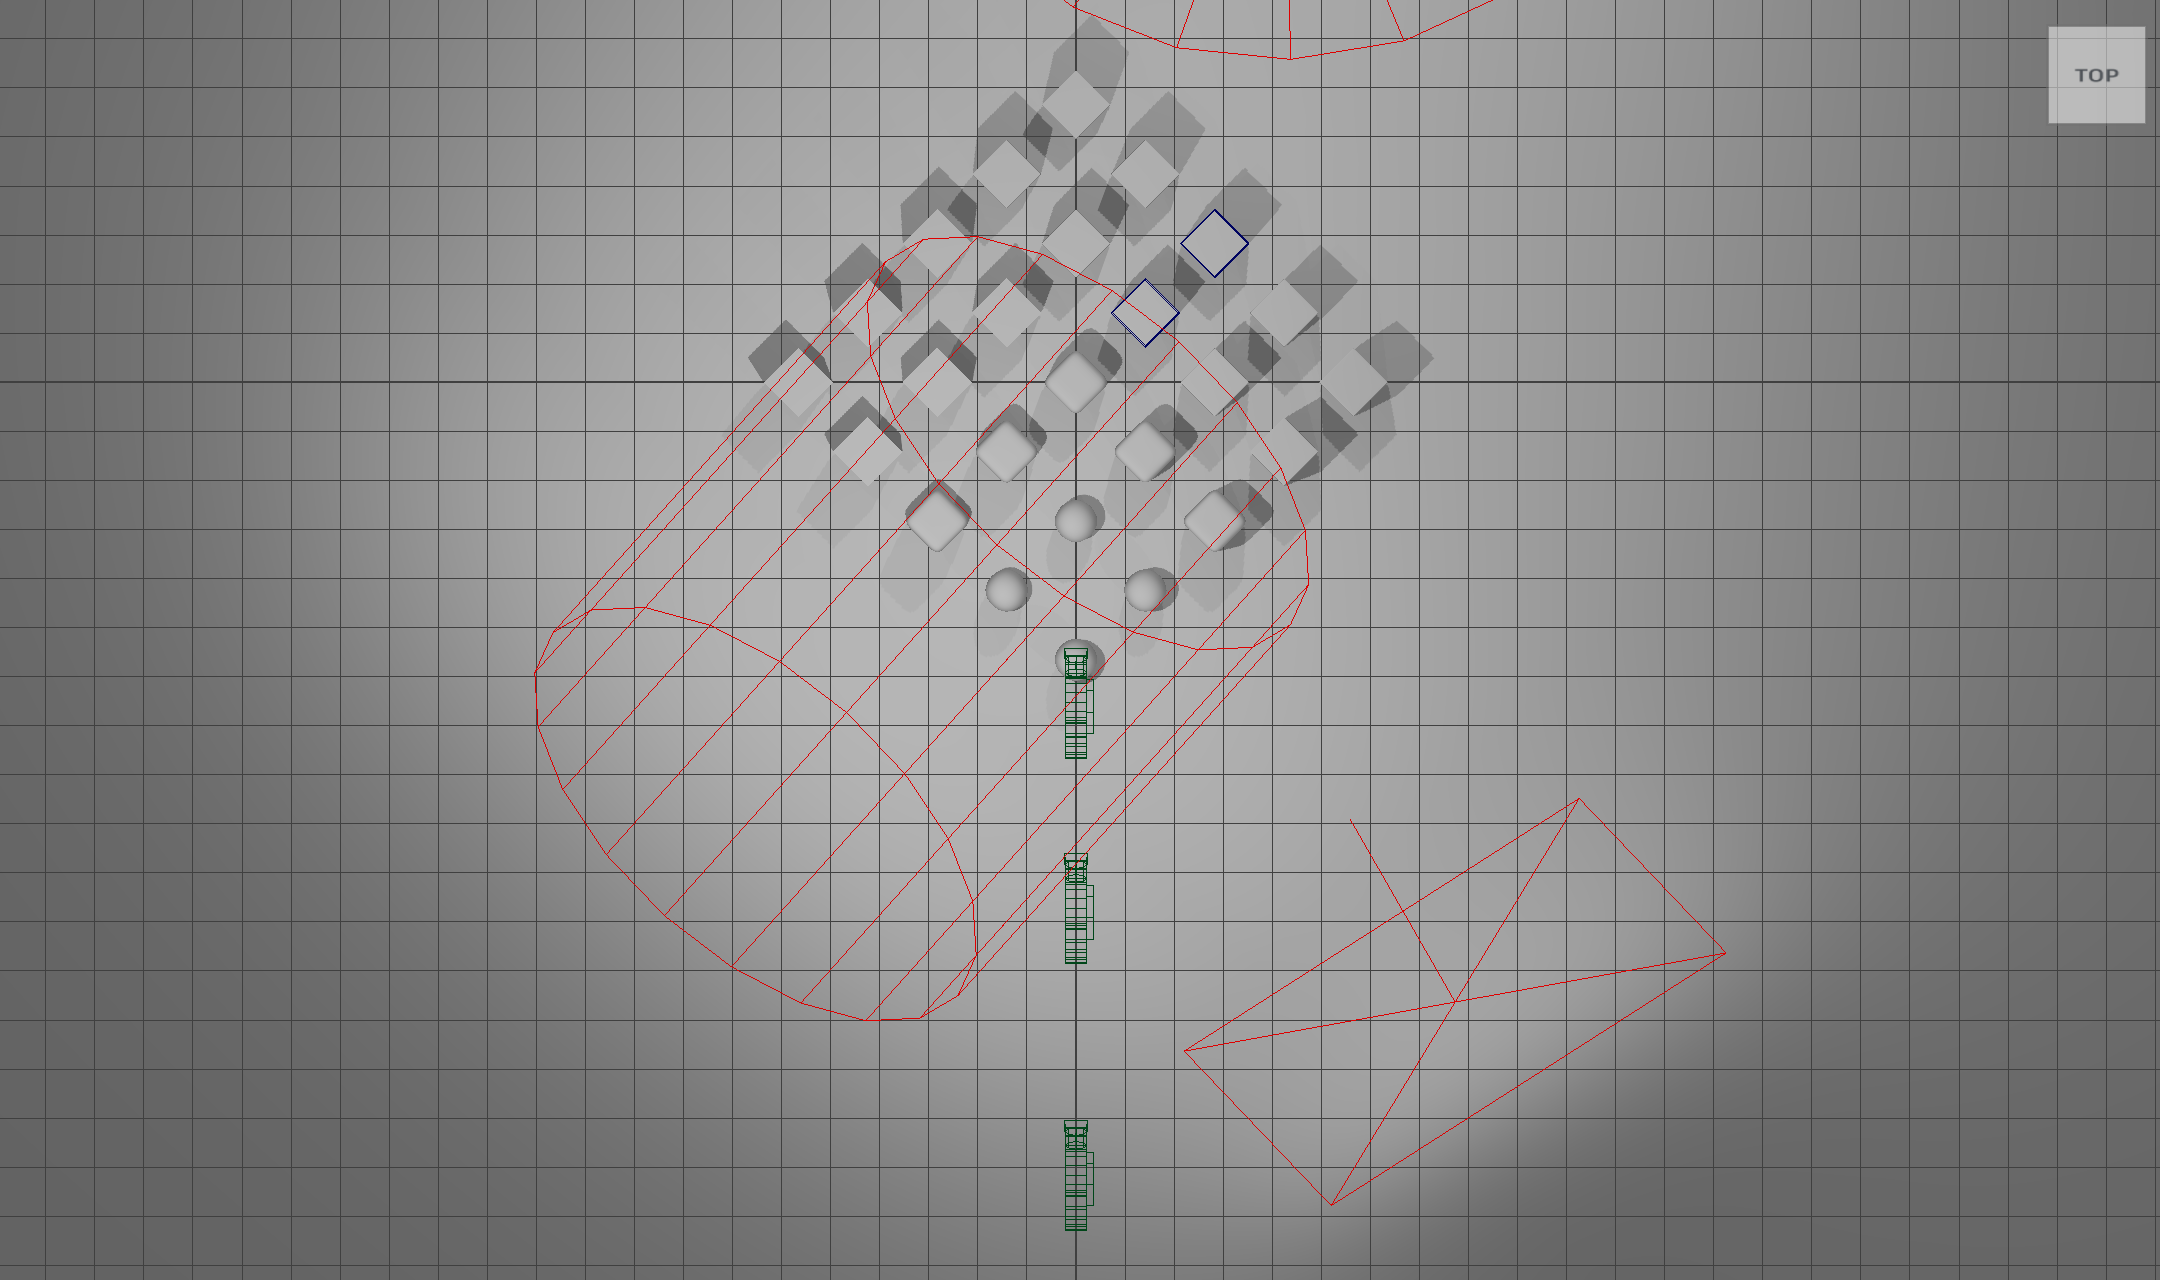
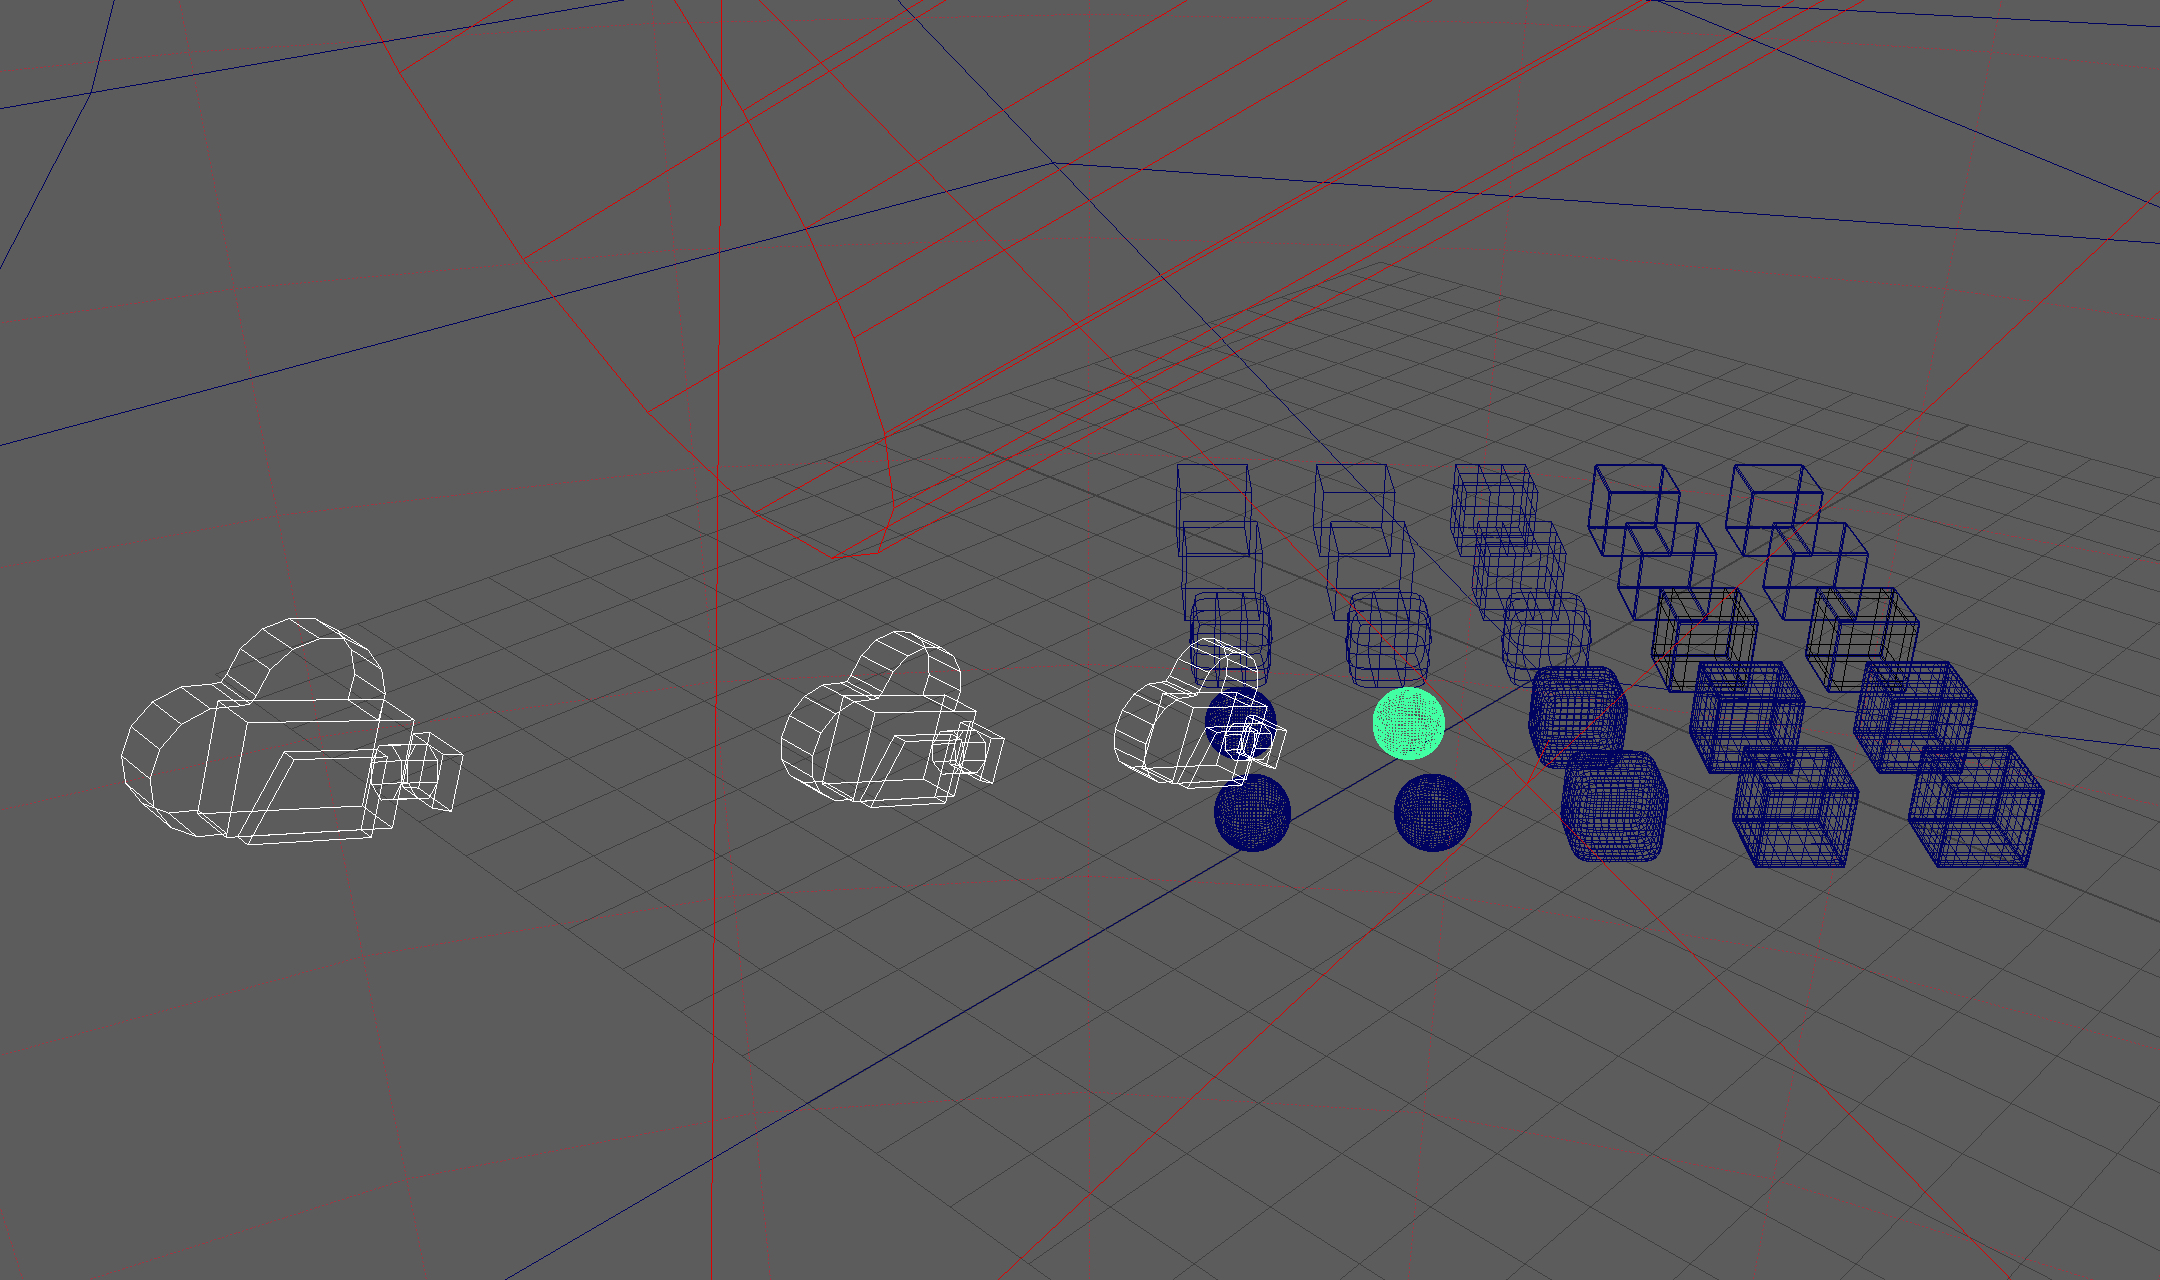
In our model, we keep the focal length at 35mm constant this time, and change the distance from the center ball: 3.25, 7.75, and 13.5 units respectively. Let’s compare the results with the focal-length study:
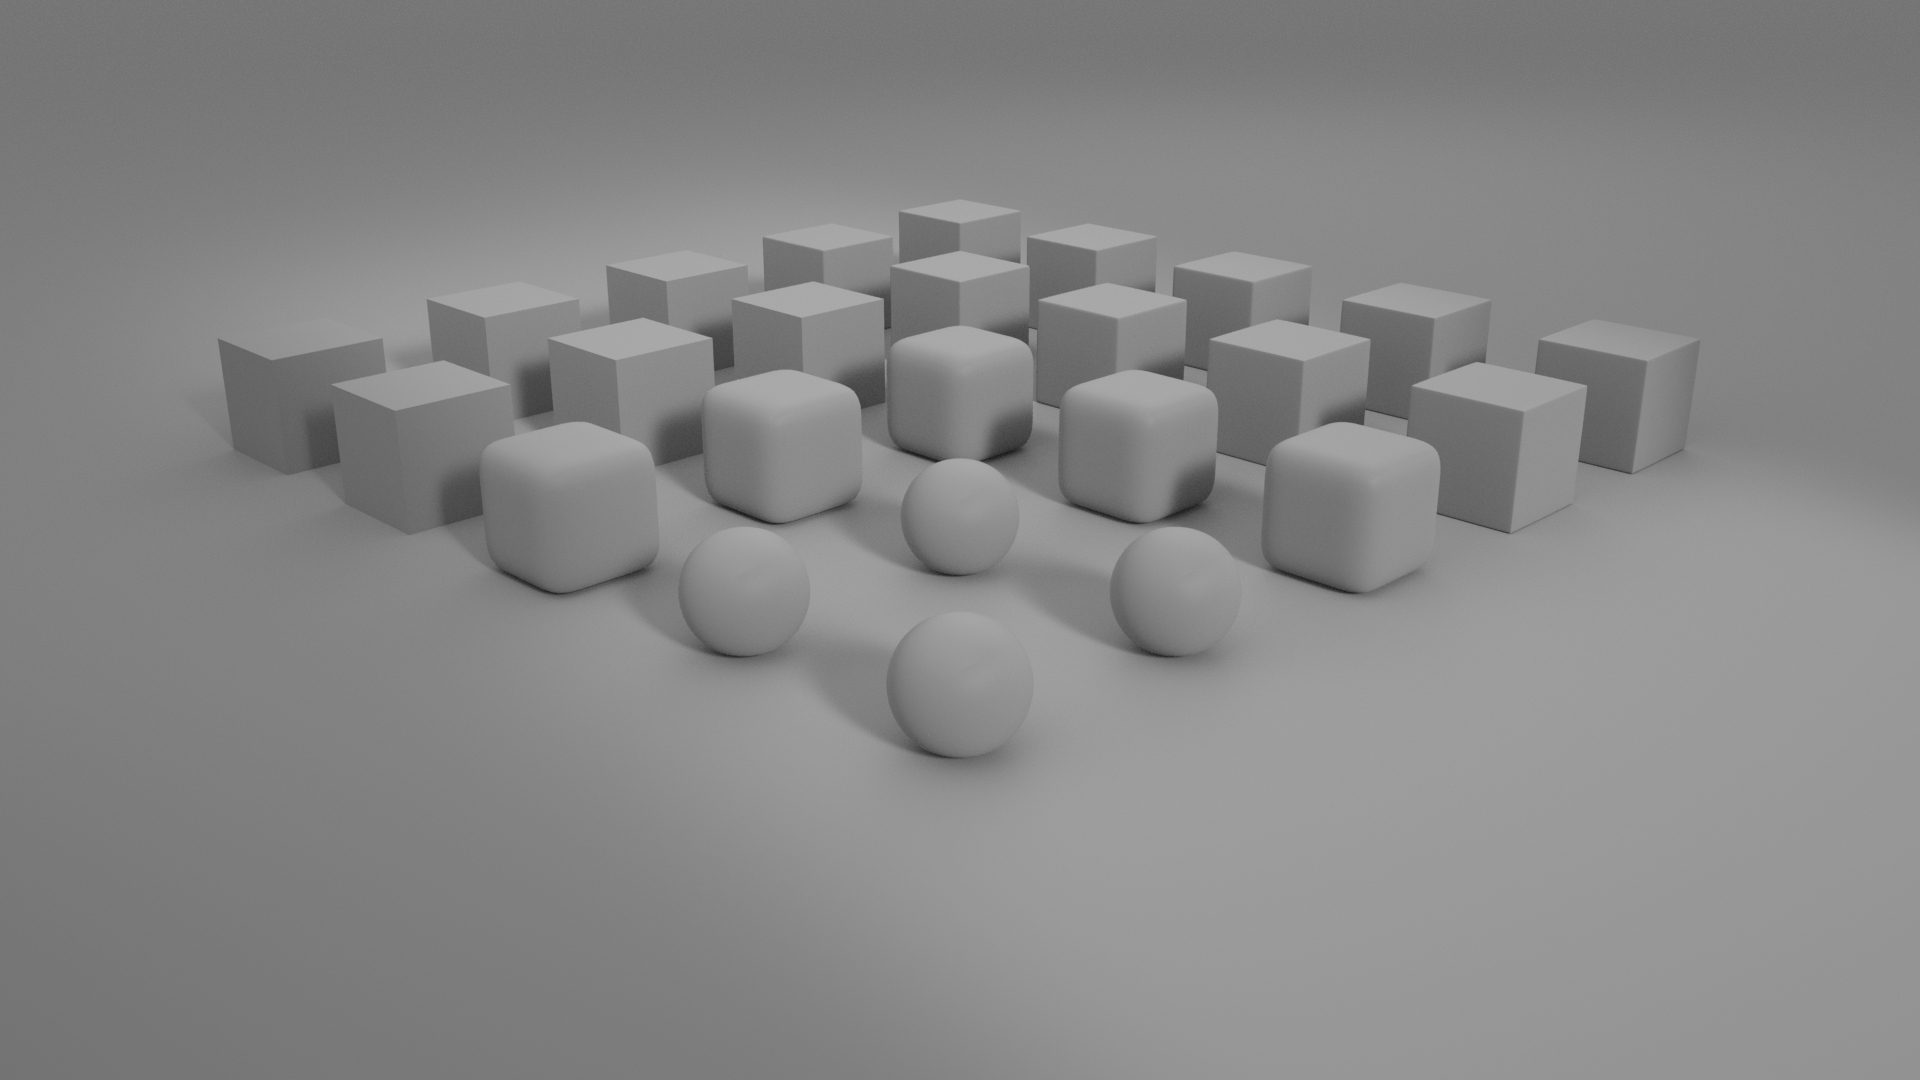
Bottom line: because it’s easier to do, you will be tempted just to dolly your camera to compose your shots. However, you can see the unfortunate results of such an editorial decision. Better to spend a little extra time looking for angle of view settings than end up with distorted results!
The general rule of thumb: choose the focal length before choosing the position. If we’re rendering a full view of an architecturally scaled object, we use around a 20-30mm focal length. If creating a full view of a human-scaled character, we try around 30-80mm. For a full view of a detail, we try 80 to 150mm. After we set the focal length, we can move the camera to a good compositional position.
Depth of field
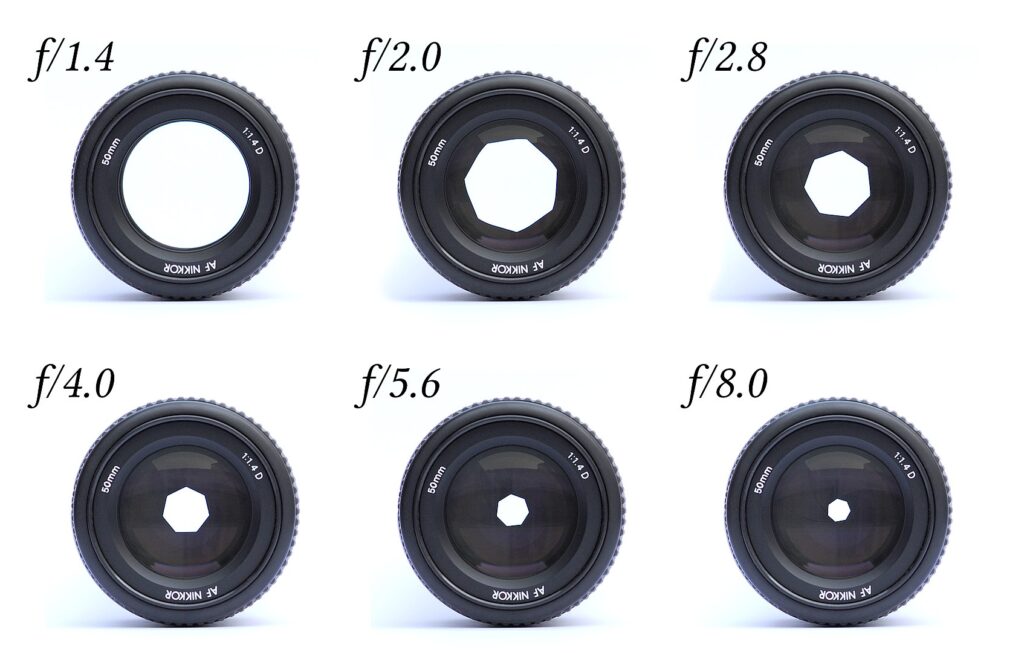
Some byproducts of focal length choice are the distance you’ll create between subject and camera and the amount of background depth you’ll see. In photography, a third variable, the aperture, can contribute to the sense of depth created in a composition. Aperture can be thought of as a dilation of a pupil to allow or restrict light entering the eye:
These variables create a photographic phenomenon known as depth of field, the amount of a scene that can be seen in crisp detail. Here we can see the different ways these variables can affect depth of field.
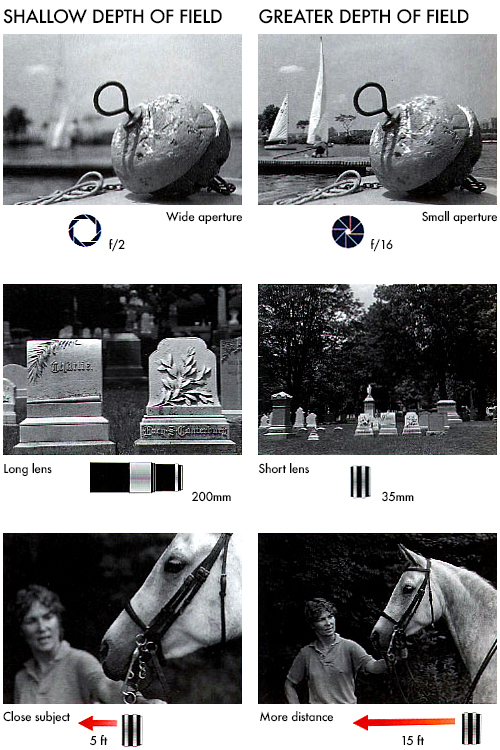
Three variables contribute to a deep or shallow depth of field. Adapted from illustrations in Photography by Barbara London and John Upton, 1981 edition.
Depth of field mimics the way humans can focus on something closer or farther away. This creates a visual emphasis that suggests space and depth. We can usually access the depth of field parameters for a selected camera through settings, to turn it on or off, or to create DOF effects.
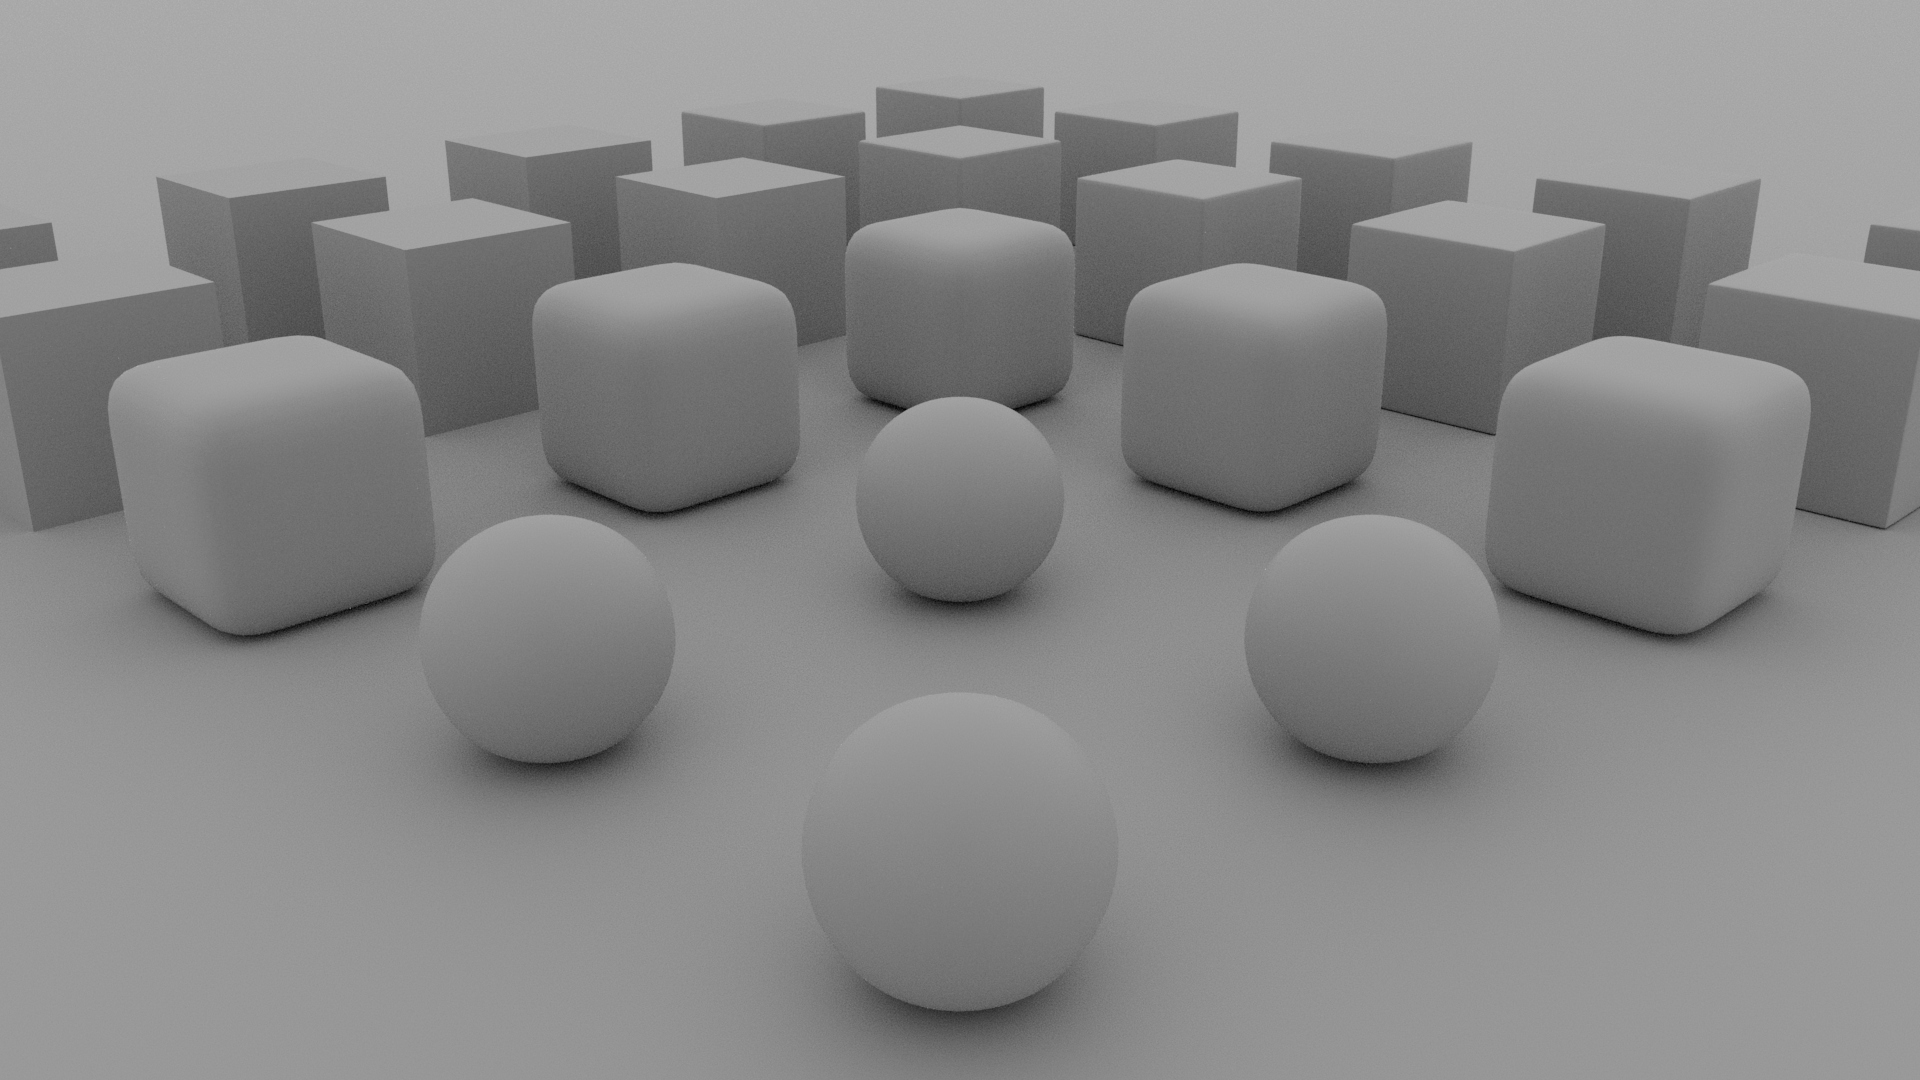
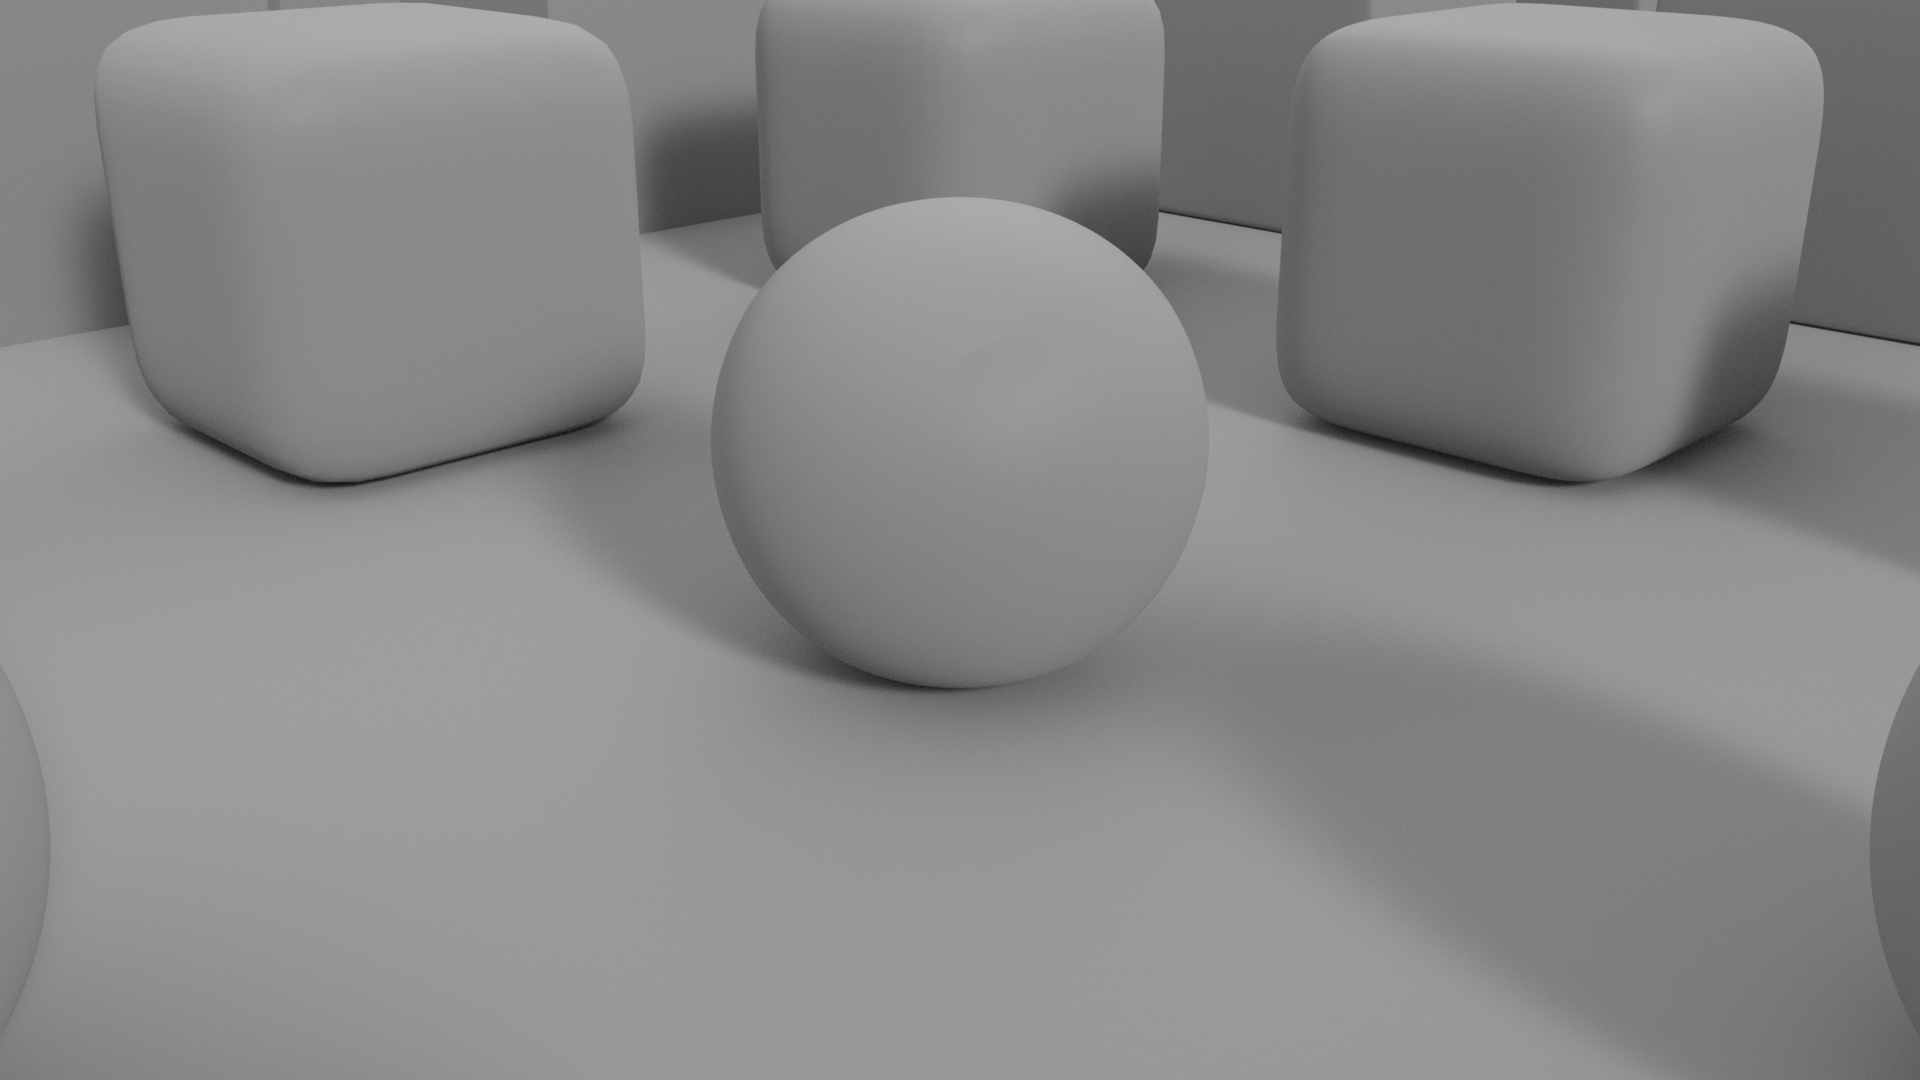
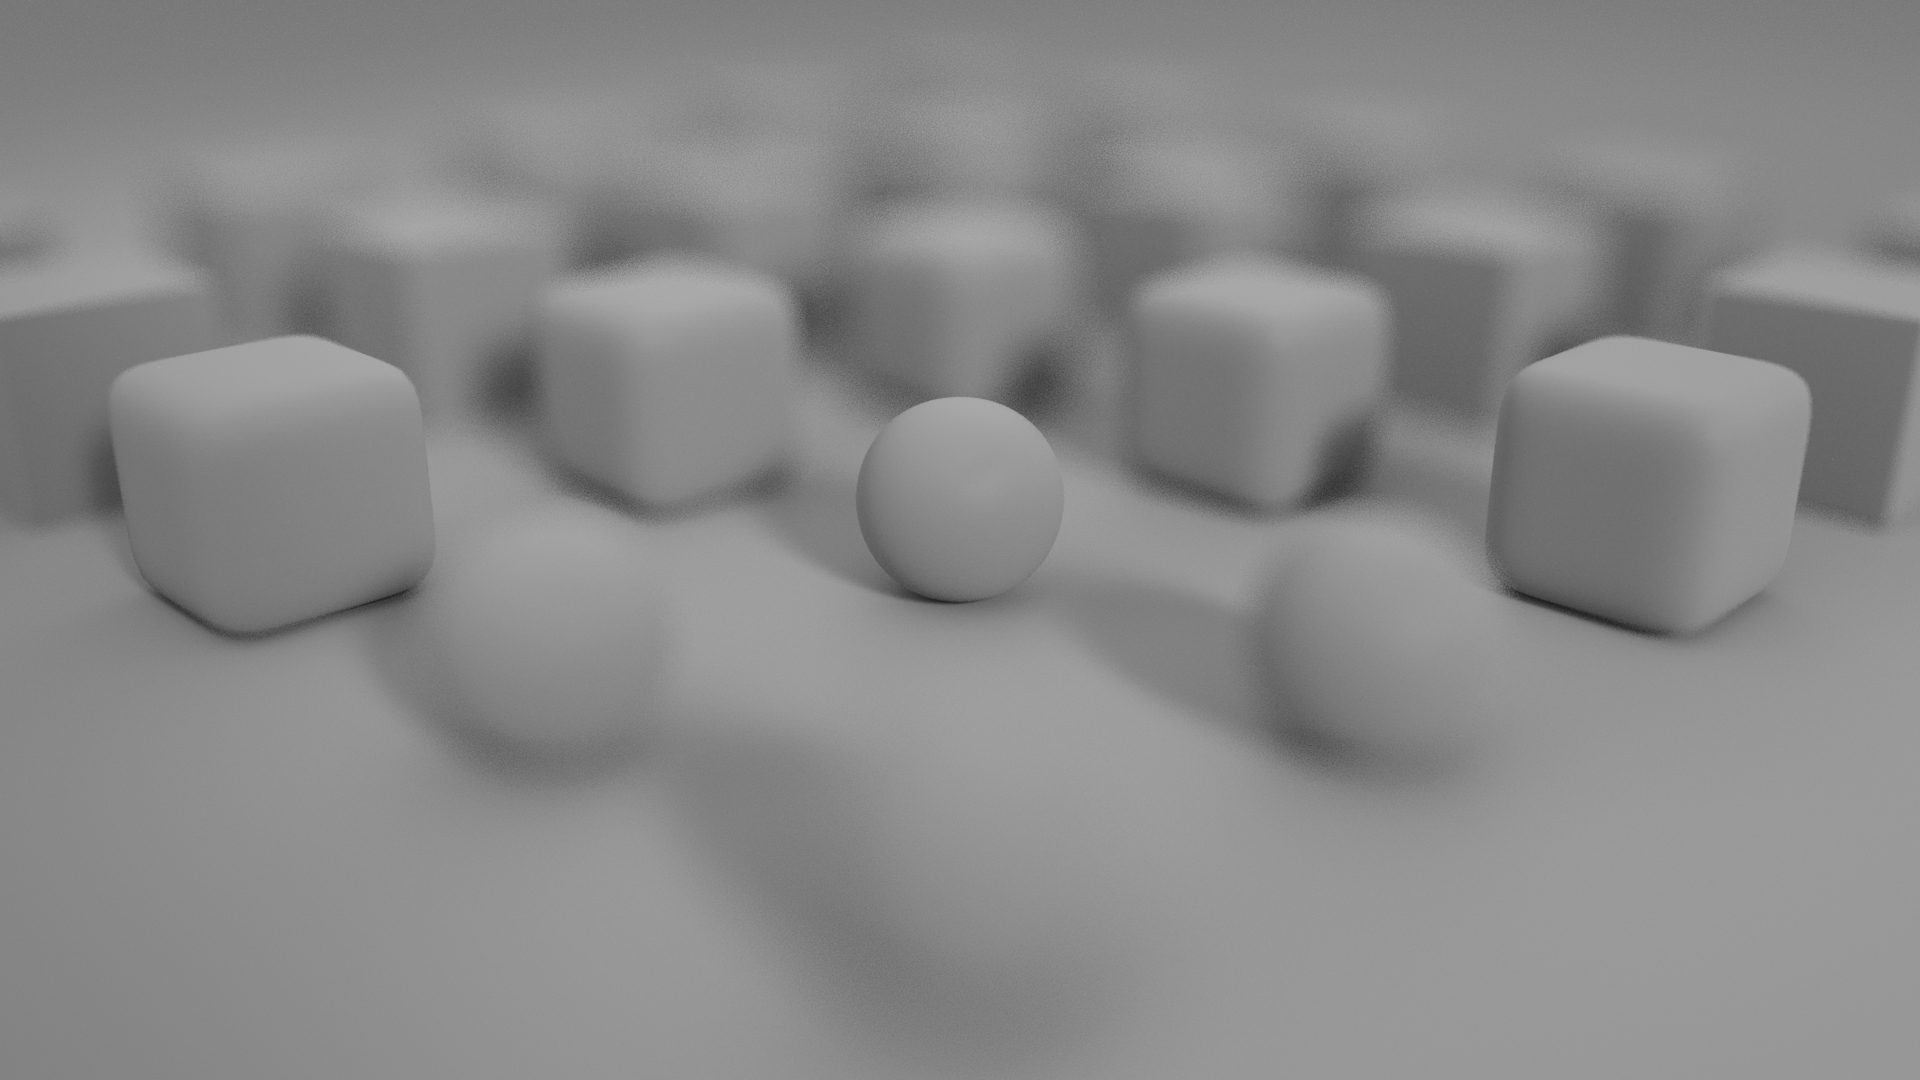
Arnold case study
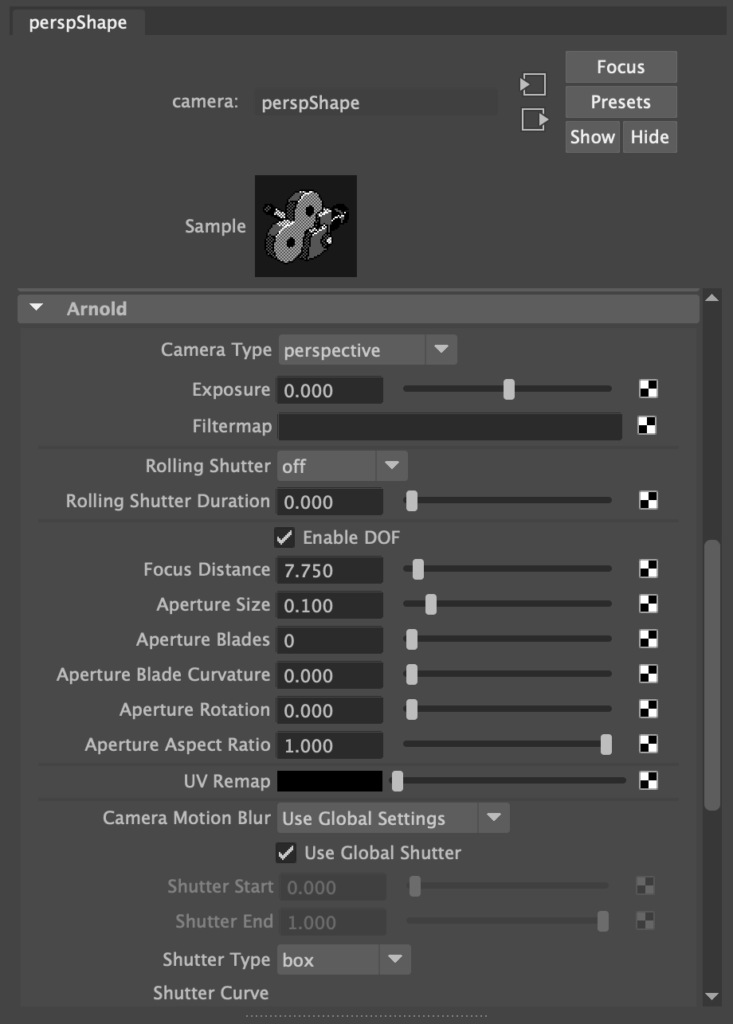
We ran another case study for the Arnold renderer. The depth of field settings are in a terrible and confusing place, as we can see in the illustration. Confusing because it overrides a more clearly expressed “Depth of field” drop-down in the same list, it isn’t even properly labeled. Can you find it? Hint: look for DOF.
We created renders set at a focal distance of 7.75 units with a focus on the center ball. The shallowest DOF found at Aperture = 1.0. Still narrow at 0.5. At 0.1 still shallow but more realistic. At 0.05, still present but minor influence, a deep DOF.


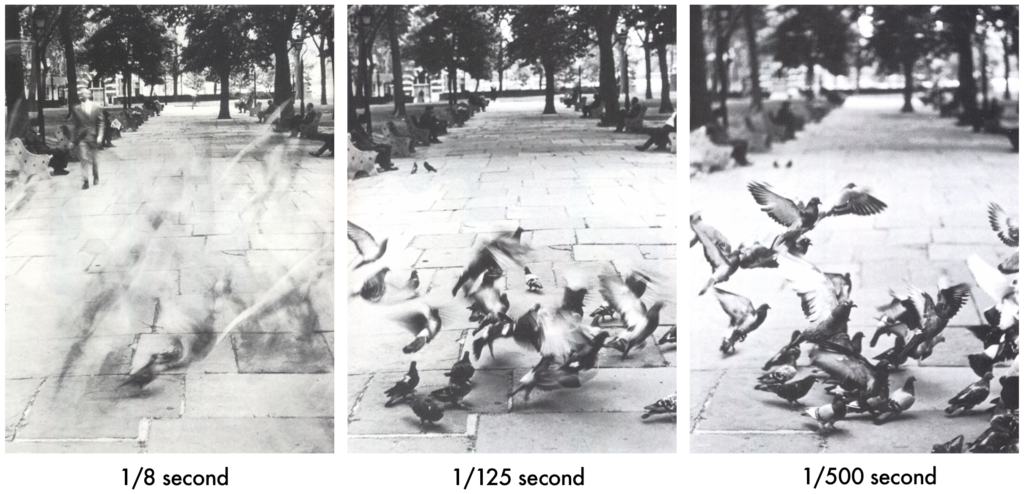
Motion blur
There is one final camera variable to explore: shutter speed. This closely relates to the aperture. At f/16, a very tiny aperture, we need longer exposure times, thus the longer the shutter stays open. At f/2.0, a wide aperture, we get more light faster, so we can afford quick shutter speeds.
During long exposure times, we capture a phenomenon called motion blur when an object in motion moves faster than the shutter can shut.
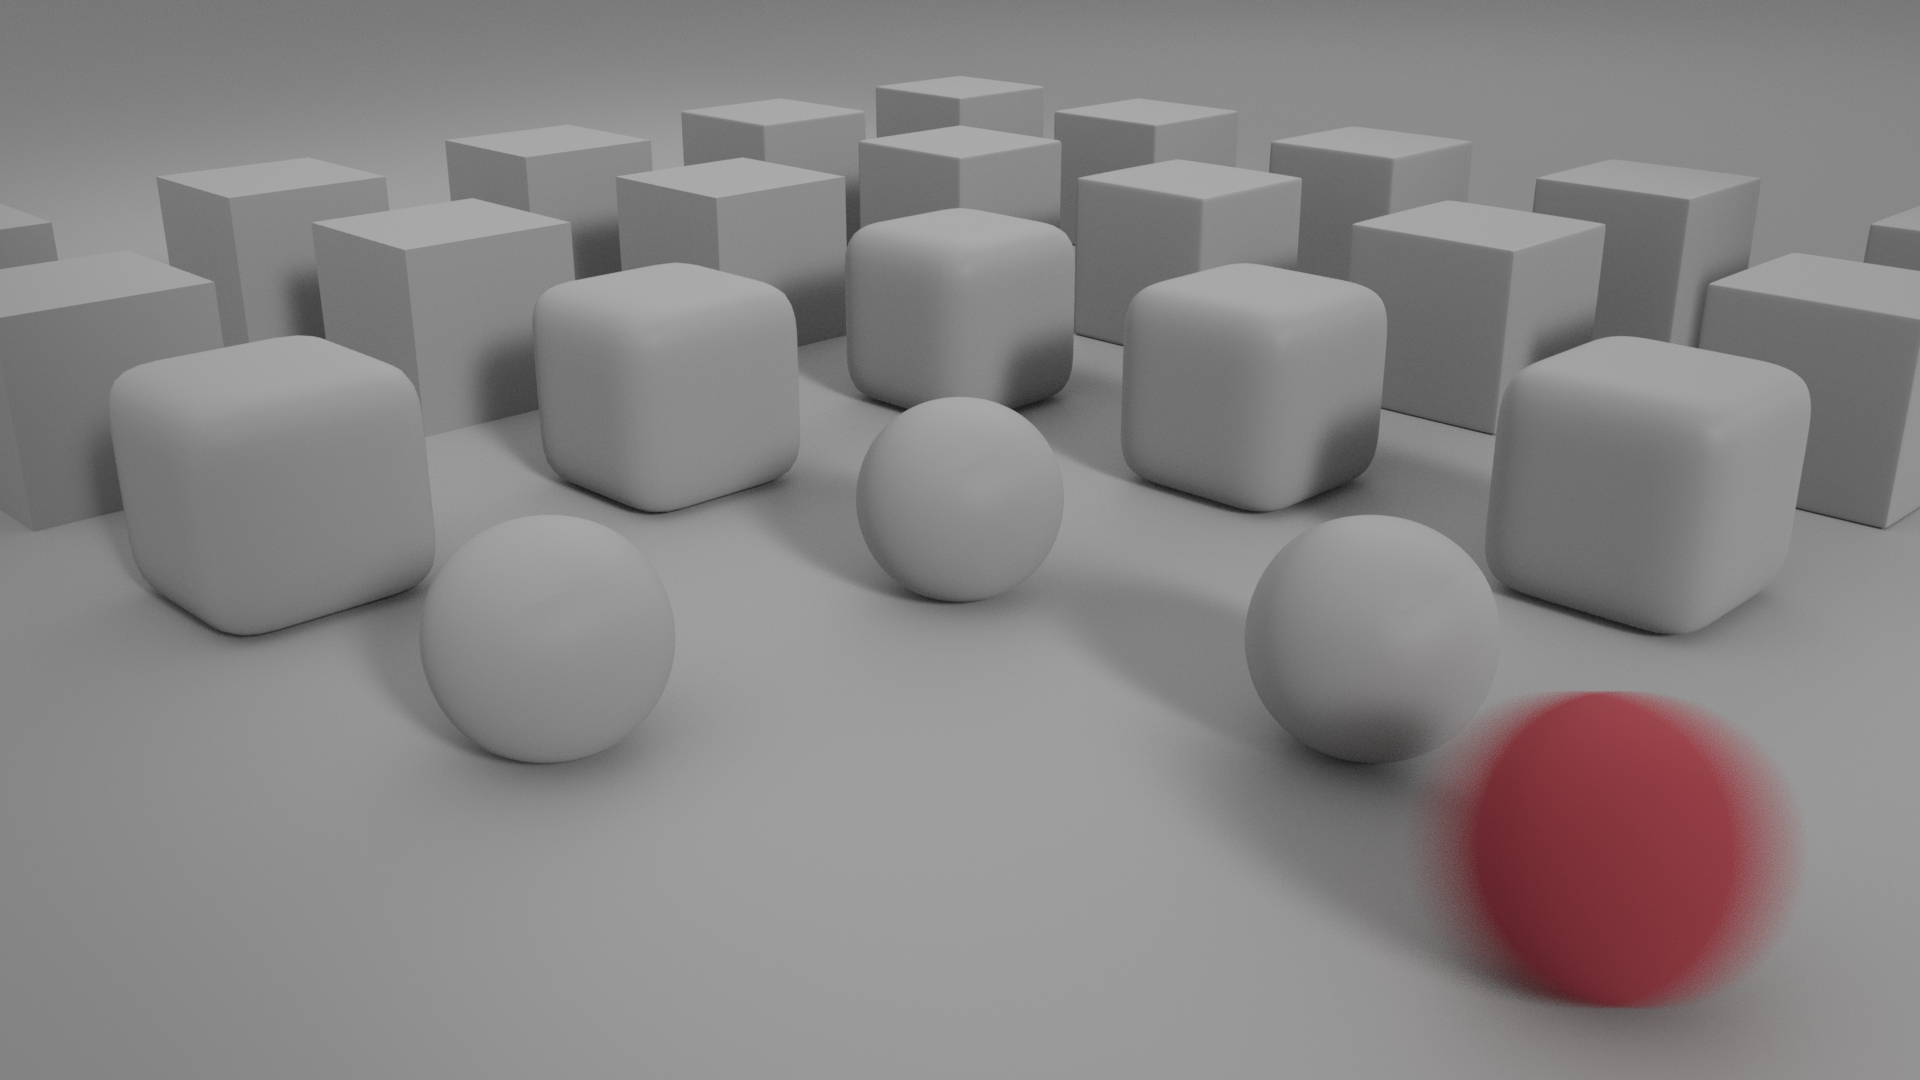
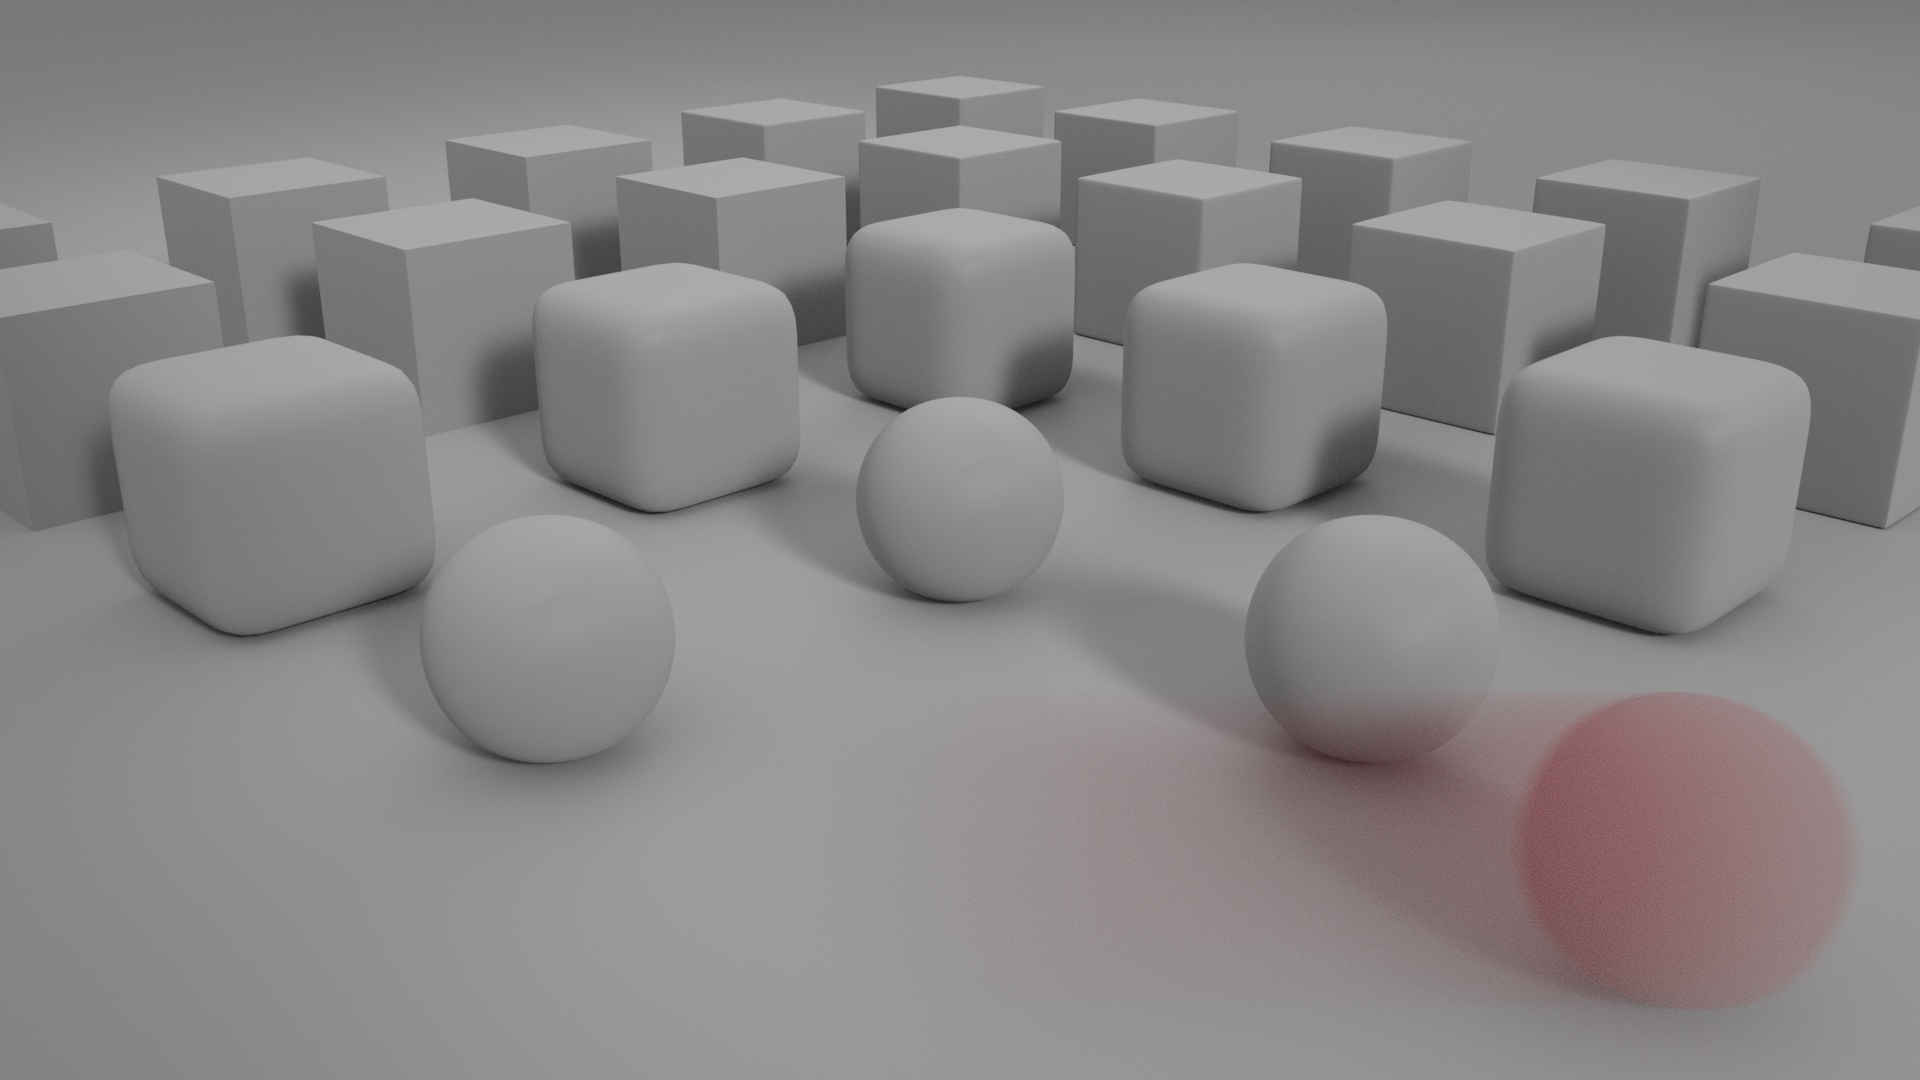
Arnold case study
For our case study, we assigned a dark red rubber material to the front ball for visibility, then we set it in motion for 15 frames — one-half second if 30 frames equals one second. We set the speed to decelerate as it approaches frame 15, creating a slow-out. To render the blur, we Enable motion blur in the Render Settings dialog.
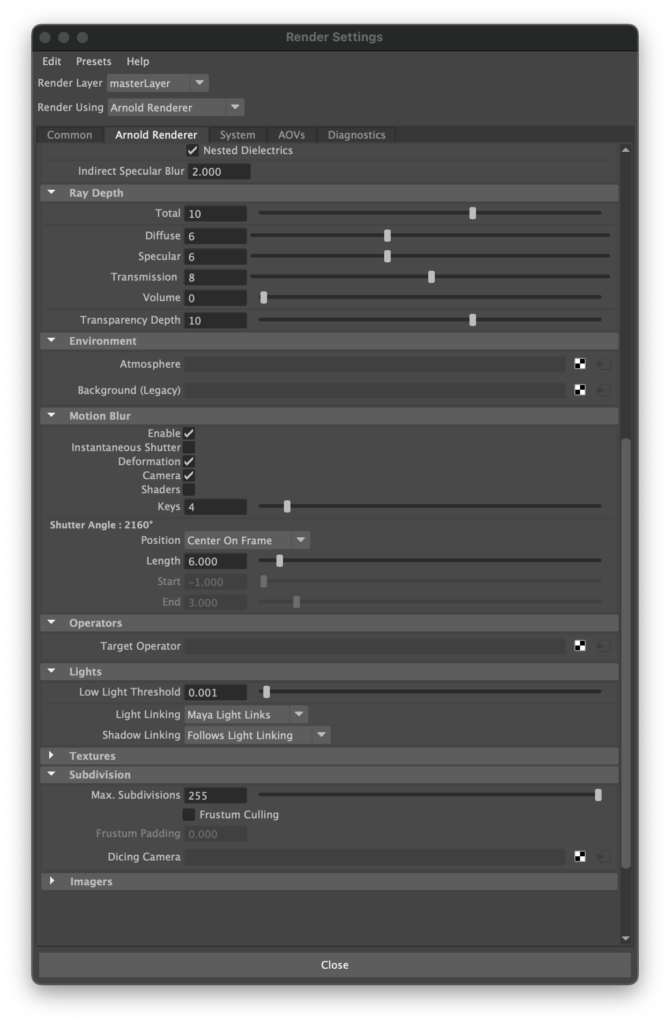
Next, we do some work on the timeline. We select frame 8, halfway between the two keyframes seen at 1 and 15:
Back in Render Settings, we developed three different exposure times centered on frame 8 as follows:
- Short motion set for 2 frames: 2/30 is equivalent to a 0.07-second exposure. We record motion from frames 7 to 9 for a small but visible amount of blur.
- Medium motion set for 6 frames: 6/30 is equivalent to a 0.2-second exposure. We record motion from frame 5 to frame 11. The slow-out means the ball is still blurry, it hasn’t stopped moving by 11 but it’s significantly slowing by that frame.
- Long motion set for 15 frames, or a 0.5-second exposure. We see the motion as pronounced and blurrier, but this also captures the ball fully stopped.

We should mention that if we animate the camera, there is a provision in the Render Settings to capture motion blur from camera movement as well!
Shot design
The manipulations just discussed yield certain kinds of “shots” conventionally defined in still photography and cinema. As you conceptualize a composition, it may be useful to keep these shot types in mind. From far to near, they are:
Extreme long shot
Wide, panoramic view with emphasis on the environment as the subject itself.
- Focal length: short, 24-28mm.
- Distance from subject: far.
- Depth of field: usually deep.
- Aperture: depends on available light, but use the smallest to maximize depth.
- Shutter: shortest possible given aperture, avoid motion blur.
Long shot
Wide view showing the interplay between subject and environment.
- Focal length: 50mm and under.
- Distance from subject: far, but detail in the foreground is possible.
- Depth of field: usually, but not always, deep.
- Aperture: depends on available light, but try smaller to maximize depth unless DOF effects are desirable.
- Shutter: shortest possible given aperture, avoid motion blur.
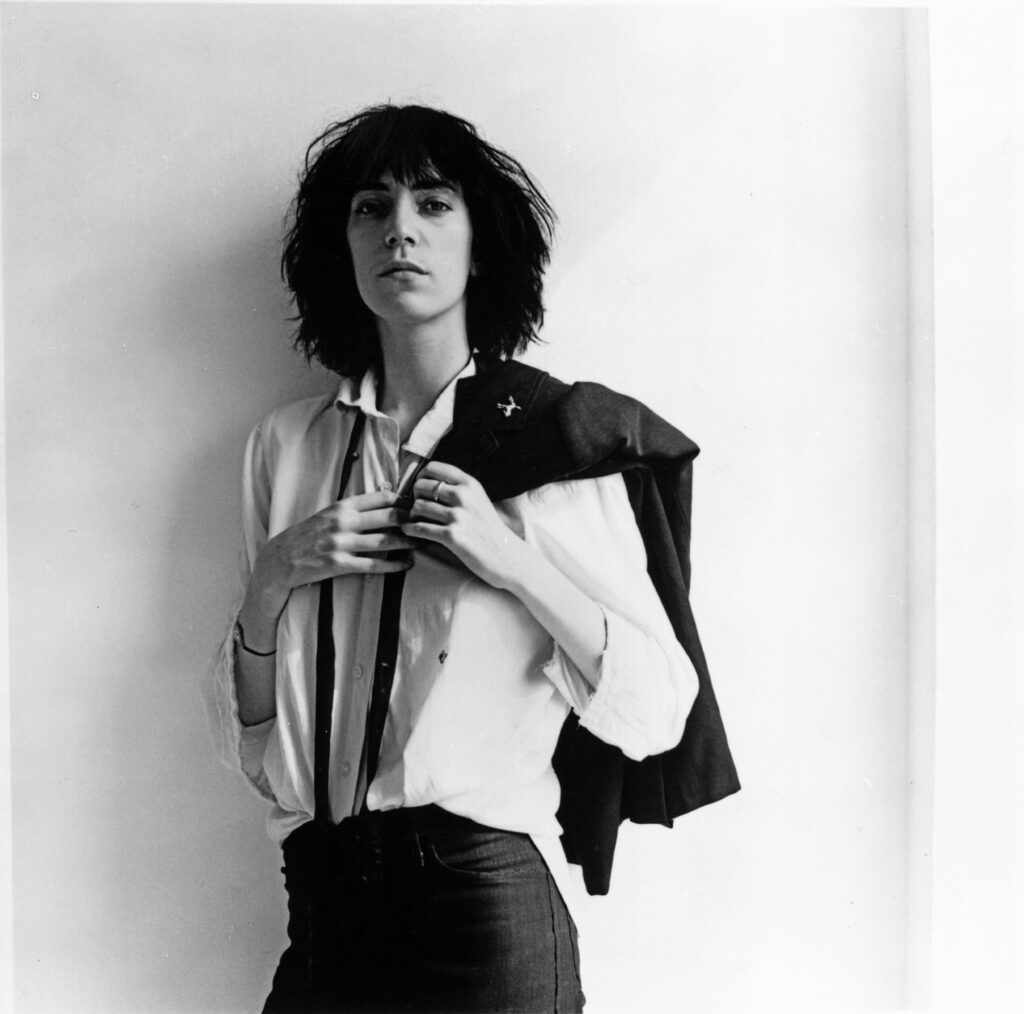
Middle (mid) shot
Full to more-than-half view of the human figure or inanimate subject shown in relationship to the environment.
- Focal length: 30mm full figure to 80m waist-high.
- Distance from subject: moderate.
- Depth of field: subject within focal range.
- Aperture: light is controllable for interior shots so control this to achieve smaller values unless DOF effects are desirable.
- Shutter: shortest possible given aperture, motion blur can sometimes be interesting.
Closeup
Subject dominant, with a minimal exposition of environment.
- Focal length: 80 to 150mm depending on scale.
- Distance from subject: close.
- Depth of field: lenses with these focal lengths have narrow ranges but the subject remains in focus.
- Aperture: light is controllable for interior shots so control to achieve smaller values unless DOF effects are desirable.
- Shutter: shortest possible given aperture, motion blur can sometimes be interesting.
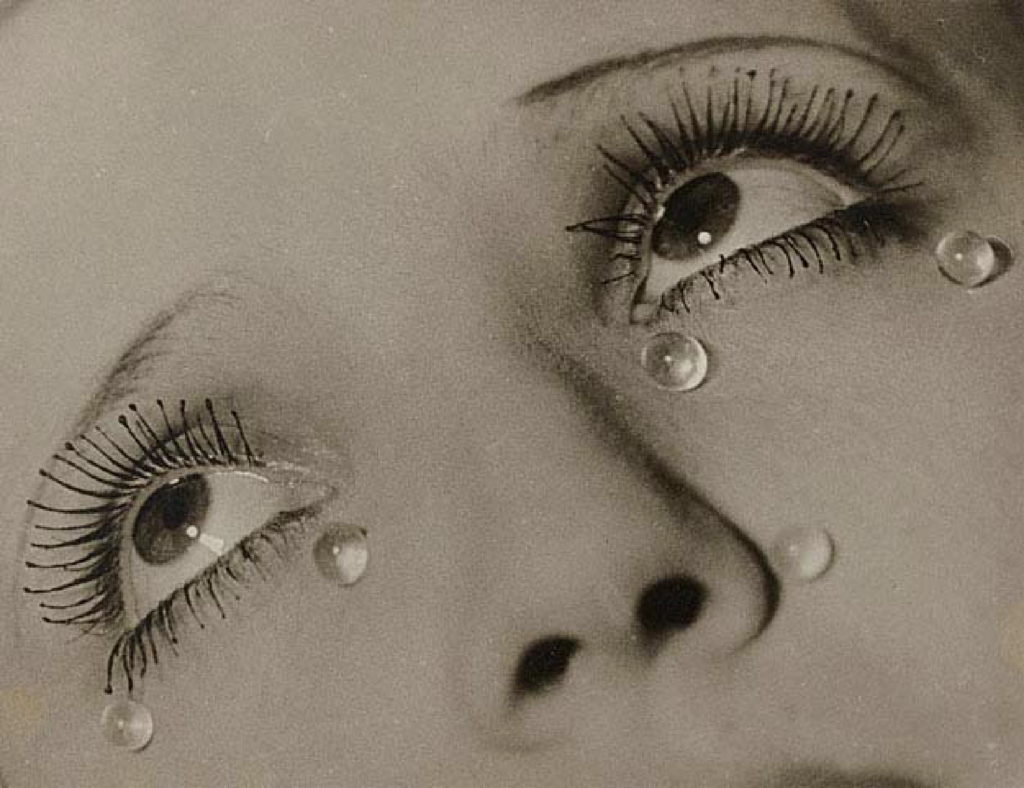
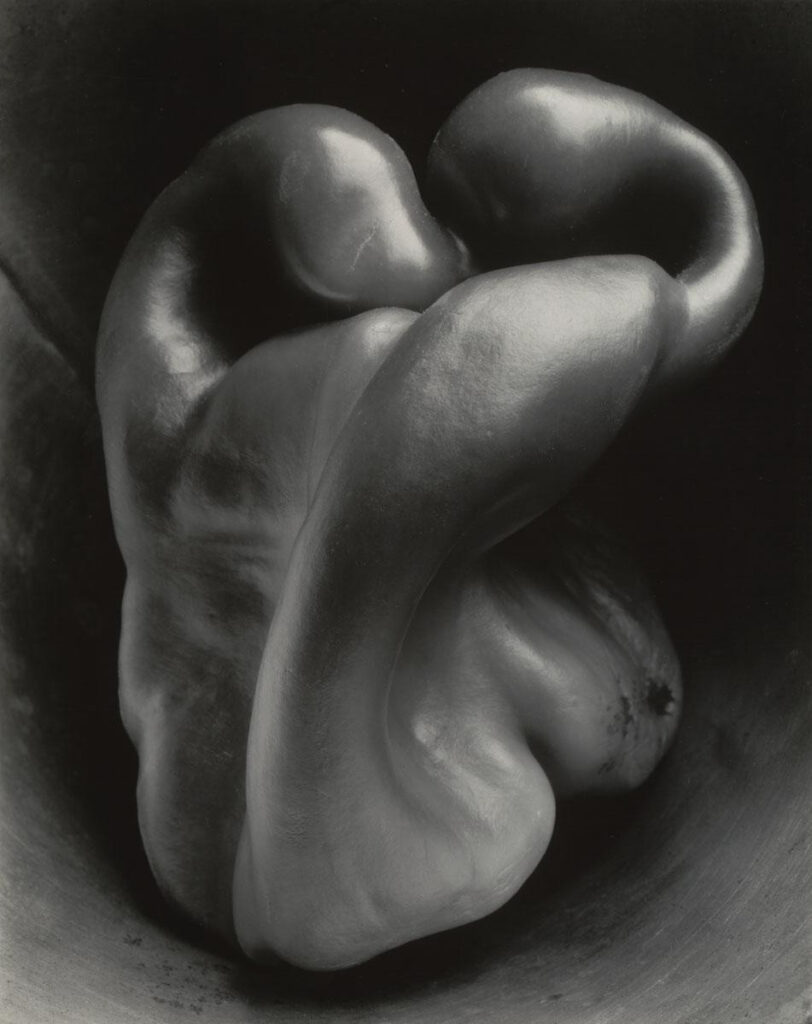
Extreme closeup
Detail within the subject, little to no environment shown.
- Focal length: 150mm or greater.
- Distance from subject: inches.
- Depth of field: intrinsically narrow at this focal length so the subject can fall outside of focal range unless kept perpendicular to the camera view.
- Aperture: light is controllable for interior shots so control to achieve smaller unless extreme DOF effects are desirable.
- Shutter: shortest possible given aperture, motion blur can sometimes be interesting.