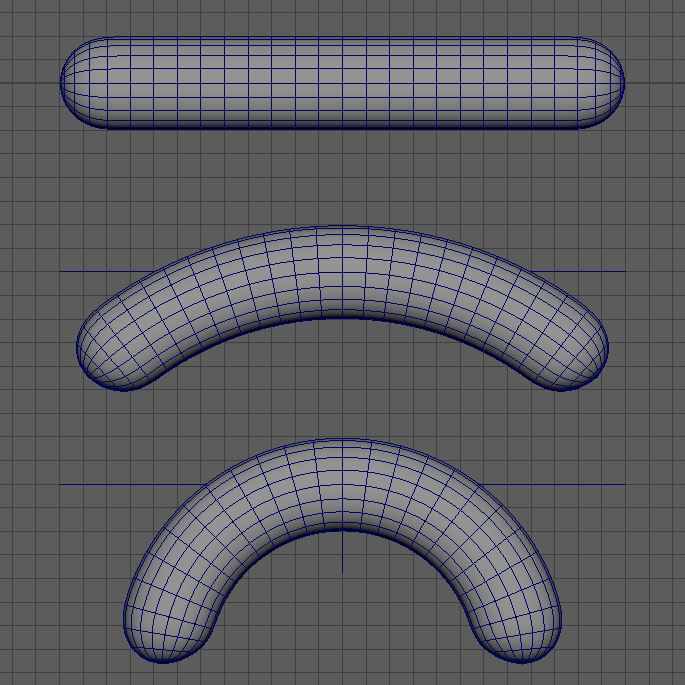
Three kinds of rig
View the .zip file to download it
This is a directory with one shared .zip file in OneDrive. In the new browser window that opens, select the .zip file and download. This will maintain the integrity of the Maya project folder.
Welcome to the Worm Circus!
The newMedia Worm Circus contains samples for all basic rig types. Your goal in this exercise is to look at all of these as case studies, then recreate at least ONE that will be similar to the basis for your rig.
What is a “rig?”
Making a rig is the process of creating some kind of hidden (that is, non-rendered) deforming or constraining device and controller that allows a 3D model to animate. Some authorities will specifically define this as being a skeletal rig, using “bones” to manipulate a “skin” over time. This analogy is misleading and conceptually biased toward character modeling. Misleading, because the deformation process is a complex algorithmic one, not an imitation of a physical process. Conceptually limiting, because so many entities (robotic arms, butterflies, spoons, planets) can be manipulated using many kinds of deformers.
Here, we’ll define a rig as any relationship between any kind of geometry and any kind of deformer and controller. In the Worm Circus, we explore variations on three kinds of rig:
- Basic Deformations: Transforms and Blend Shapes: manipulation, subtle or dramatic, using minimal rig elements.
- Motion: Path and Deformer Rigs: motion path or deformations like sine or twist, some of which we can compound into sophisticated distortions.
- Skeletal: Joint and IK Rigs: the “skeletal” rig most associated with animation. Can include a class of other constraints and deformers with obscure jargon-y names like point constraints and cluster handles.
Global setup for each scene
In every one of our scenes, we used the same basic setup, which we describe here step by step.
Step 1: Creating rig-friendly geometry
First-time riggers have fewer tricky hierarchy issues to contend with by using polygons, so we start with that. With careful planning, one can generate the right poly count for the intended deformations.
In the Worm Circus, we create a simple, wormlike form from a polygon cylinder whose rounded caps are oriented horizontally. We used the following inputs:
Radius: 2
Height: 20
Subdivisions Axis: 20
Subdivisions Height: 20
Subdivisions Caps: 4
Round Cap ON
Subdivision smoothing hotkey 3
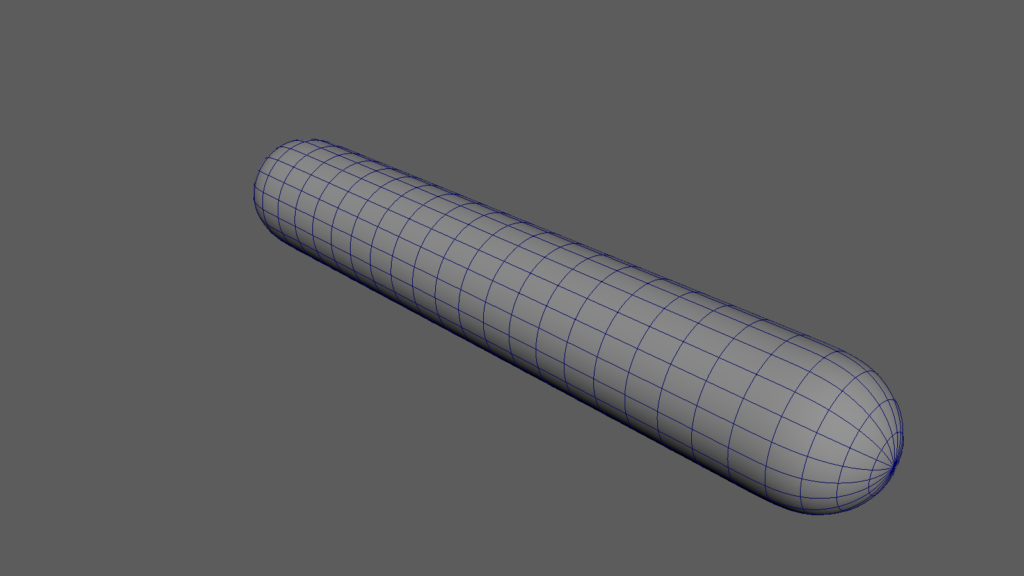
This provides just about 450 polygons — enough (but not too much) geometry for the deformations it will undergo using our rigs. Each of the scenes in the sample project folder contains the worm created above. Additionally, we do the following steps to prepare the worm to rig:
- Name the geometry worm1.
- Rotate worm1 to horizontal and manually zero out all the Channel Box translate data to move the center of the worm to the world origin.
- Select Menu: Modify > Freeze Transformations while the geometry is still selected and this zeros out the rotation data.
- Finally, select Menu: Edit > Delete by type > History to clear unnecessary nodes.
Since that’s the opening move for every scene in the Maya project folder, we won’t include those 4 steps in the workflows for the rigs below.
Step 2: Creating controllers
What makes each of these samples qualify as a rig? Some of the more basic deformations just appear to be basic keyframing exercises. The distinguishing feature of any rig is the presence of controllers. A controller is simply a NURBS-based closed curve shape, invisible to rendering, which becomes a hierarchic parent of the worm geometry. Our convention for naming controllers is CTR in ALL CAPS to visually distinguish them in the Outliner. We also place the controllers high in the list so they are the first thing the animator sees. Animators should avoid keyframing geometry; it’s not considered best practice. Instead, almost all keyframing happens via controllers.
In our samples below, we use simple NURBS circles of varying diameters as controllers:
- Name the NURBS geometry CTR. When you have more than one, you will need to add logical descriptors to the name as a suffix with an underscore (e.g.: CTR_WORM or CTR_ARM).
- Rotate CTR to proper orientation and manually zero out all the Channel Box translate data to move the center of the controller to a logical position for the worm geometry.
- Select Menu: Modify > Freeze Transformation while the geometry is still selected and this zeros out the rotation data.
- Select Menu: Edit > Delete by type > History to clear unnecessary nodes.
- Parent the worm geometry by selecting it in the Outliner and middle-click dragging it over the name of the controller. In some instances, we attach a controller to something other than the worm geometry, and we will describe this in each workflow below.
As with the worm, we won’t include basic controller steps in the workflows unless they become special cases.
Rig 1: Basic Deformation Rigs: Transforms and Blend Shapes
This first kind of rig is defined by deformation based on two extreme transformed states of an object — the first, an original, undeformed state, and the second, a fully deformed state.
Rig 1.1: Transform
This is the most basic of all rig types: just a worm and a CTR!
Rig 1.1.1: Simple transform deformation
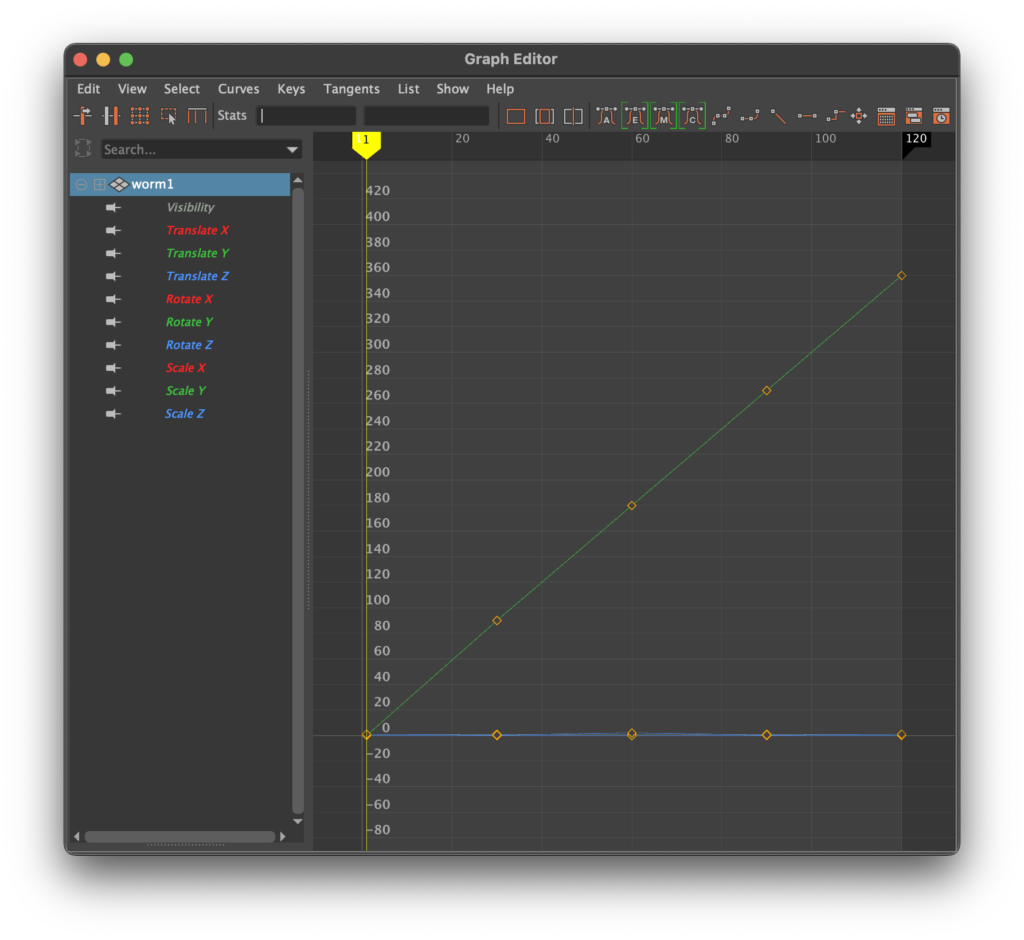
You are already familiar with transforms manipulating movement, rotation, and scaling. These are the basis of any rig-induced deformations, which you can visualize in the Graph Editor.
This simplest of rigs can induce the following:
- Inflation or deflation: balloon, or a sense of breathing
- Oscillation: bouncing back and forth like a ball, or a clock pendulum
- Rotation: like a wheel, or a propellor on a plane or helicopter
Find the scene named 1.1.1_worm_transform in the sample project folder to reference the following:
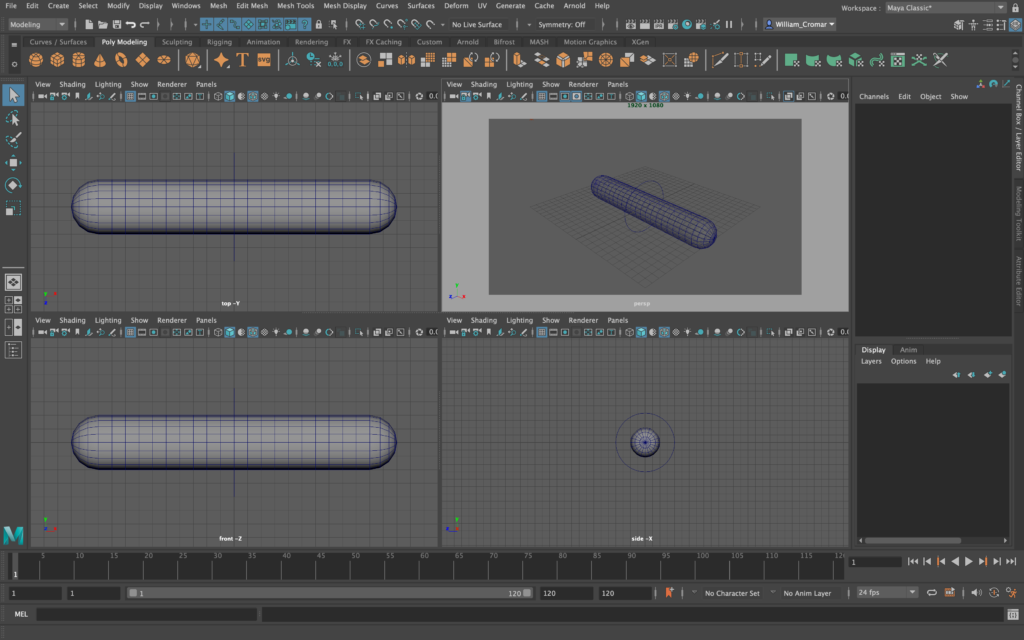
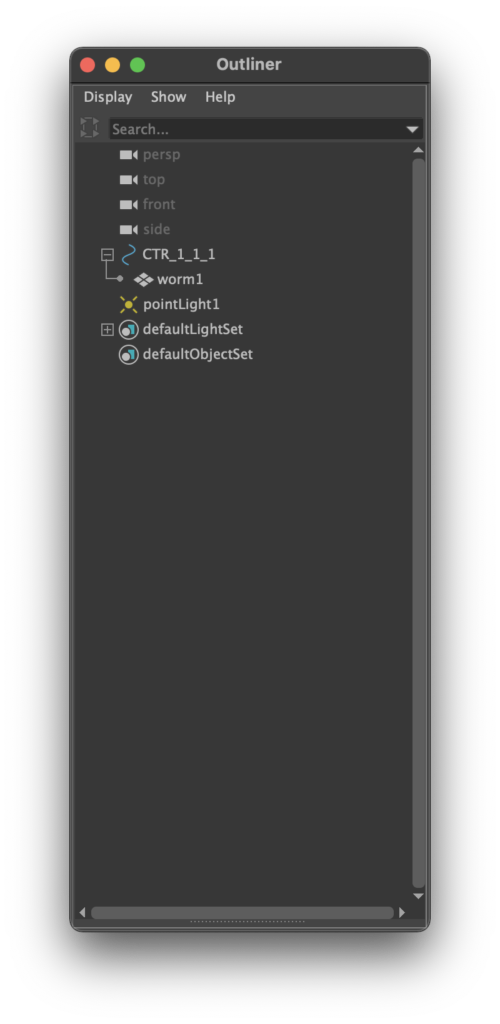
On images: Right-click>Open Image in New Tab to view larger
Basic workflow for 1.1.1_worm_transform
A simple 4 steps:
- Create the basic worm and controller as described in the Global setup for each scene above, then attach the controller logically to the worm geometry.
- Selecting the controller, apply the desired transform functions and keyframes. In our sample, we rotated in 90-degree increments at frames 30, 60, 90, and 120. We applied a different non-uniform scale at each keyframe. As it returned full circle, we made sure it returned to the original scale so it would loop properly.
- In the Graph Editor, we knock out the bezier smoothing at the start and stop of the rotation cycle, making a straight linear graph. This allows the rotation to loop without a slow-in slow-out transition at the start and end of the cycle.
- Hit Play Forward at the Timeline controls to see the result. Adjust as necessary.
Rig 1.2: Blend Shapes
Another deformation, but this time using the Blend Shape deformer and some tricks in the Shape Editor. We have two examples of this simple but non-intuitive technique. Find the objects named 1.2.1_worm_blend_simple and 1.2.1_worm_blend_complex in the project folder.
Blend shape manipulations require the presence of a hidden geometry representing the end state of a distortion, and a visible geometry representing the original undistorted condition. One key to a successful blend shape manipulation is to make sure the geometry for both states contains the same number of vertices. To ensure this, blend shapes are most often done with duplicates of the same geometry, distorting one and leaving the other intact.
Distortions can happen as a function of basic transforms—translating vertices or rotating faces, for example—but they can also happen by applying a non-linear deformation tool like Lattice or Nonlinear Sine. Find these useful rigging tools under the Modeling Menu: Deform > Nonlinear >… In our examples, we used the Nonlinear Bend tool.
Blend shapes can solve a wide range of rigging problems:
- Subtle manipulations like facial movements: eyes blinking or smiling.
- More dramatic action like wings flapping or a hand grasping, is simpler to achieve than with a skeletal rig if the movement needed is repetitive or predictable.
- Radical morphing, like changing from Dr. Jekyll to Mr. Hyde (as long as the vertex count remains the same!)
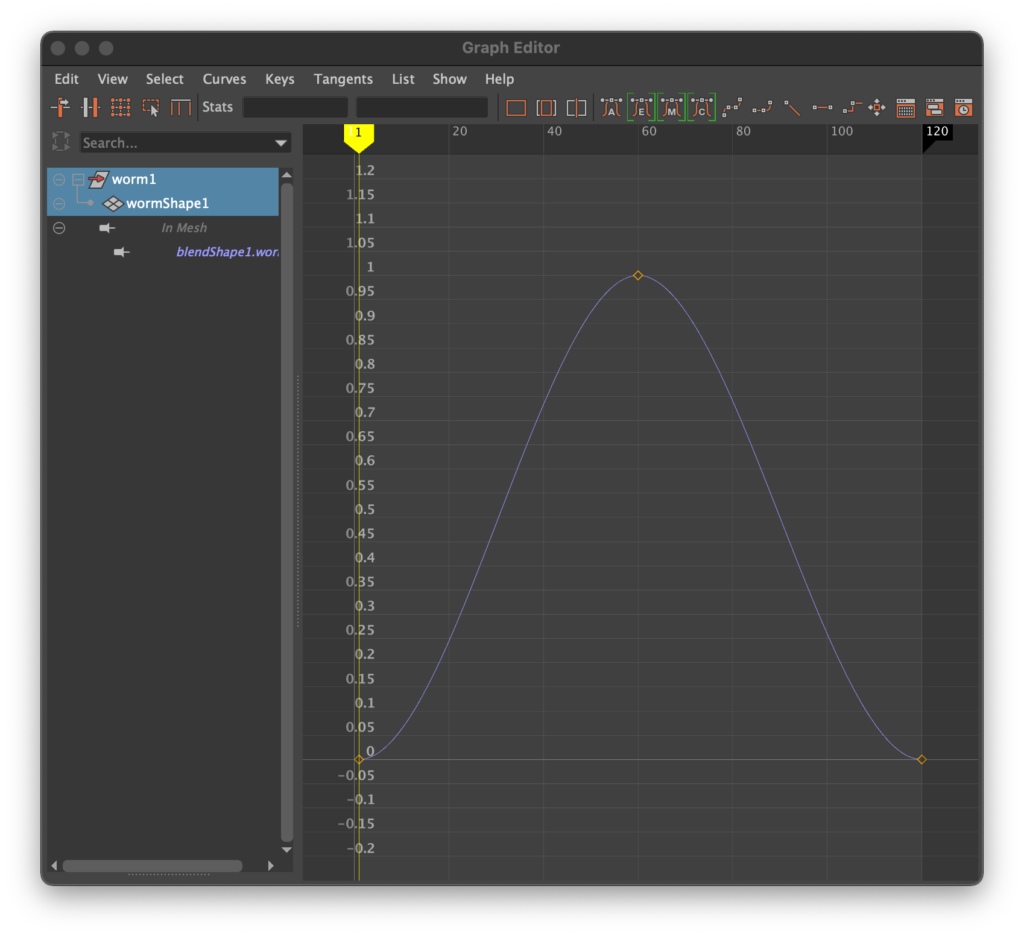
Blend Shapes are keyframed unusually, using the Shape Editor described in Important Editor Windows below. This method is somewhat annoying in that it’s hard to see the keyframes created, but you can visualize them in the Graph Editor. With all these open floating windows, Maya can sure start to crowd your screen real estate!
Rig 1.2.1: Simple Blend
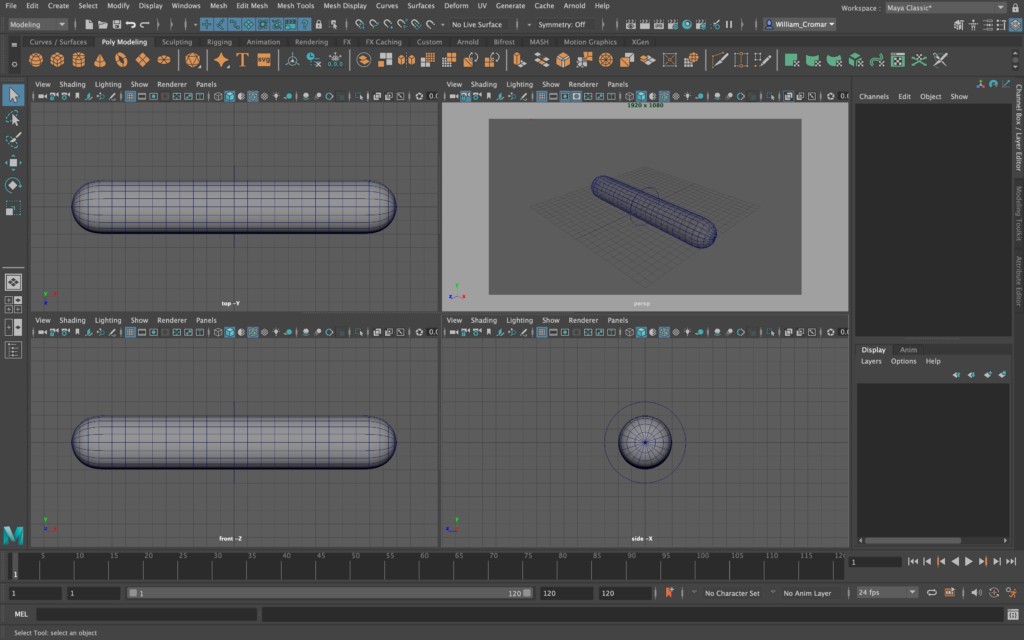
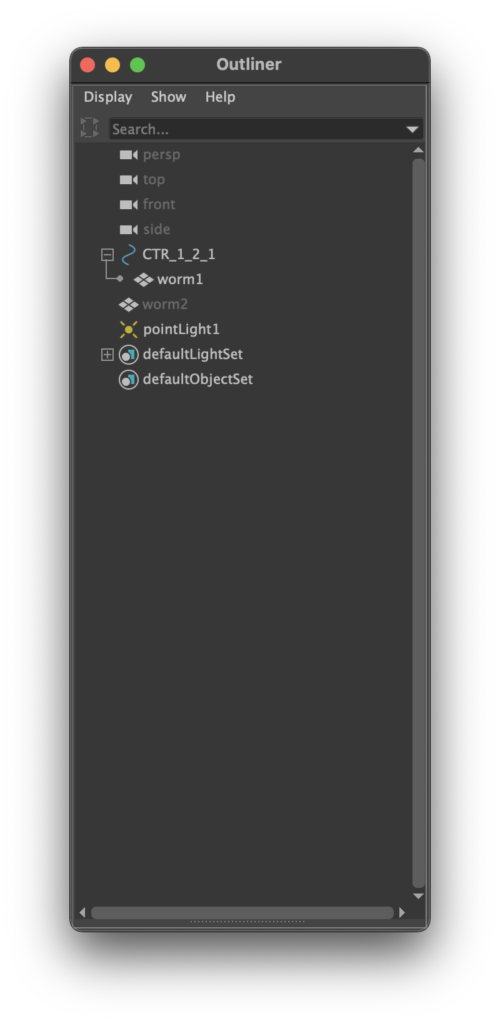
For the scene named 1.2.1_worm_blend_simple in the project folder, note the following:
On images: Right-click>Open Image in New Tab to view larger
Basic workflow for 1.2.1_worm_blend_simple
Create objects
- Create the basic worm and controller as described in the Global setup for each scene above, but don’t attach the controller quite yet.
- Select worm1, apply Menu: Edit > Duplicate Special with Duplicate input graph checked on in the dialog box, name the new geometry worm2, and apply Menu: Modify > Freeze Transformations.
- With worm2 selected, find Modeling: Menu: Deform > Nonlinear >… and apply a Deform tool to worm2. In the sample, we used a Nonlinear Bend.
- The tool will often apply itself in an orientation you don’t want: rotate or otherwise transform it to correct this. In the sample, we applied Rotate X 90, Rotate Z -90.
- With the Bend tool still selected, go to Channel Box: Inputs and select the bend node to open its parameters, and play with Curvature. In the original, we applied a curvature of about 90.
- After bending, select worm2 and apply Menu: Edit > Delete by Type > History. The deformer disappears, but the distorted geometry remains as is.
Apply the Blend Shape and attach the controller
- Select the two worms, with the base object selected last, open the Menu: Window > Animation Editors > Shape Editor, and in the dialog select Create Blend Shape. Play with the sliders to see the results. If the deform is not in the right orientation, try rotating objects one at a time until the desired orientation is achieved.
- Select worm2 and apply Menu: Display > Hide > Hide Selection.
- Now create the hierarchy: apply CTR to worm1. You do not need to carry worm2 along for the ride!
Make keyframes for the Blend Shape
- Select worm1 and open Menu: Window > Animation Editors > Shape Editor.
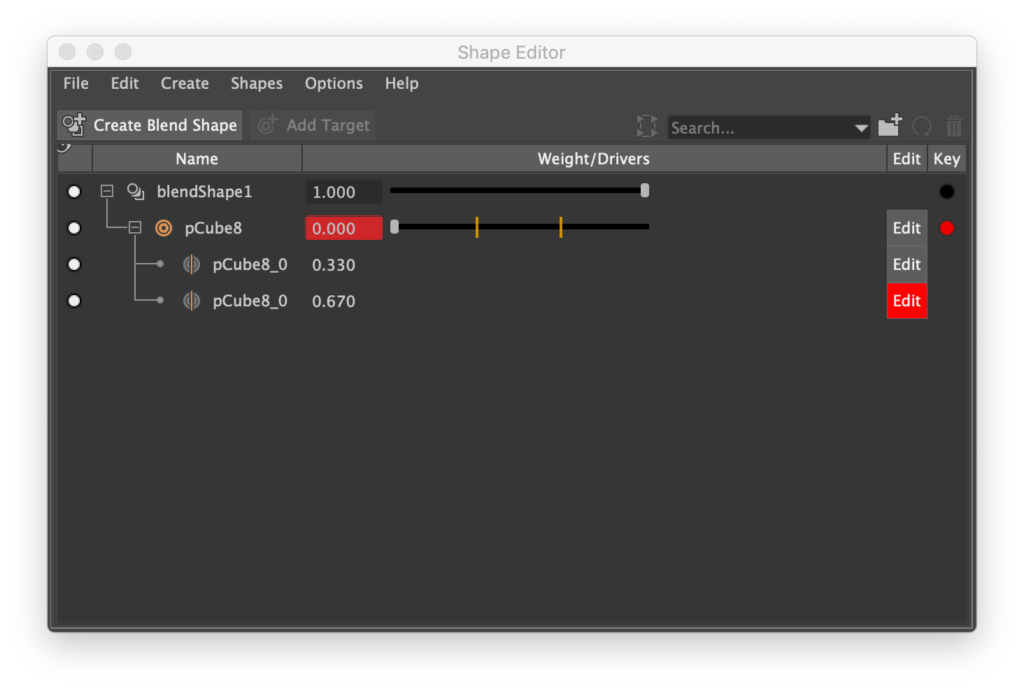
- Select worm1 (not CTR, that’s just for moving the rig), and set a key at Frame 1 with no blend applied: 0.000 weight on the slider. Confusion alert: you will not see a keyframe created on the timeline.
- Move the Timeline to an appropriate frame — in our sample, Frame 60 — and in the Shape Editor drag the slider next to the name, here worm2. Watch as it applies the deformation. When you are satisfied—in our case, the slider is set the way to 1.000 — hit the Key button to the right of the slider in the dialog box. Again, you will not see a keyframe created on the timeline.
- Continue creating keyframes until complete. In our example, we created a third keyframe in the Shape Editor at Frame 120 to loop a full deformation once. If you want a loop make sure your end-state keyframe and start keyframe are in the same state of deformation.
Check and see that you can use the CTR to move the entire rig. If you can’t, use the Attribute Editor to find the nodes for the geometry (usually the first node tab you find) and test checking Inherits Transforms on and off under Transform Attributes until you find a setting that solves it. Find out more about this at Important Editor Windows below.
Rig 1.2.2: Complex Blend
Where a Blend Shape deformation has a linear or subtle effect, the simple blend above is adequate. However, rotational or extreme distortions can ruin the sense of volumetric continuity for the geometry: the form inflates or deflates in an undesirable way. The workflow below shows you how to create an approximation of extreme rotational blending by incorporating in-between targets. In the Outliner for scene 1.2.2_worm_blend_complex, you’ll see several hidden groups, each describing a step in the process. If you create an emulation of this rig, you don’t need to keep all this geometry like this — it’s here simply to help you understand the end state of each step. So in addition to the invisible group named step4_addSelectionAsInBetweenTarget, find these hidden steps in reverse order as such:
- step3_freeze_transformations
- step2_delete_history
- step1_orig_bend_deform
Make step1_orig_bend_deform visible and you can see we created several versions of the bend deform, running through an extreme 180-degree bend at 45-degree increments:
1: No deform applied
2: bend1 input: Curvature: 45
3: bend2 input: Curvature: 90
4: bend3 input: Curvature: 135
5: bend4 input: Curvature 180
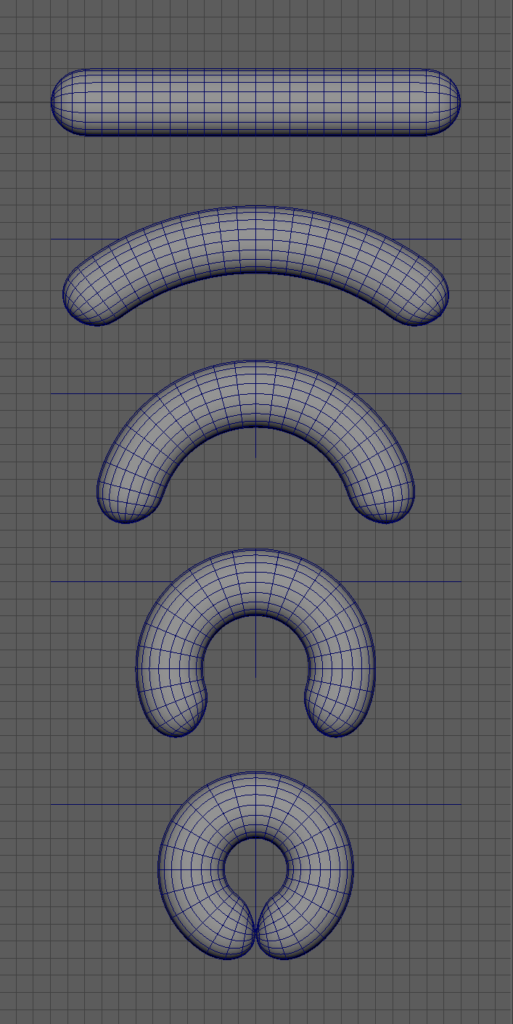
Turn on step2_delete_history and you can see the bends baked into the worms by applying Menu: Edit > Delete by Type > History. Turn on step3_freeze_transformations and you can see we’ve zeroed out the Channel Box translate data and applied Menu: Modify > Freeze Transformations. The final hidden group, step4_addSelectionAsInBetweenTarget, not illustrated here, simply contains the final blended shapes.
step2_delete_history. The only change here is no deformers left, and the deformations are baked in.
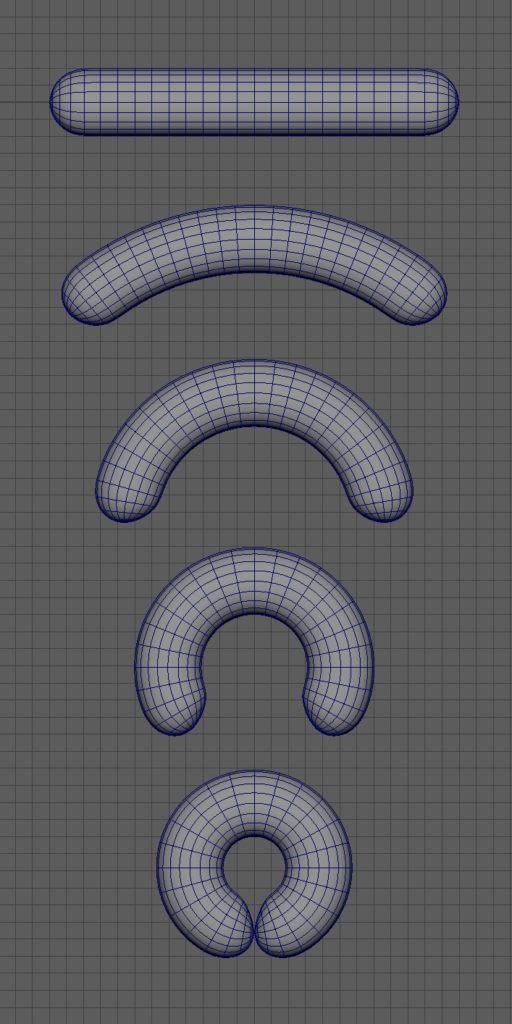
step3_freeze_transformations. The worm translate data is manually zeroed outFreeze Transformations is applied.
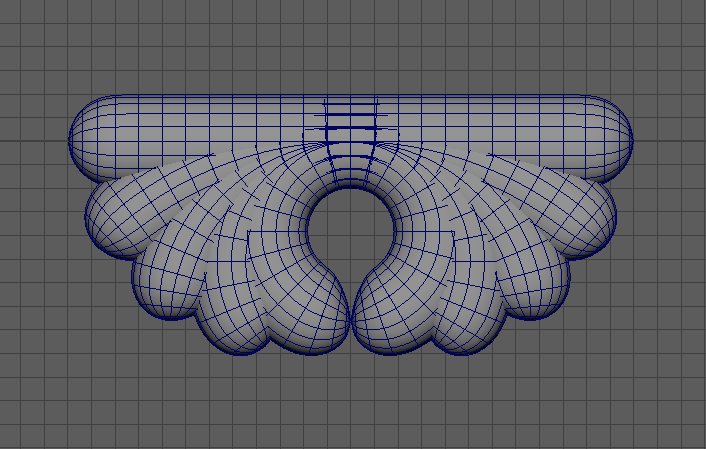
For the scene named 1.2.2_worm_blend_complex in the project folder, note the following:
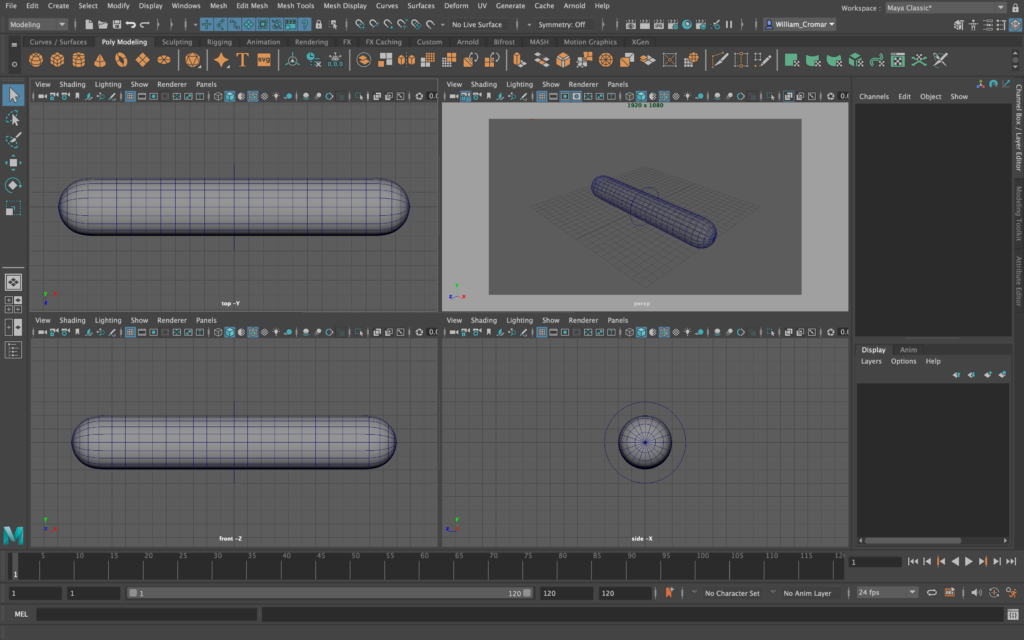
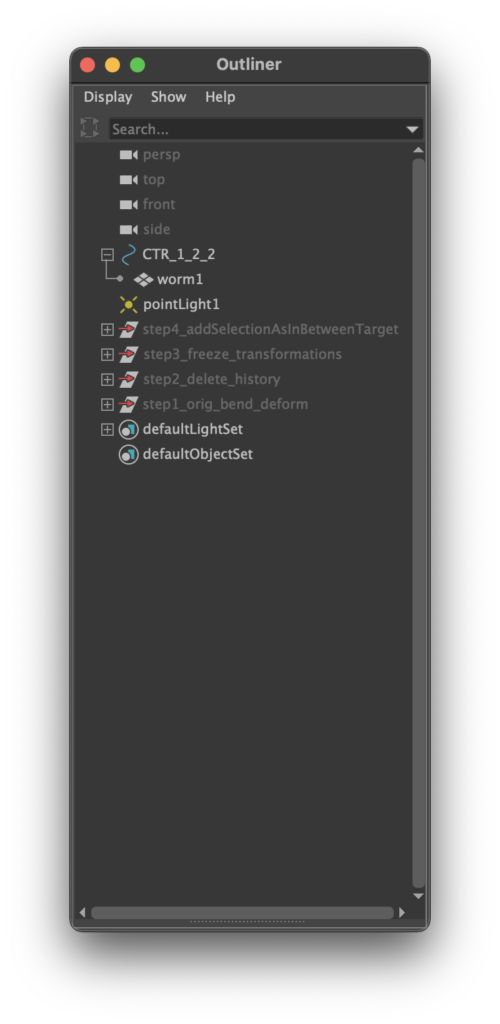
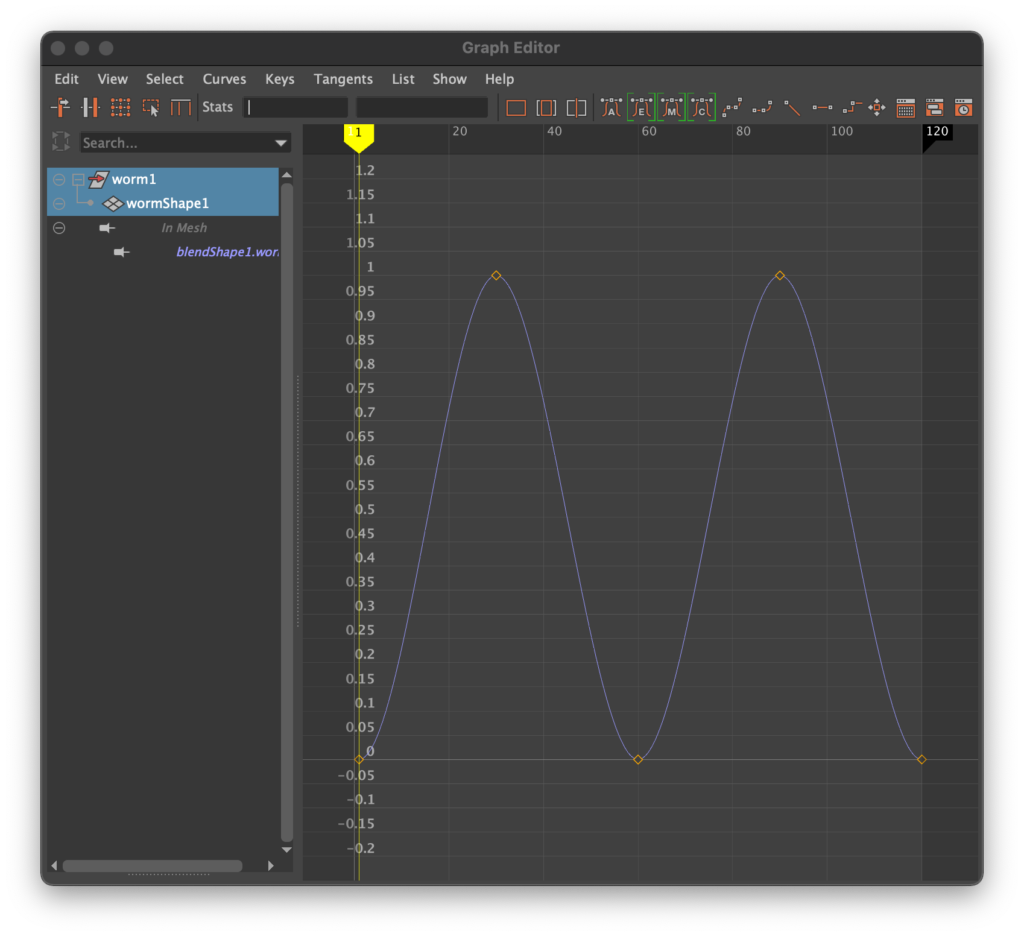
On images: Right-click>Open Image in New Tab to view larger
Basic workflow for 1.2.2_worm_blend_complex
Create all the objects to blend
- Create the basic worm and controller as described in the Global setup for each scene above, but don’t attach the controller quite yet.
- Select worm1, apply Menu: Edit > Duplicate Special with Duplicate input graph checked on in the dialog box. Do this 4 times and name the resulting new geometries worm2, worm3, worm4, and worm5, then apply Menu: Modify > Freeze Transformations.
- With each worm selected in turn, find Modeling: Menu: Deform > Nonlinear >… and apply a Deform tool to each. In the sample, we used a Nonlinear Bend.
- The tool will often apply itself in an orientation you don’t want: rotate or otherwise transform it to correct this. In the sample, we applied Rotate X 90, Rotate Z -90.
- With the Bend tool selected in each instance, go to Channel Box Inputs and select the bend node to open its parameters, and play with Curvature. As described above, we applied Curvatures at 45, 90, 135, and 180 degrees.
- After bending, select each worm and apply Menu: Edit > Delete by Type > History. The deformer disappears, but the distorted geometry remains as is.
- Manually zero out all the Channel Box Translate data to move the center of each worm instance to the world origin, and apply Menu: Modify > Freeze Transformations.
Apply the Blend Shape and attach the controller
- Select the first and last state of the worm instances, with the base object selected last, open the Menu: Window > Animation Editors > Shape Editor, and in the dialog select Create Blend Shape. Play with the sliders to see the results. If the deform is not in the right orientation, try rotating the objects, one at a time, until the desired orientation is achieved.
- Now for the secret sauce: To maintain the volume of the deformed object in rotation, open the Shape Editor, select worm2 in the viewport, then select the name of the blend shape node in Shape Editor and right-click over it to apply Add Selection as In-Between Target from the contextual dropout menu. Note this creates a hierarchy under the blend shape node, and while Edit is still highlighted in red, dial in a number adjacent to the new sub-node. In our sample, for worm2, we dialed in 0.250 because this is one-quarter of the way through the motion. Notice the red line that appears at that location on the main node’s slider. Repeat this for worm3 at 0.500 and worm4 at 0.750.
- Select all the worm iterations except the first one and apply Menu: Display > Hide > Hide Selection.
- Now create the hierarchy: apply CTR to worm1. You do not need to include other worms!
Make keyframes for the Blend Shape
- Select worm1 and open Menu: Window > Animation Editors > Shape Editor.
- Select worm1 (not CTR, that’s just for moving the rig), and set a key at Frame 1 with no blend applied: 0.000 weight on the slider. Confusion alert: you will not see a keyframe created on the timeline.
- Move the Timeline to an appropriate frame — in our sample, Frame 30 — and in the Shape Editor drag the slider next to the name, here worm5. Watch as it applies the deformation. When you are satisfied—in our case, the slider is set the way to 1.000 — hit the Key button to the right of the slider in the dialog box. Again, you will not see a keyframe created on the timeline.
- Continue creating keyframes until complete. In our example, we created a keyframe in the Shape Editor at Frame 60 to return the worm to straight, Frame 90 to curl, and Frame 120 to straighten, and this loops the full deformation twice. If you want a loop make sure your end-state keyframe and start keyframe are in the same state of deformation.
Though this is a simple rig, it’s weedy. If you need a visualization for these instructions, and you have access to an account, visit George Mastri’s Model and Rig a Flower Bloom at LinkedIn Learning.
Rig 2: Motion Rigs: Deformers and Paths
Deformers (Lattice, Bend, Sine, Wave, etc.) can sometimes function like motion paths, in that objects can travel along them and be influenced by them, although they are not constrained to the deformer to do so. Motion Paths do less to distort the shape of an object; instead, they influence location over time in a constrained way.
Rig 2.1: Deformers
In the scenes named 2.1.1_worm_sine_deformer and 2.1.2_worm_sine_deformer_transform in the project folder, we apply a controller to the deformer itself to transform it against the geometry. Instead of a complex skeletal rig, deformer-based rigs can make an amazingly simple task of rather sophisticated-looking actions, just a scant few of which can include:
- Muscle flexing, melting, crushing (Lattice deformer)
- Elliptical orbits, complex machinery rotations (Wrap deformer)
- Hand waving, bending steel bar (Bend deformer)
- Time-lapse-style plant growth, explosion (Flare deformer)
- Water ripples (Wave deformer)
- Ball bouncing (Squash deformer)
- Arm turning (Twist deformer)
- Flag waving (Sine deformer)
- Trampoline action, pillow deforming for a head (Sculpt deformer)
The inputs for each deformer will vary, but they generally include an area of influence (envelope, low bound, high bound), intensity (amplitude, dropoff), repetition (wavelength), and so forth. The best way to find out what each deformer can do is to apply them to a volume and play with them for a while.
Rig 2.1.1: Controlled deformer and static geometry
Find and open the scene named 2.1.1_worm_sine_deformer in the project folder to reference the following:
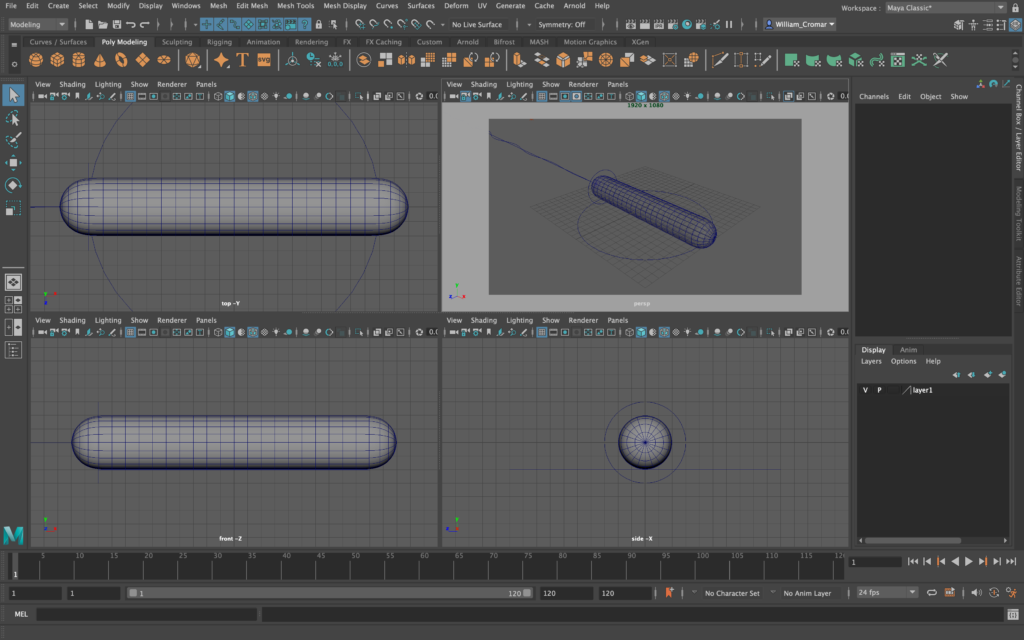
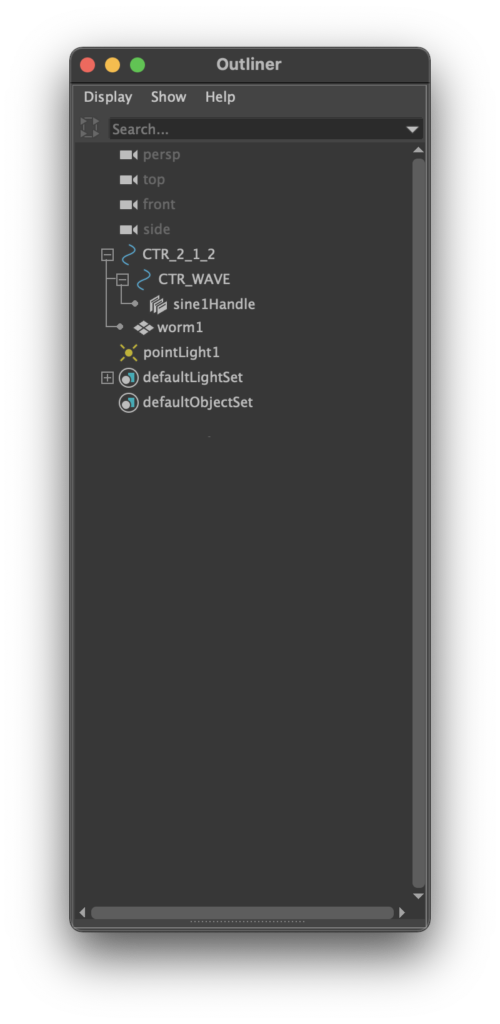
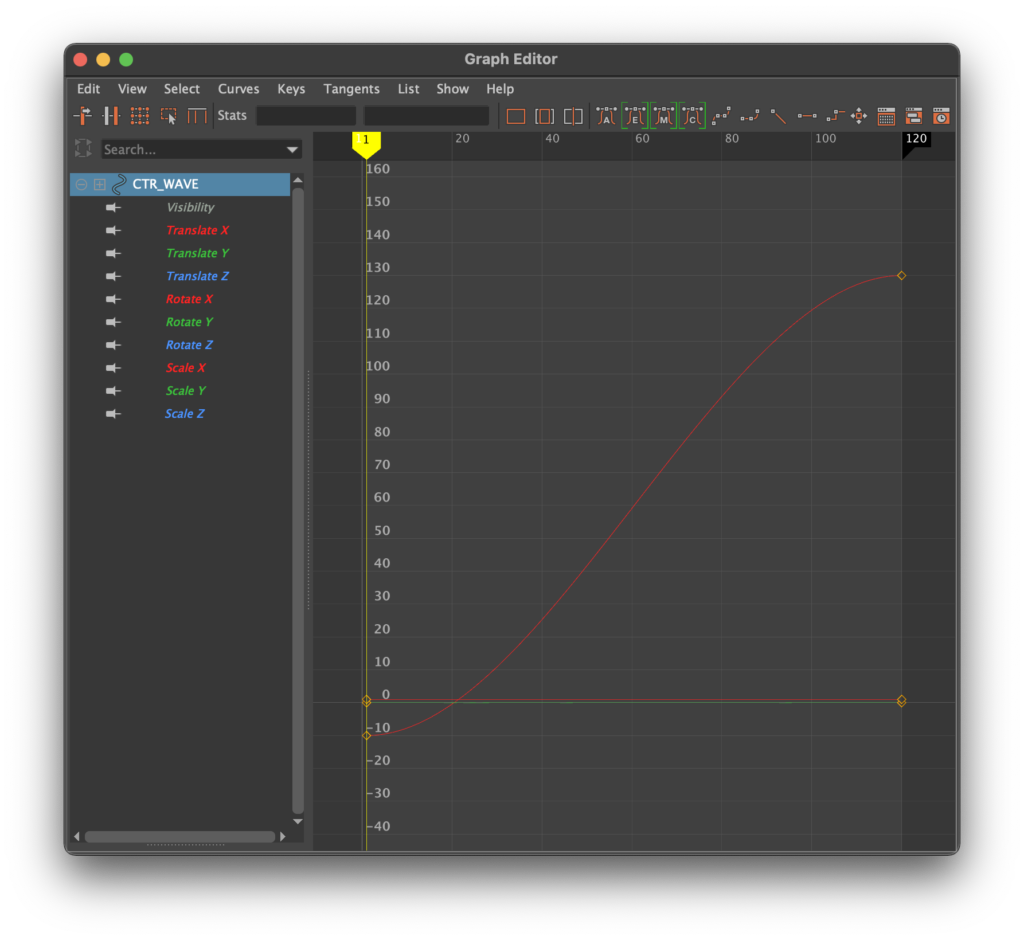
On images: Right-click>Open Image in New Tab to view larger
Basic workflow for 2.1.1_worm_sine_deformer
This workflow will be particular to the Nonlinear Sine Deformer, but attaching and manipulating any deformer is similar in process if not in specific results.
Create object and deformer
- Create the basic worm and controller as described in the Global setup for each scene above, but don’t attach the controller quite yet.
- With worm1 selected, find Modeling: Menu: Deform > Nonlinear >… and apply a Deform. In the sample, we used a Nonlinear Sine.
- The tool will often apply itself in an orientation you don’t want: rotate or otherwise transform it to correct this. In the sample, we applied Rotate X 90, Rotate Z -90.
- Manipulate the Channel Box Input values for the deformer. For the original, we manipulated the sine values as follows: Envelope=1, Amplitude=0.1, Wavelength=1.5, Offset=1, Dropoff=1, Low Bound=-5, High Bound=5. This creates a taper in the sine wave for a slow-in-slow-out effect. The large bound differential creates what is, in effect, a path.
Create the hierarchy
- Apply your standard CTR controller to the deformer, not the geometry. It’s the deformer that will move!
- In this hierarchy, we’re adding a compound controller that many riggers call a root controller. This root allows the entire rig to be moved as one unit, without disturbing the keyframing specific to the deformer’s controller. Where we have a root CTR, we’ll add a descriptor suffix to the deformer’s CTR to something like CTR_WAVE to logically distinguish its function. Don’t forget Freeze Transformations when you apply the root CTR. To be clear, we aren’t moving the root controller, but we need it when we reference this rig into a master scene.
Make keyframes
- Select CTR_WAVE and at Frame 1, position the deformer so it is not influencing the geometry. In our sample, we Translate X -10.
- Go to the final frame, in our sample Frame 120, and use CTR_WAVE to move the deformer through the geometry. Here, that value is Translate X 130.
- We don’t need to return the deformer to the original point to make a loop this time, because the deformer is not influencing the geometry at the first and final frames.
Check and see that you can use the NURBS-based controllers to move the rig without flyaways. If you can’t, use Attribute Editor to check and uncheck Inherits Transforms under Transform Attributes, and test until you solve the problem. Find out more about this at Important Editor Windows below.
Rig 2.1.2: Controlled deformer and non-path-based motion
Deformers influence the geometry attached to them, even if they are not touching the deformer. That means very interesting effects can be created by moving the geometry simultaneously. In our previous sample, the geometry is static and the deformer moves, so this is a bit like wind moving to wave a flag. What if we wanted more activity, like a fish darting against a stream of water? We can move the geometry side to side to create a fishlike motion. Find and open the scene named 2.1.2_worm_sine_deformer_transform in the project folder to reference the following:
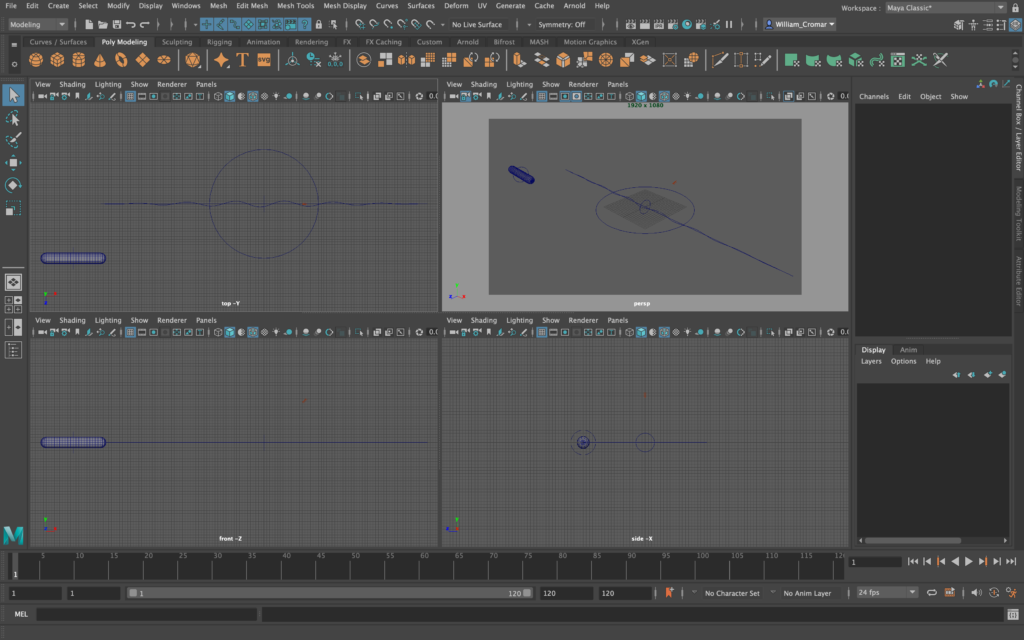
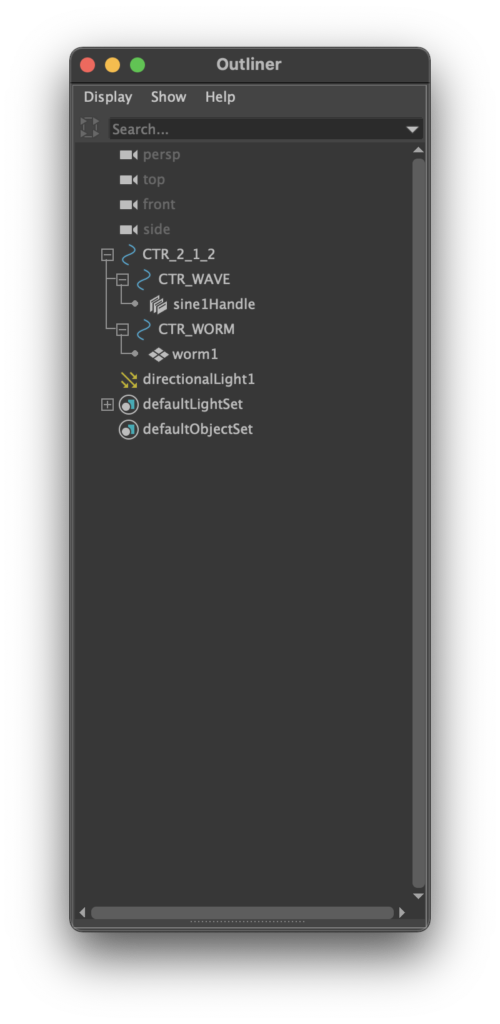
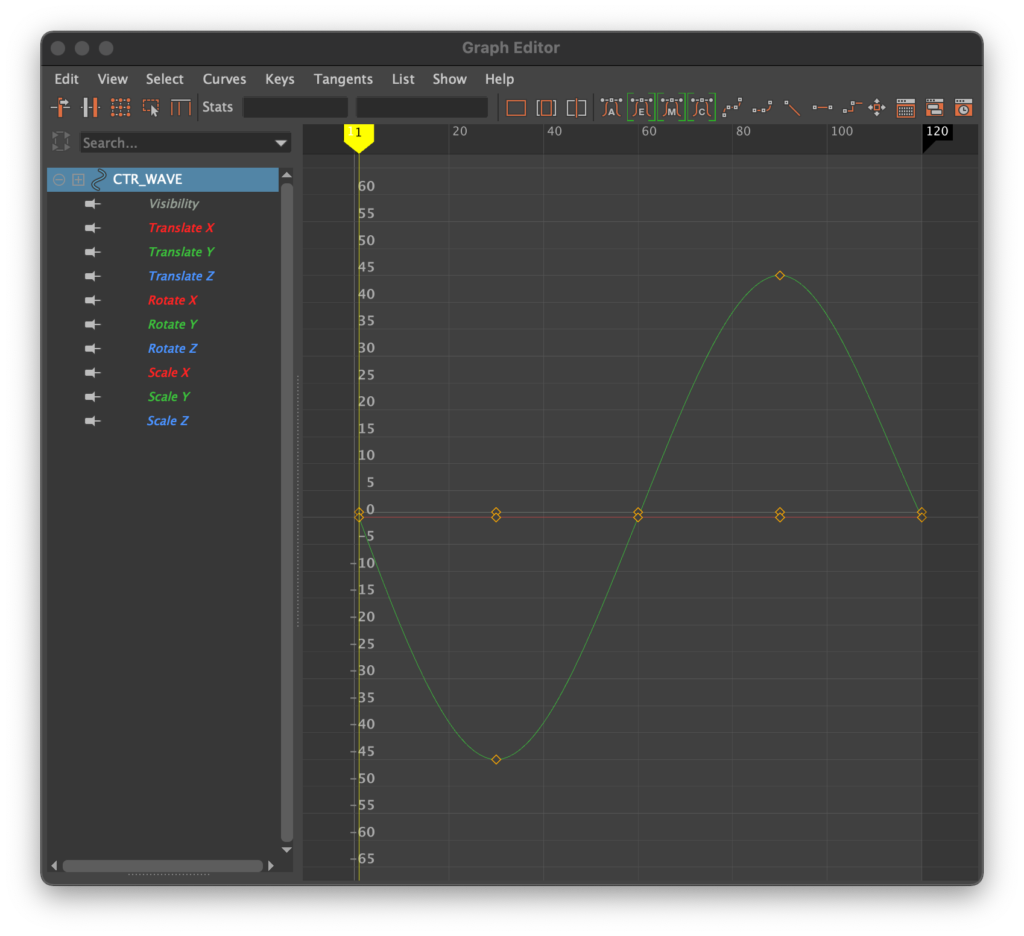
On images: Right-click>Open Image in New Tab to view larger
Basic workflow for 2.1.2_worm_sine_deformer_transform
The workflow for this is nearly identical to 2.1.1_worm_sine_deformer, so refer to that workflow above. The one difference: we apply a controller to the worm itself, which we named CTR_WORM, so that we can keyframe the worm. In our sample, we just applied Translate to the worm at Frames 30, 60, 90, and 120. This allows the first and last frames to be in the same coordinate to loop.
Rig 2.2: Motion Paths
Motion path rigs tend to occupy a lot of space, as we’ll see with 2.2.1_worm_squash_deforme and 2.2.2_worm_path_and_deformer found in the sample project folder. Get ready to add some cameras!
Rig 2.2.1: Controlled geometry and static deformer
In this sample, we switch the hierarchy and apply CTR to the worm, with the deformer staying in one place (though both are paired up under a root controller). The difference is subtle, but where a static-body/active-deformer works for something like a flag blowing in the wind, this one works for something like a slithering snake—or maybe a worm that makes the jump to light-speed! Find and open the scene named 2.2.1_worm_squash_deformer in the project folder to reference the following:
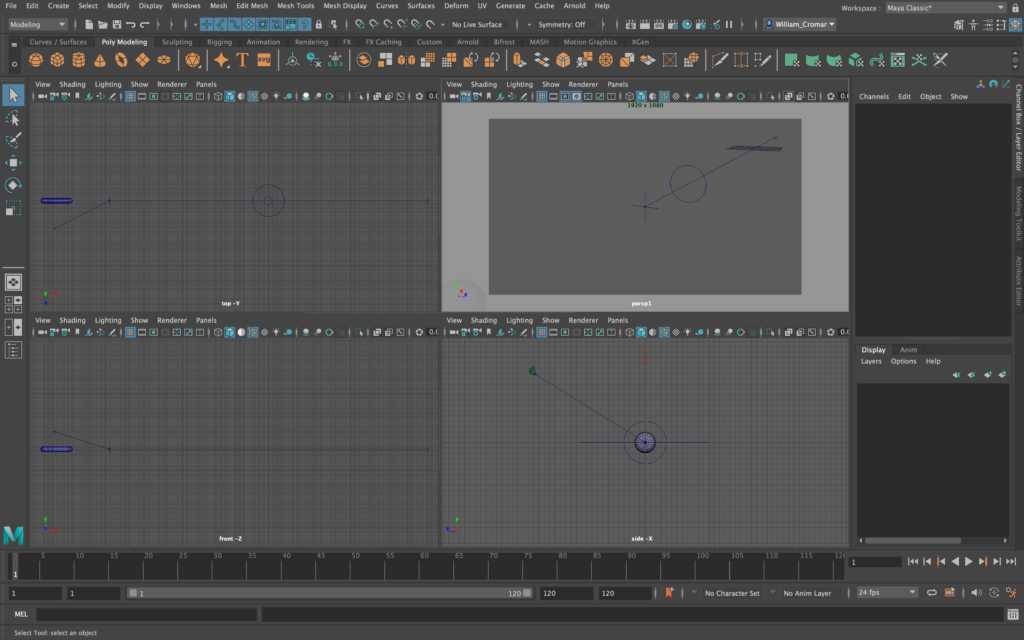
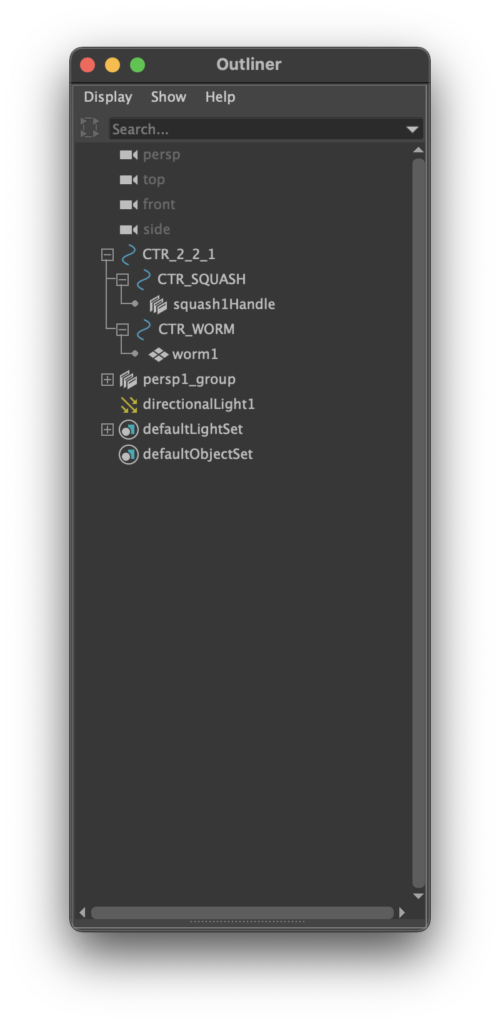
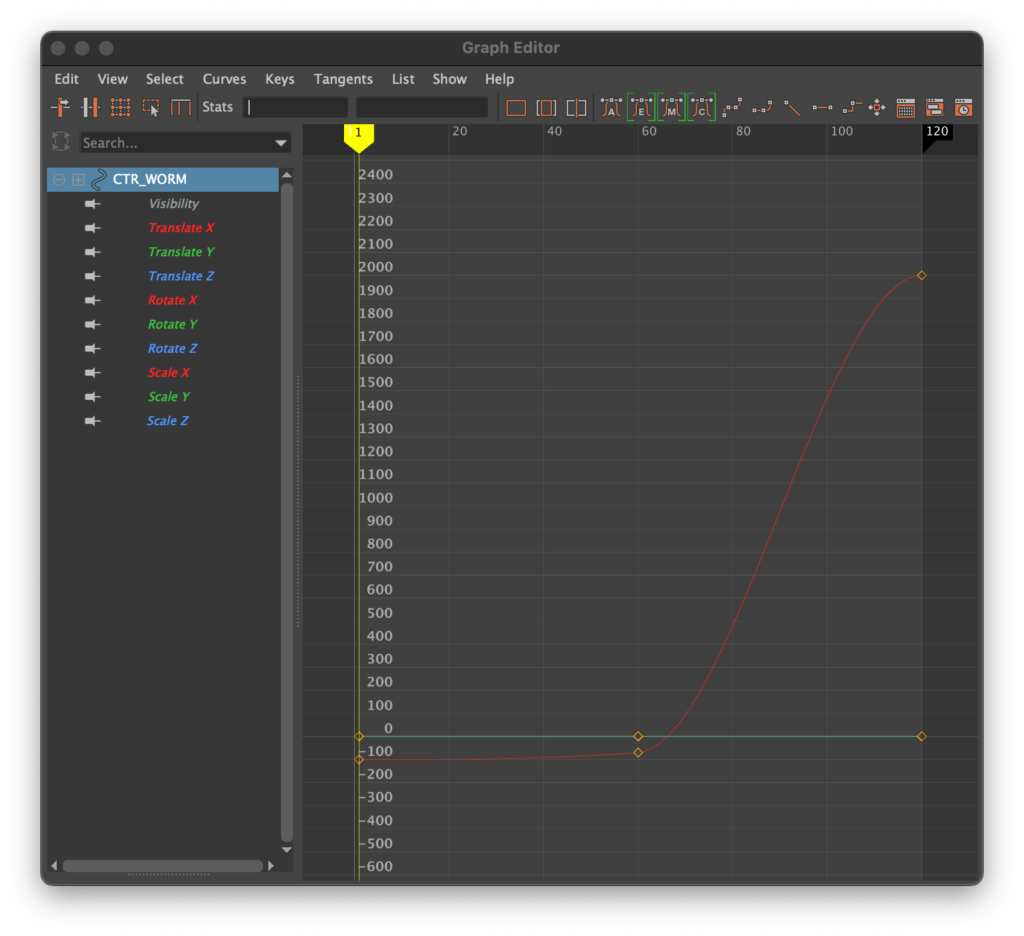
On images: Right-click>Open Image in New Tab to view larger
Let’s try a squash deformer this time. It’s great for making an exaggerated slingshot effect that enhances a sense of acceleration.
Basic workflow for 2.2.1_worm_squash_deformer
Create object, controller, deformer, and hierarchy
- Create the basic worm and controller as described in the Global setup for each scene above, and attach CTR to worm1.
- With worm1 selected, find Modeling: Menu: Deform > Nonlinear >… and apply a Deform. In the sample, we used a Nonlinear Squash.
- The tool will often apply itself in an orientation you don’t want: rotate or otherwise transform it to correct this. In the sample, we applied Rotate Z 90.
- Manipulate the Channel Box Input values for the deformer. For the sample, we manipulated the values as follows: Envelope=1, Factor=1, Expand=30, Max Expand Pos=0.5, Start Smoothness=-1, End Smoothness=1, Low Bound=-10, High Bound=10. This creates the stretchy slingshot effect. The large bound differential creates what is, in effect, a path. Move the object on, over, through, or around the area of influence to test the deformation. Make any adjustments necessary, and return the object to its original position.
- Create a controller for the Squash deformer. Now create a root controller for the entire rig (although we won’t move the deformer or the rig, it’s essential to reference it into a master scene later). Rename CTRs to be logical. In our sample, the CTR for the deformer is CTR_SQUASH, and for the worm is CTR_WORM.
Make keyframes
- Select CTR_WORM and keyframe it to slowly approach the deformer. In our sample, we moved a very short distance from Frame 1 to Frame 60, half the duration of the timeline.
- To get a great squash-and-stretch slingshot effect, go to the next position at the end frame, here Frame 120, and translate it quite far to set a key. We sent it off to X 2000 for a rapid sense of acceleration.
- In the Graph Editor, note the effect of the acceleration. You can manipulate the tangents here to tweak if needed.
Do more: Lighting and Cameras
Instead of a simple point light in this scene for rendering, we have to use a directional light due to the long travel distance for the worm. We also found it necessary to create a Camera and Aim group. This helps set up a good point of view to capture the jump to light speed. All of these can be seen in the Outliner and viewports.
Rig 2.2.2: Controlled deformer and path-based motion
The motion of this worm looks exceptionally complex but is deceptively easy to build, though you can get tripped up by the hierarchy. This involves creating a helical NURBS motion path. A worm is attached to that, and it has a bend applied to look more natural on the curve. There is also a sine deformer that rotates to influence the worm geometry as it moves down along the spiral. So there’s a total of three deformers applied to this worm! It turns out that you can compound the effect of multiple deformers. This makes for quite elaborate distortions through rather simple means. The net effect of such compositing can give you:
- A fish swimming in a circle
- A train on tracks or a car on a road
- An object on a sliding board or moving through an assembly line
In our sample, we wanted to emulate the motion of a fish swimming from the top to the bottom of a bowl. Find and open the scene named 2.2.2_worm_path_and_deformer in the project folder to reference the following:
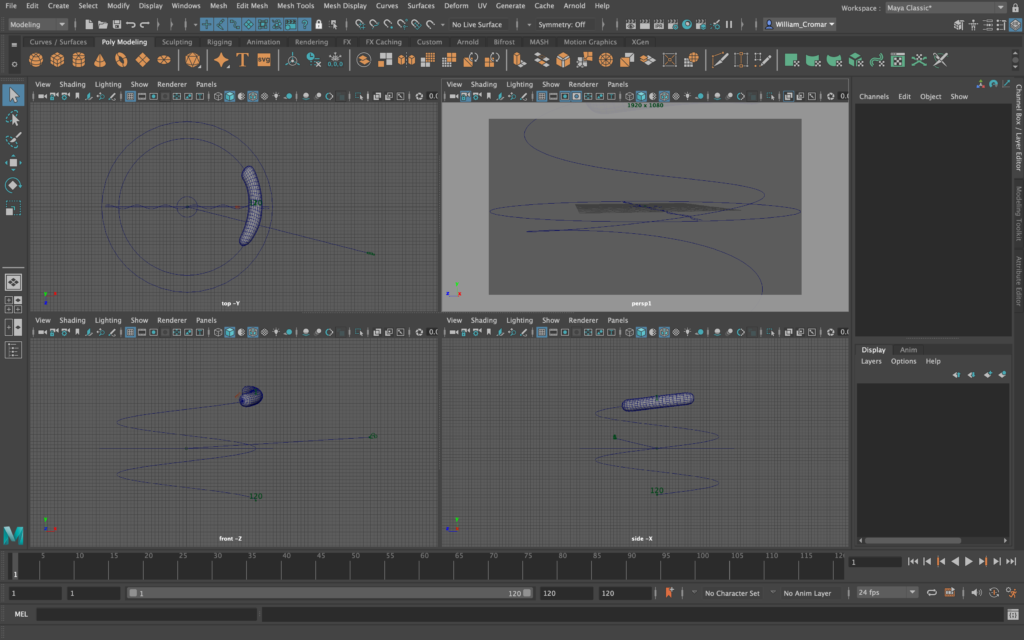
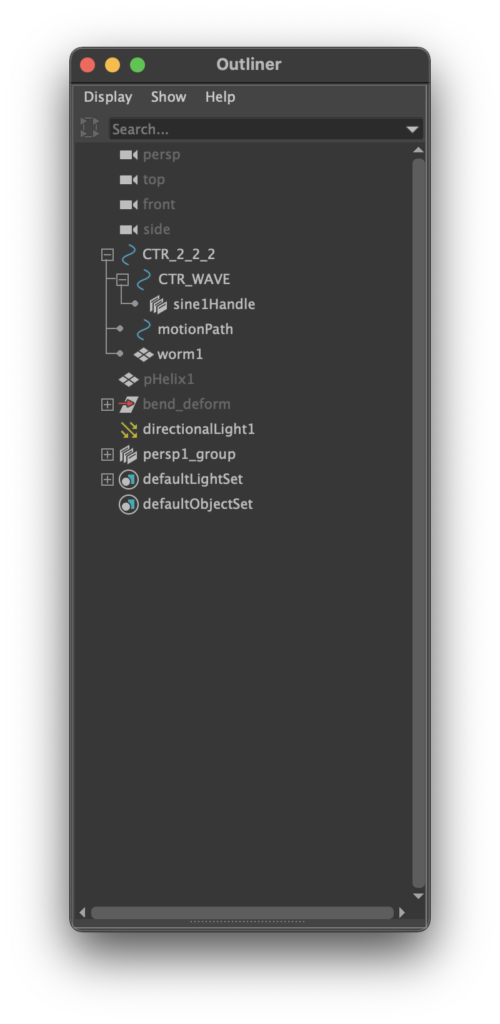
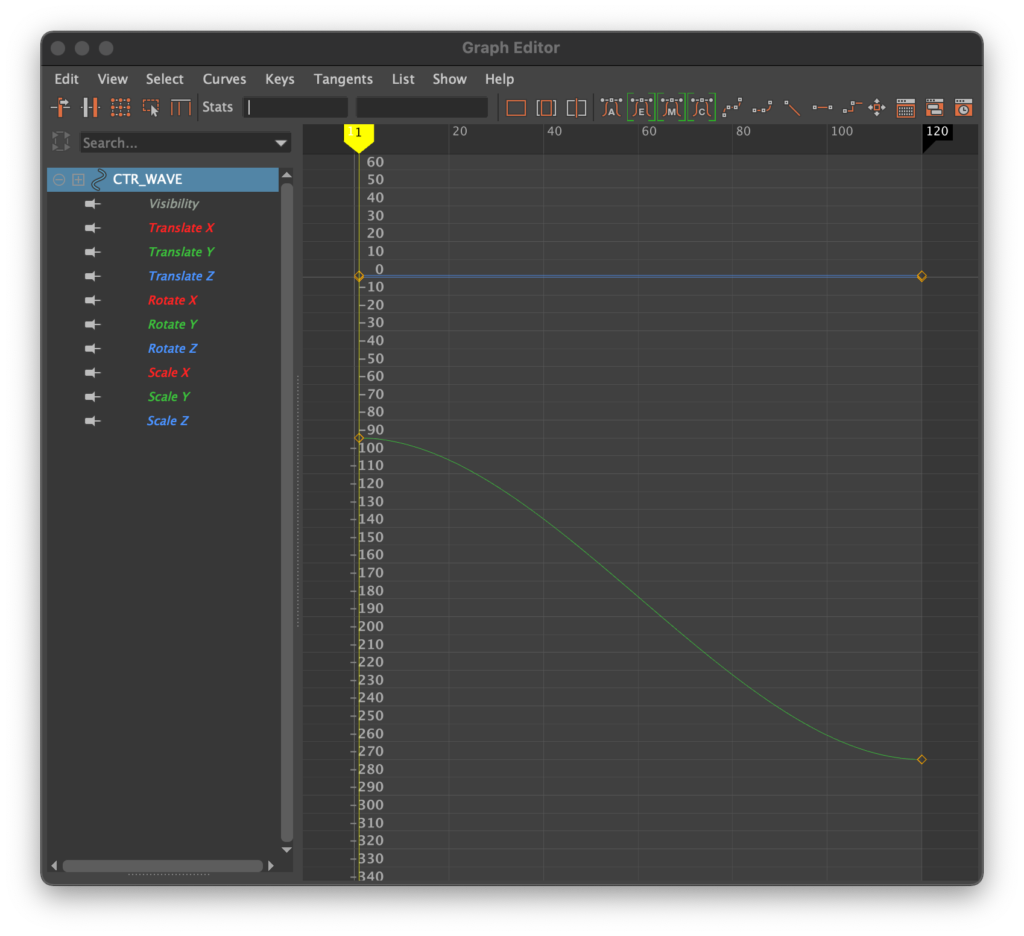
On images: Right-click>Open Image in New Tab to view larger
Basic workflow for 2.2.2_worm_path_and_deformer
Create the object
- Create the basic worm as described in the Global setup for each scene above, but don’t create the controller this time! The motion path will take its place as a controller.
- Create a NURBS curve to function as a motion path. In our example, we created a helix curve. But there’s no helix primitive on the Curve shelf! Here’s a cheat if you want to make one:
- Create a helix by using Menu: Create > Polygon Primitives > Helix. We used a small radius and a large width and height, with just a couple of coils.
- At the sub-object level, using Edge, select one of the long edges by double-clicking.
- Under Menu: Modify > Convert > Polygon Edges to Curve, and presto: an easy NURBS helix path. Select the poly helix and hide it.
- Select worm1, and find Modeling: Menu: Deform > Nonlinear >… to apply a Nonlinear Bend.
- Rotate the Bend to the proper orientation. We applied Rotate X 90, Rotate Z -90.
- With the Bend still selected, go to Channel Box Inputs and select the bend node to open its parameters, and play with Curvature. We found that Curvature: 35 looked like it would conform to the helix arc when we used a Top view to compare.
- To make sure the bend stays put you could easily delete history, but we wanted the option to keep adjusting the curvature. So instead, we made bend1Handle a child of worm1. As you’ll see, when we attach the worm to the helix curve, the deformer will follow along.
Attach to motion path
- Select the geometry, then the path, and go to Animation: Menu > Animate > Motion Paths > Attach to Motion Path and click the small square options icon to open the dialog box.
- In the dialog, note the Front axis and Up axis selections, and choose X, Y, or Z to orient your object on the path appropriately, then hit the Attach button. If it orients incorrectly, just undo it and reapply with a different orientation.
- Test the motion by dragging the timeline and adjusting if necessary. The motion path automatically keys to the timeline, so no keyframing is necessary.
Create sine deformer and controller
- In our example we attached a Sine deformer to worm1, rotating it to a logical orientation to achieve a wriggle. Our Sine has the following values: Envelope=1, Amplitude=0.1, Wavelength=1, Offset=0, Dropoff=0, Low Bound=-2, High Bound=2.
- Create a CTR_WAVE and apply it to the deformer. This will allow us to randomize the orientation of the deformer’s influence as the worm rides down the helix, making it feel more random and natural.
Keyframe the sine CTR_WAVE
- The Sine deform affects the geometry regardless of distance, and note also how its influence is linear—that is, when the worm is traveling perpendicular to it, there’s essentially no deformation.
- Select CTR_WAVE and rotate to randomize the orientation, and keyframing at logical intervals.
Finally, and for the same reason as we needed to for the light-speed worm, we needed to use a directional light and a Camera and Aim for rendering.
Do More: Acceleration and Deceleration
Observe the Graph Editor and select the geometry. You’ll see a slow-in slow-out graph. You can right-click and add keys. These can be selected, and with the Move tool active, their Bezier handles can be manipulated to achieve acceleration, deceleration, and even reverse motion. Play around with the handles and note what shape curves denote these various speed manipulations.
Rig 3: Skeletal Rigs: Joints and IKs
The metaphor of “skeleton” is too powerful to ignore when using joint and IK rigging, but these are just as useful for rigid mechanical motion as they are for organic motion.
Rig 3.1: Simpler Joint Rigs
Find the scenes named 3.1.1_worm_joint-ik and 3.1.2_worm_mechanical_joint in the project folder for basic joint rigs.
Rig 3.1.1: Simpler Organic Motion: Joint with IK
A uniform “skin” — one polygonal piece of geometry — in combination with a joint and IK handle becomes the basis for most finger, hand, arm, and leg motion in bipedal character rigs. This can do more though: think about how it can deform a spoon to jump out of a drawer, for example. Anthropomorphizing uniformly skinned inanimate objects by giving them a skeleton rig is a common trope of animation.
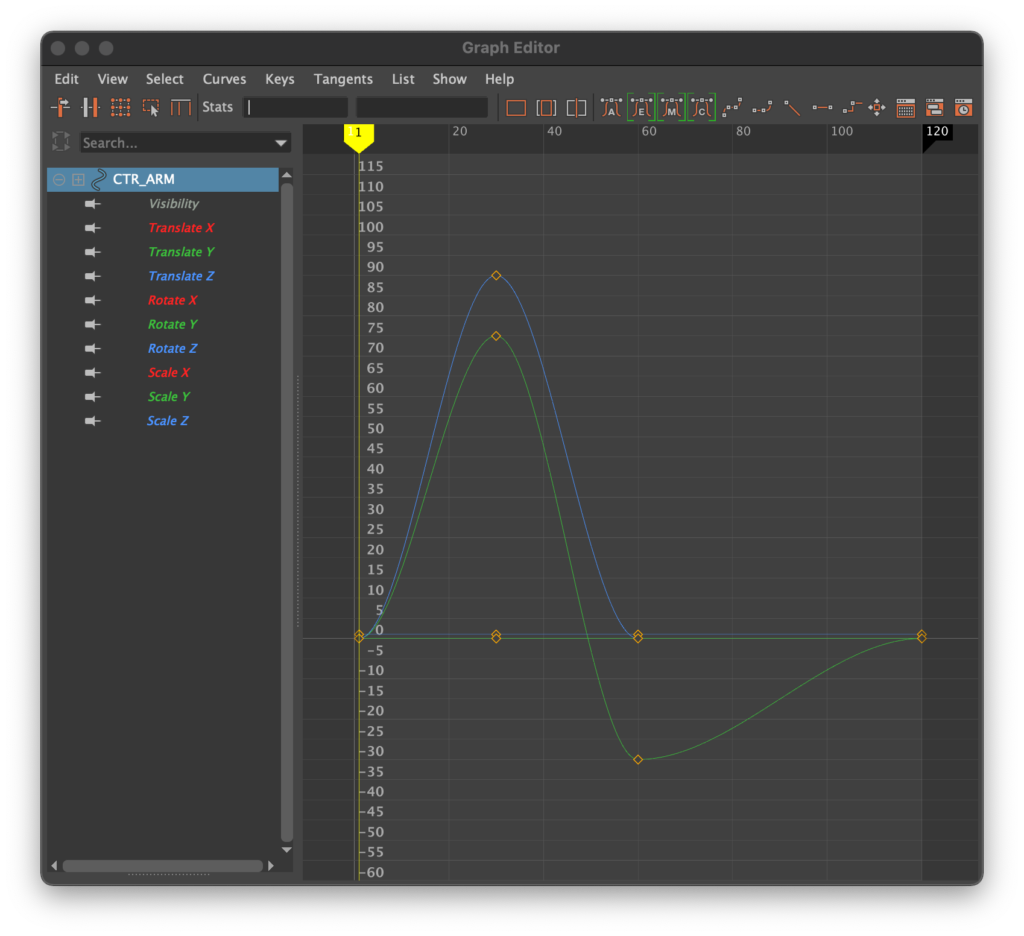
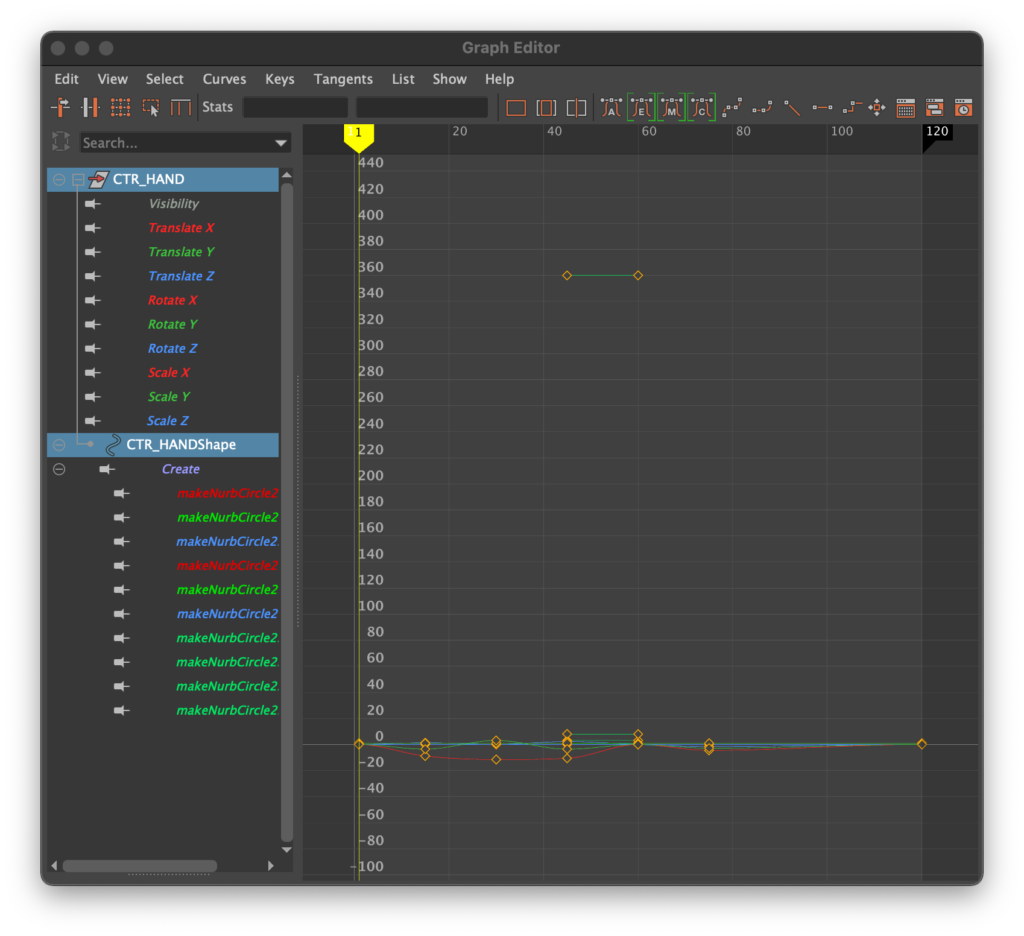
In 3.1.1_worm_joint-ik, take some time to carefully analyze the Outliner hierarchy and the keyframing, both in the Timeline and in the Graph Editor. A lot is going on here, but essentially two things are keyed: the NURBS-based controller rotating about 90 degrees, functioning like a shoulder or hip, and the NURBS-based controller attached to the IK handle at the “hand” or “foot” end of the rig. In our sample, this feisty worm is ready to throw a punch! Let’s see how.
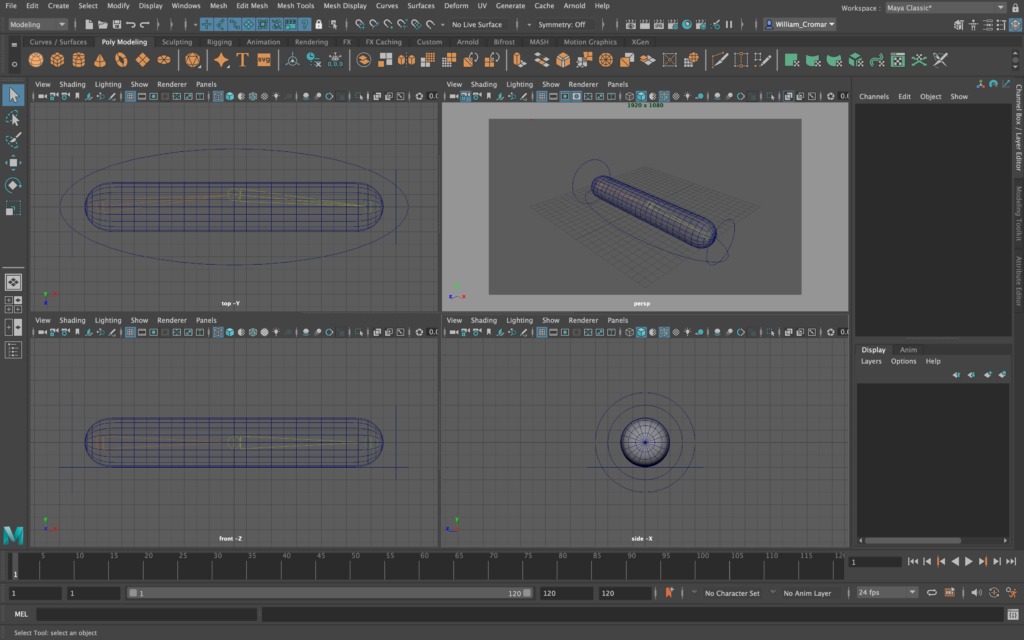
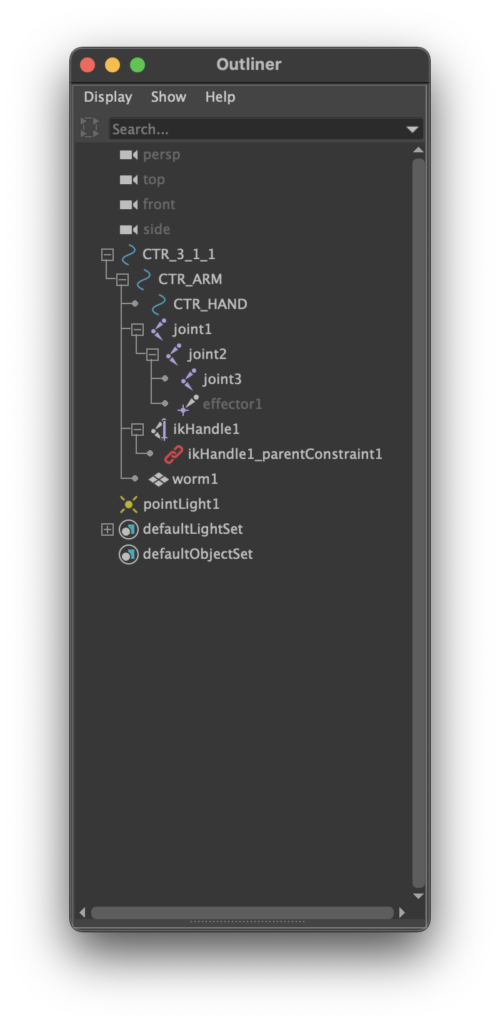
On images: Right-click>Open Image in New Tab to view larger
Basic workflow for 3.1.1_worm_joint-ik
Create object and joint chain
- Create the basic worm and controller as described in the Global setup for each scene above, but wait to attach the controller just yet. Name the geometry worm1.
- Viewing worm1 from an ortho TOP view window in X-Ray or Wireframe mode, select the Joint Tool icon from the Animation shelf (it looks like a ball-and-stick model). Click once at the beginning, once in the center, and once at the end to make three joints. Important: add a small kink in the joint chain at the elbow so Maya knows which direction to bend the IK. If you forget there’s an easy shortcut: Select the middle joint with the Move tool active, then use hotkey D to use pivot point mode to move the middle joint without moving the ends.
Add IK handle and bind
- Under the Animation shelf, select the IK Handle Tool icon (to the immediate right of the Joint Tool).
- Click the first joint, then the last joint to add an IK handle at the last joint.
- Select the joints, IK, and geometry, with the geometry being the last selected, and select Animation Menu>Skin>Binding: Smooth Bind.
Create the hierarchy and parent the controllers
- Use Duplicate Special to create a second NURBS circle from the first controller, and rename CTR_ARM and CTR_HAND. Place them into logical locations, and apply Freeze Transformations.
- Develop a hierarchy in the Outliner: Under CTR_ARM place CTR_HAND, the joint, the IK handle, and worm1.
- Create a root controller CTR and place CTR_ARM under that.
- Select CTR_HAND, then select the IK handle, and using Animation: Menu: Constrain > Parent, create a parent constraint that will ensure that when this controller is transformed, the entire rig will transform with it.
Create keyframes
In our sample, we used keyframing to make it look like the worm is punching:
- First, we want CTR_ARM to rotate to wind up and strike. We set keys with rotate transforms at 1, 30, 60, and 120.
- Next, we want the “elbow” to bend so that at the windup, the “arm” is bent, and during the punch, it is fully extended. So we select CTR_HAND and set move keys at 1, 15, 30, 45, 60, 75, and 120. Frame 30 represents the fully retracted windup, and 75 represents the fully extended punch.
- We returned CTR_HAND to its original position at 120 to create a loop.
- Test the animation and make adjustments as necessary. Using the Graph Editor can smooth out motion or adjust acceleration or deceleration for the right effect.
You might notice when you use the NURBS-based controller to keyframe that things fly apart. Never fear, use Attribute Editor to either turn on or off Inherits Transforms under Transform Attributes, testing this setting until the flyaways go away. Find out more about this at Important Editor Windows below.
You have also encountered Parent Constraint for the first time in this rig. To learn more about this, see Group v Parent v Parent Constraint in the section Useful Key Commands below.
Rig 3.1.2: Mechanical Motion: Joints linking multiple hard-surface geometries
What if your arm is mechanical, using hard-surface instead of organic modeling techniques, for which skin deformation is not appropriate? Worse, what if it is made of many separate, articulating geometries? Joints and IK Handles can be used to create many kinds of mechanical movement:
- Crane at a construction site
- Articulating desk lamp (like the protagonist of Pixar’s Luxo Jr.)
- Robot arms
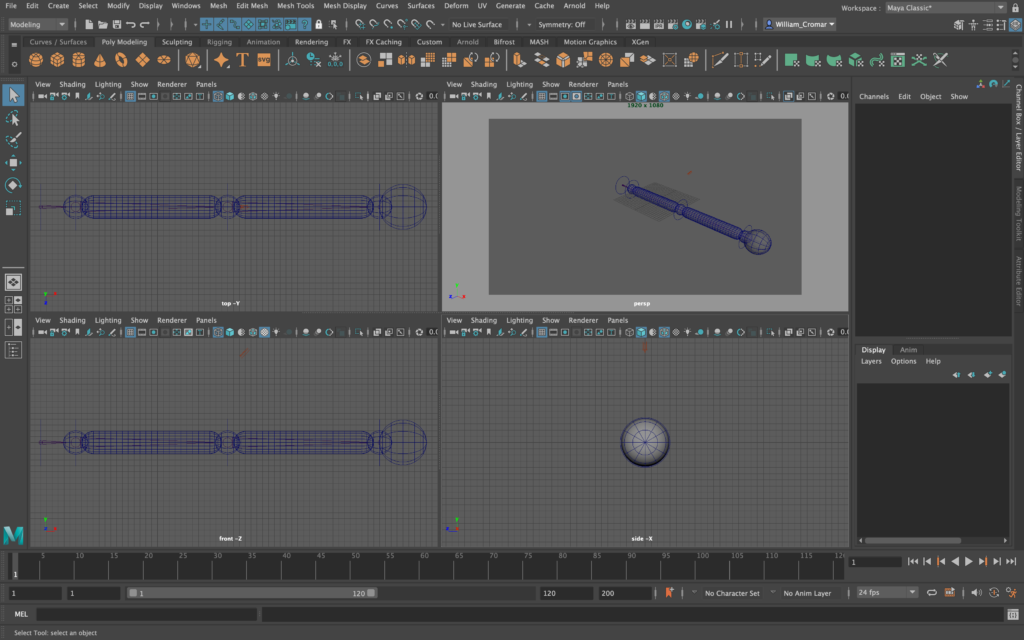
Because we illustrated IK in the previous sample, our sample will emulate a robot arm with a universal joint, which, unlike an elbow, can bend in any direction. So while this rig is nominally simpler, it’s going to follow a slightly unusual workflow and hierarchy to accommodate multiple and hard-surface geometries. Find the scene 3.1.2_worm_mechanical_joint in the project folder to reference the following:
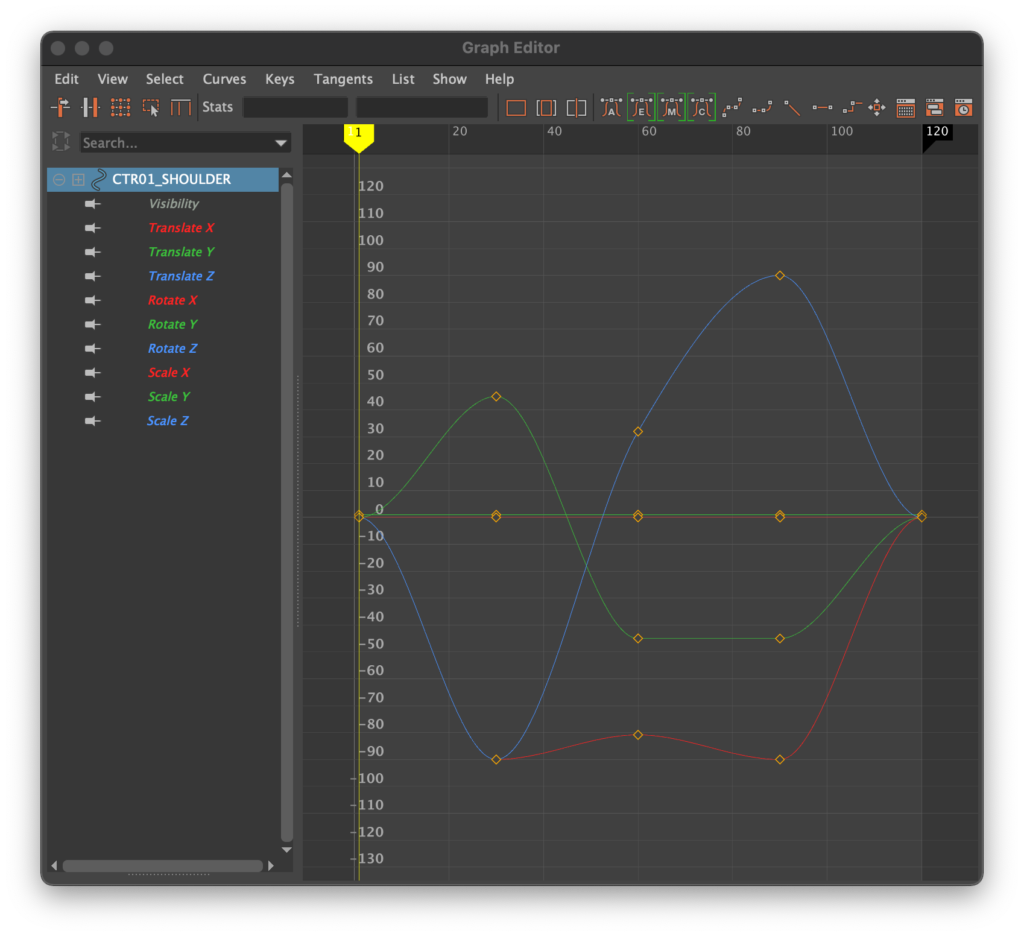
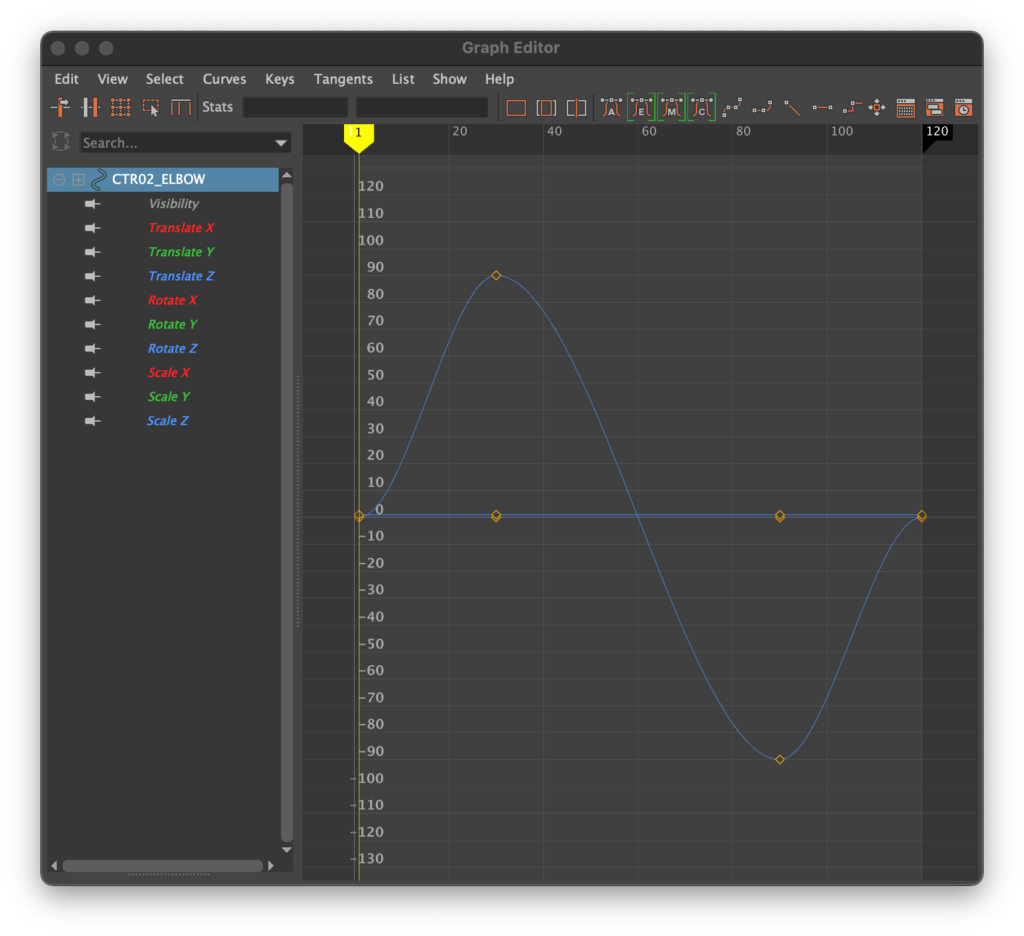

On images: Right-click>Open Image in New Tab to view larger
Basic workflow for 3.1.2_worm_mechanical_joint
Create the geometry chain
- Create the basic worm and controller as described in the Global setup for each scene above, but don’t attach the controller yet. Name the geometry worm1.
- You’ll need more than the worm here: create a small polygon sphere and name it pivot1.
- Use Menu: Edit > Duplicate Special with Duplicate input graphs checked ON to make another copy of worm1 and three other copies of pivot1. The last copy of the pivot is automatically renamed as pivot4: scale it to twice the original size and rename it hand1.
- Organize these elements so they are lined up on the world X axis: pivot1, worm1, pivot2, worm2, pivot3, hand1. There should be some physical overlap from element to element, but not too much: refer to the scene in Maya to analyze, and use grid snaps to assist with precise placement.
- Select Menu: Modify > Freeze Transformations and zero out the transform data.
Create joints for mechanical elements
- View the geometry from a TOP or SIDE view ortho window in X-Ray or Wireframe mode.
- Select the Joint Tool icon from the Animation shelf. Holding down X, click once at the beginning, once in the center, and once at the end to make FIVE joints, with the first joint external to the geometry (observe this configuration in the file). This technique provides a connection to another body, for example — although we are not modeling that.
- Because this rig does not use an IK Handle, each joint should snap to the midpoint of each pivot sphere, and there should be no offset for an “elbow” action. Using grid snap helps!
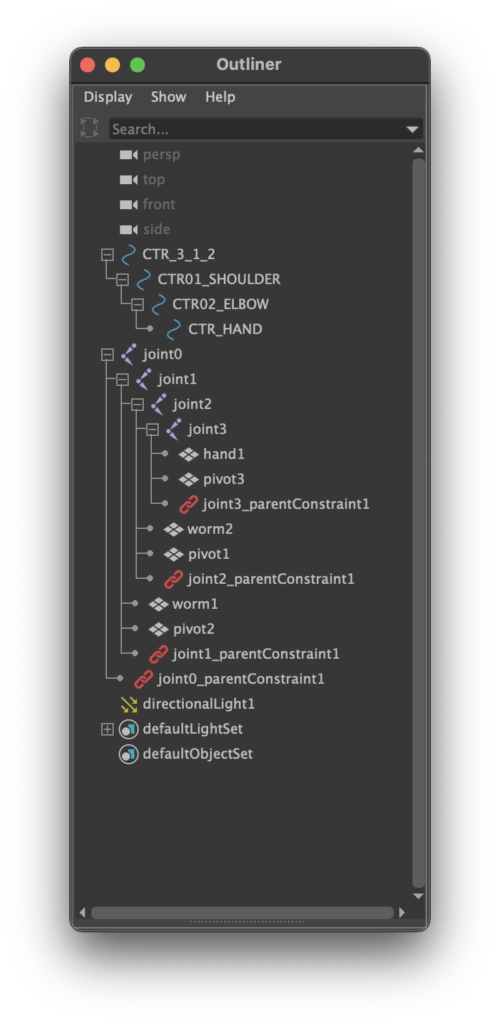
- Look in the Outliner and note the presence of a hierarchy that was automatically created: joint1, joint2, joint3, joint4. For reasons you’ll appreciate below, rename joint1 to joint0, joint2 to joint1, and so on.
The Skin Bind function we used for our aggressive punching worm always creates organic deformations. These are not wanted in a hard surface rig, so instead we’ll use a new technique.
Parent (hotkey P) joints to geometry
- Select hand1, then select pivot3 and the joint3 ball centered inside it, and press P. It’s useful to watch the Outliner as you do this, as you will see a hierarchy automatically develop.
- Select worm2, then select pivot2 and the joint2 ball inside it, and press P.
- Repeat for worm1, pivot1, and the joint1 ball inside it.
Create controllers and a hierarchy
- Duplicate Special the NURBS circle CTR, making a controller for each joint plus one root controller, renaming them logically for their function: ours are named CTR, CTR_SHOULDER, CTR_ELBOW, and CTR_HAND. Place each in a logical location rotated and centered over the corresponding joint, and apply Freeze Transformations.
- Develop a hierarchy in the Outliner by placing CTR_SHOULDER under CTR, CTR_ELBOW under CTR_SHOULDER, and CTR_HAND under CTR_ELBOW.
- Use Rigging: Menu: Constrain > Parent (Caution: not to be confused with hotkey P) and constrain joint0 to CTR, joint1 to CTR_SHOULDER, and so on.
- Test the rig by grabbing each CTR and rotating it. Debug the chain if needed.
Make keyframes
When creating motion, you may use a Move or Rotate transform on the root controller CTR, However, only use Rotate transforms on all other CTR elements. This is a standard keyframing exercise, so we won’t list step by step on the assumption you are now comfortable with keyframes. However, be aware that rotational motion can be a bit unpredictable. It can compound in unexpected ways, so keep it simple and use the sample file as a guide.
You should know that this is an extremely elementary mechanical rig. This is why you can’t use Move on CTR elements beyond the root controller. If you do, it just falls apart. There are more sophisticated techniques to constrain elements so that doesn’t happen, but for a beginning-level rig, simply remember the rule “Rotate Only” for all CTR elements other than the root. If you’re super curious about developing those kinds of constraints and want to know more, visit Teemu Auersalo’s video Rigging the Desk Lamp in Maya.
You might notice when you use the NURBS-based controllers to keyframe that things fly apart. Never fear, use Attribute Editor to either turn on or off Inherits Transforms under Transform Attributes, testing this setting until the flyaways go away. Find out more about this at Important Editor Windows below.
You have also encountered the hotkey for Parent in this rig. So now you’ve got confusing Parent and Parent constraint options in addition to “parenting” in the Outliner or creating groups! To learn more about the differences among these, see Group v Parent v Parent Constraint in the section Useful Key Commands below.
Rig 3.2: Complex Joint Rigs
I remember a student who, when challenged by me to “keep it simple,” came up with the idea of an inchworm crawling on a leaf. What could be more simple than that?
It turns out, almost everything! Why is that? Well, for starters, don’t assume a simple creature isn’t capable of complex motion, and the motion of an inchworm requires the same kind of joint chain that is used for the spine in bipedal rigs — and it’s this kind of chain that makes bipedal rigs so challenging, not the limbs.
So I almost didn’t include this case study as one that violates the “keep it simple” rule. Nevertheless, it’s fairly compact in its complexity, so for those who like a challenge — and a measure of tedious repetition — I present the basis for all complex organic motion: multiple joints connected with an IK spline and controlled by Clusters. Get ready for a ride!
3.2.1 Complex Organic Motion: IK Spline with Clusters
Find the scene named 3.2.1_worm_IkSpline in the project folder to reference the following:
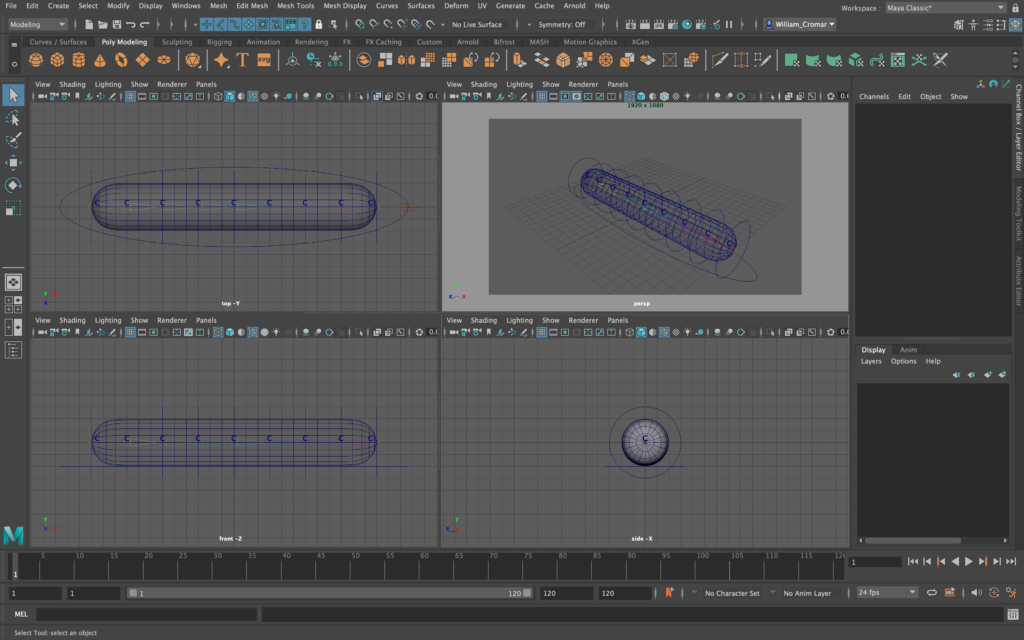
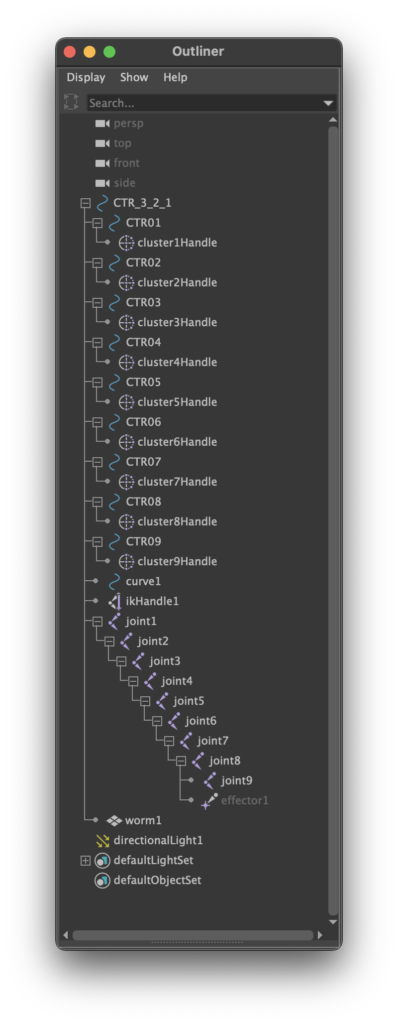
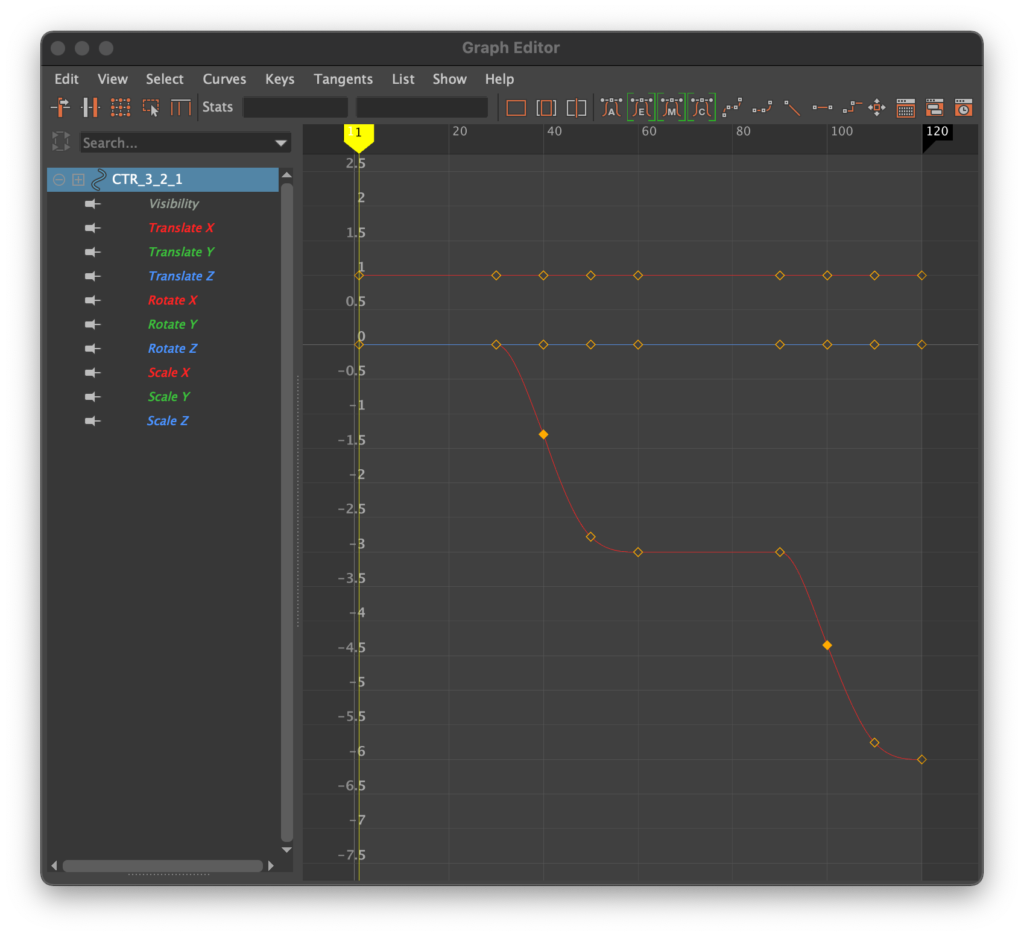
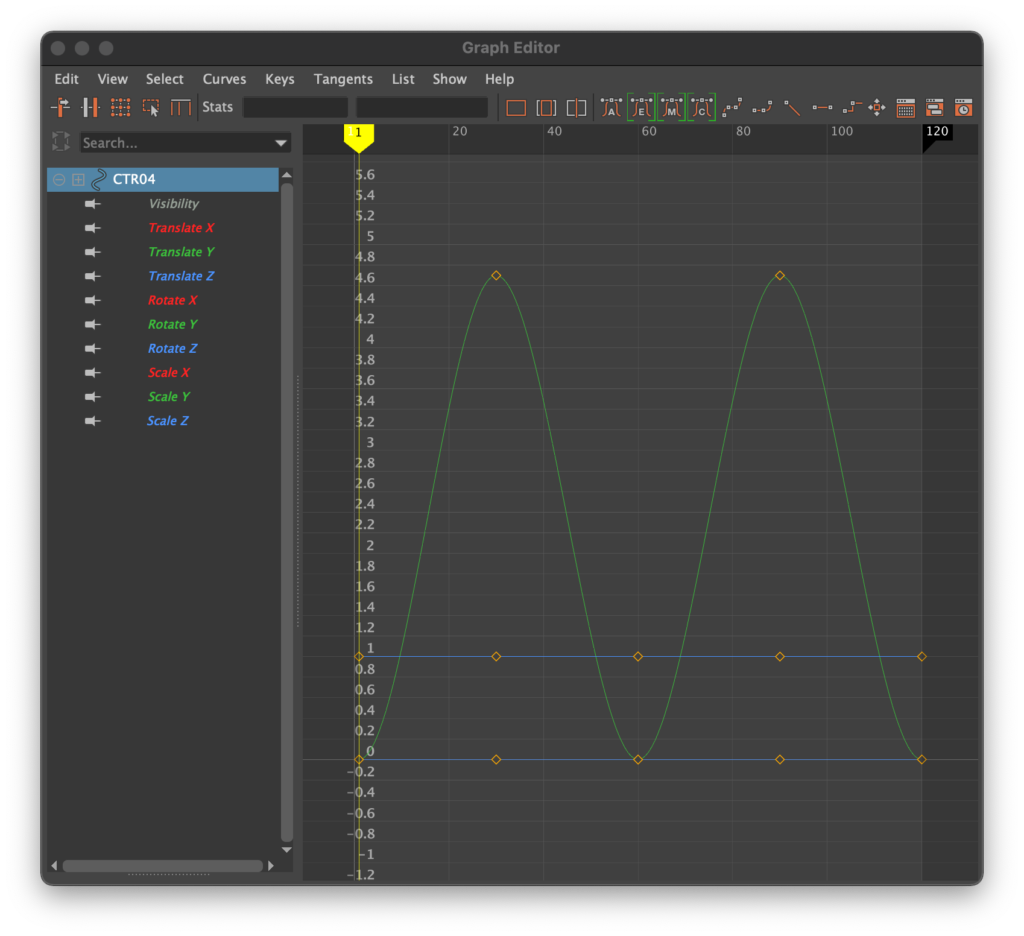
On images: Right-click>Open Image in New Tab to view larger
Note: in this rig, about 6 of the controllers are animated, all in a similar manner to CTR_04 illustrated above.
Basic workflow for 3.2.1_worm_IkSpline
Make geometry and joints, then skin bind before applying IK
- Create the basic worm and controller as described in the Global setup for each scene above, but wait to attach the controller just yet. Name the geometry worm1. Reserve the controller for later.
- Viewing worm1 from an ortho TOP or FRONT view window in X-Ray or Wireframe mode, select the Joint Tool icon from the Animation shelf. Using grid snaps ON, create 9 joints from end to end of the worm, 3 units equally spaced apart. Since there is no “elbow” action, don’t create a kink in this joint chain. Use grid snaps to make it straight.
- Select the joints and geometry, with the geometry being the last selected, and select Animation: Menu: Skin > Binding: Smooth Bind.
- Test this rig so far before applying the IK. An effective quick check is to use Menu: Select > All by type > Joints to select every joint. Then, use Rotate to observe the effectiveness of the Skin Bind. if worm1 curls up uniformly as you rotate, you are good to go.
Add IK spline and create Clusters
- Because we want a flexible IK handle, we use Rigging: Menu: Skeleton > Create IK Spline Handle and open the dialog box. This allows us to uncheck the Auto parent curve and Auto simplify curve because we’ll want a lot of control vertices spaced uniformly in the spline that controls the IK handle.
- Once the tool is set, click the first joint, then the last joint to add the IK handle at the last joint.
- When this is created, note the presence of the new NURBS spline element named curve1. You can select it in the Outliner, then right-click and select the sub-object mode Control Vertices.
- Select the first two control vertices and create a Cluster: go to the Rigging shelf and find the icon or go to Rigging: Menu: Deform > Cluster. This creates one Cluster, indicated by a C in the viewport, that controls both vertices.
- Repeat this process, but this time create one Cluster each per every single vertex down the curve until you get to the final two vertices, for which you can create one Cluster as you did for the first pair. You should have a total of 9 Cluster handles, one per joint. This is very tedious, but it provides extremely satisfying fluid motion.
Make and apply the controllers
- Select your controller curve and use Duplicate Special to create one CTR circle per Cluster handle, for a total of 9. Move each into place over its corresponding Cluster handle.
- In the Outliner, select and drag each Cluster handle under its corresponding CTR curve. Double-check after this to apply Freeze Transformations to every CTR curve. Don’t, however, delete history on them: it will delete the attached cluster handle!
- Create one final NURBS circle to function as the root controller. In our sample, we took a large NURBS circle and scaled it non-uniformly to create an oval to contain the rig, then deleted history. We moved the circle logically under the worm. Finally, we applied it to the entire rig by moving all other controls, IK handles, joints, and geometry into it.
Keyframe rig to emulate an inchworm
- This involves syncopating the up and down motion of some intermediate CTR curves with the forward motion of the root controller. In our sample, we dragged CTR04 and CTR05 up in the Y direction. This created an arch in the worm’s back. Keyframe that arch pose.
- Move to a new frame, drag the same handles down to their origin, and keyframe the worm in a flat pose.
- By inspecting the Graph Editor and observing in an ortho Front view, we can offset the backsliding motion of the worm by moving and keyframing the root controller forward in a manner that keeps the “tail” of the worm relatively still. If this sounds a bit vague, open the scene and observe it in action in the ortho FRONT view, and it will make sense!
You might notice when you use the NURBS-based controller to keyframe that things fly apart. Never fear, use Attribute Editor to either turn on or off Inherits Transforms under Transform Attributes, testing this setting until the flyaways go away. Find out more about this at Important Editor Windows below.
Do More: IK Spline in a Larger Rig
We noted above that this structure is the basis for a spine in a bipedal rig. You won’t create a bipedal rig from scratch in this project, but to see how it integrates when you are ready to tackle it, visit Jeremy P at 3D Asset Development and watch Spline IK Setup 2.0.
Important editor windows
Outliner: Ordering Hierarchies
Menu: Window > Outliner | Rigging is simply not feasible without the Outliner. It allows you to see (and create) the hierarchic relationships inherent to the process. Selecting and middle-mouse-holding-and-dragging is a drag on a Mac! However, that’s the only way to 1) reorder items or 2) drag one item under another to create a hierarchy in Outliner. If you are rigging in the computer lab remember to go into Mac System Preferences to create a middle mouse function on our networked machines before the start of every rigging session. In the Worm Circus, hierarchies are generally ordered as follows:
- rootCTRL | The NURBS-curve-based object used as controller. Distinguish controllers with all-caps CTRL to set them off visually in Outliner.
- otherCTRL_and_or_clusterHandles | Dependent controllers and point constraints often associated with them (e.g. cluster handles).
- jointHierarchy | The string of joints, or in the case of a complex skeletal rig, group of joints.
- IkHandles_and_or_otherConstraints | IKs and other constraint tools (except for cluster handles).
- geometry | The deformed, renderable object, or group of multiple objects.
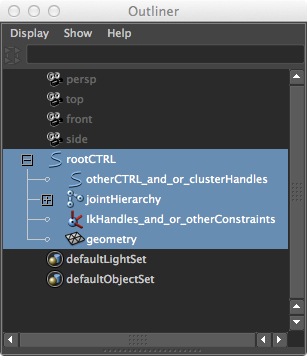
This best practice hint is used, even though it doesn’t affect functionality much. We like this order because 1) it makes finding common elements in a massively complex rig predictable, especially 2) if you are working in a team or handing off the rig to an animator who may want to know where to find controllers and cluster constraints (easy, because they’re at the top).
Now, you won’t always have a joint hierarchy or constraints, and you may not even have a set of sub-controllers under a root controller — these items simply won’t show up in your particular hierarchy in that case. However, you will ALWAYS use a root controller such as a NURBS circle to position even the most elementary rig.
Shape Editor: Keying Deformations as a Blend Shape
Menu: Window > Animation Editors > Shape Editor | Use the Shape Editor instead of keyframes to set the amount and timing of Blend Shape deforms. The use of this not-particularly-intuitive dialog box is described in detail under 1.2 Blend Shapes above.
Graph Editor: Smoothing Motion
Transforms illustrated in 1.1 Transform above work well in mechanical entities like vehicles or machines, where repetition of motion may be desirable. Go to the Graph Editor and use cycles to create loops of repeating motion:
- In the outline list to the left of the graph, select Scale X and Scale Y, hit hotkey F to center, and then zoom out a little
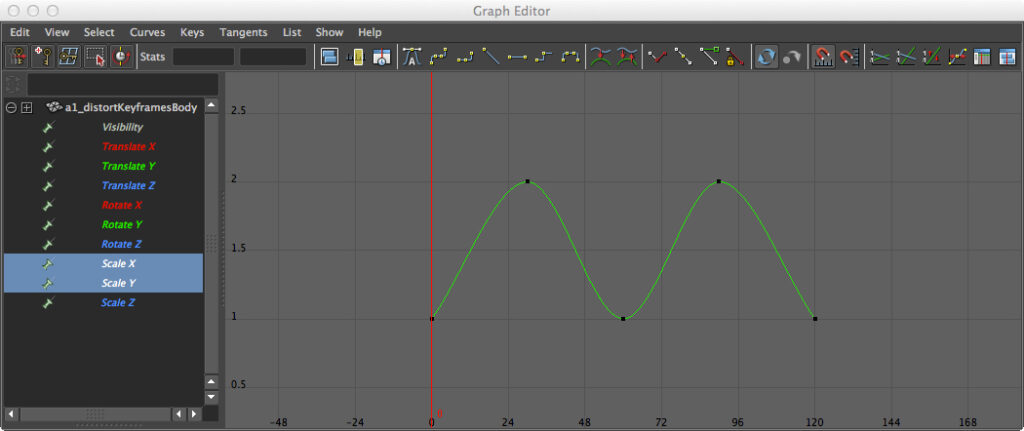
- In the editor menu select View > Infinity.
- In the editor menu select Curves > Pre Infinity > Cycle and Curves > Post Infinity > Cycle.
- Observe the bottom curves of the resulting graph. The black dots represent keyframes, the curve represents tween values. The middle curve is smooth on either side of its keyframe and represents an “ease-in/ease-out” movement, but the end keys are sharp.
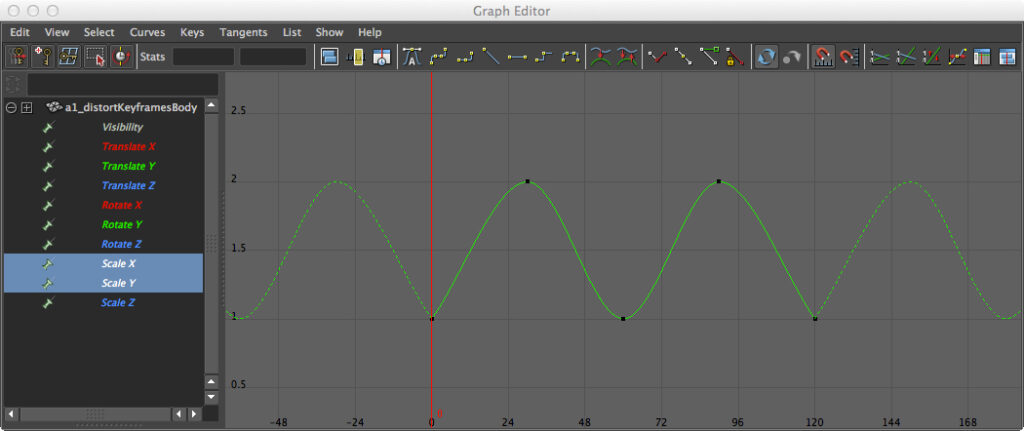
To smooth the loop, drag a marquee over an ending keyframe to select, then shift-select the other ending keyframe. Notice they are Bezier handles.
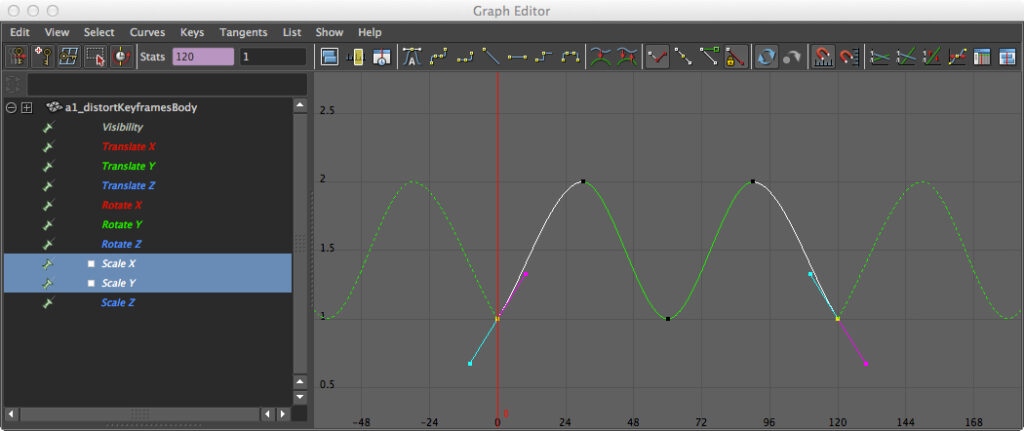
The handles can be selected and moved with the Move Tool active (hotkey W), but we have a nifty shortcut called Auto-tangent that will flatten the curve for us when we click it. The result is a smooth animation that will loop infinitely! You can find out more about the Graph Editor at Kakes’ 3D Blog.
Attribute Editor: Inherits Transform
Show/Hide Attribute Editor icon at the upper right of the Maya UI | If you have a simple rig and it doesn’t seem to want to follow its root controller, find the node tab in the Attribute Editor window, and under Transform Attributes check ON Inherits Transform for the geometry and deformers under that controller’s hierarchy.
If, on the other hand, you have crazy flyaway nodes, the hierarchy is creating a double deformation, which often occurs with joint and/or IK rigs. Try to get the rig under control by turning OFF Inherits Transform for any nodes that seem to fly too fast away, i.e. ik Handles, constrained objects, bound skins, blend shapes, etc.
Useful key commands
Group v Parent v Parent Constraint
There are times when you have objects in your scene that you would like to relate to each other without being hierarchically connected as a single entity… a chair and a table, for example. This set of objects can be selected and made into a group by using Menu: Edit > Group or Command+G. Notice that objects in a group are still quite independent of each other and can still be individually selected in the hierarchy. The Group node that connects these can be selected and then used to perform actions across the whole group, like moving them together. Grouped objects can be Ungrouped.
Parent works a bit differently, in that it creates a hierarchy among the objects instead of superimposing a group node on them. Selecting a set of objects and pressing hotkey P will create a parent out of the last object selected. All the other objects are now children of that parent. If one selects the parent object and moves it, all the children must follow. But children can be selected and moved without affecting the parent object. Parented objects can be Unparented (hotkey Shift+P).
Parent Constraint via Menu: Constrain > Parent is NOT the same thing as Parent. If objects are simply parented, they are linked forever. With Parent Constraint, you can set keys to have an object constrained at some points in an animation, and unconstrained at others. So it’s a bit of a mashup between Group and Parent functionality, but how is that useful? Say we have a kid picking up and throwing a ball in our scene. When the kid picks up the ball, a Parent Constraint is keyed ON so the ball stays attached to the hand. When she throws it, the constraint is keyed OFF.
Move the Manipulator (Hotkey “D”)
From time to time, you will create an object or develop a hierarchy and suddenly find the transform manipulator is no longer associated with the object. Perhaps it starts showing up at the world origin. The simple fix is to select a Transform like Move, locate the manipulator, and press and hold the D key. A small yellow circle will show up in the center of the manipulator. This is known as the pivot point. While this is active, you can select and move the pivot point wherever it is most useful. Using ortho views and grid or point snaps is helpful when moving the manipulator. Once the manipulator is in the correct position, release the D key.
Special menu items
Menu: Modify > Freeze Transformations
For the selected object, this sets all transform values in the Channel Box to 0 (or 1 for Scale). This is most useful when setting up a rig with elements that are not congruent with the origin.
Menu: Edit > Delete by Type > History
This separates a geometry from a deformation while retaining the effects of the deformation. Do this with a duplicate of the object so you have a historical state of the original deformation setup with the input data intact. Also, do this only when you are sure you don’t need to access the object’s input or other data: from that level, it is no longer editable.
With those caveats, Delete by Type > History can be your best friend. It can relieve you of unnecessary hierarchy and allow you to perform deforms on quite sophisticated, already-deformed objects that bear little relationship to a primitive.
Menu: Edit > Duplicate Special (Shift-Command-D)
This makes a unique new instance and carries input values so they can be modified. Use this instead of Duplicate or Copy/Paste, unless retaining input values for the node is unimportant — it almost always is, however. It’s very hard to get into the habit of duplicating in this special way. But be conscious of it early in your Maya experience and it will soon become second nature.
Keeping rigging simple
For the project, you are only being evaluated for generating a rig of the complexity illustrated here. If you want to do more, time will only permit you to find a free or low-cost rig and animate that, in addition to your simple rig. If you do acquire a rig elsewhere, this doesn’t guarantee simplicity. Choose an easy-to-animate rig that will allow you to keep your project simple yet interesting. Making a Pixar short is not your goal: it takes a large team of animators months to do even a short film. You are one person acting as a modeler, rigger, AND animator, and you have just weeks to complete the task. You’ll get seconds, not minutes, to tell your story. But as the Belgian animator Raoul Servais famously reminded John Lasseter as he was creating Luxo Jr.: “You can tell a story in 10 seconds.”
