

sftp


Adobe Dreamweaver’s inscrutable connect-to-remote-server icon
SFTP: the other protocol
Have you ever wondered what HTTP or HTTPS means in a web address? It’s called a protocol, and in simplified terms, it’s there to allow a server (where the website lives) and a client (the device attempting access to the website) to communicate. Think of it as the front doorbell to your site: the doorbell rings, you recognize the person there, and you allow them in.
There’s another door, however, the one where you might bring groceries in or take out the trash, and it’s usually only used by people living in the house: we’ll call it the back door.
SFTP is that door. Like HTTPS, it’s a network protocol. However, it’s private and allows you to move files and directories from your local machine — the place where you design and build your website — to the server.
Filezilla icon
In this title, we’ll first review best practice for file management, to ensure things will work when moving it up to the server. Then, we’ll review two SFTP ecosystems: the one provided inside Adobe Dreamweaver, and another provided by the popular FileZilla, a standalone SFTP application.
File and directory best practices
What’s in a name?
When naming assets such as HTML files, images, and directories for publishing to the Internet, it’s important to use names that are descriptive, to the point, and easy to understand. This not only makes it easier for humans to understand the content, it also helps search engines and can influence SEO (search engine optimization). Descriptive naming also helps your website achieve accessibility goals.

Banksy, Flying Red Balloon Girl (2019), lithograph
Best practice for naming conventions
- Be descriptive… | Names should accurately describe content. For a picture of red balloons, a good file name may be red-balloons.png.
- … But keep it simple! | Keep file names short while still being descriptive. This makes it easier to remember, reduces typo risk, and avoids creating a long URL. 99-red-balloons-floating-in-the-summer-sky.png is unnecessary.
- Use hyphens and underscores instead of spaces | Spaces and tabs break code. A file named red balloons.png shows up as red%20balloons.png. The convention:
- For red balloon.png, use a hyphen: red-balloons.png
- For a prefix or suffix descriptor like a date or number, use an underscore. For 99 red balloons.png, write 99_red-balloons.png
- Use lower case | lLowercase letters ensure the name is consistent across platforms and avoids case sensitivity issues. It’s also easier to remember: was it Red Balloons or red balloons?
- The case against camelCase | camelCase, sometimes known as camelBacking, is an alternative spacing convention found in programming, but it’s not necessary in a file name. So: use red-balloons, not redBalloons.
- Avoid reserved or special characters | Characters like & < > ” © ® ™ ≈ ≠ £ € ° and the em (—) or en (–) dash are reserved in HTML, so putting them in names will break code. Special characters like # & % + * = @ ~ ^ $ may not be understood by a browser. Emojis? Come on.
- Be consistent! | A consistent convention across all files and directories makes them easier to manage.
- Make extensions explicit | It’s important to append the file type: .jpg, .png, .css, .htm, and so on.
But what if I can’t see any file extensions?
Some file extensions have legitimate alternates, like the following:
- .htm and .html are valid for HTML documents. I favor .html in my convention.
- Both .jpg and .jpeg are valid for the JPG file type. I tend to favor .jpg.
It’s important to be able to see extensions and alternates in web development. One annoyance found in both Windows and Mac is a default for the OS to hide file extensions. This may make for a prettier UI, but for a web developer it’s torture, especially if you’re not sure about alternate extensions lurking among your files! To remedy this and force the interface to display extensions, do the following:
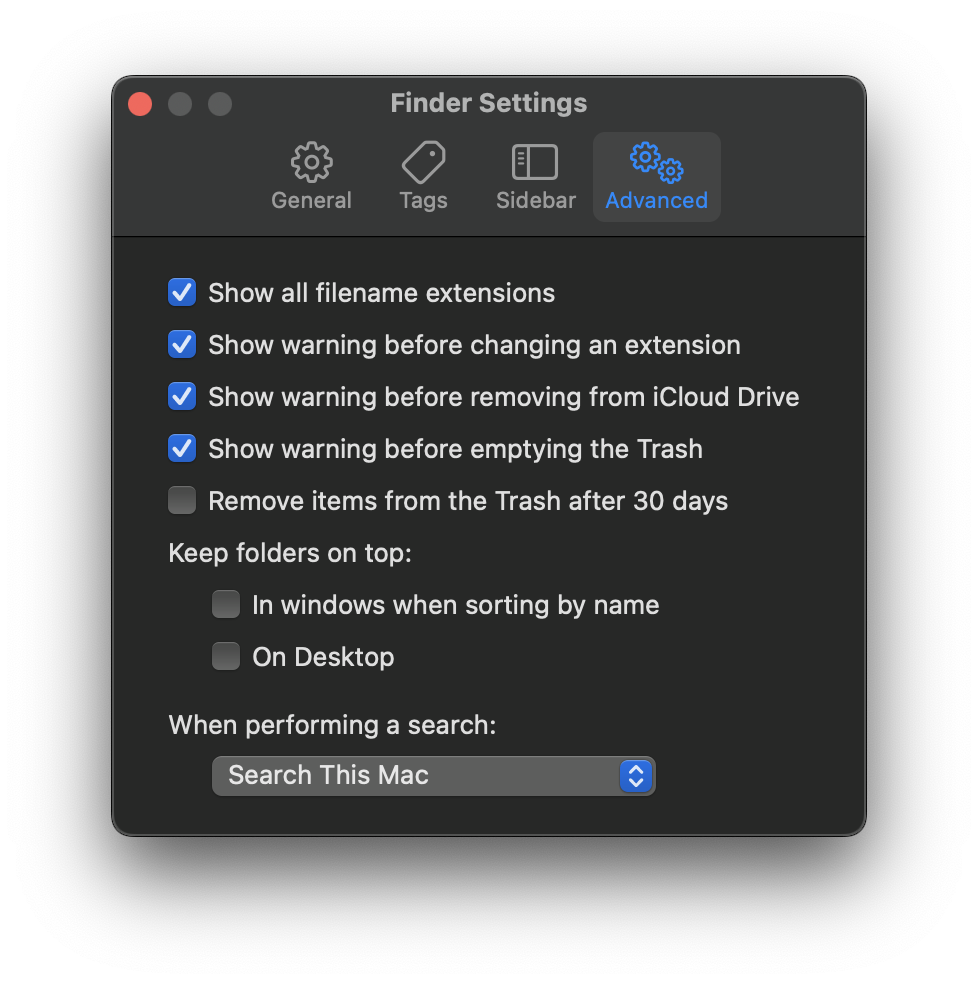
- For Mac | Go to the Finder > Preferences menu, select the Advanced tab, and check the Show all filename extensions box. This is a global preference and only needs to happen one time.
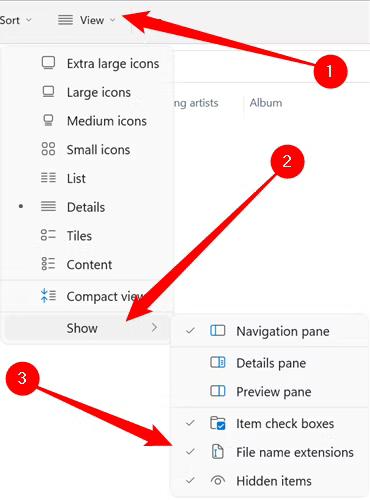
- For Windows 11 | 1) Click the View tab along the top of a File Explorer window. 2) Mouse over Show at the bottom of the drop-down menu, and then 3) click File Name Extensions in the sub-menu. Annoyingly, this has to be done window by window.
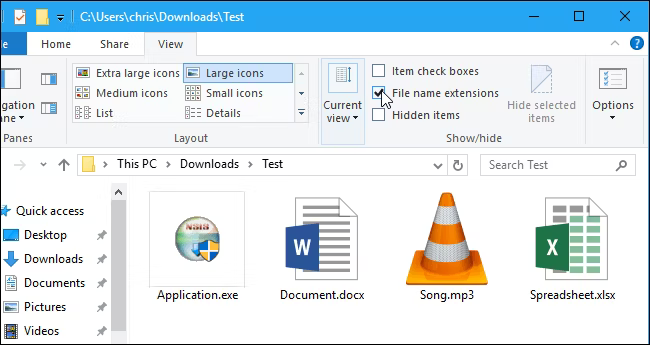
- For Windows 10 | 1) Click the View tab along the ribbon of a File Explorer window. 2) Activate the File name extensions box in the Show/hide section to view file extensions. As above, this has to be done window by window.
There’s no place like the root directory
When working on a website designing locally on your computer, you must keep all the related files in a single folder that perfectly mirrors the published website’s directory structure on the server. This folder can live anywhere you like, but you should put it somewhere logical. We call this the root folder or root directory.
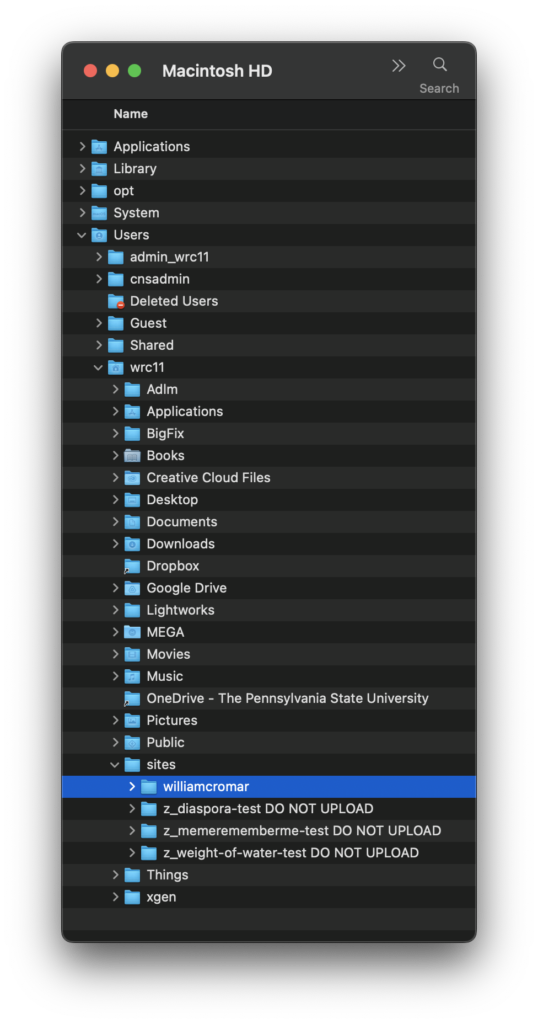
- On a personal Mac | Each Mac’s user has a folder, known as
Home. Inside are a bunch of default folders, likeDocuments. If you’re on a personal Mac, create a folder inHomeorDocumentsthat holds your website.- Example: I have multiple sites, so I created a folder in
Homecalledsites. Inside, I created a folder calledwilliamcromar, naming it after my website williamcromar.com. The local root for my site iswilliamcromar. - The local site folder address is:
/Users/wrc11/sites/williamcromar
- Example: I have multiple sites, so I created a folder in
- On a personal Windows | Choose a folder to permanently store your site.
- Inside this folder, create a new folder called
sites(or similar). This is where all your websites will live. - Inside this folder, create another folder to store your first website. Call it
my-site(or similar). That is the root folder. - It may have an address like this:
C:\Users\yourname\Documents\sites\my-site
- Inside this folder, create a new folder called
- On a networked machine in a lab | It’s not optimal: we recommend keeping your development on a personal machine. But if necessary, you can work on in a computer lab.
- Keep your website backed up on an external hard drive (flash drives are risky). Give this file a logical name like
local-root. - Copy this folder to the Desktop. DO NOT WORK FROM THE EXTERNAL DRIVE.
- It may have an address like this:
/Users/wrc11/Desktop/local-rootorC:\Users\yourname\Desktop\local-root
- Keep your website backed up on an external hard drive (flash drives are risky). Give this file a logical name like
A big disadvantage of working on a networked machine is that you have to rebuild a SFTP connection every time. If you’re on a personal machine, you only need to do it one time.
Creating your SFTP connection
So let’s go over the creation of your SFTP connection. Recall that you created a personal site using a template in our In the Cloud reference. Here, we’re going to upload it to a server. You may choose one of the following methods depending on your access to tools. In either case, the instructions are not difficult, but there are many steps and few of them are intuitive. So remember this wiki title as a resource if you have to rebuild your connection — especially important if you’re working from a networked machine.
In DreamWeaver
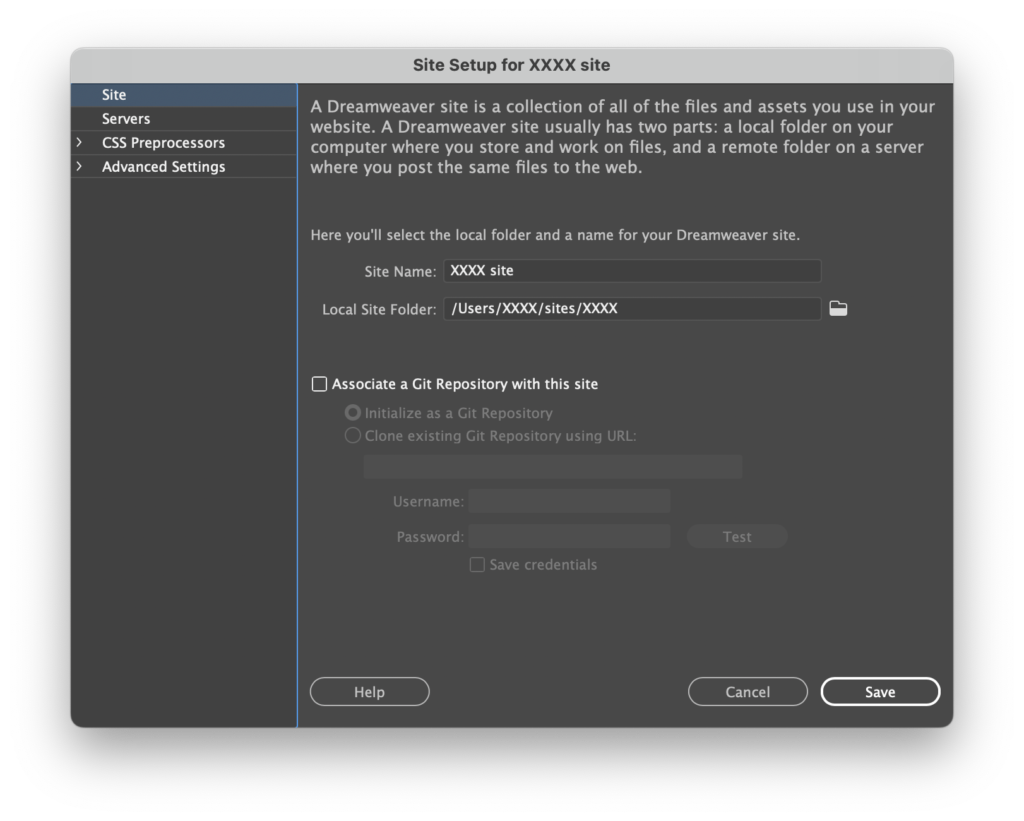
Open DreamWeaver and in the menu go to Site > New Site…
In the Site Setup for… dialog box, click on Site at the top left of the box. On this first screen, fill in the Site Name field with a logical name. Then, click the folder icon at the Local Site Folder field to help you locate the folder on your computer. Once found, hit Save.
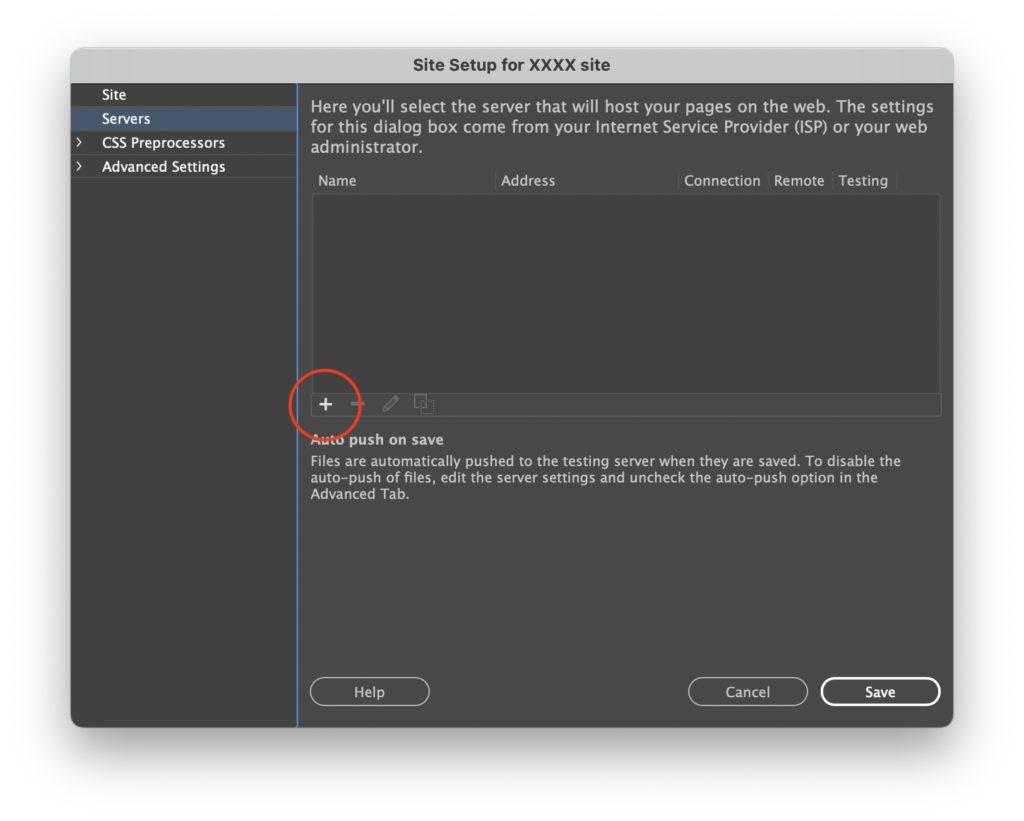
Next, highlight the Servers tab at left in the box. Click the plus (+) sign at the bottom left of the center box to Add New Server.
Server setup information for my studios
In the pop-out window, with the tab at the top on the Basic setting, enter the server information for your website. Make sure the tab at the top is on the “Basic” setting. If you are in a studio I teach, you’ll enter the information below. If not, you’ll need to consult with your own instructor, IT department, or web hosting service for this information.
- Under Server Name: type XXXX server (where XXXX is a logical name)
- Under Connect using: select SFTP
- For SFTP Address: type XXX INFO PENDING and for the Port: type 22
- Under Username: type your user name (in the form XXX INFO PENDING)
- For Password: type in your password XXX INFO PENDING and check the Save Password option
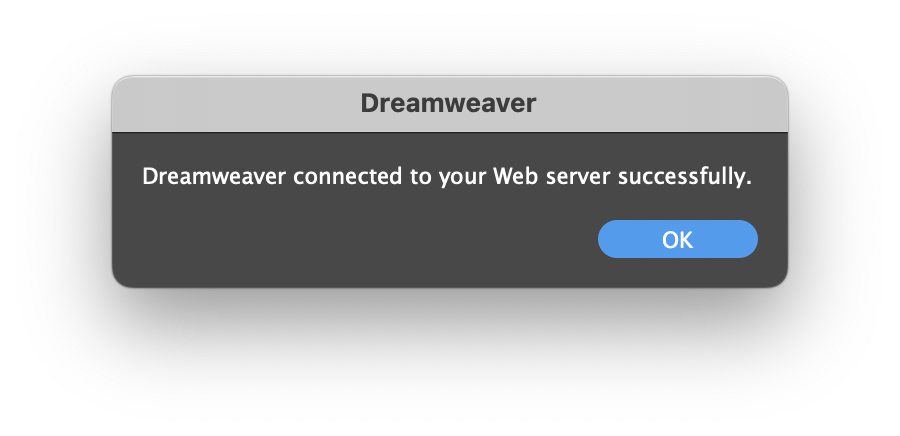
DON’T HIT THE TEST BUTTON YET, BUT KEEP FILLING OUT THE FIELDS FIRST
- Under Root Directory: type XXX INFO PENDING
- For Web URL: type XXX INFO PENDING
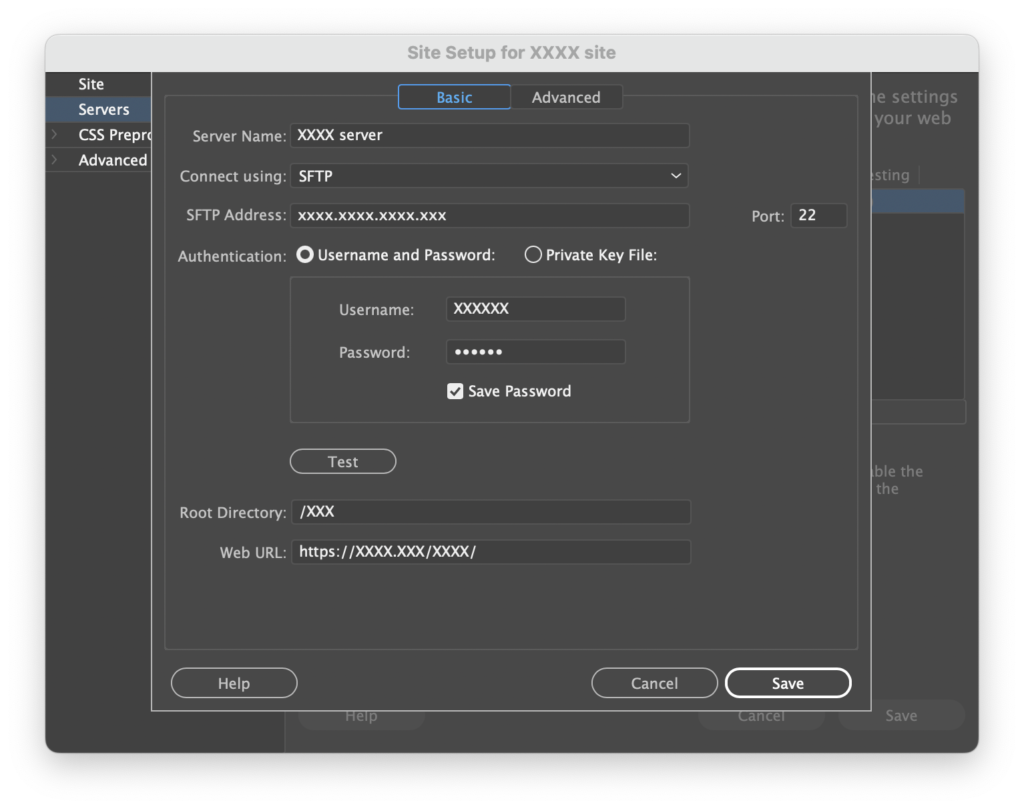
NOW: hit the Test button and wait for Dreamweaver to establish contact. If you don’t get the popup indicating success, check your typing. If you do, hit OK, then hit Save and close out the dialog box.
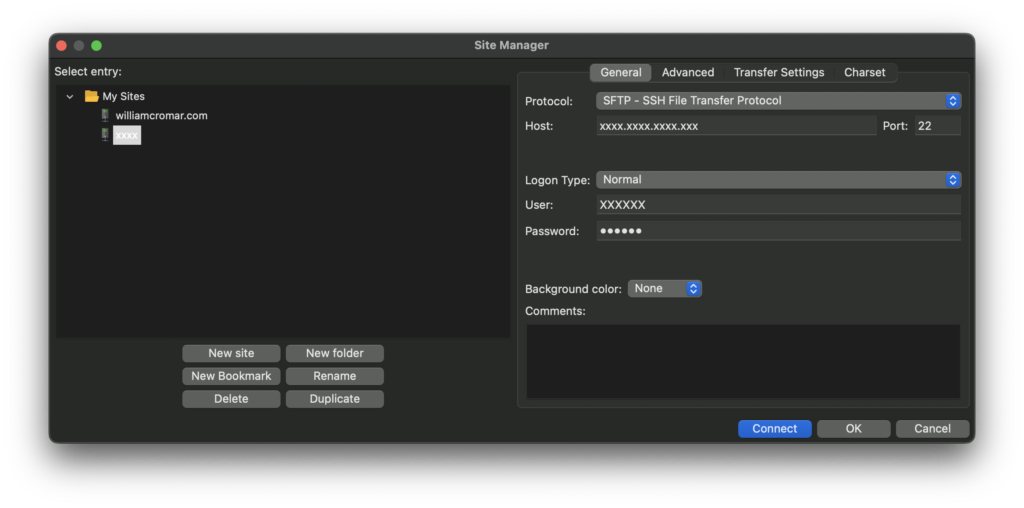
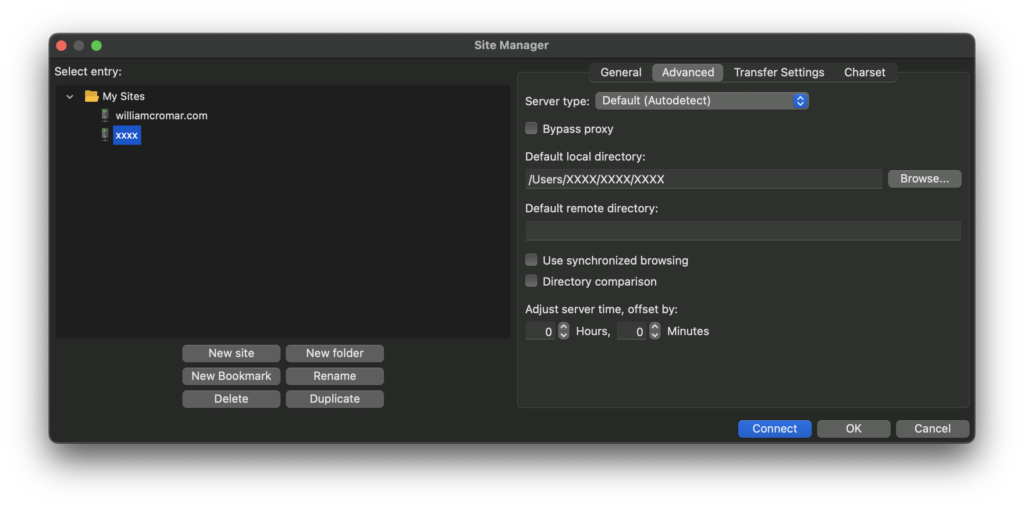
In FileZilla
Visit this explainer at Geekflare.
Author Hitesh Sant describes two methods of connecting to a server with FileZilla using SFTP. For the server setup fields in Filezilla’s Site Manager, use the same information found at Server setup information for my studios in the DreamWeaver instructions above.
Upload your site!
Once you establish a connection, you can upload your site and manage files as your site evolves. We’ll cover the specifics of uploading in helloWorld, the next title in this series.