

Rhythm

Rhythm: modulating Symbols on the Timeline
Rhythm is an essential consideration in the production of motion graphics. One of the most common and simple time signatures is 4/4, where four beats are evenly heard over one bar of music and each note is one beat. We’re all familiar with House music’s 4/4 beat. This method of counting time can be applied to animation. In House music, the beat is counted in cycles of eight. The rhythm is established and peaks at the fourth beat. It reduces in the next four beats, in preparation for the next set of eight beats.
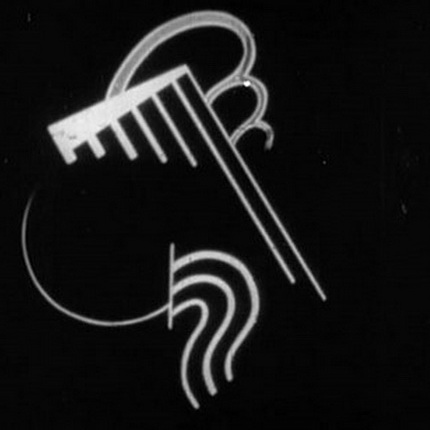
Frame from Viking Eggeling’s Symphonie Diagonale, 1921-4
In this Bodyrox sample from Wikipedia at right, the syncopation of the synthesizer melody only starts to make sense when you can hear the four-on-the-floor kick once the rhythm track starts. Count off 8 beats “from the top” and you’ll be able to visualize the patterns discussed in the exercise.
One of the key concepts in understanding animation is visualizing time. Whether you are keeping track of the musical score or graphic frames on a timeline, counting time is important and “seeing” the count is a necessity.
Early experiments
Early experimental animation kept time visually with abstract shapes. Rhythm is the topic of Viking Eggeling’s film Symphonie Diagonale (1921-4). Lines, curves, and forms play in rhythm. Pay attention to the formal design relationships while watching this animation. Watch for balance and movement, form and negative space, and the expressiveness of a line. Notice how the formal balance changes over time and shapes change in size and value. Rhythm is used to create a sense of predictability within the abstraction, and departures from that predictability create drama and focus.
Viking Eggeling’s Symphonie Diagonale, 1921-4
Consider formal design properties of balance and movement while watching Oskar Fischinger’s animation, Spirals.
Oskar Fischinger, Spirals, 1926
Harry Smith’s homage to Fischinger remains abstract though it is even more layered and complicated. Notice the color harmonies and formal balance. Balance changes over time, shapes change in size and transparency. Rhythm is used to create a sense of predictability within the abstraction.
Harry Smith, No. 5: Circular Tensions, Homage to Oskar Fischinger – No. 7: Color Study, 1950-1952
Visualizing time, keyframes, shape tween
Download the .zip file at the top of this title, and open it. Look for the rhythm.fla file, and open in Adobe Animate. Notice that the interface is somewhat similar to Dreamweaver. We’ll use this sample file to guide the work below.
Now open a new file. Click on the button for HTML5 Canvas and change the size to 600 width and 400 height. Select Create.

Inside Animate, notice a Tool Palette, Color Picker, Properties and various other palettes that we can open and close from the Window Menu. The key difference between Animate and Dreamweaver is the timeline and playhead. The timeline is located at the bottom of the screen. Animate expresses the code keyframes and durations graphically, like a video editor. For visual thinkers, this is a great help!
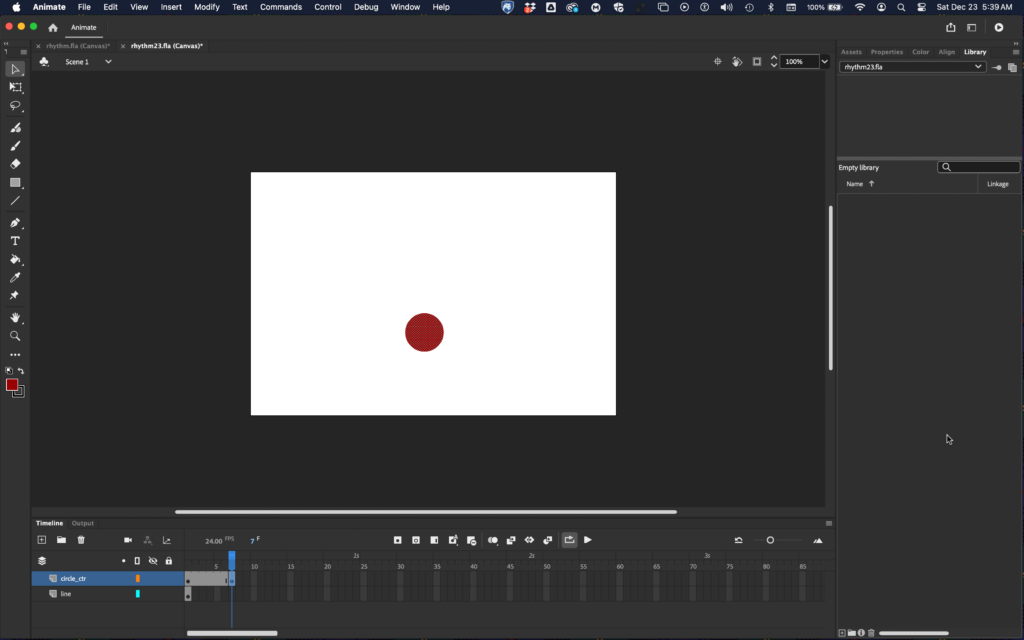
By default, there is one empty layer and one empty frame. Double-click on Layer 1 and name it line. In Animate, we make or place all of the art on the Canvas, while we insert all of the instructions about how we animate the art into frames on the Timeline. Draw a gray line in the bottom one-third of the stage. This line will serve as a baseline. Notice in the image below that the line is gray because the color selected for Stroke color is the gray hex value, #666666.
Adding a layer
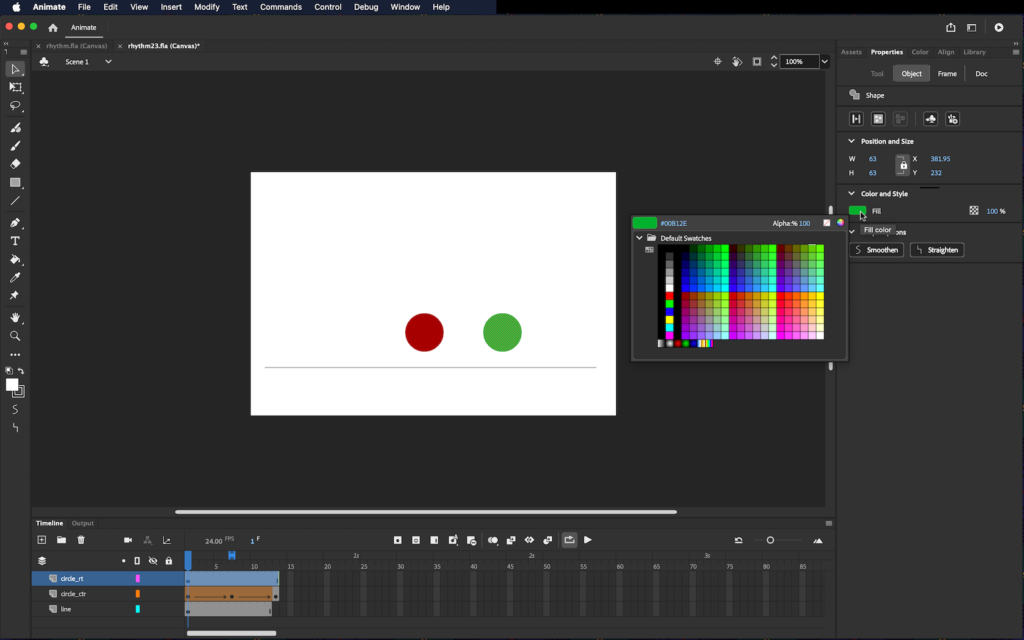
Add a new layer by clicking on the Insert Layer button (a small square with a +) towards the bottom left of the Timeline Palette. Name it circle_ctr. When we highlight the new layer, this activates it. Draw a circle using the Oval Tool in the Canvas. Position the circle above the center of the baseline. The stroke of a shape is the line around the outside. The fill is the color inside the outline of the shape. It happens that when you make the circle, it creates a stroke object AND a fill object which are independent.
Use the Selection Tool to click on the stroke around the circle (in our example, the stroke is gray and the fill is dark red). Press DELETE on the keypad so the shape we make is a fill with no stroke.
Inserting a keyframe
In the Timeline, click on frame 7 then click Menu: Insert > Timeline > Keyframe OR right-click on frame 7 and in the contextual menu choose Insert Keyframe. Keyframes are points in time where something on the Canvas changes. We often use keyframes to add or modify content. “Tweening” is animation terminology for drawing the shapes between two keyframes so that it seems as if one morphs into another. We often use Tweening to create motion. Animate creates both shape and motion tweens. We will explore shape tweens in this chapter and motion tweens in the next.
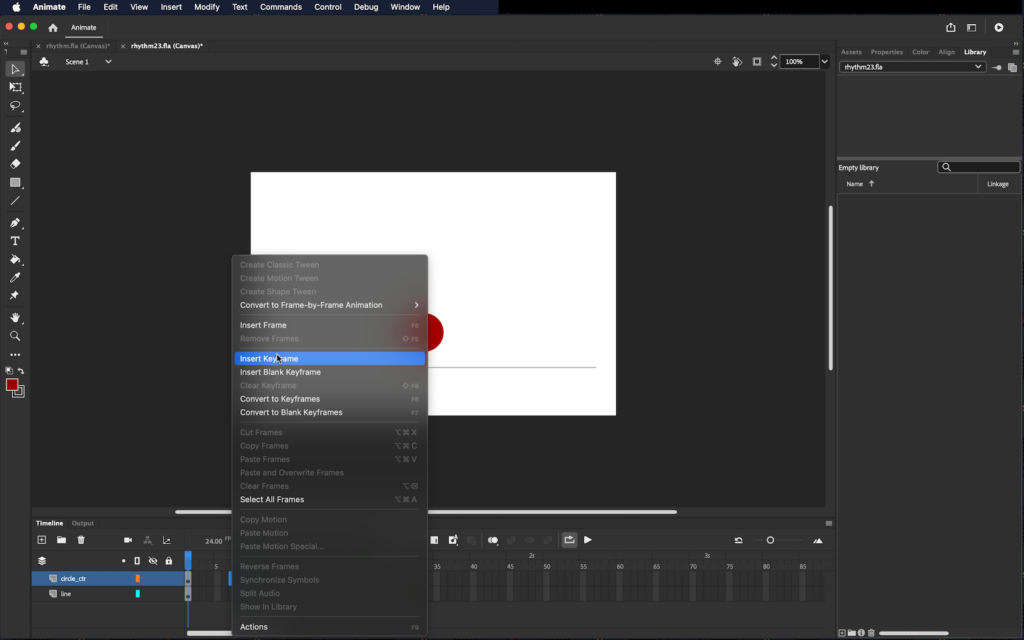
Notice the keyframe, indicated in the Timeline by a black dot. Frames between keyframes are gray. The last frame before a keyframe is a gray rectangle. The playback head is a red rectangle over the frame number indicator at the top of the Timeline, with an accompanying red line stretched through all layers. At the bottom of the Timeline Palette, the frame number that the Playback Head rests upon is reported (in this instance, the number 7).
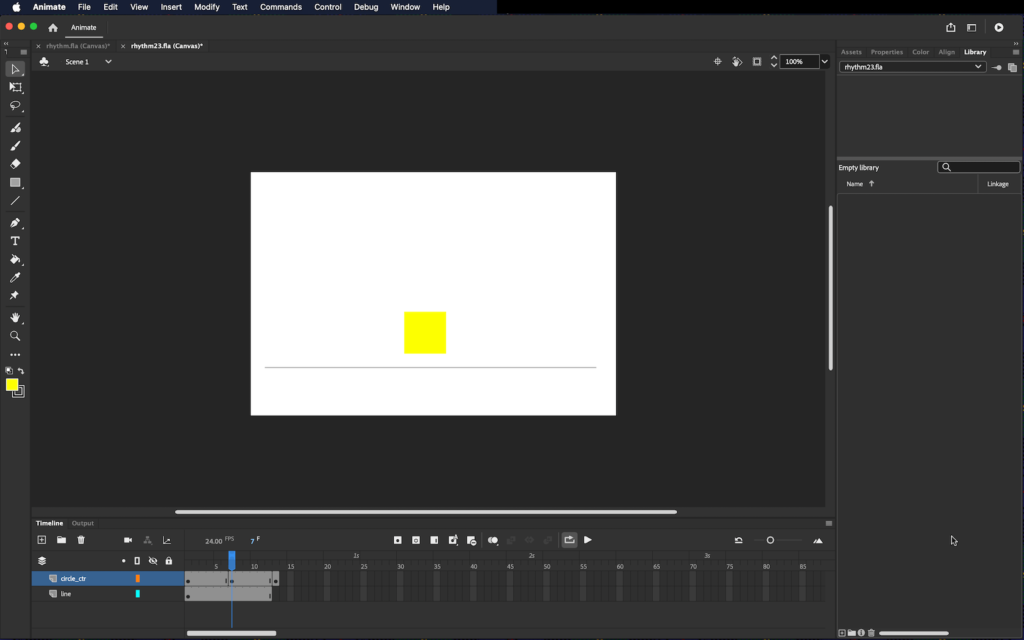
Create another keyframe for circle_ctr on frame 13.
Add frames for the layer containing the baseline. We do not need to add another keyframe, as the baseline will not change throughout the animation. Click on frame 12 on the line layer and select Insert > Timeline > Frame.
Creating a Shape Tween
Click on frame 7 on the circle_ctr layer then use the Rectangle Tool to draw a square over the red circle. Notice that we set the stroke color to none. You can try a different hue for the square as you used for the circle. In our sample we chose yellow.
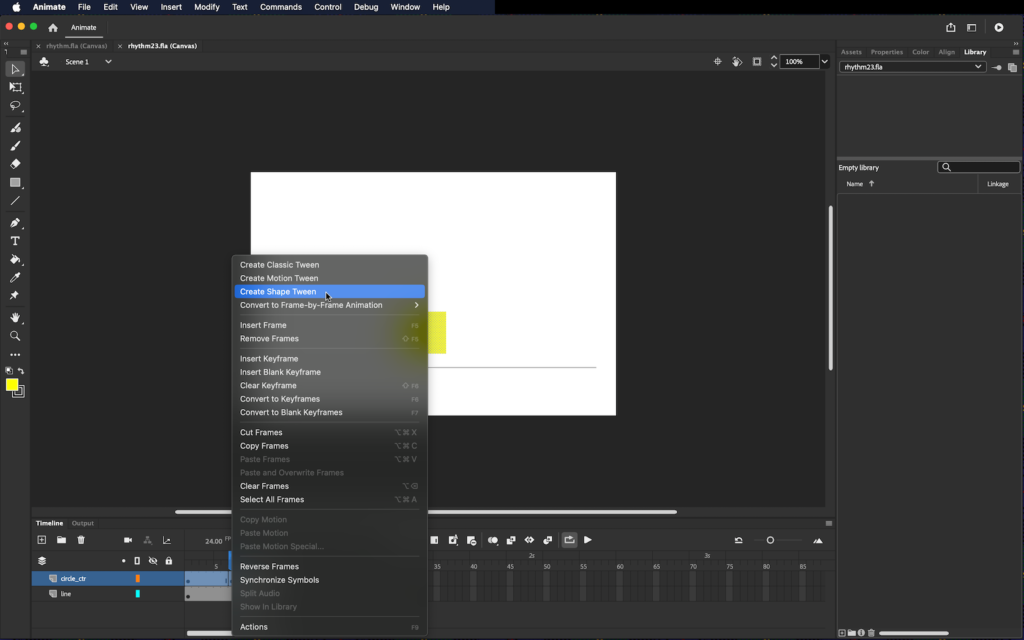
In the Timeline, click once on frame 1, hold SHIFT, and click once on frame 7. This selects frames 1-7; notice how they highlight. Now click Menu: Insert > Shape Tween or right-click in the highlighted frames and in the contextual menu select Create Shape Tween. Animate will construct all of the frames between the keyframes to animate the content automatically.
Click File > Save As and save the .FLA file if you haven’t done this already.
View or Test the animation by pressing CMD+RETURN or use Control > Test Movie > in Browser. You can open and play the file in your default browser. Testing the movie creates a pair of files: an .html file with an externally referenced .js file, the two together compile into a playable interactive understood in web browsers.
Modifying the frame rate adjusts the speed of the beat
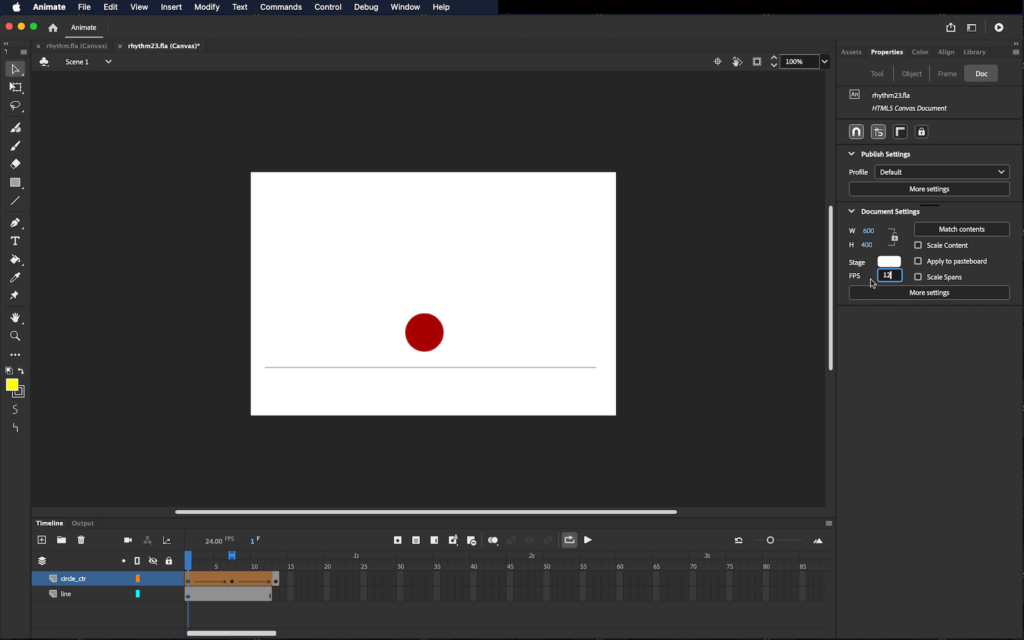
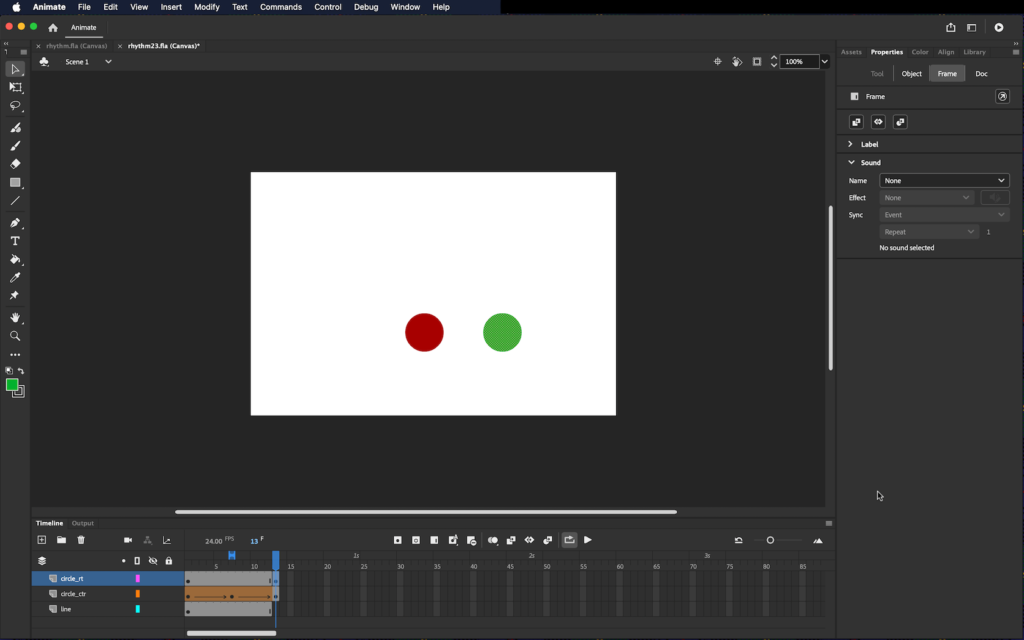
The animation created above is exactly one half second long. The frame rate determines the length of time that each frame is played. Dividing the number of frames used in the animation (the number of the last frame – 1) by the frame rate results in the duration of the animation. In our file, the frame rate is 24 frames per second (FPS), so (13 – 1)/24 = 0.5 second. Since the frame rate is the same for the entire timeline, it is a property of the document. In this exercise we will modify the frame rate by using the Properties Palette.
Click on the stage, and notice the properties displayed in the Properties Palette on the right side. On this palette, find four tabs: Tool, Object, Frame, and Doc. Since frame rate is a document property, select Doc. Under the group Document Settings, click the arrow if contents are not visible, then find FPS, and change it to 12. Doubling the frame rate will make the animation move twice as slow.
Test the file at this new frame rate. Open the .html file and note the slower speed. If you observe carefully you may even be able to detect individual frames a this slow rate. Then, return to the Animate file and change the FPS value back to 24.
Visualizing tempo
Create a new layer and name it circle_rt. Create a new circle on this layer. We created ours by copying the original circle, selecting the new layer, and pasting.
Click, hold and drag the new circle to the right of the first circle. Note the Snap guide that helps you align the tops of the two circles. You can turn these on or off in Menu: View > Snap Align. In the Properties Palette, under the Object tab, click in the Color Palette change the color of the new circle.
Insert a new keyframe at frame 13 on the circle_rt layer.
Increasing the length of the timeline
Now we’re going to increase the length of the timeline to 25 frames. We do this by duplicating the first 13 frames of our original circle_ctr object to allow us to see it after frame 13.
Select the frames you want to copy by clicking on frame 1 of the “circle ctr” layer and holding SHIFT while clicking the 13th frame. Click Edit > Timeline > Copy Frames or right-click on the selection and select Copy Frames from the contextual menu.
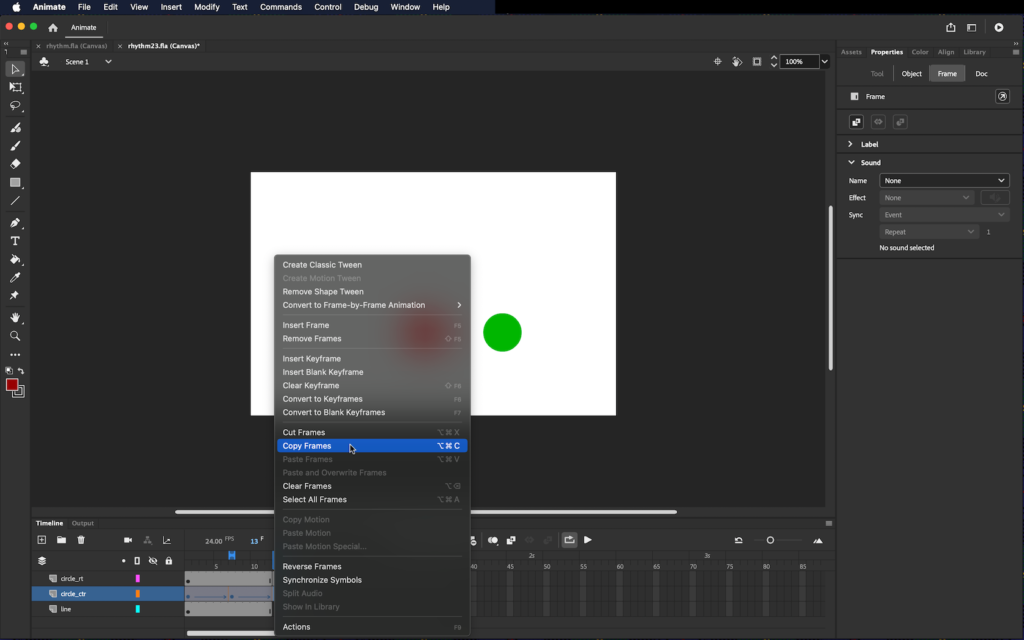
Select the first destination frame, which will be frame 13. Yes, we ARE pasting on top of the second keyframe at frame 13! Click Edit > Timeline > Paste Frames or right-click on the selection and select Paste Frames from the contextual menu.
We should note here: there is a huge difference between Copy and Copy Frames. Edit > Copy will copy a shape or an object. Edit > Timeline > Copy Frames will copy the entire contents of one or multiple frames.
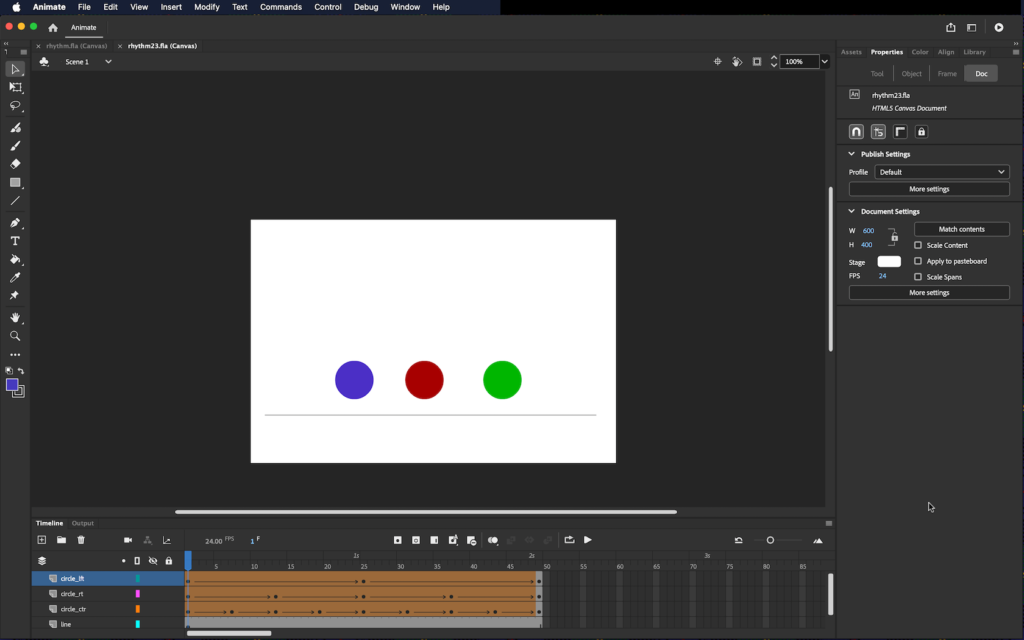
Back on the line layer, click on frame 25 and use Menu: Insert > Timeline > Frame, or right-click on the selection and select Insert Frames from the contextual menu. Finally, duplicate the 13 frames in circle_rt in the same fashion we did for circle_ctr. Timelines for all 3 layers should now end at frame 25.
Reshaping circle_rt
Click on frame 13 on the circle_rt layer and mouse over the edge of the circle on the stage with the selection tool. The cursor changes into an arrow with a curved line. This symbol means that you can pull the edge of the circle to reshape it. Change the shape of the circle using this technique.
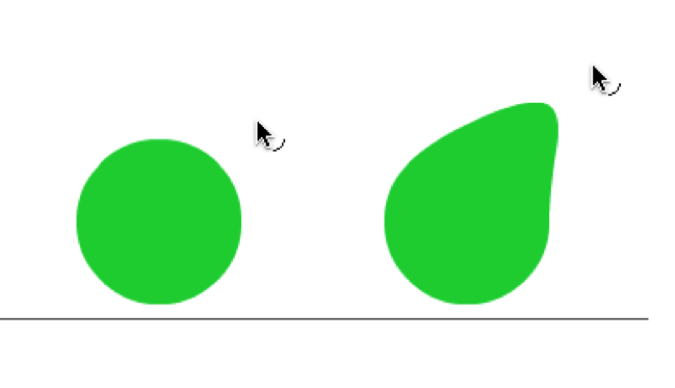
Now select frames 1 through 13 on the circle_rt layer, right-click on the selection, and select Shape Tween from the contextual menu. Notice the change in the timeline, and scrub the timeline to see the result.
Test the new animation. In some browser contexts, this can confuse, as the browser may try and open a cached version of the file. If this happens, simply close the tab, find your .html file, and open that version in the browser. This should clear up the illusion that nothing is saved! Notice that the new tween takes twice as long as the tween in the first circle-to-square animation. The tempo of the new tween is slower than the tempo of the first circle.
Basic bouncing ball
Our final circle is going to have a longer cycle than both of the other shapes. This will result in the slowest tempo.
Create a new layer named circle_lft and create a new circle on it in the same manner we did for circle_rt. Give this circle a new color using the Color Palette, as we did before.
Add a new keyframe on circle_lft at frame 25 so the circle will end in the same position. When we want an animation to cycle seamlessly, we place a keyframe at the end of the layer holding the same content as the first frame.
Now, in circle_lft, select and move the circle up or down with the Selection Tool. We start on the second keyframe at frame 25 and use SHIFT + Up Arrow six times (Shift + up + up + up+ up + up + up) to move the circle 60 pixels higher than its starting point. When you scrub the timeline it doesn’t look too bouncy yet. Create a Shape Tween between keyframes 1 and 25.
Test and open the .html file to watch the new animation.
Publish
Upon completion of this exercise, upload your .html/.js pair to a unique folder in your server space. Link the .html file to your webpage, and use an iframe embed to display it on your blog. The final file will look like this:
Note: if you’re looking at the iframe content on a mobile device, rotate your screen horizontally. Eventually, you’ll be able to create responsive content, but these beginner-level exercises are fixed-size.