Mesh mods
Digitizing and mesh modifications
3D printing turns the data found in a digital model into a tangible thing. Digitizing does the exact opposite: it transforms a thing into data. The sculptural techniques of casting and mold-making can be a metaphor for digitizing.
As is true with those sculptural techniques, digitizing can be used to transform an object. You can make it in another material, scale it, distort it, or combine it with other stuff. In this exercise, we’ll introduce the possibilities inherent in basic digitizing.
Part 1: Best practices for digitizing an object
Optimal scanning…
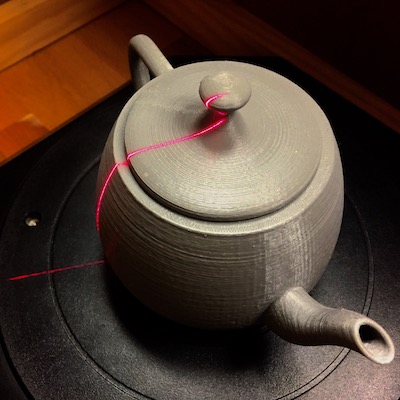
Scanning has begun to move away from dedicated devices and toward an app-based ecosystem using mobile devices. In the maker space at the school where I teach, we offer a dedicated device for advanced users, and we also help clients who want assistance using an app.
Don’t expect a scanner to create a perfect copy of an object. If you keep your expectations within reason, you’ll see that a scanner device or scanning app can do a remarkable job. You want to find or prepare an object that meets certain guidelines:
- Super shiny, dark, transparent, or “fuzzy” objects are hard to scan. You can obtain the best results by avoiding such objects.
- Reflective surfaces can be dulled with a 3D scanning spray, or even a foot powder, which washes off with water.
- Dark or multi-color objects can also be painted with white tempera paint, which can wash off of non-porous surfaces with water.
- Occluding objects—that is, objects that hide parts of themselves—can be tricky. With an app, you can simply move the camera on your device to see every surface, but with a static scanning tool, you need to position an object at an angle to allow a scanning device to “see” the hidden surfaces. Objects with handles, like a coffee cup, can be challenging to find any angle where occlusion is avoided. Some scanner devices use a multi-scanning function that can cure some, but not all, occlusions by combining more than one scan of the same object.
The results are not perfect—the scanner will not create sharp edges or perfectly flat planes. But the scans are accurate and well-scaled enough to clean up with a mesh editor like Meshmixer. You can also use a scan as a reference object to import into 3D modeling software. It’s pretty straightforward to “trace” the scan in space.
Using a device
If you are an advanced practitioner and don’t mind a bit of a learning curve, you can get better results using a device. For students at the school where I teach, we offer the Creality CR-Scanner.
For safety, be aware that many scanner devices use flashing lights that are difficult for people with photosensitive epilepsy. But remember: flashing or patterned light effects can make people with or without epilepsy feel disorientated, uncomfortable, or unwell!
Using an app
if you are a beginner, you can still get amazing results with an app. We recommend Scaniverse for its versatility and ease of use. You can learn how to use this on your mobile device at the link. If you’re a student at the school where I teach, you can get assistance using the app at our maker space.
… Or, fail is the new succeed
You might accidentally scan an unprepared transparent object like a glass. The results of course will be terrible… but maybe also interesting?
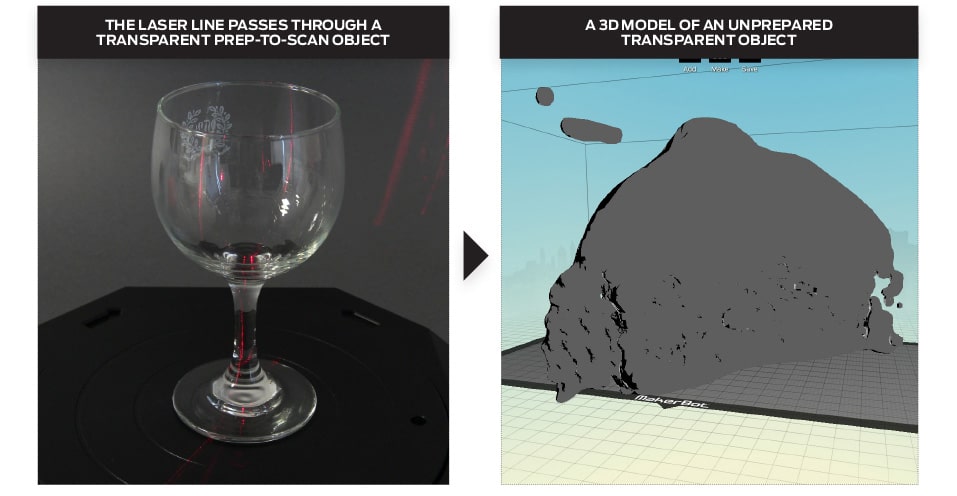
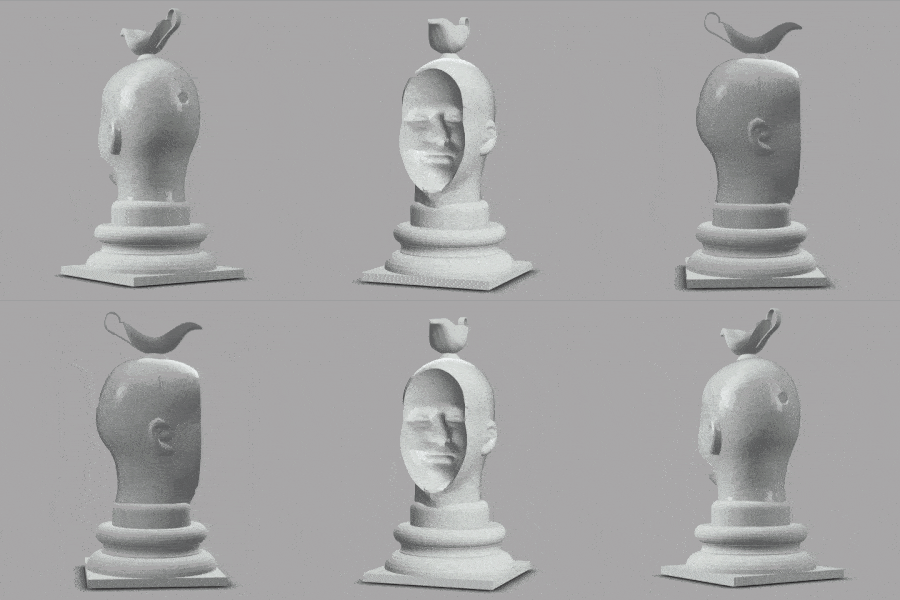
Mesh “fails” that you might ordinarily discard may embody a new way of looking at the world. An accidental application of a scale tool might create an emaciated figure like the one in Chariot by Alberto Giacometti. Grabbing a mesh face on the end of a nose and moving it by accident could make another Giacometti, like his Nose.

Alberto Giacometti, Chariot

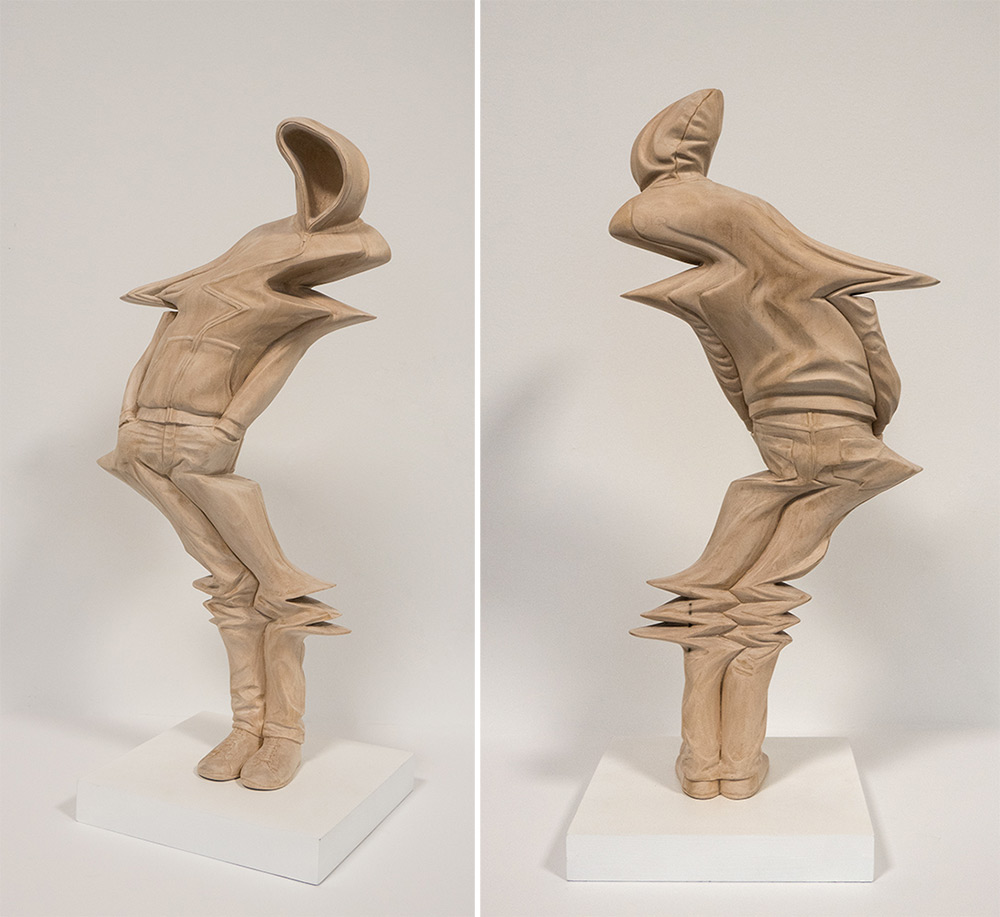
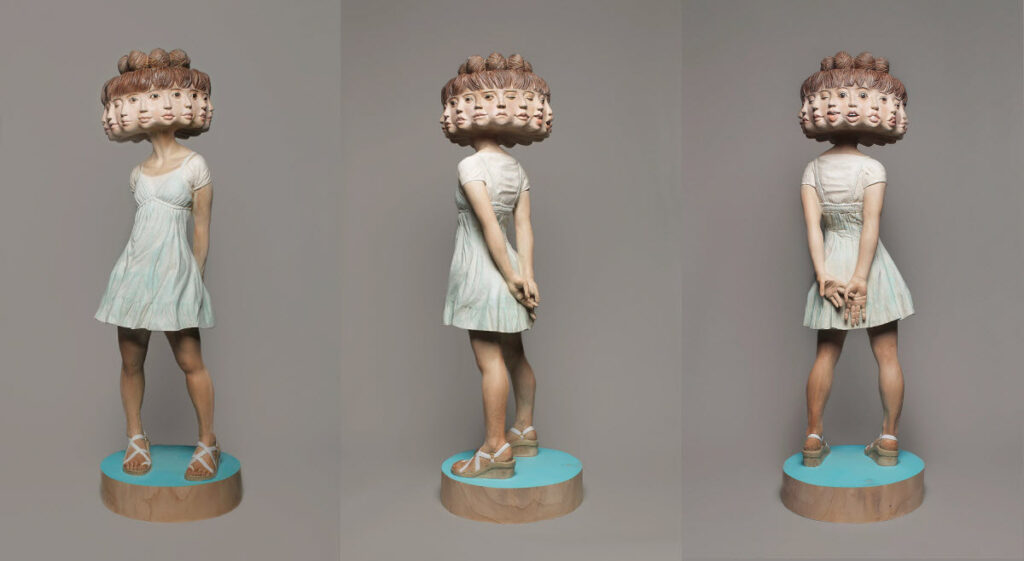
One of the warping, glitchy figures by Paul Kaptein or Yoshitoshi Kanemaki could be created by grabbing and moving, rotating, scaling, or duplicating mesh vertices, edges, or faces. These images are not models, but rather large-scale wooden sculptures inspired by digital glitching.
Select an object to digitize
Find a simple object at home that you’d like to scan and manipulate. It should be smaller than the size of a human head. The scanning device can do larger objects but these files start to get large. It also does well with organic, asymmetrical forms. These tend to obscure the perceived lack of precision seen in geometrically precise, symmetrical forms.
After obtaining a scan you like, export the mesh to STL or OBJ format. We can start to clean that up!
Cleaning a scan file in Meshmixer
If you’d like to inspect the sample files created for this title, download them from the link above.
Import (or use the Stanford Bunny)
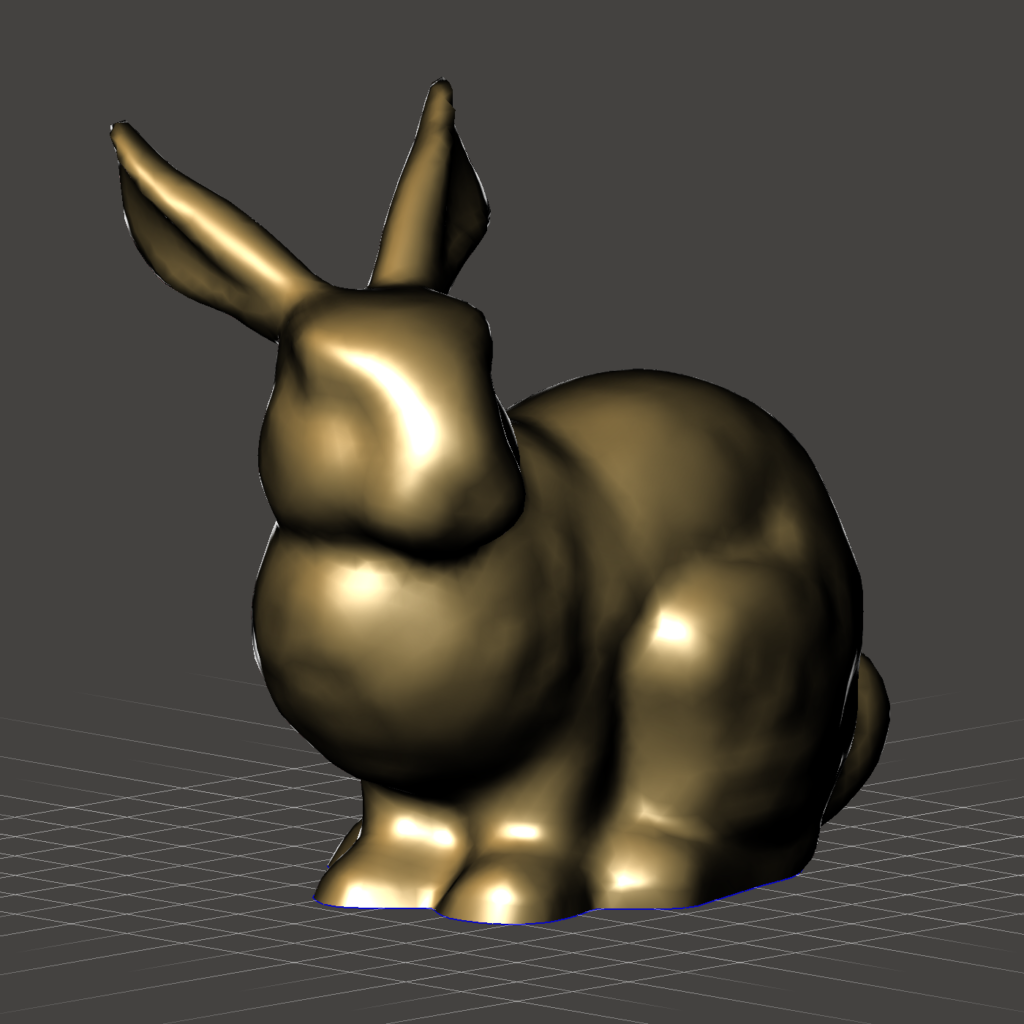
For this part of the exercise, you may choose to import your scan from above. If you don’t have one you like yet, you may import the Stanford Bunny standard reference object. Researchers at Stanford scanned this garden tchotchke back in 1994. Specifically, go to File>Import Bunny or select the Bunny’s icon in a new Meshmixer window. Avoid using the one in the Meshmix options at the Tool bar.
Navigation, selection, and “transforms”
Way-finding can be slightly disorienting to those coming to Meshmixer from modeling programs. Technically speaking, Meshmixer is not a modeling tool, but rather a mesh editing tool.
Navigation | Once you have an item imported into the viewport, you can see a standard Viewcube similar to the one you know from Fusion 360. You can click on Views or Home to navigate. On a Mac, you can use Opt+shift to pan or Ctr+shift to orbit (not quite like Fusion!)
Selection | And unlike Fusion, you are permitted only to select faces, not edges or vertices. When selecting a face it helps go to the menu View > Show Wireframe:
- To select all faces of a mesh, use Cmd+A and you’ll see Select in the Tool bar activate with a dialog box
- To select specific faces, click on Select in the Tool bar first to open the dialog, and you can play with the options here to isolate one or a few faces.
Transforms, a.k.a. Move, Rotate, and Scale | A big mystery to Meshmixer newbies is how to move, rotate, or scale items. These are not the top-shelf menu options you see in other modeling programs. Nevertheless, they are available in two ways that lead to some confusion:
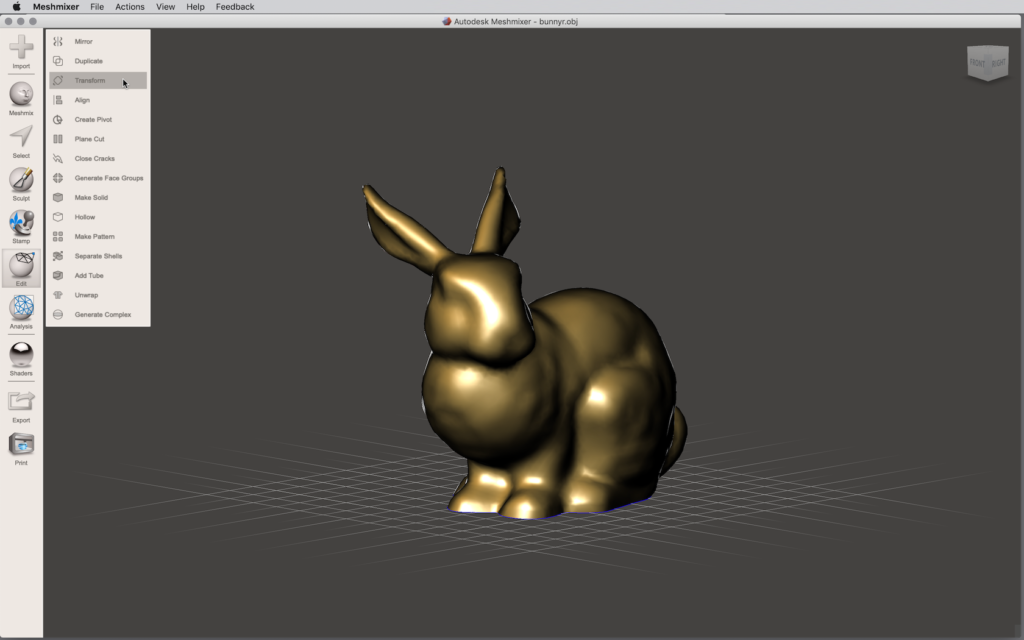
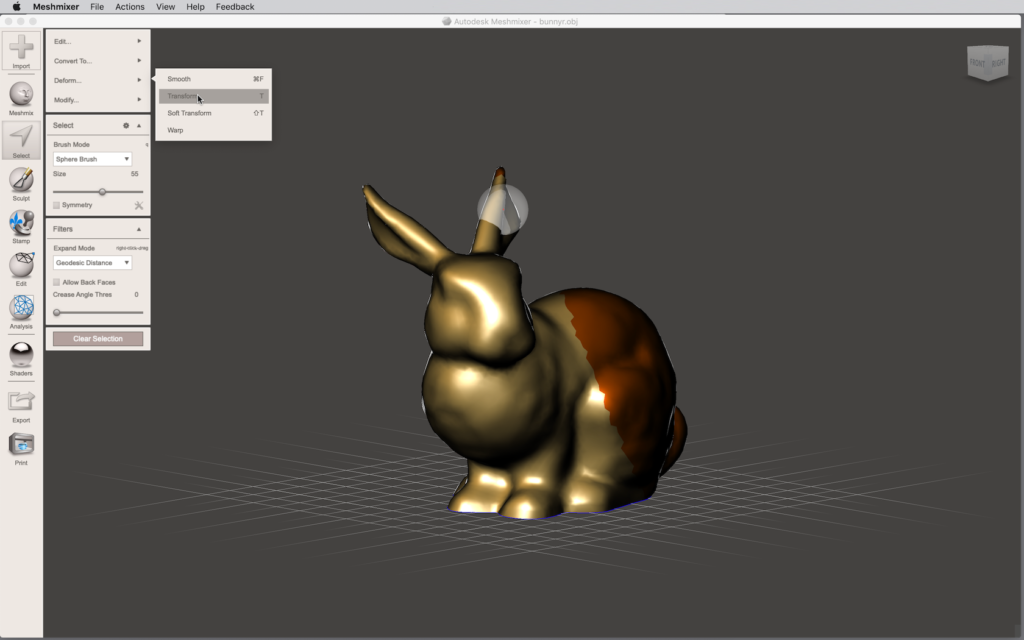
- To move a mesh, click on Edit in the Tool bar and choose Transform. You’ll see a widget similar in function to the Fusion transform tool, with scale, rotate, and move options in 3 axes.
- Make a selection of a portion of the mesh using Select, and you’ll see new functions appear at the top of the Select dialog box. Find Deform > Transform and the transform widget appears.
Basic mesh post-production
Scanning an object with the Digitizer is like cutting material on the band saw: the result is not quite what you want, so you’ll use a file and sandpaper to clean up the edge you cut. In the scanning process, Meshmixer acts a lot like that file and sandpaper: it cleans up a raw scan that may contain unwanted issues.
Closing holes
After importing your scan, inspect it to see if there are any holes in the mesh. We speak of a uniform, closed mesh as a “watertight” one, and 3D printers only love watertight meshes. In our sample, we use the Stanford Bunny because it has a known large hole in the base.
From the Tool bar, we select Analyze>Inspector to inspect and repair holes and other defects such as non-manifold geometry (i.e. impossible cross-over faces), slivers, and non-planar faces.
We notice a blue sphere appears when we invoke the Inspector, and it has a line connecting it to the defect. If you are working with your own scan, you may see one or more of these blue spheres. In the Stanford Bunny, our only defect is a hole, but it’s a defect that will prevent printing.
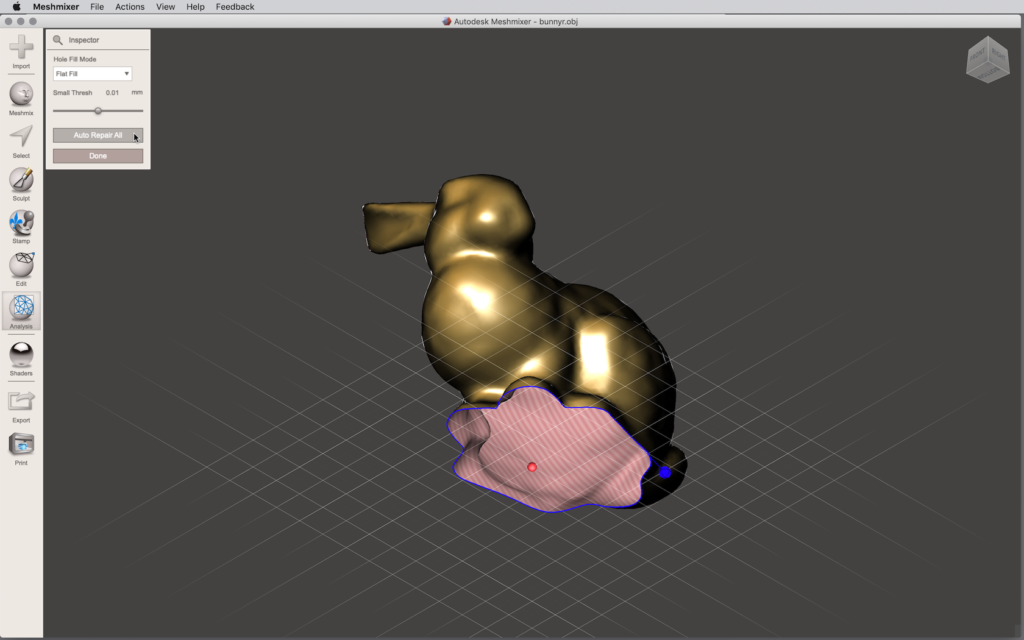
To repair, we have two options that lead to significantly different results:
- Click on the blue sphere, and the hole closes with a sharp edge.
- In the Inspector dropout menu, select Auto Repair All, and you get a softer, filleted edge.
Auto Repair will also give you options like a smoother, rounder fill. On our samples moving forward in this exercise, we opted for the sharp-edge solution.
Cleaning up faces
We want to repair (or at least be aware of) certain weaknesses in a file that may lead to problems in a print, and Meshmixer helps with an array of tools.
Under Analyze:
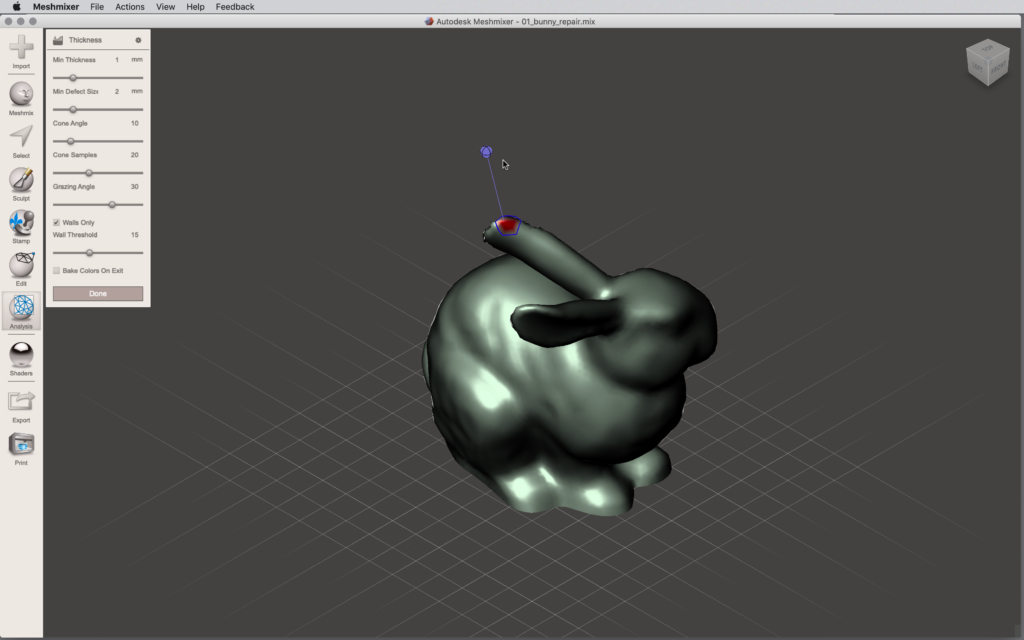
- This function will detect potentially fail-prone wall thicknesses, which you can repair by clicking on the warning sphere. In the Stanford Bunny, a tricky place at the tip of the ear is revealed, and we repair it.
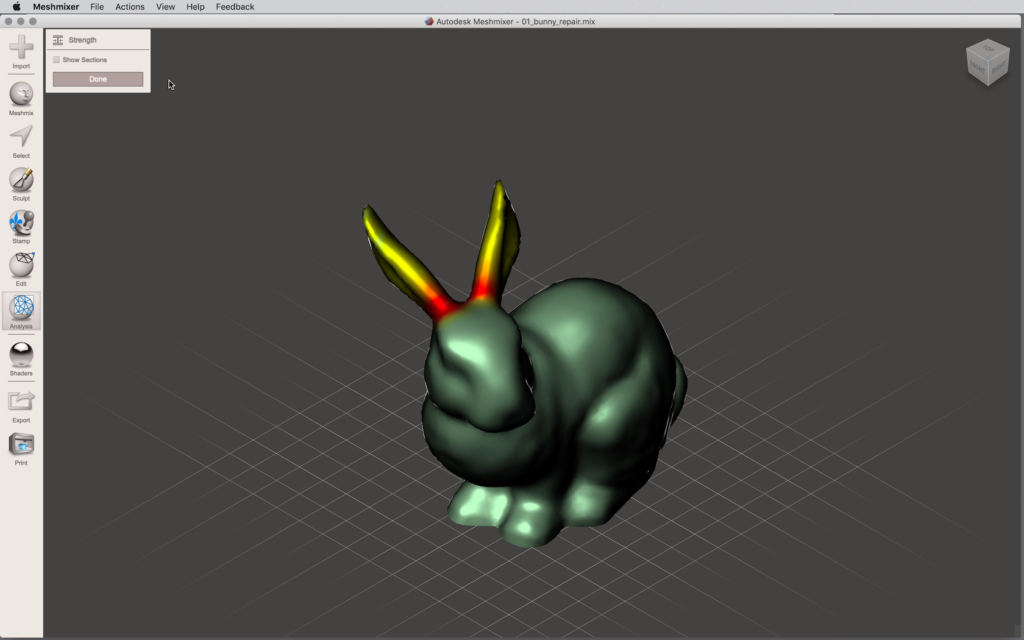
- Strength will show you a heat map of potential weak spots, where red is weaker. We see on the Bunny a red-hot weakness at the base of the ears. No repair is suggested here, but we could select and thicken this area with an Edit tool. We don’t elect to do that in our sample, because it’s common for cantilevered objects like arms and ears to show structural stress at a joint. It’s worth the risk in our sample to maintain fidelity to the original.
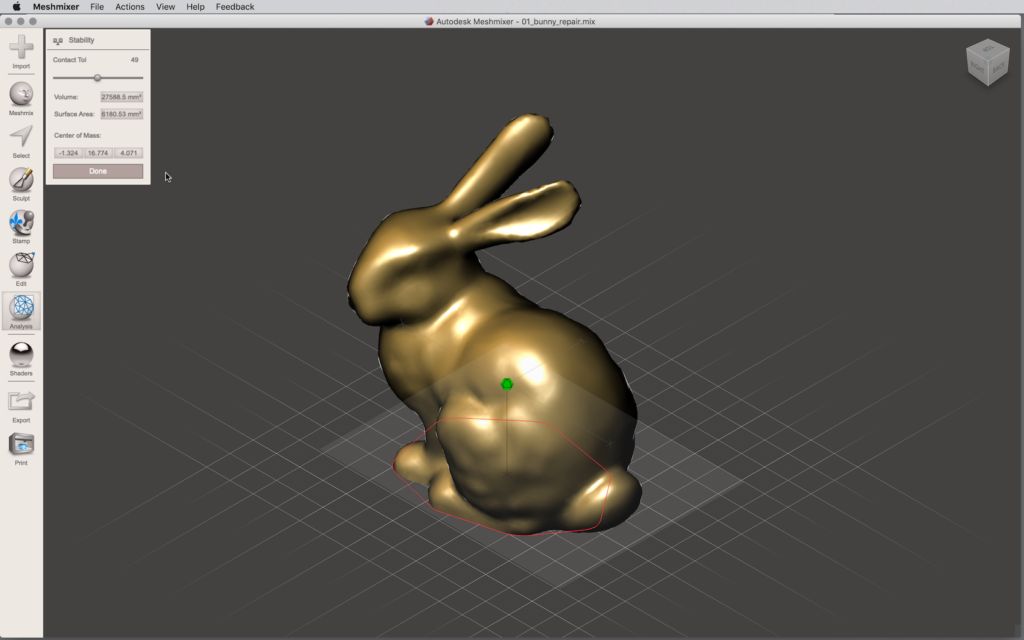
- Center of Mass will show you if your scan has a center of gravity and a base that will allow it to stand if that’s a virtue you seek. The green sphere reveals a center of gravity well within the red line scribing the surface contact with the ground plane for our Bunny.
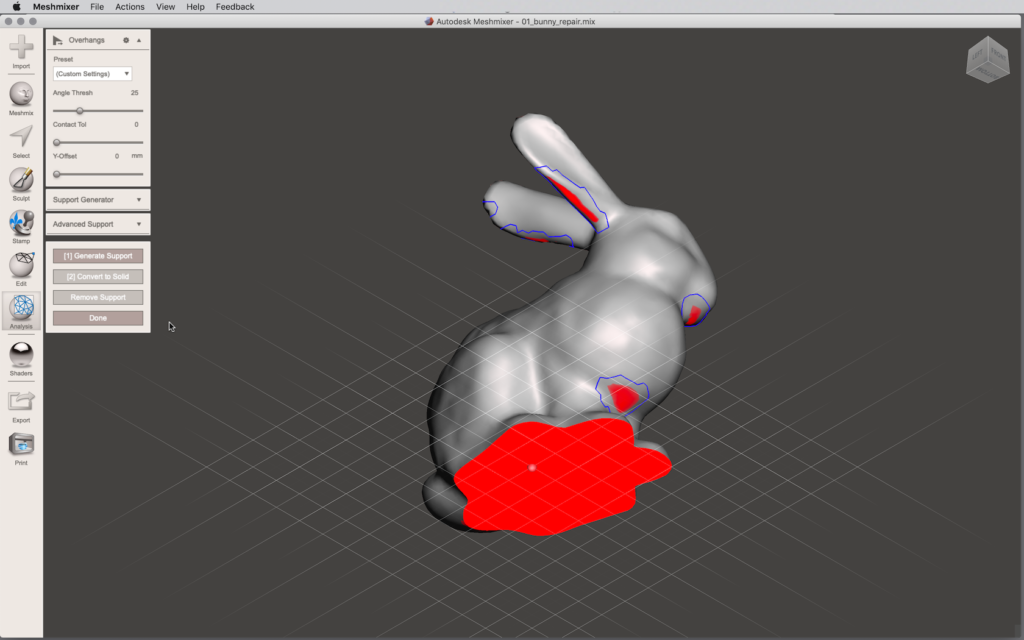
- Overhangs will predict the location of supports when you take it to the printer’s slicing program. In the Bunny, we can expect support under the ears, chin, and chest. These are seen best from a worm’s eye view. If we want, it will generate tree-style support structures which are sometimes helpful in avoiding an unwanted mass of vertical supports.
Smoothing rough spots
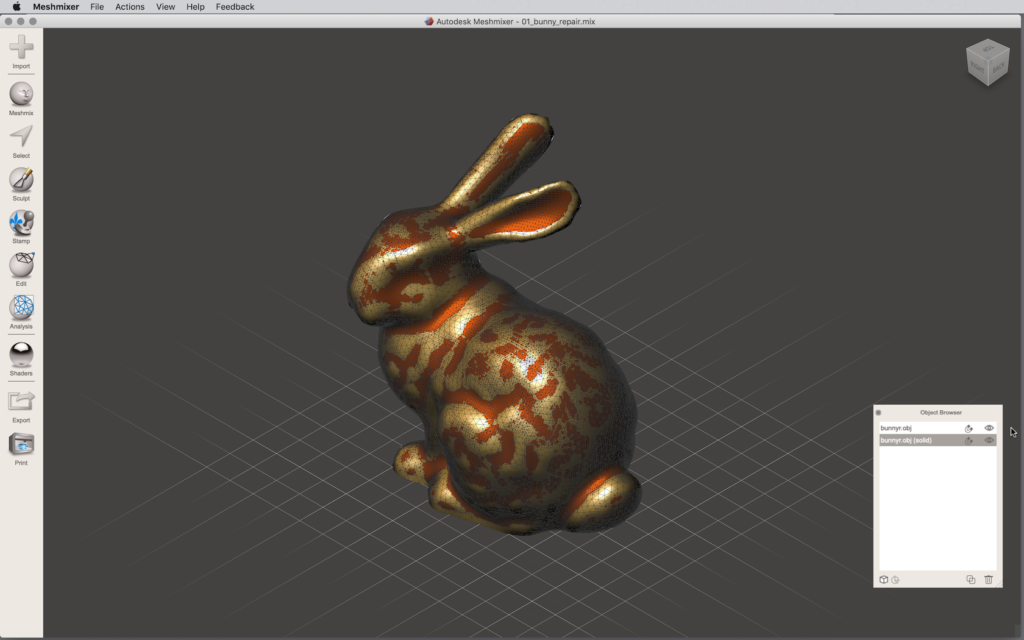
The density of your mesh determines smoothness, and in some tight areas, you might see some rough spots. On the Bunny, the resolution of the mesh in the ears creates jagged contours where we expect smoothness. In the menu, go to View>Show Wireframe and this shows the edges of your polygons, which makes it easier to see why some rough patches exist.
Here’s a quick workflow to solve:
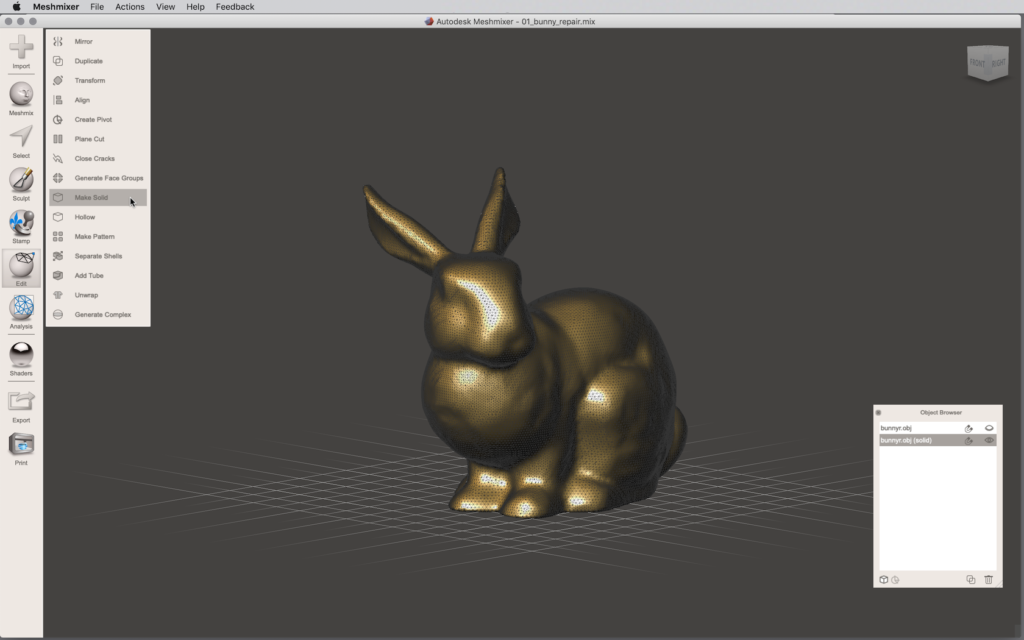
- In the Tool bar, enter Edit and select Make Solid. This effectively duplicates the original as a higher-density mesh. The Make Solid function can also further refine accuracy and mesh density by playing with variables in the dialog box. Other useful functions here are the Offset Distance and Minimum Thickness parameters, which can adjust too-thick or too-thin areas. Here’s the Autodesk help page for more.
- Hit Accept to create this solid object, and the Object Browser appears. Note the original mesh is hiding (eye icon is closed). The new mesh is visible and active (highlighted by the gray bar).
- Once complete, hit Cmd+A to select the entire active mesh.
- In the Select dialog box, go to Edit… and select Deform>Smooth. Bumps in the mesh will diminish in intensity. Hit Accept.
- With this mesh still selected to highlight it, compare the results with the old mesh to observe any significant deviation.
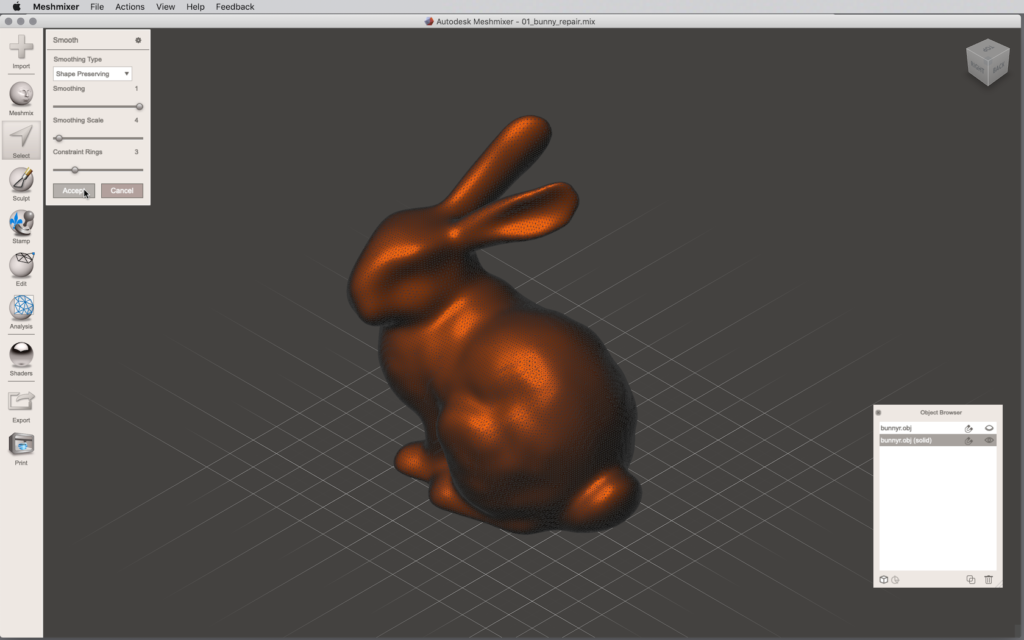
Comparing mesh copies by turning on the original in the Object Browser will reveal any lack of fidelity in the copy. We see the ears shrink a tiny amount, but not enough to reject the result of our smoothing test.
Reducing polygon count
We might export that last smooth mesh out of Meshmixer only to find that it is so large it chokes Fusion on import, or even be rejected by our 3D printer as too much data.
We can significantly reduce the number of faces (also called polygon count or poly-count). Here’s a workflow:
- Select the smoothed mesh with CMD+A and note the number of triangles indicated in the lower right corner of the viewport. In our smoothed Bunny, it’s well north of 80,000. Forget printing this or importing it to Fusion!
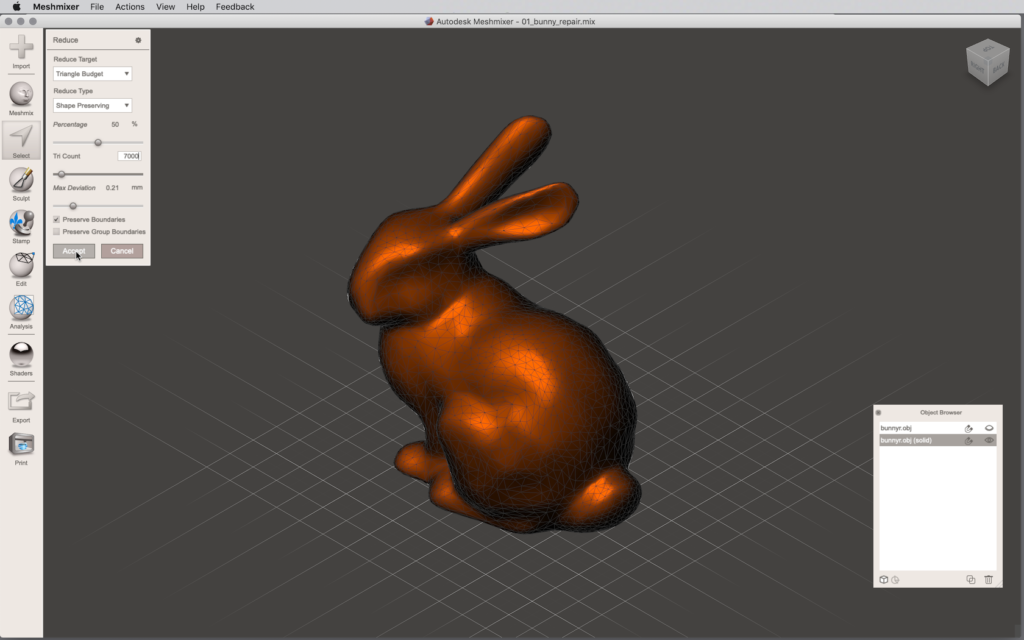
- While the mesh is still selected, choose Edit… from the Select dropout (this is NOT Edit from the Tool bar), and find Reduce.
- Our goal is to bring the poly-count down to well under 10,000 faces, a reduction of about 90% or more:
- Try Percentage from the Reduce Target dropout and type in 90 in the Percentage field (the slider is a bit sensitive). In our Bunny, we see just over 8000 faces when we hit Accept, with no appreciable loss of fidelity.
- Undo this and try Triangle Budget from the Reduce Target dropout. Here you can specify a precise number of faces, so we type in 7000 and hit Accept.
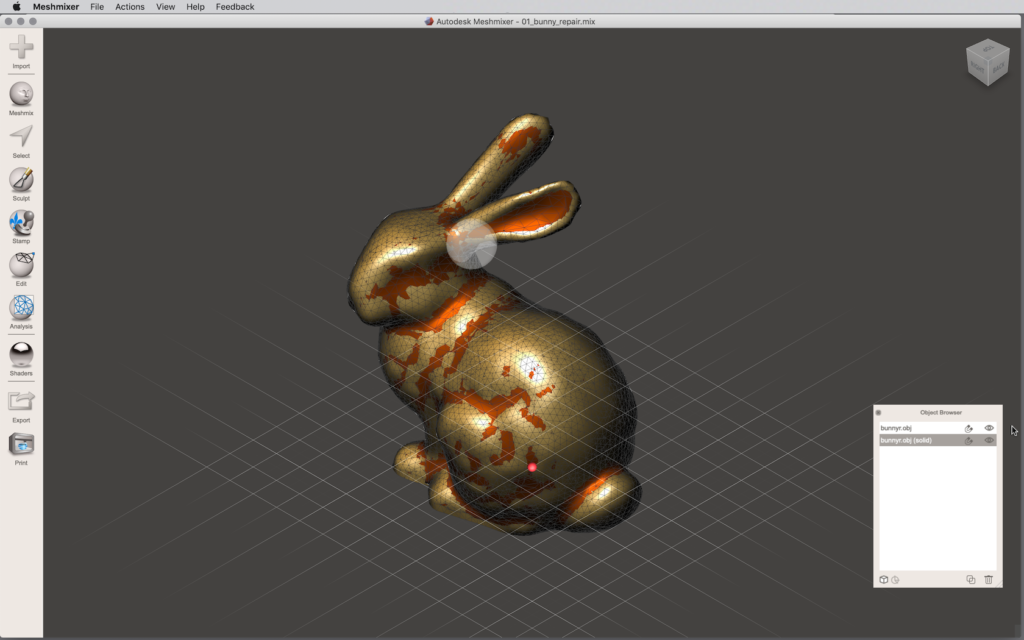
By now, you probably understand the terms faces, polygons, polys, and triangles are synonymous, but this lack of standard nomenclature in the jargon can be a bit confusing!
Save and export a clean mesh
With the mesh repaired, save the file (menu File>Save) to create a .mix file, and export (menu File>Export) to create an STL or OBJ that can be imported to Fusion or uploaded to a 3D printer. This clean mesh is the first goal, but we’re not done! Use this historical state of the file to generate interesting modifications explored below.
Part 2: Meshmixer Modification
With a cleaner, more efficient mesh, think of ways you can take the realism of the mesh into new territories and new kinds of realism — like surrealism, anyone? Below are several ways to generate a surreal state in your object.
Take a look at all of them, and for this exercise, choose ONE to manipulate a COPY of your refined mesh from above.
Scale and distortions
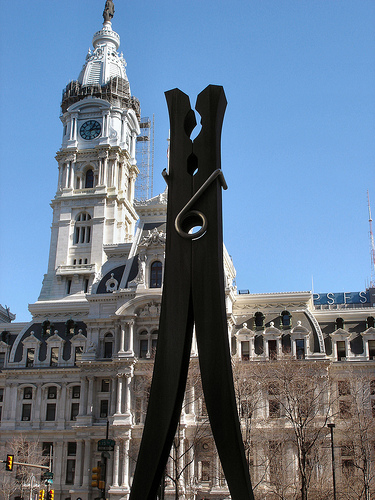
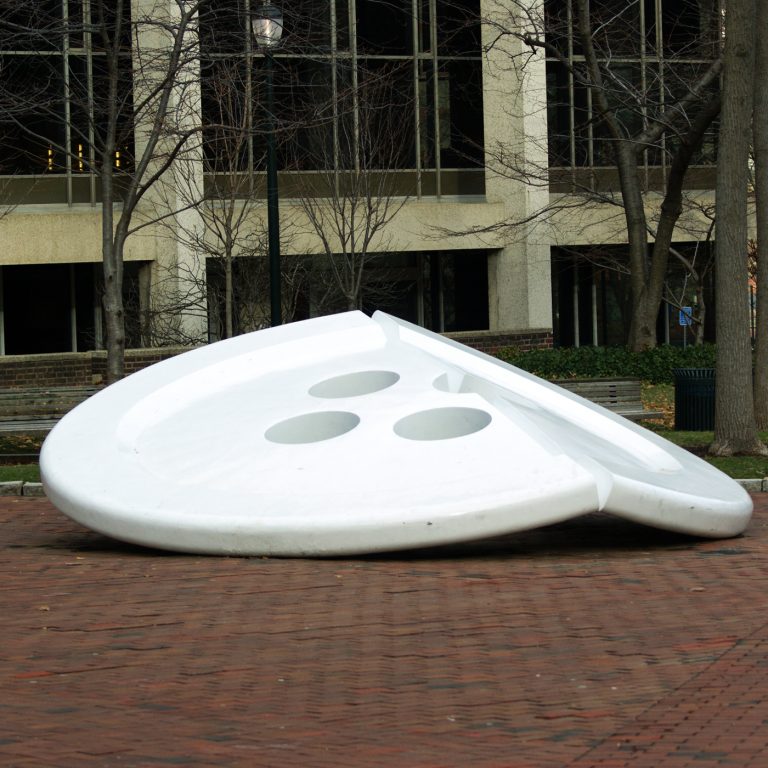
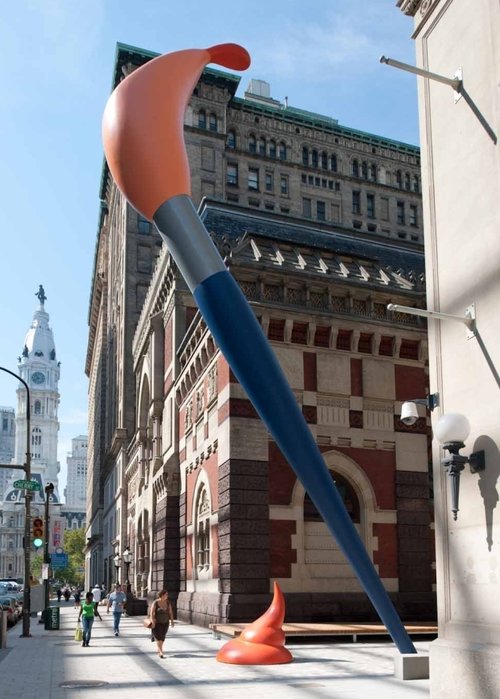
Making an ordinarily very tiny object very large, or a big item small, creates surreal states. Claes Oldenburg and Coosje van Bruggen play with the edge between Pop Art and Surrealism with such works as Clothespin, Button, and Paint Torch, all found in Philadelphia.
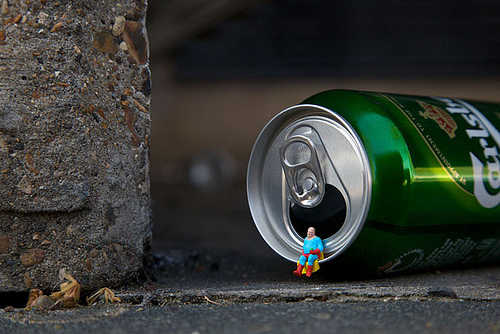
On the other side of the scale street, where big becomes small, we might find street artist Slinkachu, creating perhaps the world’s smallest figure sculptures and placing them to create random, surreal encounters with his audience.
Non-uniform scaling is not always an accident. It can be a deliberate breaking of the aspect ratios among height, width, or depth. Hans Holbein the Younger creates a surreal memento mori skull centuries before Salvador Dali in his painting The Ambassadors, 1533.


… until you see it from the perfect point of view!
This distortion became the inspiration for williamCromar’s meme_n_to_ma_ga_m_or_i, a web installation modeled using threejs, published as an interactive: click and drag on the distorted model to see a true skull magically emerge!
williamCromar, meme_n_to_ma_ga_m_or_i, © 2020
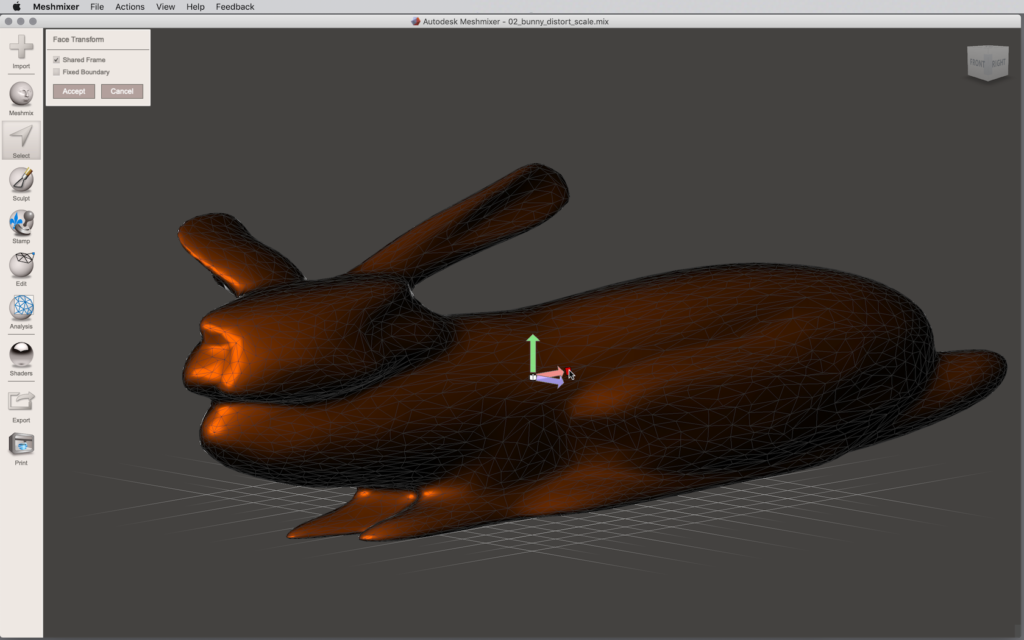
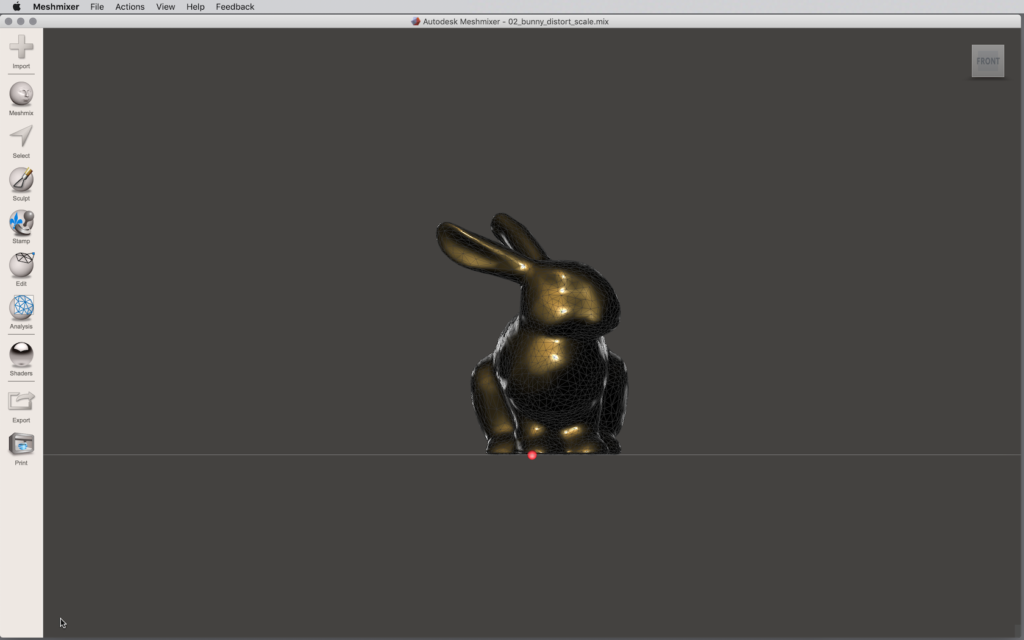
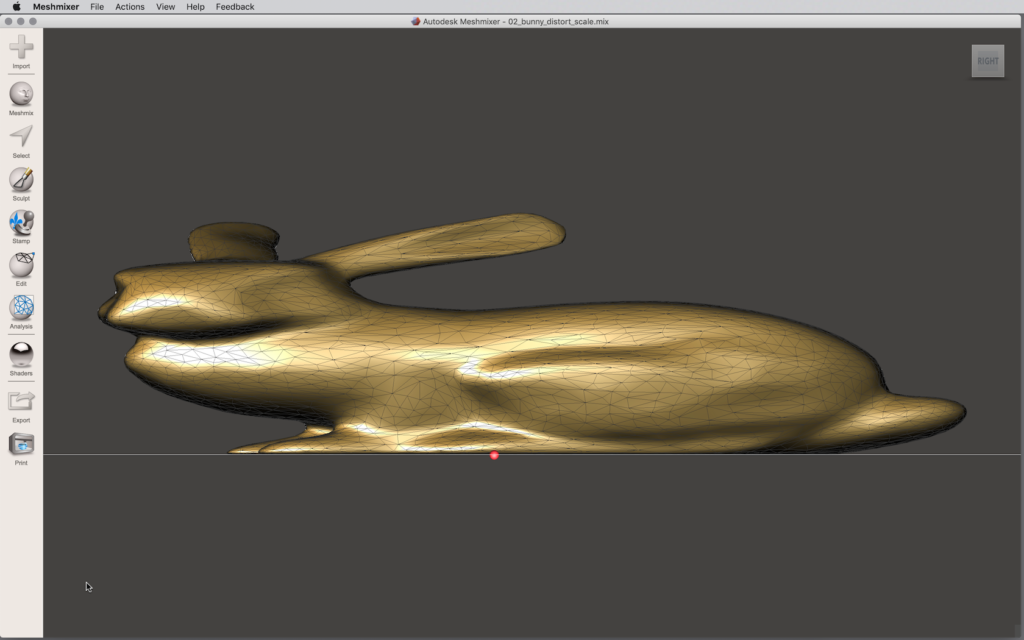
In our non-uniform scaling distortion of the Stanford Bunny, we see how Select>Deform>Transform opens the transform widget, which we select and pull only in the Y-axis direction to distort. When done, hit Accept and view from the ortho Right and ortho Front to see the strange phenomenon known as 3-D anamorphic projection.
Lo-Res
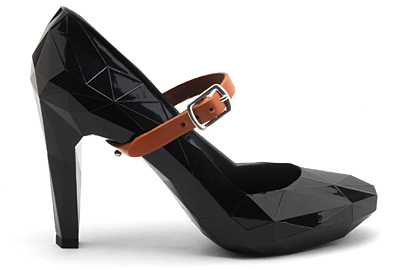
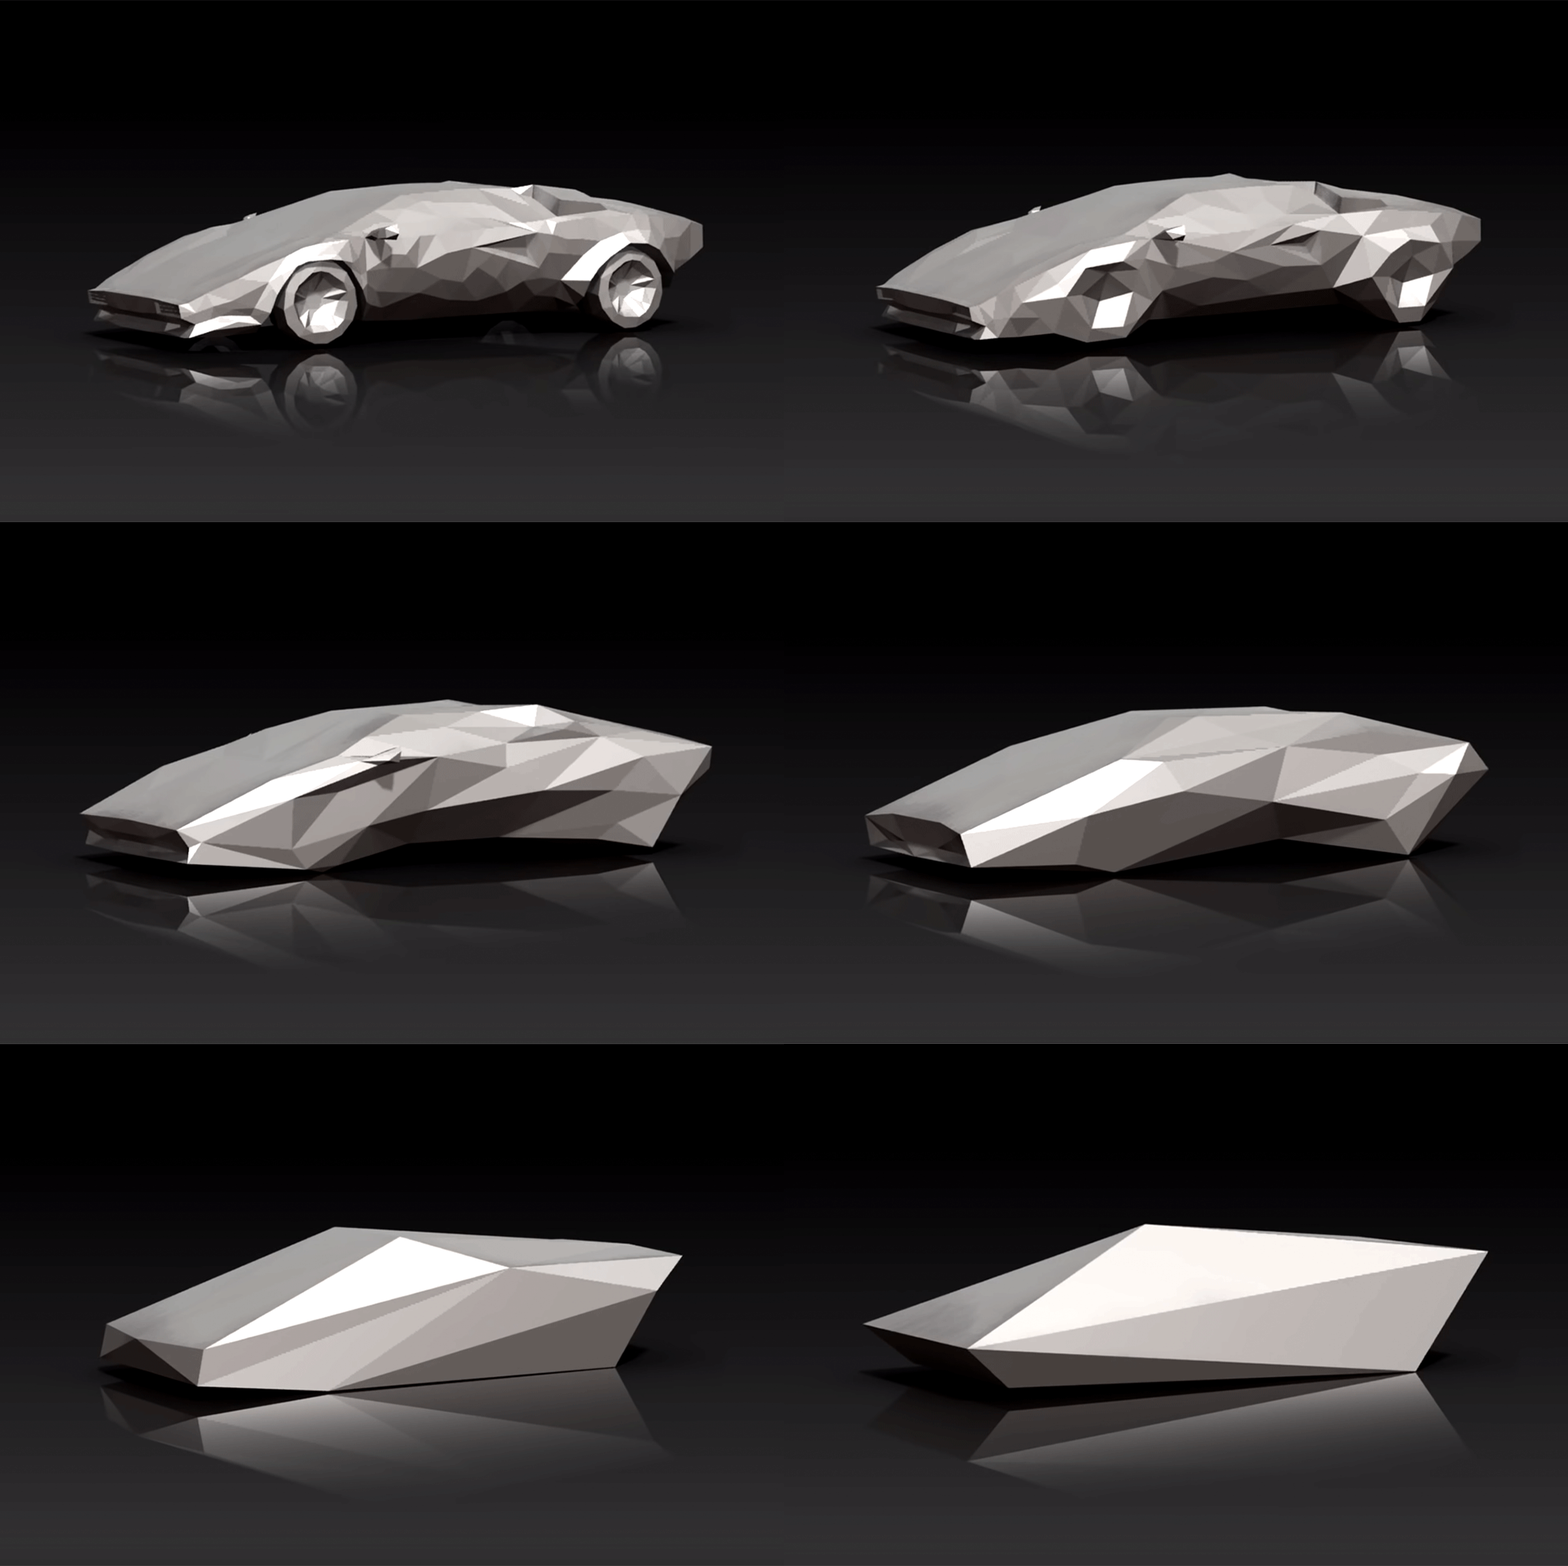
Low-poly art and design is a popular contemporary expressive device. Architect Rem Koolhaas entered the fashion and auto-design realms with his Lo-Res Shoe and Lo-Res Car under his label United Nude. The car was a polygon reduction of a Lamborghini, and it preceded the low-res design of Tesla’s Cybertruck by a few years.

But Daniel Liebeskind beat them all to the punch with his highly faceted, low-poly Tea Set in 2009.
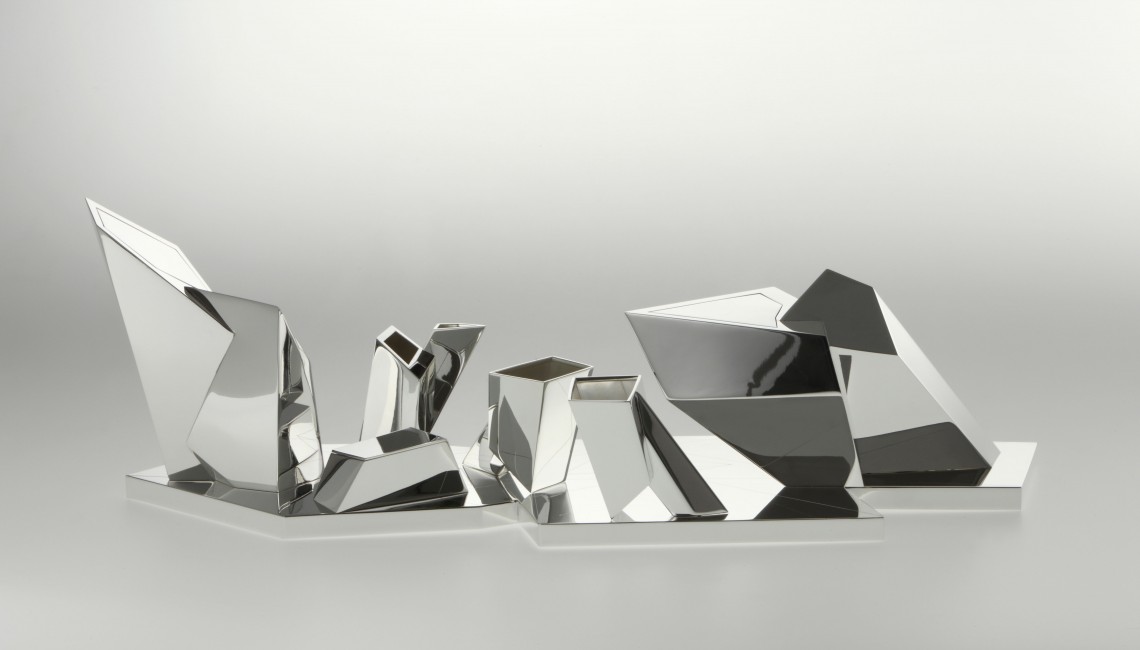
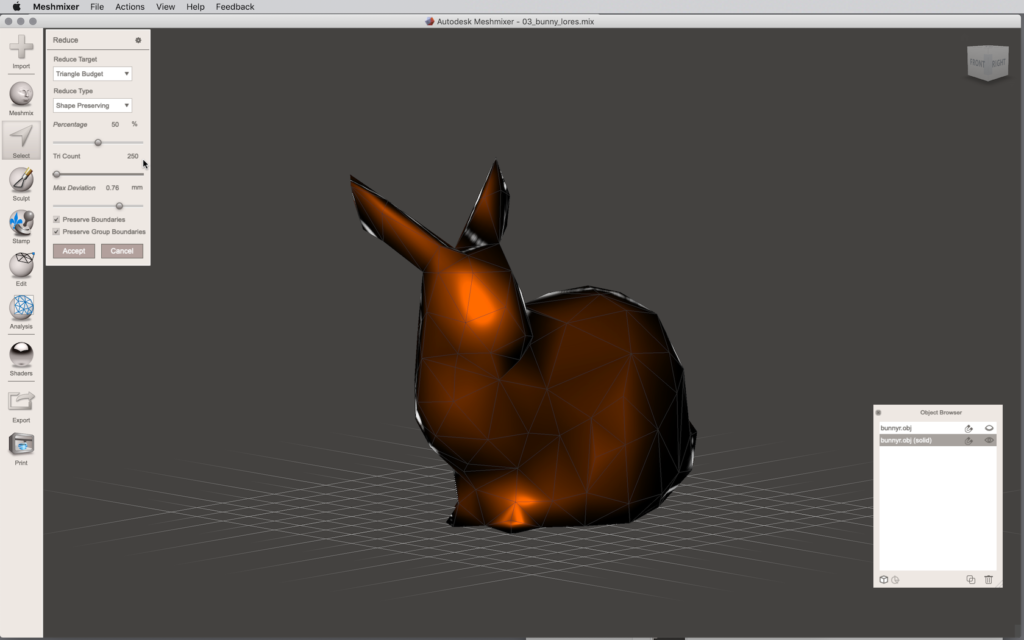
The essence of this effect is a radical reduction in the number of triangles that make up all 3D mesh objects. Since the triangles already exist, our job is quite simply to reduce, and in Meshmixer, this is the workflow for our Stanford Bunny:
- Select all with CMD+A and enter Edit… > Reduce in the dropout.
- Change Reduce Target to Triangle Budget.
- Adjust the Tri count as you wish. In our 7000 face model, we type in 250, a massive reduction that still maintains integrity. Hit Accept.
- Because the base lost its flat planarity, we use the Select > Edit… > Plane Cut to shave off the bottom, then move the base to be congruent with the XY plane for a clean base.
Voxel
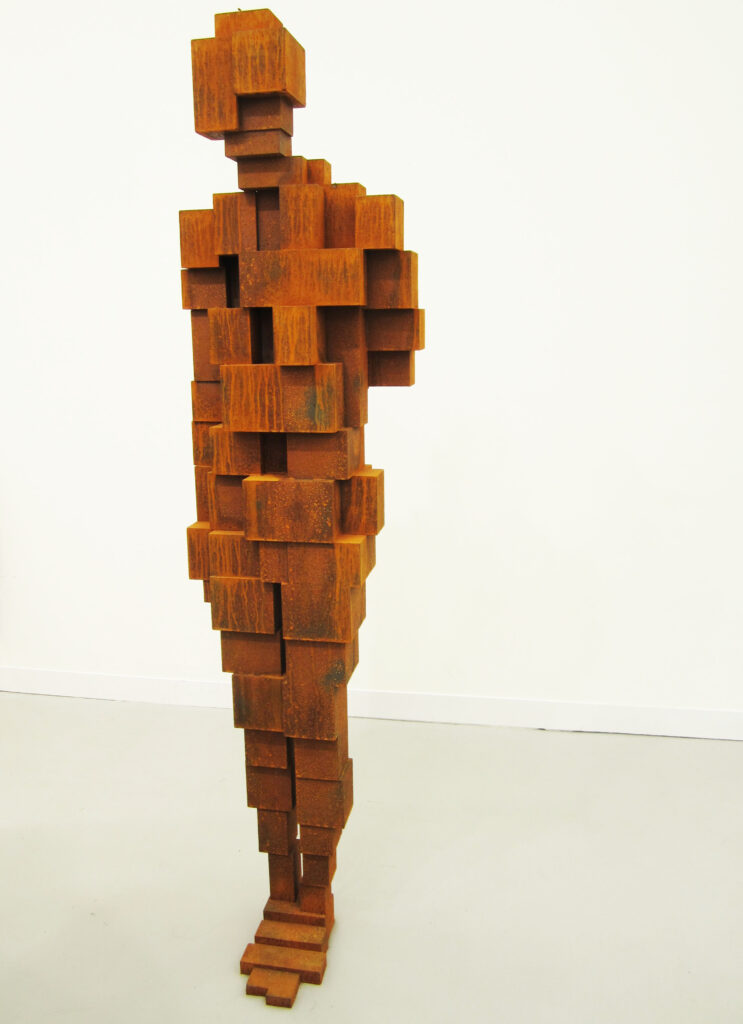
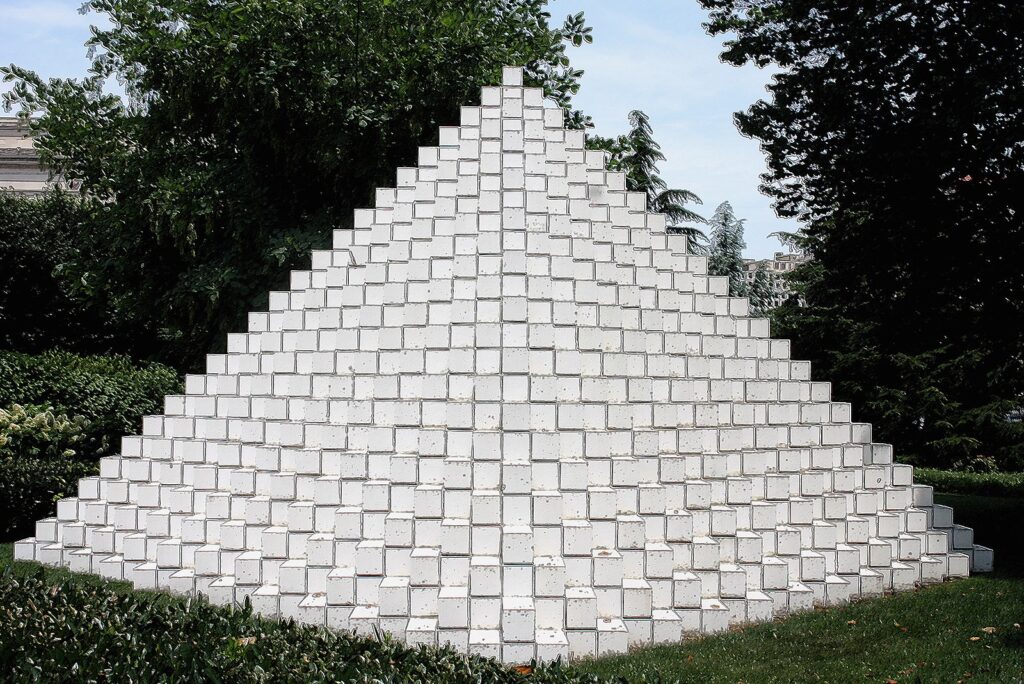
A voxel is the 3D analog to a 2D pixel. Just as a large number of pixels accumulate into an image, a massive amount of 3D voxels can generate a sculptural form.
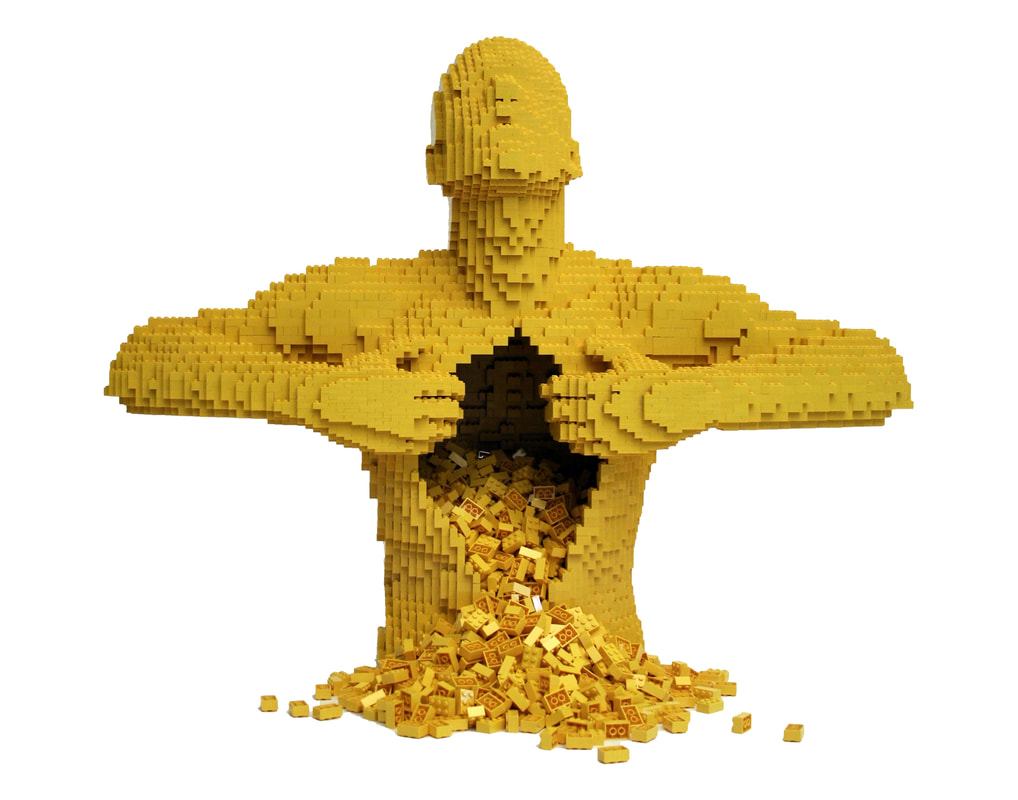
While not exactly cubes, the rectangular solids of Anthony Gormley imply a human figure at a low resolution, while a more modular grid structures a pyramid by Sol Lewitt. In a more playful venture, Nathan Sawaya uses actual Legos as his sculptural material.
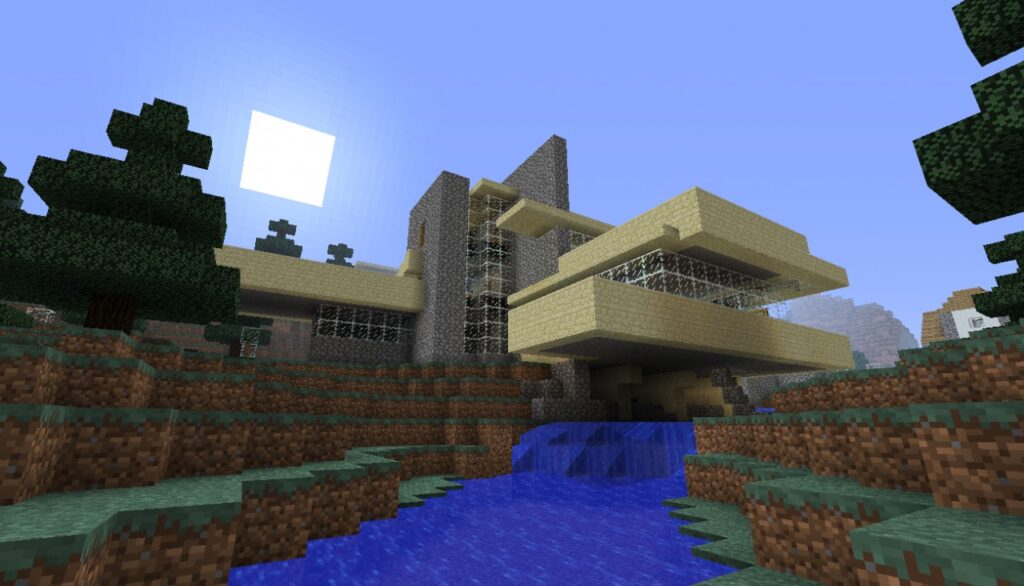
Meanwhile, various crafters in the voxel game Minecraft exploit the cubic volumetric grid system used by architect Frank Lloyd Wright to craft his iconic house, Fallingwater.

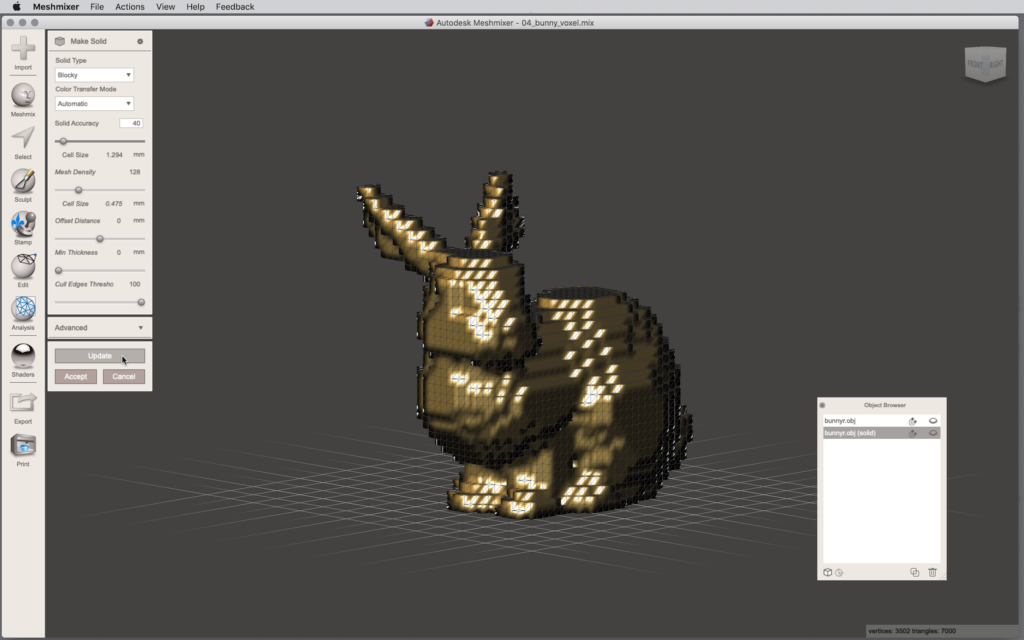
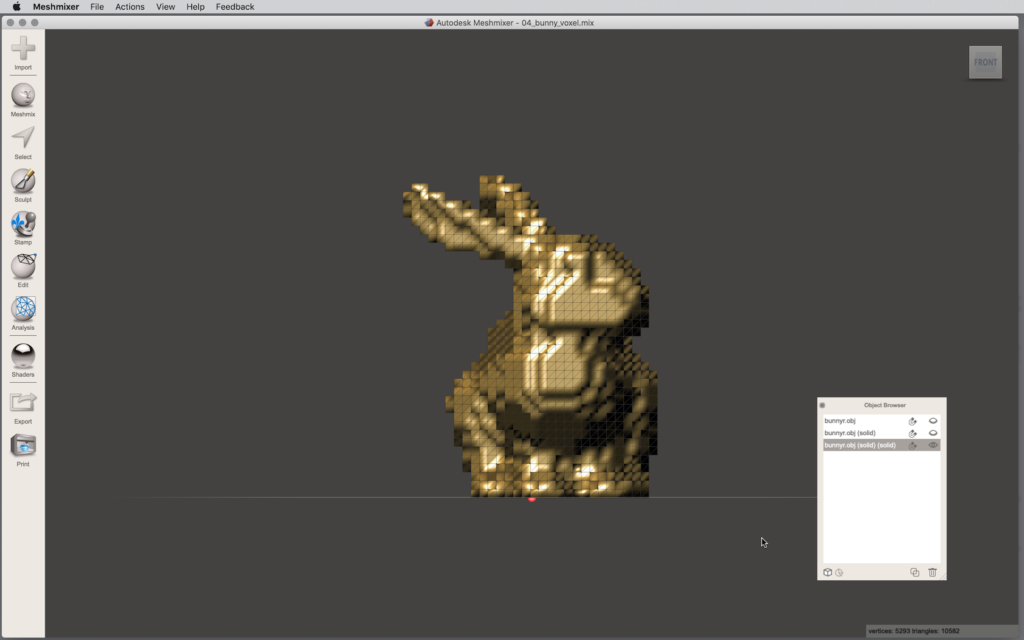
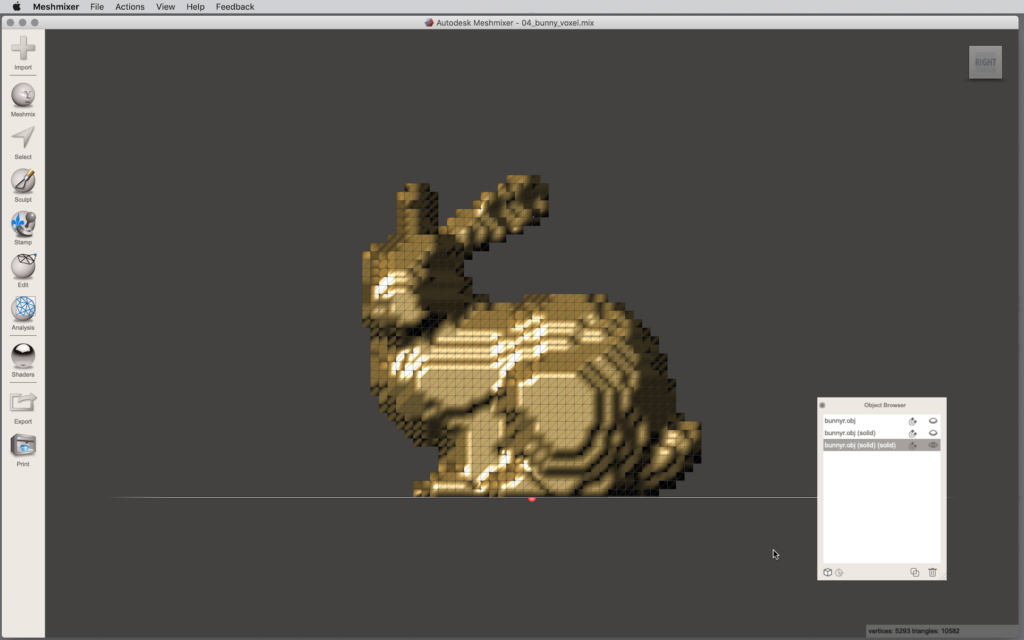
To render the Stanford Bunny in a voxelized formal language, here’s the workflow:
- Select all with CMD+A and enter Edit…>Make Solid in the dropout.
- Switch Solid Type to Blocky.
- Adjust Solid accuracy to set the density of cubes. In our sample, we typed in a lower value, around 40.
- In this algorithmically intense tool, we need to hit Update every time we change parameters to see the result.
- Inspect all around the model to catch any loose cubes, and hit Accept when satisfied.
Solving overhangs in voxel
The big downside to voxelized models: all the overhanging cubes require support! This can be a pain, but there are clever advanced tricks to avoid massive support printing:
- Select Edit > Transform and rotate the model about the X or Z axis 45 degrees.
- Select Edit > Make Solid and change Solid Type to Blocky. We used the same value as above, 40, for Solid accuracy here.
- Again, we hit Update to see our progress when changing a value, then Accept when done.
- Rotate the model -45 degrees. You’ll notice the base is no longer flat!
- Fix the jagged base using Edit>Plane Cut, and drag the plane down congruent with the XY plane.
- Hit Accept and the tool trims the base.
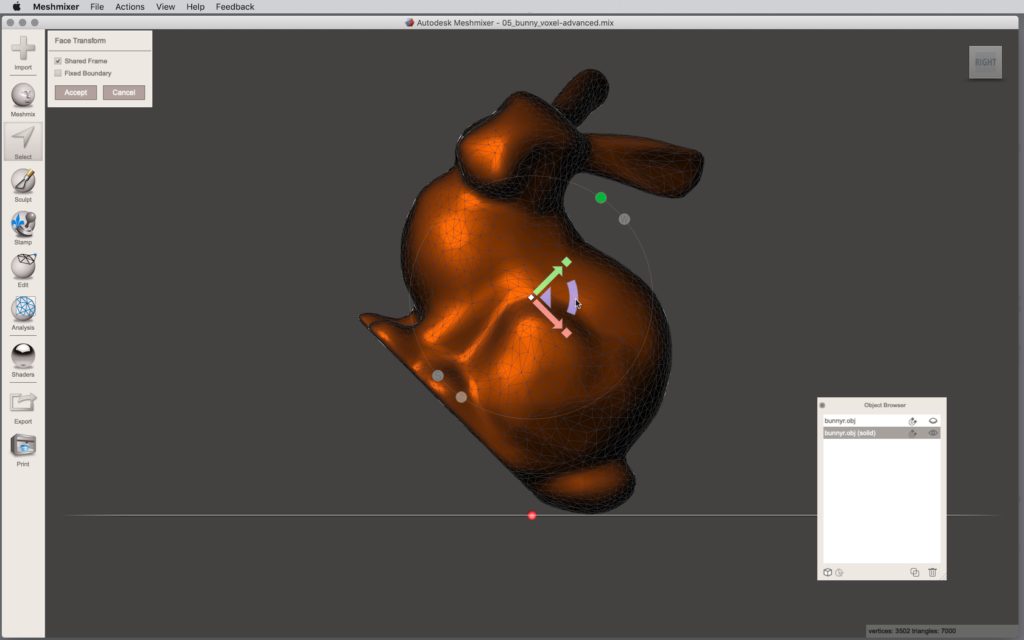
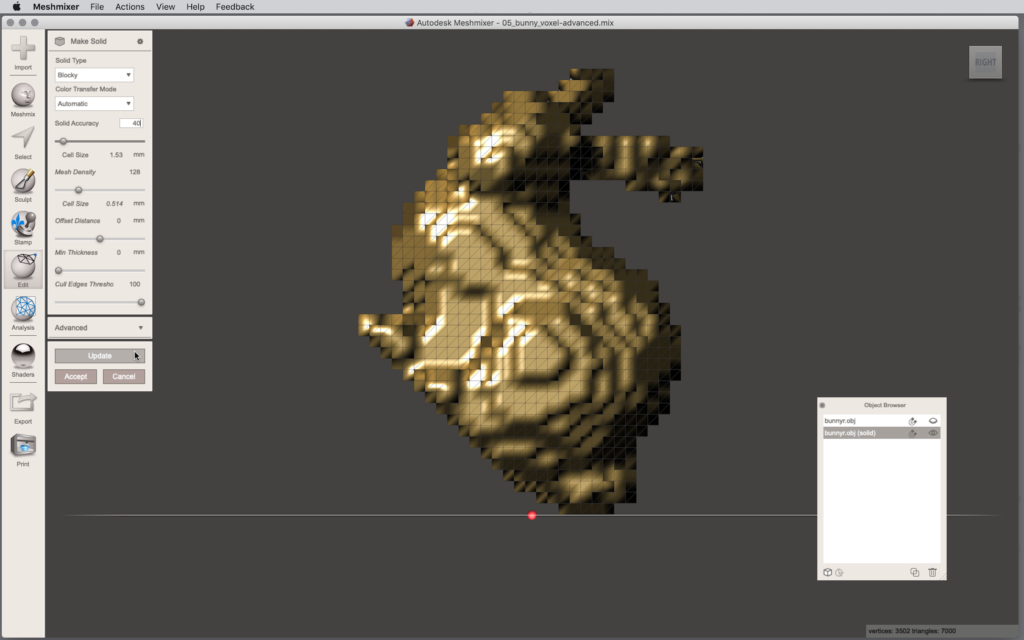
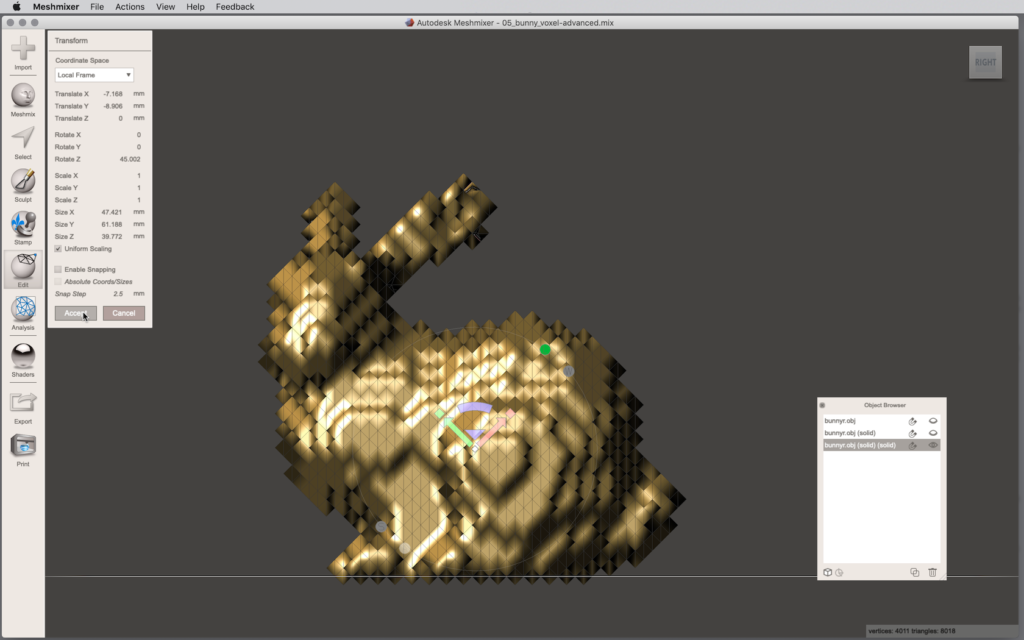

This does not eliminate ALL supports from our model, but it significantly reduces the need for massive scaffolding cleanup.
Voronoi
A Voronoi pattern is mathematically generated from a random set of points on a plane. As plane partitions emerge from these points (known as seeds), partition edges emerge such that they are equidistant from their seeds. From observing soap bubbles to tracking epidemics to designing architectural structures, Voronoi principles have practical applications.

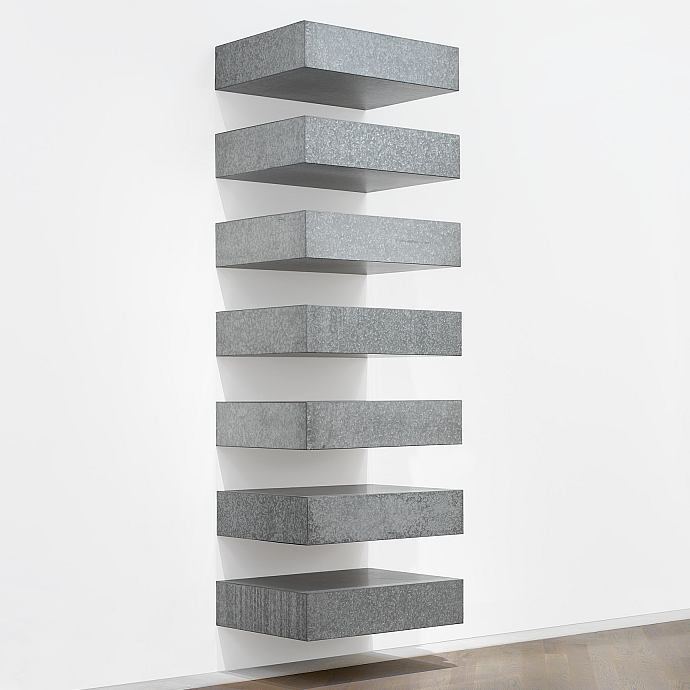
The Beijing National Aquatics Center, designed for the 2008 Olympics by PTW Architects, is not only an efficient structure, but a powerful metaphor for the activity it houses: swimming. Anthony Gormley — again! — shows his knack for expressing existential ambiguity in his Voronoi-inspired figure sculpture. Marc Newson uses gigantic CNC routing to carve a solid block of marble into his iconic Voronoi Shelf.
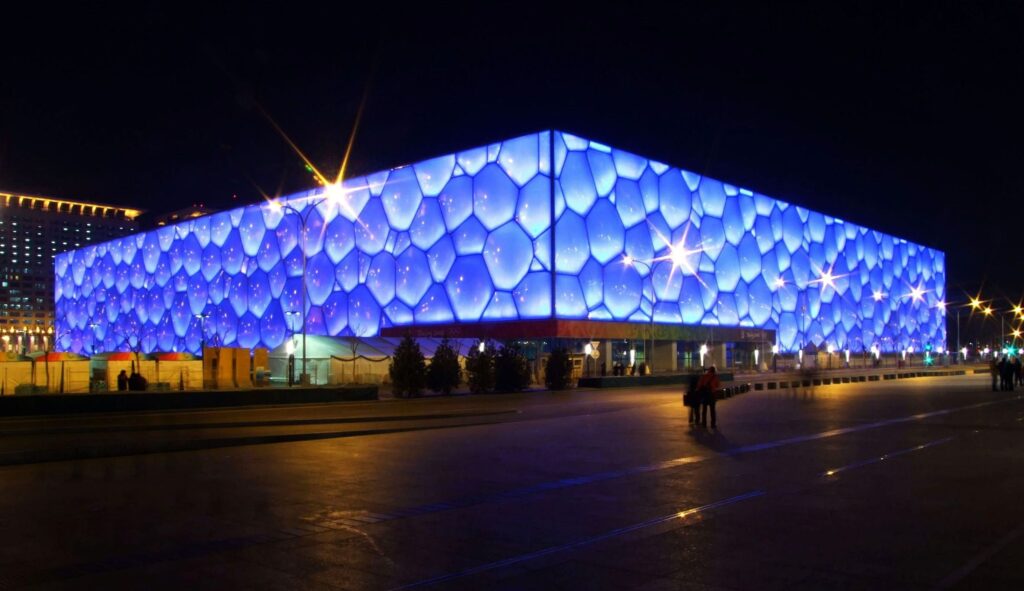
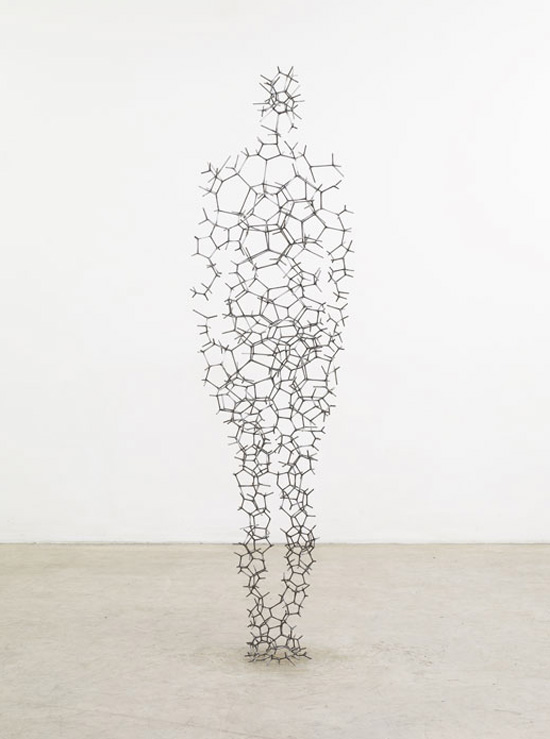
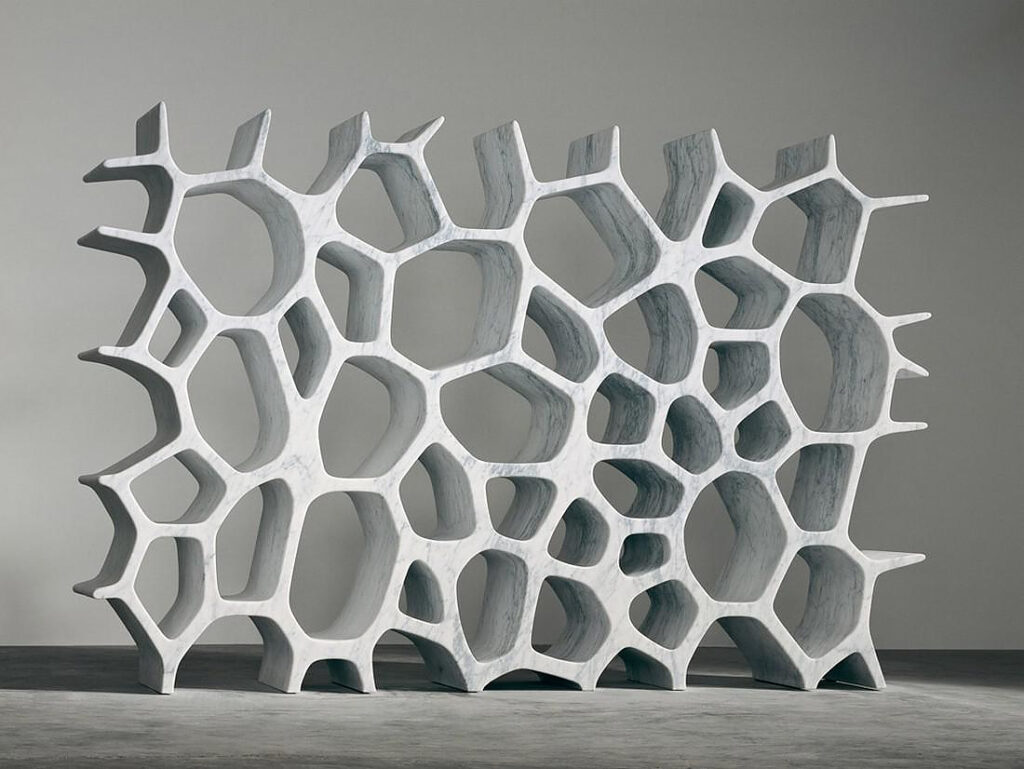
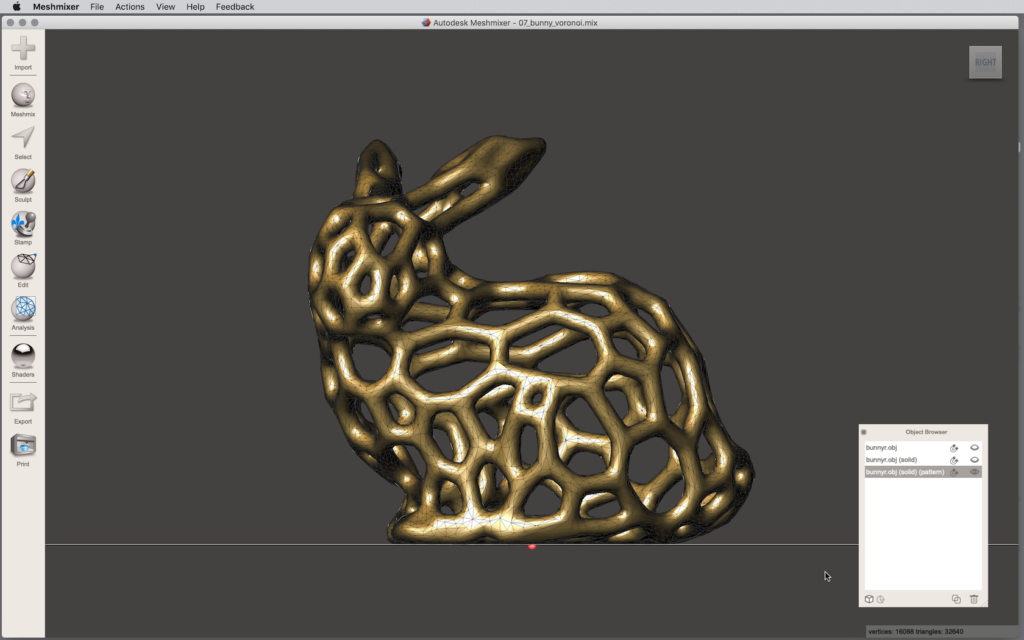
The triangle faces of a 3D mesh are essentially Voronoi planes, so it’s not a difficult leap conceptually to generate a Voronoi formal expression in a model. This can be very tricky physically, however! It’s support intensive and often creates strength issues. In other words, it’s very easy to make an impossible-to-clean-without-breaking print. If you can pull it off, however, it’s pretty impressive:
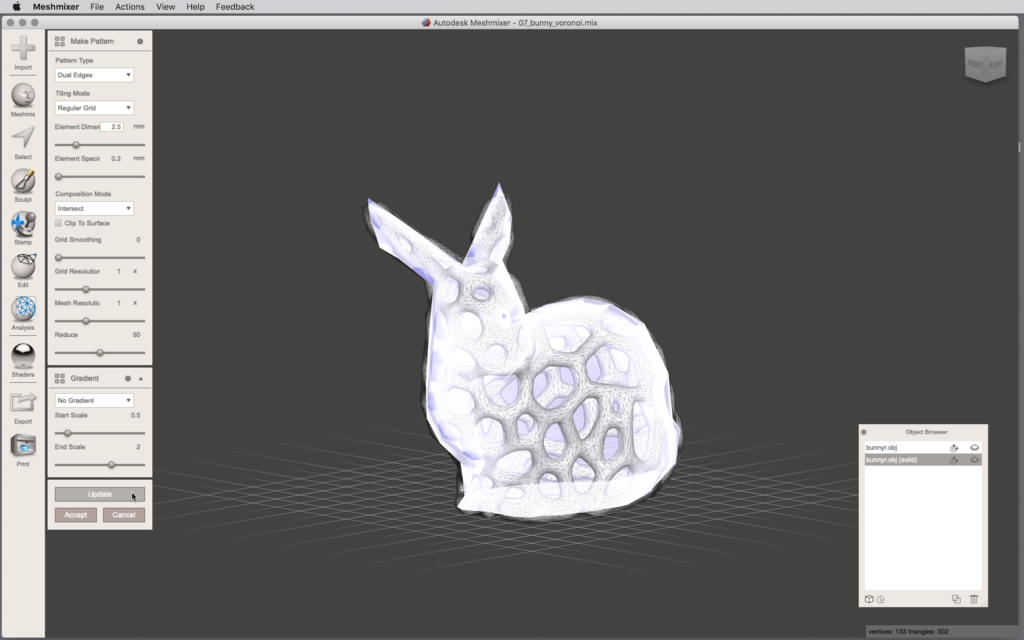
- First, make a low-res version of your mesh by following the Low-res workflow above. We use a copy of the Lo-Res version of our Stanford Bunny. The number of triangles we create in a low-poly model will generate the Voronoi cells.
- Select Edit > Make Pattern.
- In the Pattern Type drop-down, select Dual Edges and adjust the variables to suit. In our Bunny, we bumped the Element dimension up to 2.5mm.
- Update as you make changes and hit Accept when done.
Solving voronoi issues
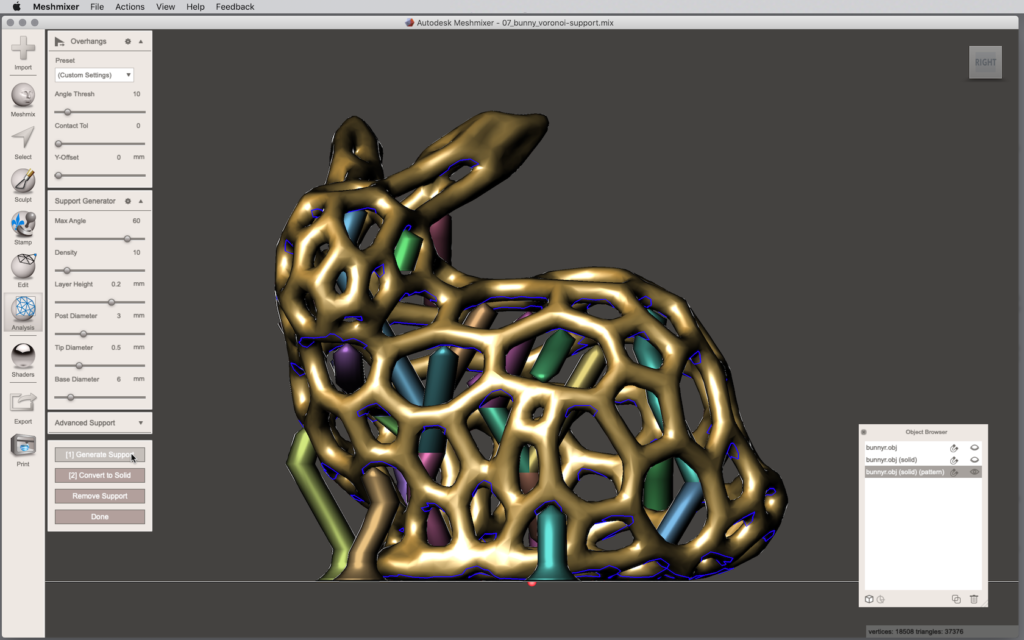
The liabilities of this model include minimal contact area with the print bed and the potential for a TON of support. Try printing with a raft or brim, and without supports if the model will allow. Alternatively, you can use Meshmixer’s tree-like support generator under Analyze > Overhangs, using variables that minimize support elements. Any way you approach it, expect trial and error with this formal expression, but the results are well worth it if you succeed!
Streamline
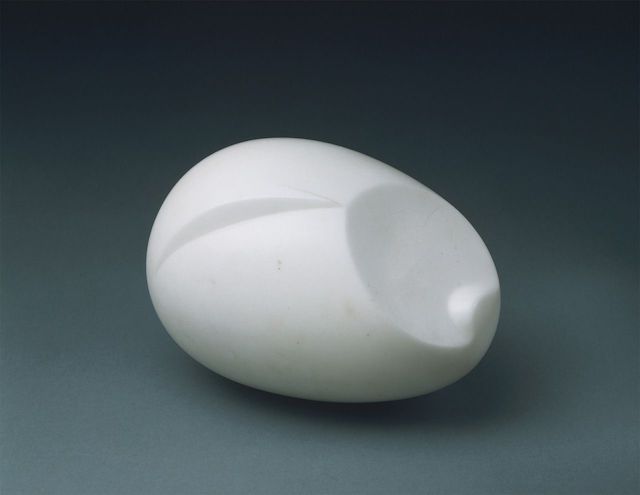
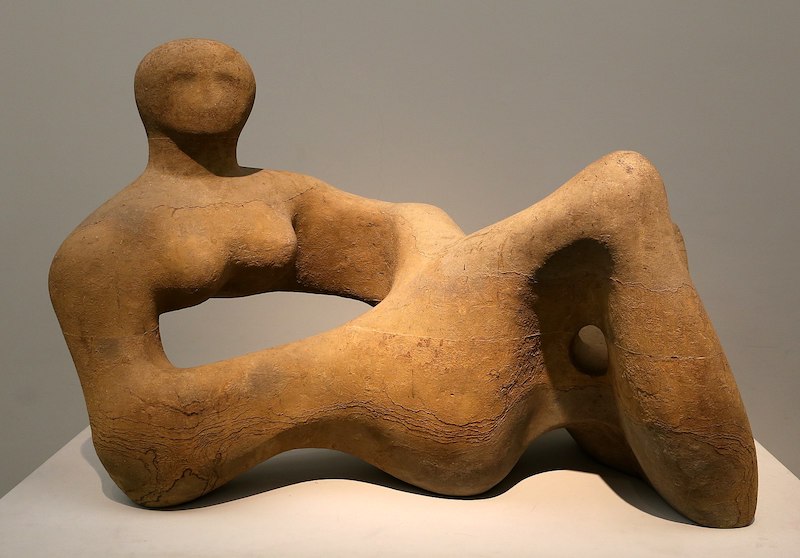
Streamlining became a hallmark of Modernism’s celebration of machine aesthetics, and still fascinates artists like Anish Kapoor, the creator of Chicago’s iconic Cloud Gate, which opened in 2006. But Modern master Constantin Brancusi played with reduced form a century earlier with sculptures such as Newborn. Sculptor Henry Moore was inspired by far older Mayan art in his Recumbent Figure, a form seemingly eroded to its essence by weather and time.

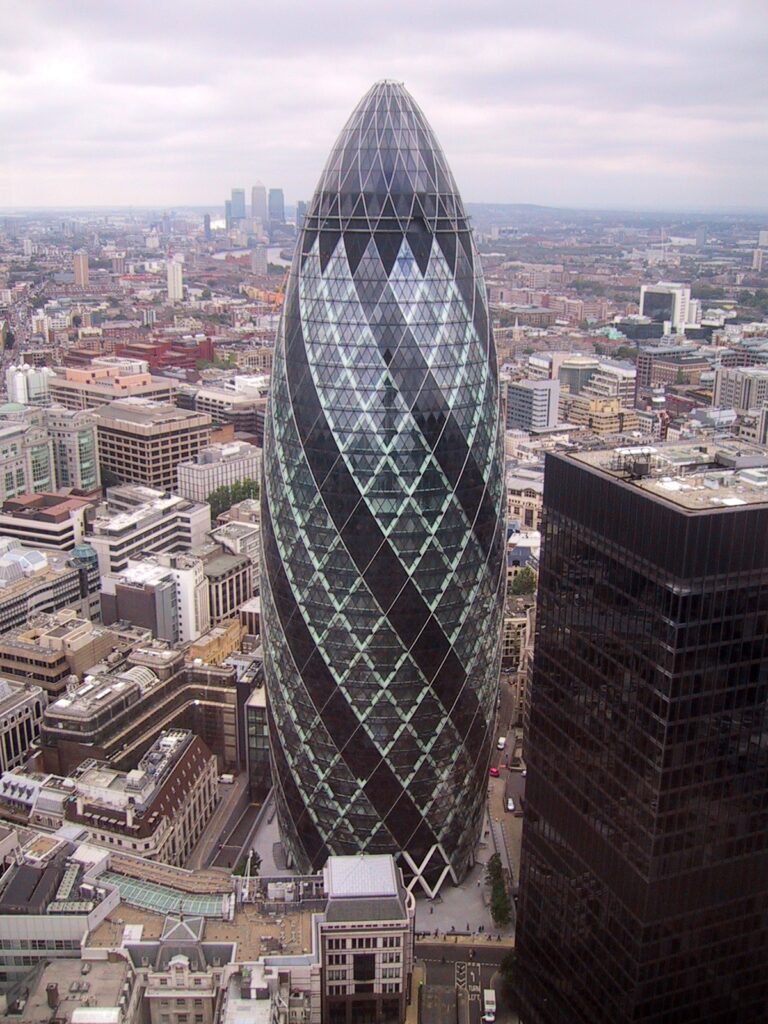
Norman Foster and Partners streamline the ordinarily blocky skyscraper with a tower nicknamed the Gherkin in London.
The workflow for streamlining a model is straightforward:
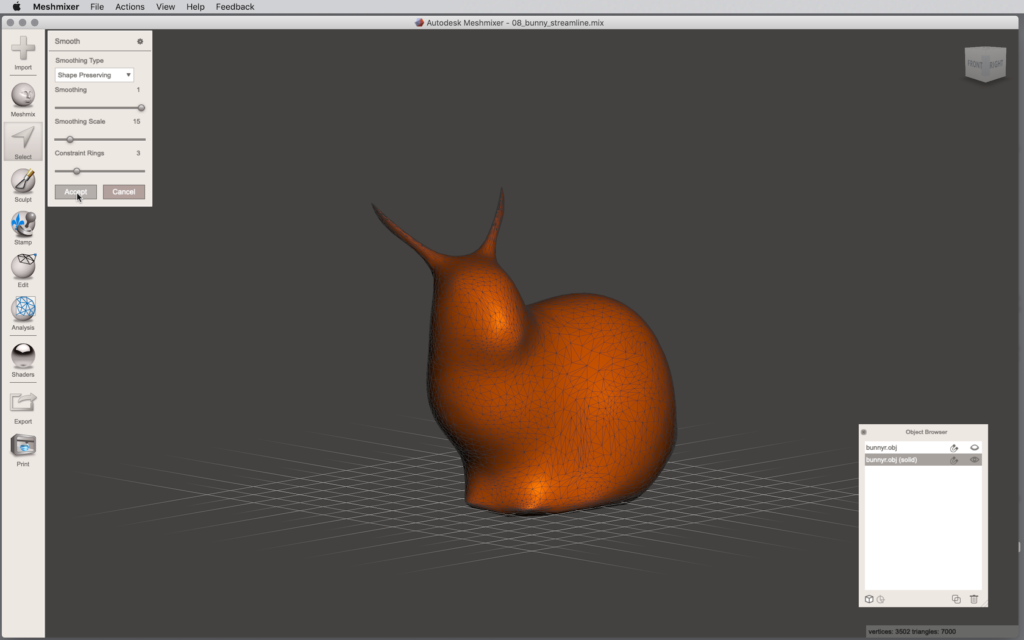
- Select all with CMD+A and enter Select > Deform > Smooth.
- In the dialog box, we use Shape Preserving and set the values to suit. For our Stanford Bunny, we used a high Smoothing of 1 and a Smoothing Scale of 15, to generate alien-antennae-like ears without making them too physically thin.
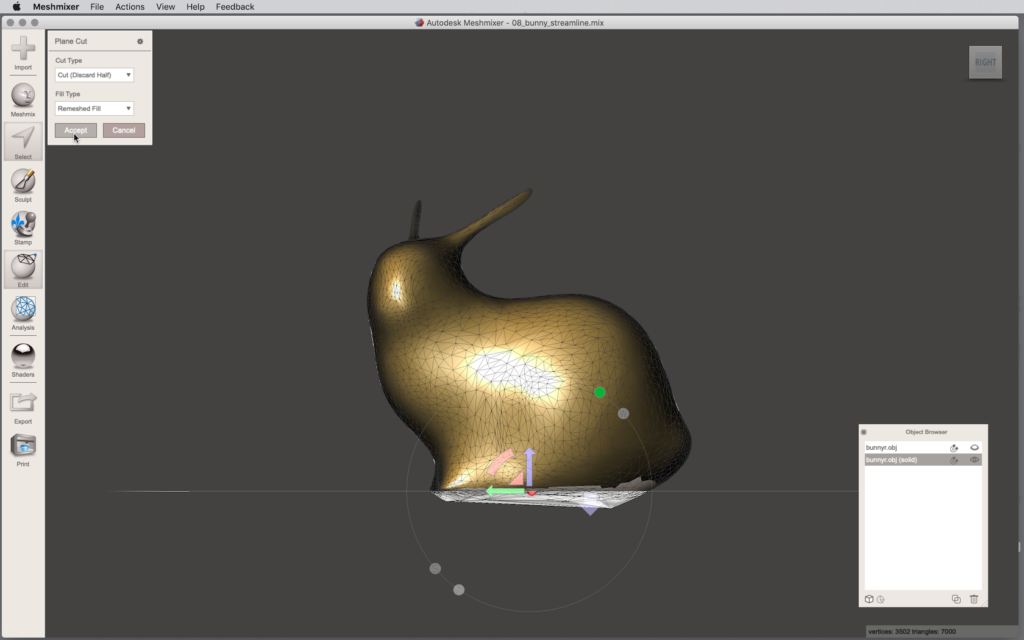
- Hit Accept, but now observe from a side view and note the appearance of the base, which has likely warped out of the plane.
- Use Edit > Transform to nudge the object down to a comfortable place to crop a new base plane.
- Use CMD+A and enter Select > Edit… > Plane Cut.
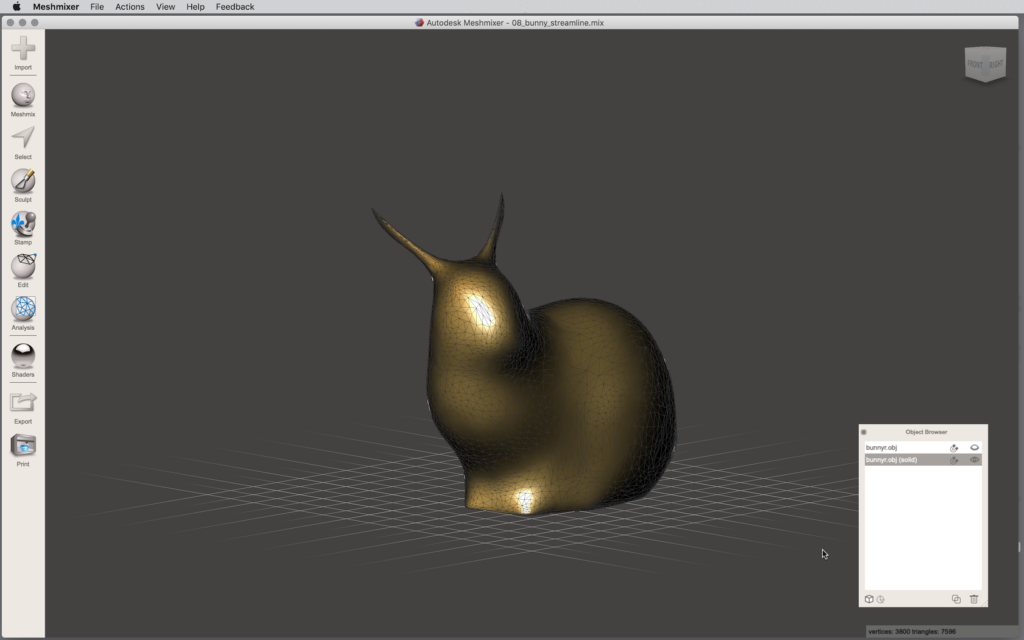
- Drag the cutting plane to be congruent with the XY plane and hit Accept.
Lattice
A lattice can imply volume through the intersection of stick-like elements in space. The sticks can imply an intersection of a Cartesian grid with an object, or they can develop out of more idiosyncratic ordering systems. An example of a diamond-based lattice is seen in Tokyo’s Sunny Hills Sweet Shop by Kengo Kuma — built by traditional Japanese woodcrafters without the use of nails or glue, it’s like walking into a giant basket. Sculptor Martin Puryear weaves a strictly modular orthogonal structure into his elephantine Big Bling, but explores a highly randomized orthographic structure in C.F.A.O.


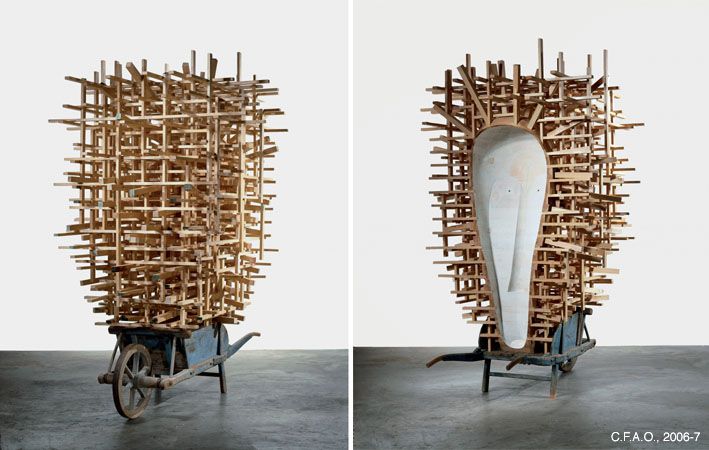
The workflow for this complex form is shockingly simple:
- Go to Edit and select Make Solid.
- With the new solid active, go to Edit and select Make Pattern.
- Under Pattern Type, choose Lattice. For our Stanford Bunny, we accepted the default, but you can tweak variables here to suit. Be mindful that the lattice can create separated, floating pieces of the mesh, so inspect all around to avoid this.
- Hit Update to see the changes, and Accept when satisfied.
- Inspect the triangle count of the final result, and if it’s excessive, Reduce as discussed above.
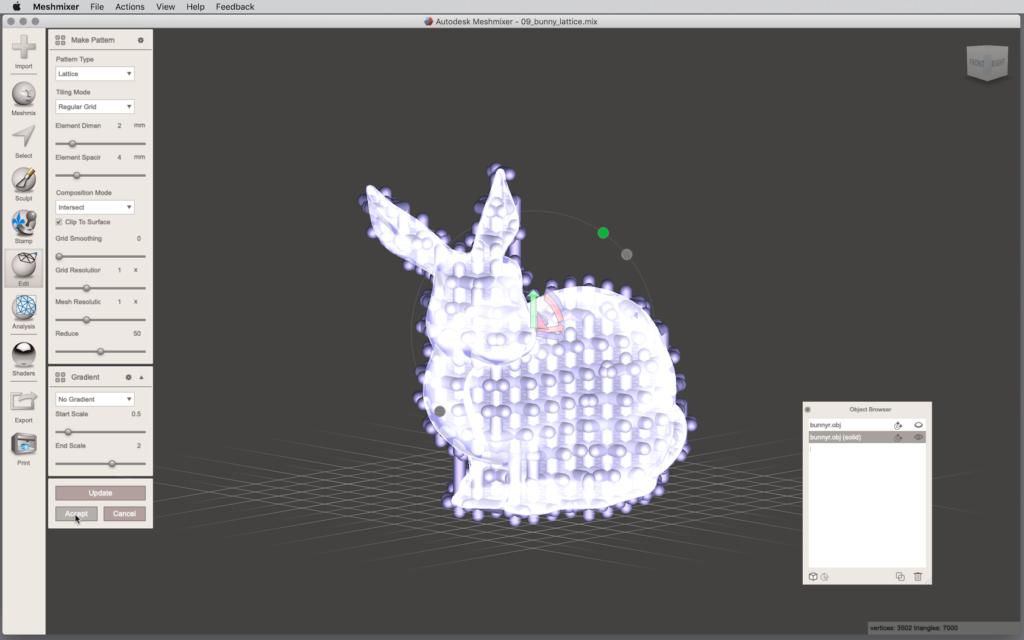
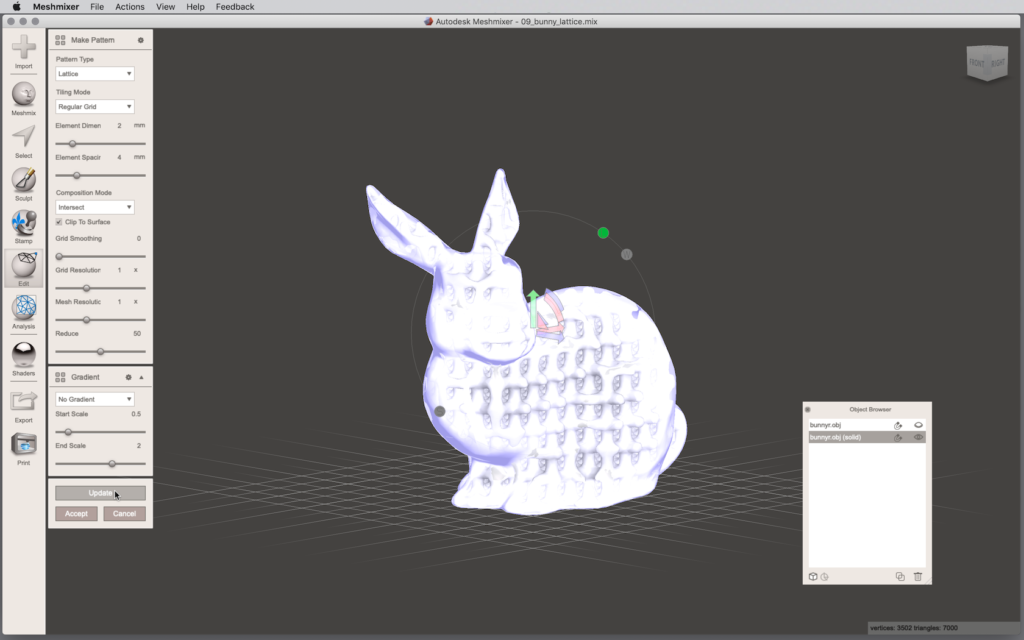
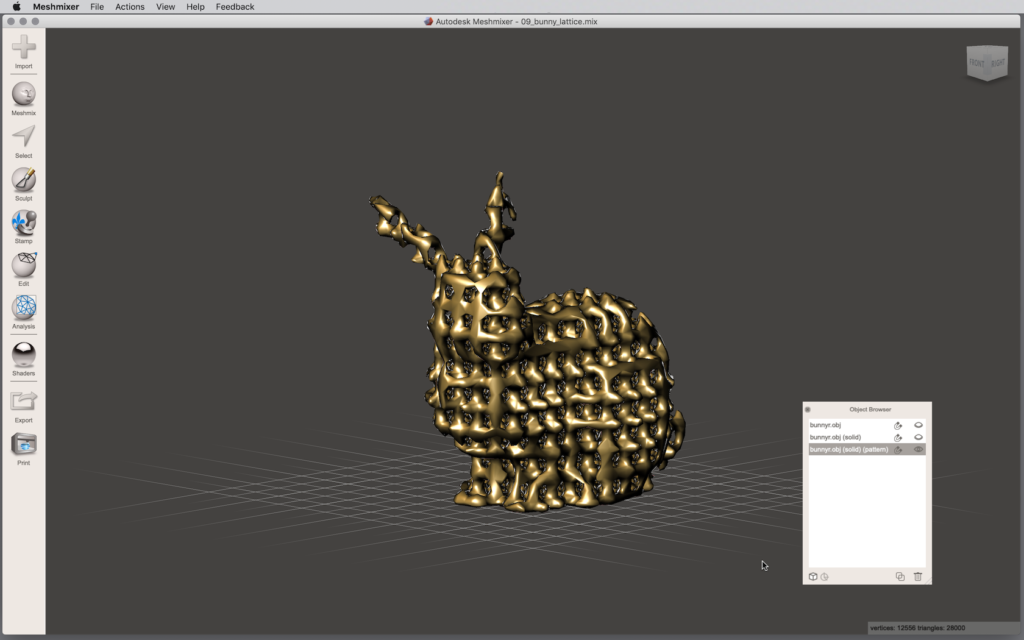
Solving lattice issues
Be very mindful that there are liabilities to a lattice that are similar to the problems with a Voronoi model! We don’t illustrate the use of Meshmixer tree supports here, but see the Voronoi model above to explore a solution you can apply here.
From Meshmixer to Fusion 360 (optional)
There are times when you might want to perform further modeling activities on a mesh in Fusion 360. Fusion is notorious for misbehaving with high-poly meshes. Use Meshmixer to reduce the poly count to 10,000 triangles or fewer.
While you can upload an STL or OBJ file through the cloud translation process to your Fusion 360 Data Panel, you can also insert a mesh using the Insert>Insert Mesh tool. Since we are interested in eventually manipulating mixed meshes together, we want to practice that method.
- From the Design>Solid>Insert drop-down, select Insert Mesh.
- This will open a finder window that allows you to select the file to insert. You can select STL or OBJ format mesh files and then hit the Open command to bring them into Fusion 360.
- The mesh body will import, and the Insert Mesh dialog box will open.
When importing, make sure to match the Fusion 360 file units with the units developed in your scan. STL and OBJ file units are absolute, which means that they won’t recognize the original scan unit on import. For example, if you create a 10 x 10 x 10 millimeter solid but import it into a Fusion 360 file whose units are defined as inches you will receive a solid that is 10 x 10 x 10 inches — your mesh will appear to have grown 254% larger!
Until you select OK in this dialog box, you can also use the Manipulator handle and certain other commands to move the mesh body into position without creating a Move keyframe in your design timeline at this point. After selecting OK, the mesh is “officially” part of the Fusion 360 file data.
Your turn
Take your clean-up, watertight, repaired mesh from Part 1 and do the following:
- Duplicate the mesh, and perform ONE of the mesh mods described under Meshmixer Mods:
- Non-uniform scale
- Lo-res
- Voxel
- Voronoi
- Streamline, or
- Lattice
- Upload an OBJ or STL export of each mesh to the course 3D Digital Scan Library linked through the course management system if you doing this in my studio.
- Place the files in your Digital Archive in OneDrive.
- Share both meshes in a reflective post in your process journal. Embed both models using one of three ways:
- Import each mesh into its own individual Fusion 360 file and use the embed code as you’ve learned in earlier exercises.
- Create a free-level account at the sharing site p3d.in, upload your models, and use the easy-to-find embed code under the Share icon.
- Use your archived file in OneDrive. It’s a typically over-complicated Microsoft work-flow:
- Select Share at the upper left of the window.
- In the dialog box that opens, select the small gear icon.
- Select the radio button for Anyone, then select Apply.
- Back in the main window, find the obscure “…” option (to the left of Download), select it, and in the drop-down select Embed.
- In the sidebar that opens, copy the embed code
Fusion embeds are seen above. Examples of other embeds are seen below:
p3d Embed:
OneDrive Embed:
