Material culture
Arnold without anxiety
Creating effective materials and renderings is a dark art. Full of nonintuitive jargon and seemingly random UI choices, you can spend days getting nowhere. To make matters worse, this project calls for photo-real renderings, but we won’t be diving into full material modeling in a meaningful way until the next project.
Thus, we will cheat. Below you will find some useful settings and tips to get you through your first real material rendering exercise with your sanity intact. Never mind that much of this is meaningless to you right now — take it on faith that these recommended settings will work. The kinds of materials this limits us to are generally materials with a uniform appearance: glass, plastic, metals, rubber, painted surfaces, certain stone types, terra-cotta pottery, and the like. But we can develop some surface sophistication within these choices: brushed or sandblasted, polished or matte, mirrored or painted. We avoid wood, fabric, and other non-uniform materials, but there’s still a lot to choose from to achieve photo-real results.
The renderer we will use is the standard Arnold renderer that comes pre-installed as a plug-in with Maya. But be aware: many exist. RenderMan, POVRay, and the now deceased mental ray are but a few examples. Each of these are plug-ins, which can be purchased and added to modeling software. A rendering engine often comes with its own library of shaders and lights. Since we’re using Arnold, it’s generally best to stay within Arnold’s options.
Material issues
Material modeling and rendering is not a one-button affair. In other words, setting up material is more than just a material issue. There are several sets of parameters to develop, in this workflow order:
- Loading the plug-in (if not present)
- Lighting
- Render Settings
- Materials
Loading the plug-in
From time to time the rendering plug-in does not automatically load. If you do not see evidence that Arnold has loaded up, in any menu set go to Windows>Settings/Preferences>Plug-in Manager. Scroll down (it’s near the bottom) and you should see a heading Applications/solidangle/mtoa/20XX/plug-ins (with XX being the year of issue). Under this heading should be a checked box named Loaded. If it is not checked, check both Loaded and Auto load boxes and hit Refresh, then Close.
Lighting
If you think about it, we don’t see material. We see the light bouncing around, onto, through, and off of material objects, so it only makes sense to develop the lights first. Setting up lights also includes creating shadows — surprisingly, lights often don’t automatically make them.
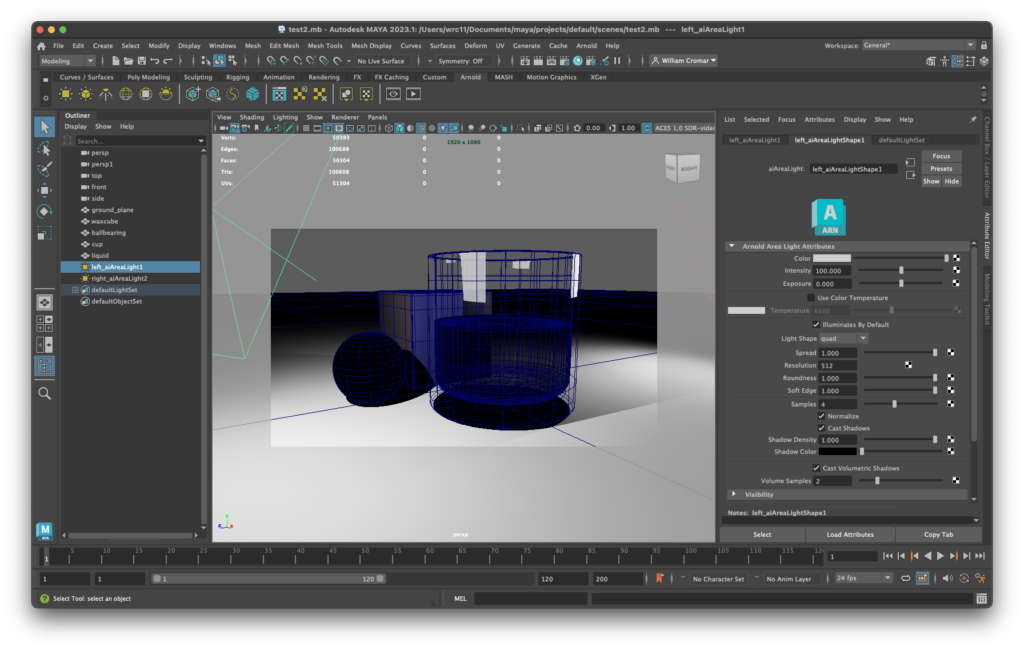
In our sample file, we use a simple light: the Arnold Area Light. Be aware that Arnold has special settings in its own tab here (which, if not present, means you need to load the plug-in as per above). We don’t use the typical Raytrace shadows other rendering engines use because Arnold carries its own internally. For the sake of brevity, any data in the Attributes that we don’t change, we won’t include in this or any other list of settings. The settings to change in the Attribute Editor are:
- Intensity: 100
- Light shape: quad (but wait, it’s round? The next setting is the trick)
- Roundness: 1
- Soft edge: 1
- Samples: 4
- Check on Normalize, Cast Shadows, Cast Volumetric Shadows
Why do these numbers work here?
All of these values work together to create a light with soft shadow edges, providing greater realism, though at the cost of increased render time:
- The Intensity is quite bright. Arnold is a notoriously dark renderer.
- Arnold likes to use Exposure to set the strength of the light in a render, and here 1 works. Instead of tweaking Intensity, you can tweak the exposure value to get brighter renders. I tend to work a render a bit dark (because you get more information into the scene that way) and then tweak it in Photoshop.
- Roundness, Soft edge, and Samples work together to create a smooth, non-sharp edge to shadows overall. The higher the Sample value, the smoother, and the larger the Roundness, the less sharp.
- All the shadow settings checked create a dark shadow but not pure black like on the Moon. Shadows on Earth carry a bit of light bounced around by the atmosphere and hence are less dense.
Keep in mind the more lights in a scene, the more render time this creates. However, a scene more natural than our sample file will typically have lights from many sources. Look around your room and identify how many sources of light there are. For simplicity, we typically use at least one major light and one minor light (photographers often call the minor light a fill light, as it fills areas the primary light does not). We try to avoid any unnecessary light load on the renderer.
Render Settings
After lighting, without proper render settings, you’ll still see nothing. In the Rendering menu set, go to Render>Render Settings… or hit the Render Settings icon — a clapboard with a gear overlay — on the Status Bar. We select Render Using: Arnold Renderer and go to the Common and Arnold Renderer tabs to set the variables at right. Only variables we change are listed, so accept defaults in any option not expressly detailed.
Be careful here and observe the settings in the tabs Common, Arnold Renderer, and AOVs:
Common tab:
- Name prefix noice_raw_test to automatically name the file.
- Image format: exr (this creates a file type we can denoise).
- Check on Preserve Layer Name, Tiled, Merged AOVs
- Image size: Width 1920, Height 1080.
Arnold Renderer tab:
- Sampling
- Camera (AA) set to 3, all others 2
- Advanced
- Check on Nested Dielectrics
- Ray Depth
- Total: 10
- Diffuse: 2
- Specular:3
- Transmission: 8
- Volume:2
- Transparency Depth: 10
AOVs tab:
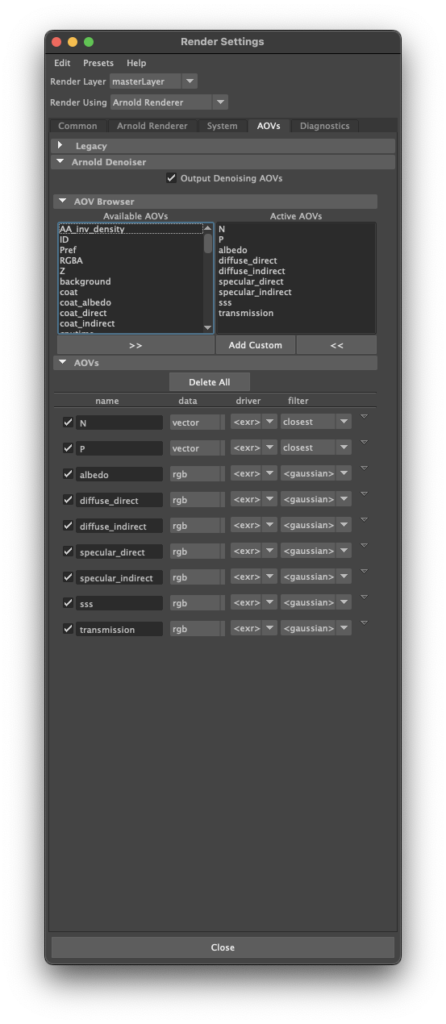
- Arnold Denoiser:
- Check on Output Denoising AOVs
- AOV Browser: activate:
- N
- P
- albedo
- diffuse_direct
- diffuse_indirect
- specular_direct
- specular_indirect
- sss
- transmission
Why do these numbers work here?
These values work together to create a render that is clean and contains no noise. Noise is a term that refers to pixel randomization perceived to be too random and textured. Arnold is capable of creating quite smooth and appropriately uniform color gradations within a rendering, but it is notoriously noisy, and it’s difficult to discern what the source of the noise is. More on this topic below.
Materials
For this project we keep it simple: avoid cloth, wood, marble, or any kind of material exhibiting texture or internal color changes. Using uniform materials still permits a great variety of choices, as we can see below.
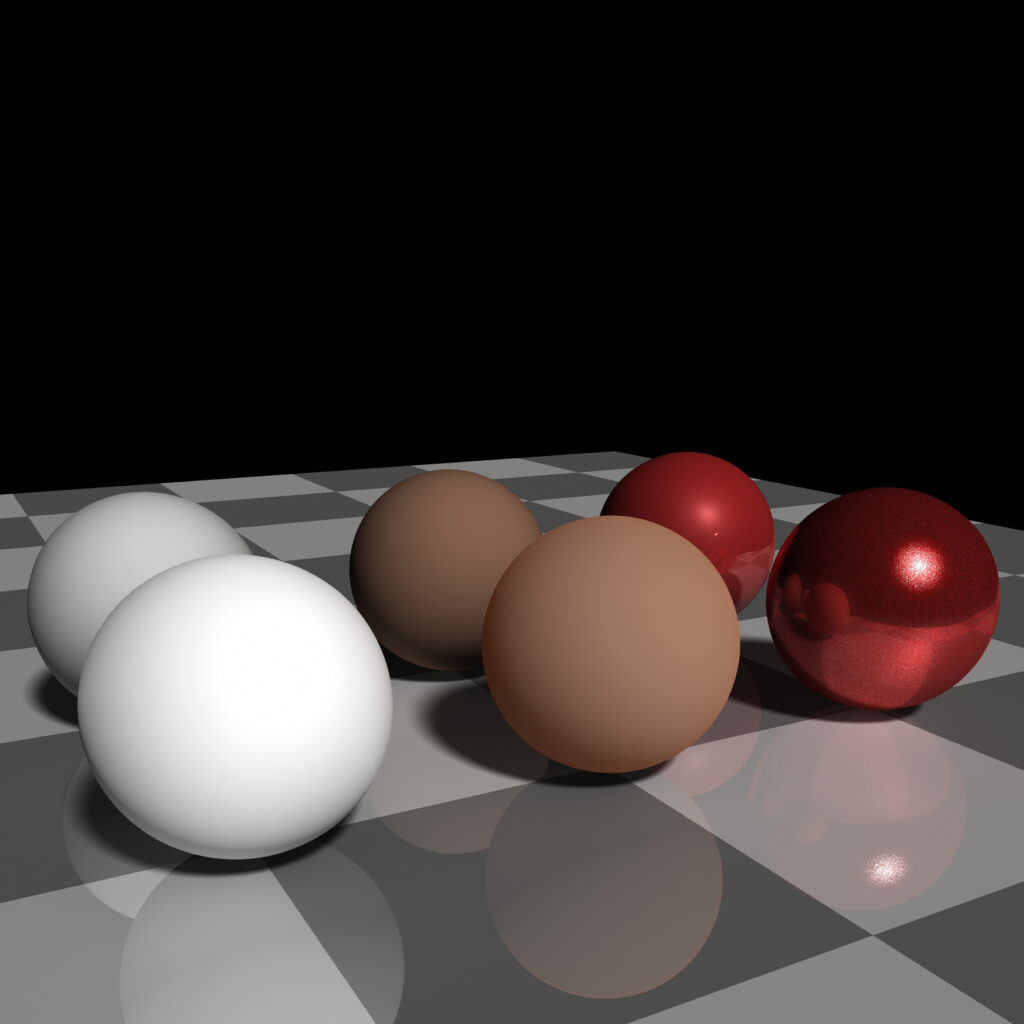
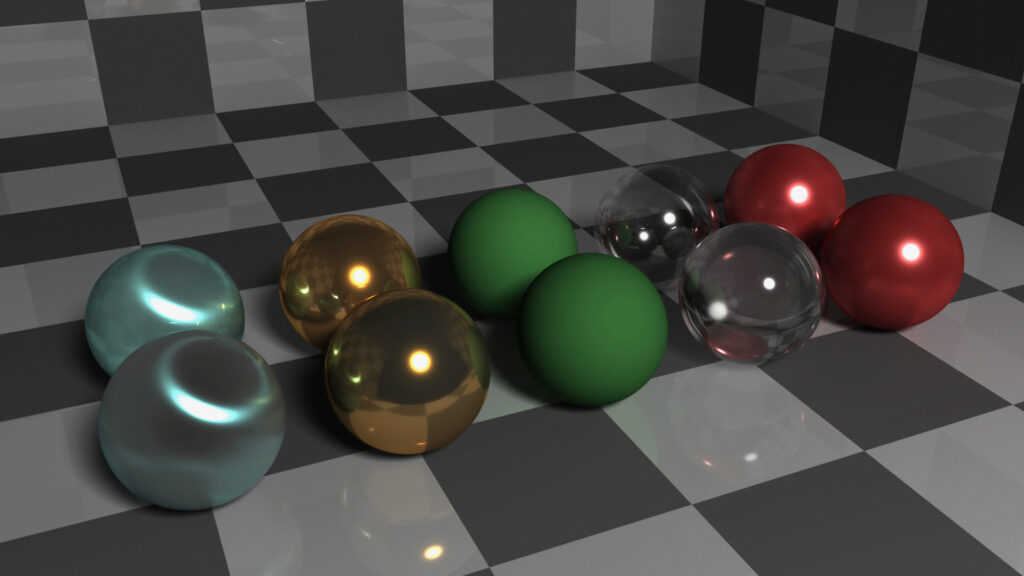
Simple materials are based on common Maya materials: Anisotropic, Blinn, Lambert, Phong, and PhongE. These do an adequate job of suggesting material without costing a lot in terms of rendering time. The biggest liability with Maya materials is found in metallic and glass materials, where refraction is limited or non-existent. In the illustration below, the back row is rendered using Maya standard materials.
If you have the processor capability for more realistic reflections and refractions, try the aiStandard material under the Arnold>Shader options in the Assign New Material dialog box. The aiStandard is an accurate material that can model almost any kind of surface by just selecting and tweaking a common set of variables. Unlike Maya standard materials, regardless of surface, the parameter categories and names remain identical, making for a refreshingly logical user interface. In the illustration, the front row duplicates the back row in aiStandard. The biggest problem is that it is a processor hog and takes a long time to render.
Demo file data
Open the demo file linked above, named material_samples_ai_v_maya.mb, and make the layer named standards visible. Below, I have charted out the standard materials and how I’ve manipulated the parameters under each material, leaving out any parameters that are left at their default values.
Some Maya shaders get quite close to the aiStandard results. Brushed metal effects are more subtle in aiStandard. The biggest difference is seen in the relatively poor results in Maya shaders creating clear materials that refract. The Maya clear glass looks like a thin wall soap bubble, but the aiStandard has a robust and physically accurate index of refraction (IOR) and complex internal reflections. This is great—but watch your render times with thick refractive materials!
“TROLL THE NOOBS” ALERT!
FOR CLEAR MATERIALS IN ARNOLD:
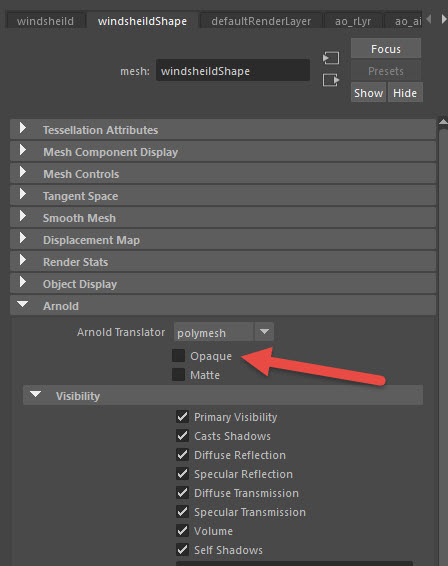
In the Attribute Editor tab, Arnold creates a special self-named dropout on the xobjectShape node (where xobject is the object’s name) where various rendering properties are specified. By default, Opaque is checked so that the object will appear opaque. Uncheck this box for any instance where an object needs to appear transparent.
Simpler materials
With the standards layer on and the composites layer off, you’ll see these materials from left to right:
- Blue brushed metal
- Polished yellow brass
- Green matte rubber
- Clear solid glass
- Glossy red plastic
In the back row, you’ll find Maya shaders, while the front row features aiStandard shaders for comparison.
Back row: Maya materials with key parameters
Parameters not listed are left at default settings — click on the material name to view
-
BRUSHED
METAL -
SHINY
BRASS -
MATTE
RUBBER -
CLEAR
GLASS -
GLOSSY
PLASTIC
Maya Anistropic shader
Common
Color: H:166, S:0.2, V:0.8
Specular Shading
Angle: 0
Spread X: 2.700
Spread Y: 50.00
Roughness: 0.980
Fresnel Index: 20
Specular color: H:166, S:0.5, V:0.5
Reflected color: H:166, S:0.2, V:0.6
✔ Anistropic Refl
Maya Blinn shader
Common
Color: H:32, S:0.5, V:0.5
Diffuse: 0.500
Specular Shading
Eccentricity: 0.250
Spec roll off: 0.500
Specular color: H:32, S:0.8, V:0.8
Reflectivity: 1.0
Reflected color: H:32, S:0.5, V:0.5
Maya Lambert shader
Common
Color: H:120, S:0.5, V:0.65
Maya Phong shader
Common
Color: H:0, S:0, V:0
Transp: H:0, S:0, V:0.7
Diffuse: 0.200
Specular Shading
Cosine Power: 50
Specular color:
H:0, S:0, V:0.25
Reflectivity: 1.0
Reflected color: H:0, S:0, V:1
Maya PhongE shader
Common
Color: H:360, S:0.75, V:0.5
Diffuse: 0.95
Specular Shading
Roughness: 0.3
Whiteness: H:0, S:0, V:0
Specular color: H:0, S:0, V:0
Reflectivity: 1.0
Reflected color: H:360, S:1, V:0.2
Front row: Arnold aiStandard with key parameters
Parameters not listed are left at default settings — click on the material name to view
-
BRUSHED
METAL -
SHINY
BRASS -
MATTE
RUBBER -
CLEAR
GLASS -
GLOSSY
PLASTIC
aiStandard shader
Diffuse
Color: H:166, S:0.2, V:0.8
Weight: 0.7
Roughness: 0.8
✔ Fresnel affects Diff
Specular Shading
Color: H:180, S:0.5, V:1
Weight: 1.0
Roughness: 0.5
Anistropy: 0.85
✔ Fresnel
Refl at Normal: 0.4
Reflection
Color: H:166, S:0.2, V:0.8
Weight: 0.2
✔ Fresnel
Refl at Normal: 0.0
aiStandard shader
Diffuse
Color: H:32, S:0.5, V:0.5
Weight: 0.6
✔ Fresnel affects Diff
Specular
Color: H:32, S:0.8, V:0.8
Weight: 0.5
Roughness: 0.2
Anistropy: 0.5
✔ Fresnel
Refl at Normal: 1.0
Reflection
Color: H:32, S:0.5, V:0.5
Weight: 0.5
aiStandard shader
Diffuse
Color: H:120, S:0.5, V:0.65
Weight: 0.7
✔ Fresnel affects Diff
Specular
Color: H:120, S:0, V:1
Weight: 0.0
Roughness: 0.5
Anistropy: 0.5
aiStandard shader
Diffuse
Color:
H:0, S:0, V:0
Weight: 1.0
Roughness: 0.2
✔ Fresnel affects Diff
Specular
Color:
H:0, S:0, V:1
Weight: 1.0
Roughness: 0.15
Anistropy: 0.5
✔ Fresnel
Reflection
Color: H:0, S:0, V:0.25
Weight: 0.95
✔ Internal Refl
Refraction
Color: H:0, S:0, V:0.9
Weight: 1.0
IOR: 1.5
✔ Fresnel uses IOR
Transmittance: H:0, S:0, V:0.95
aiStandard shader
Diffuse
Color: H:360, S:0.75, V:0.5
Weight: 0.95
✔ Fresnel affects Diff
Specular
Color: H:360, S:0.5, V:1
Weight: 0.3
Roughness: 0.3
Anistropy: 0.5
Reflection
Color: H:360, S:1, V:0.2
Weight: 0.4
✔ Fresnel
Refl at Normal: 0.5
Complex materials: glow and sub-surface scattering
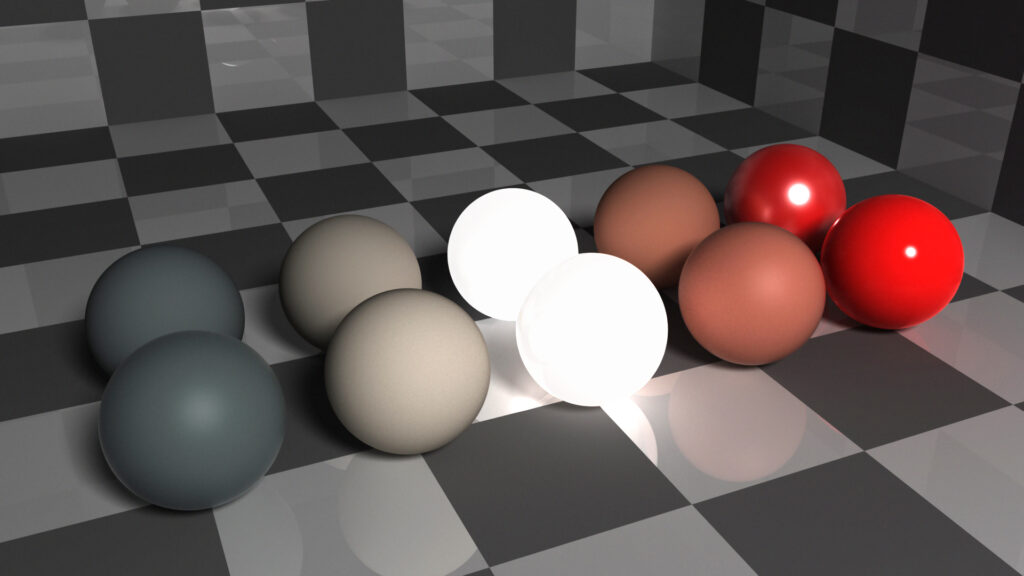
Candle wax, human skin, car paint, soap, translucent plastic, lightbulbs — all of these materials have one thing in common: sub-surface scattering of light. This class of complex materials has been notoriously time-consuming to model in the past. Arnold makes it easy for beginners to jump in since it is now no more difficult to model them than it is to create any other Arnold material.
Open the demo file linked named material_samples_ai_v_maya.mb again and this time make the layer named composites visible. For most, we’ll use the aiStandardSurface shader found in the Arnold>Shader group in the Assign New Material dialog box. For the last one, we’ll use aiCarPaint.
With the composites layer active, you’ll see these materials from left to right:
- Slate
- Marble
- Lightbulb
- Skin
- Car paint
Again, in the back row, you’ll find Maya shaders, and the front row features Arnold shaders.
Back row: Maya materials with key parameters
Parameters not listed are left at default settings — click on the material name to view
-
BLUE
SLATE -
WHITE
MARBLE -
BRIGHT
BULB -
TAN
SKIN -
CAR
PAINT
Maya Lambert shader
Common
Color: H:180, S:0.1, V:0.5
Diffuse: 0.800
Maya Lambert shader
Common
Color: H:33, S:0.15, V:0.7
Diffuse: 0.920
Maya Phong shader
Common
Color: H:15, S:0.1, V:1
Diffuse: 0.800
Incandescence: 0.300
Specular Shading
Cosine Power: 20
Specular color: H:0, S:0, V:0.5
Reflectivity: 0.50
Reflected color: H:0, S:0, V:0
Maya Lambert shader
Common
Color: H:15, S:0.5, V:0.9
Diffuse: 0.800
Maya PhongE shader
Common
Color: H:360, S:0.9, V:0.9
Diffuse: 0.92
Specular Shading
Roughness: 0.32
Highlight Size: 0.50
Whiteness: H:0, S:0, V:0.5
Specular color: H:0, S:0, V:0.5
Reflectivity: 0.5
Reflected color: H:0, S:0, V:0
Front row: Arnold materials with key parameters
Parameters not listed are left at default settings — click on the material name to view
-
BLUE
SLATE -
WHITE
MARBLE -
BRIGHT
BULB -
TAN
SKIN -
CAR
PAINT
aiStandardSurface shader
Base
Weight: 0.80
Color: H:0, S:0, V:1
Diffuse Roughness: 0
Metalness: 0
Specular
Weight: 1
Color: H:0, S:0, V:1
Roughness: 0.50
IOR: 1.33
Anistropy: 0
Rotation: 0
Subsurface
Weight: 1
SubSurface Color: H:180, S:0.10, V:0.50
Radius: H:0, S:0, V:0.15
Scale: 1
Type: randomwalk
Anistropy: 0
Coat
Weight: 0.40
Color: H:0, S:0, V:1
Roughness: 0.30
IOR: 1.33
Anistropy: 0
Rotation: 0
Normal: 0, 0, 0
Sheen
Weight: 0.20
Color: H:0, S:0, V:1
Roughness: 0.50
aiStandardSurface shader
Base
Weight: 0
Color: H:0, S:0, V:1
Diffuse Roughness: 0
Metalness: 0
Specular
Weight: 1
Color: H:0, S:0, V:1
Roughness: 0.50
IOR: 1.33
Anistropy: 0
Rotation: 0
Subsurface
Weight: 1
SubSurface Color: H:34, S:0.15, V:0.70
Radius: H:34, S:0.15, V:0.90
Scale: 1
Type: randomwalk
Anistropy: 0
Coat
Weight: 0.25
Color: H:0, S:0, V:1
Roughness: 0.30
IOR: 1.33
Anistropy: 0
Rotation: 0
Normal: 0, 0, 0
Sheen
Weight: 0.19
Color: H:34, S:0.15, V:1
Roughness: 0.50
aiStandardSurface shader
Base
Weight: 0
Color: H:0, S:0, V:1
Diffuse Roughness: 0
Metalness: 0
Specular
Weight: 1
Color: H:0, S:0, V:1
Roughness: 0.50
IOR: 1.5
Anistropy: 0
Rotation: 0
Subsurface
Weight: 1
SubSurface Color: H:15, S:0.1, V:1
Radius: H:0, S:0, V:0.15
Scale: 1
Type: randomwalk
Anistropy: 0
Coat
Weight: 0.7
Color: H:0, S:0, V:1
Roughness: 0
IOR: 6
Anistropy: 0
Rotation: 0
Normal: 0, 0, 0
Sheen
Weight: 0
Color: H:15, S:0, V:1
Roughness: 0.30
Emission
Weight: 0.30
Color: H:15, S:0.1, V:1
aiStandardSurface shader
Base
Weight: 0
Color: H:0, S:0, V:1
Diffuse Roughness: 0
Metalness: 0
Specular
Weight: 1
Color: H:0, S:0, V:1
Roughness: 0.50
IOR: 1.33
Anistropy: 0
Rotation: 0
Subsurface
Weight: 1
SubSurface Color: H:12, S:0.5, V:1
Radius: H:14, S: 0.90, V:1
Scale: 1
Type: randomwalk
Anistropy: 0
Coat
Weight: 0.25
Color: H:0, S:0, V:1
Roughness: 0.30
IOR: 1.33
Anistropy: 0
Rotation: 0
Normal: 0, 0, 0
Sheen
Weight: 0
Color: H:0, S:0, V:1
Roughness: 0.30
aiCarPaint shader
Base
Weight: 0.80
Color: H:360, S:1, V:1
Roughness: 0.50
Specular
Weight: 1
Color: H:0, S:0, V:1
Flip-Flop: H:0, S:0, V:1
Light Facing Color: H:0, S:0, V:1
Falloff: 1
Roughness: 0.05
IOR: 1.52
Transmission Color: H:0, S:0, V:1
Flakes
Color: H:0, S:0, V:1
Flip-Flop: H:0, S:0, V:1
Light Facing Color: H:0, S:0, V:1
Falloff: 1
Roughness: 0.4
IOR: 100
Scale: 0.01
Density: 0.1
Layers: 1
Normal Randomize: 0.7
Coat
Weight: 1
Color: H:0, S:0, V:1
Roughness: 0
IOR: 1.5
Normal: 0, 0, 0
Taming Arnold noise and render times
One liability of Arnold is its propensity toward generating noise: granular texture where smoothness is the goal. This is discussed in the Arnold for Maya User Guide. Where ordinary radiosity sampling is handled in the Attribute Editor tab, in Arnold we head elsewhere.
The frustrations early adopters of Arnold had with intrinsic noise have been addressed in the last couple of updates to the software. Here we introduce a much-improved, time-saving workflow using Arnold RenderView and Arnold Denoiser (noice). It will feel extremely technical at first, but it’s a technique that, once learned, will save you WEEKS of render time. I’m not kidding!
Our case study
Though Arnold has vastly improved as a rendering solution since it replaced Mental Ray in 2017, it’s still a dark and dirty rendering engine. Pumping up samples, blasting lights, and generating impossibly long render times seemed the only solution. I really missed Mental Ray! However, the introduction of NOICE as a post-processing solution to eliminate noise — those dirty-looking shadows and speculars — has made Arnold my favorite renderer now.
If you stick with Arnold lights and Standard Shaders, and apply NOICE in post, the pesky noise or “fireflies” you almost always encounter in Arnold are not hard to eliminate. Our goal is to do this without creating impossible render times. In this case study, we’re aiming for a high-resolution video render in about a half hour or a large-scale print resolution in under 4 hours. Can it be done? By following the workflow in this case study, we can significantly reduce render times for high-quality output, even in challenging ray sampling situations. We’ll explore this case study in several steps:
- Modeling
- Lighting
- Materials
- Render settings
- Using ArnoldRenderView to troubleshoot noise
- Using Maya Render View to create an .exr file
- Using NOICE to denoise the .exr file
- Finish in Photoshop
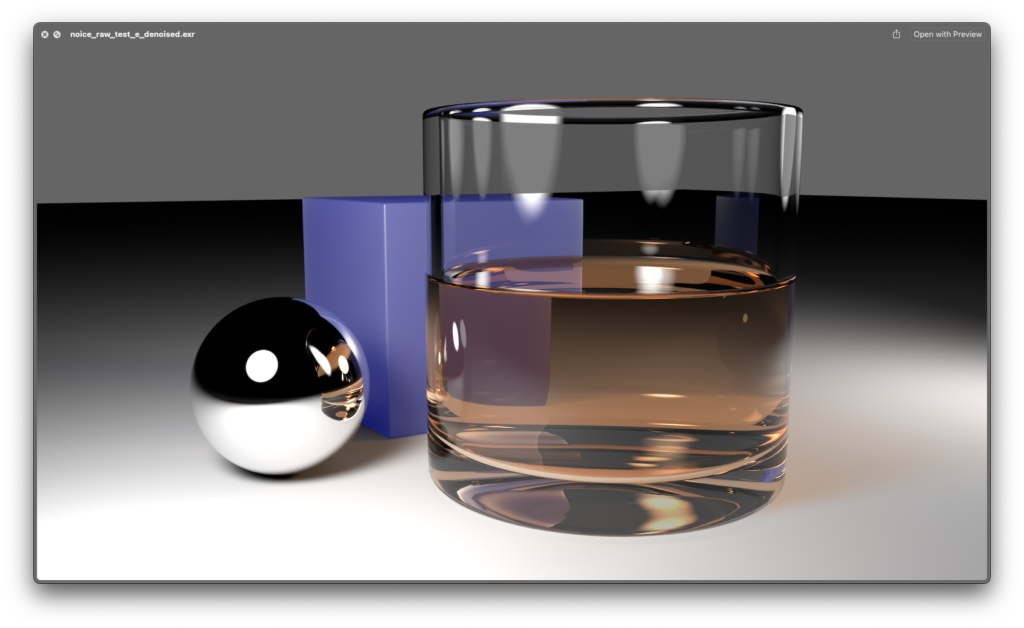
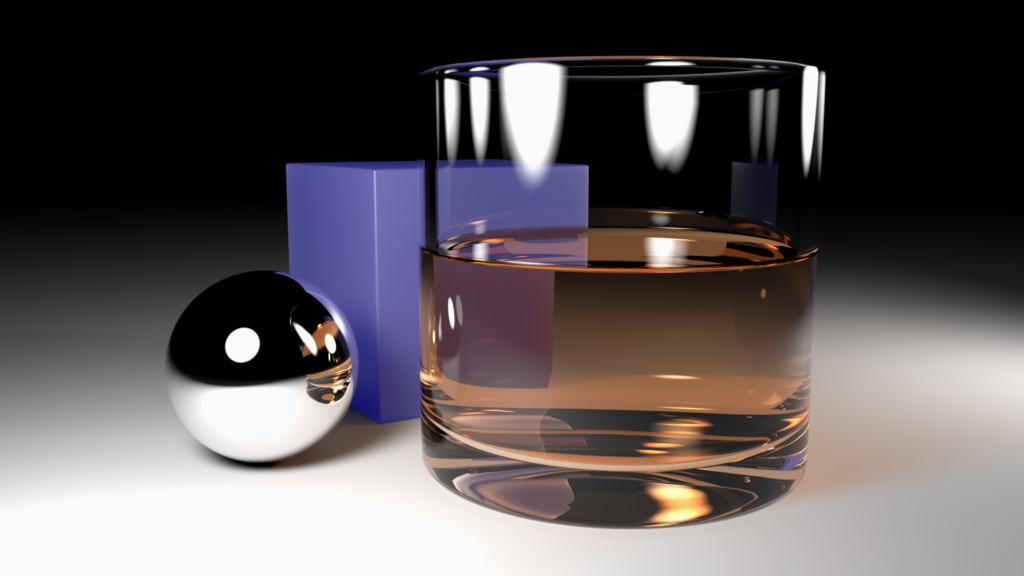
Our final scene will look like this, and the Maya project folder is available above for download:
Modeling
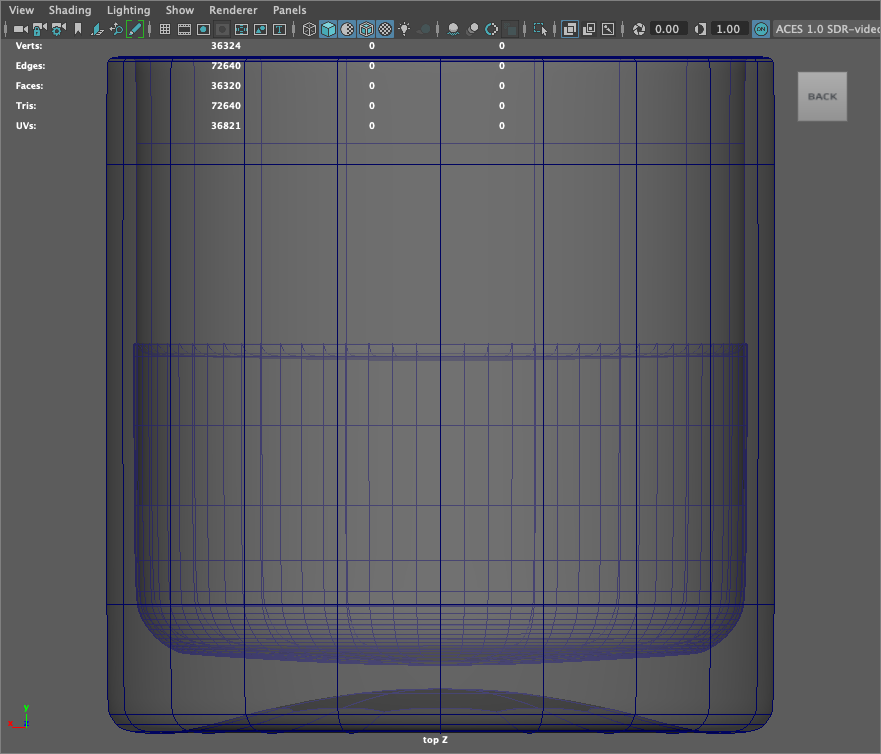
Good rendering starts with good modeling. Our scene is formally simple, but to get good micro-beveling and smooth curving surfaces we need to indulge in a high polygon count: there are 50,000 faces among all the objects here. In addition to the ground plane, I have modeled a sphere using default sub-divisions, a cube with micro-bevels, and a cup with liquid. Both cup and liquid are based on cylinders with default sub-divisions, though I added a couple of subdivisions for the caps to help give the cup bottom the roundness of mass you see in fine glassware.
A few modeling tricks here have implications for rendering quality:
- All geometry is smooth mesh previewed. This effectively increases the polygon count 16 times! But for smooth bevels at corners, we require a smooth mesh preview (3 on the keyboard).
- The liquid is boolean subtracted to fit tight to the interior of the glass, but then scaled up 1.01 to intersect slightly with the glass for refraction.
- Because the boolean will double faces, reduce the radial polar effect by deleting edges and vertices incrementally, leaving only a few radial edges at the center. This takes time to do but will eliminate unintended ripples in the highly reflective and refractive surfaces when the smooth mesh is previewed. Download and inspect the sample file to see this.
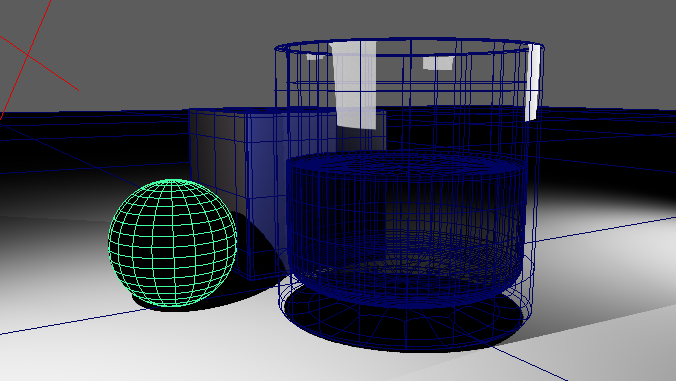
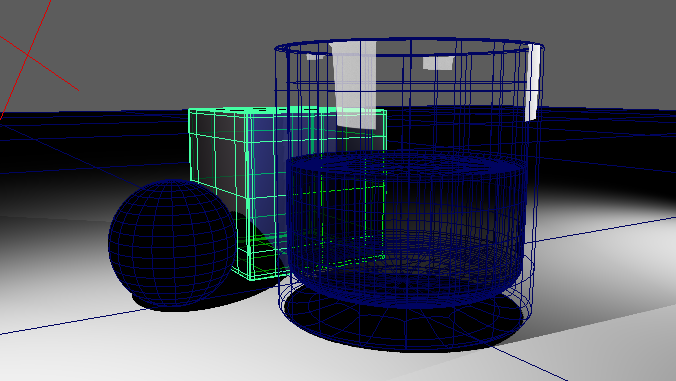
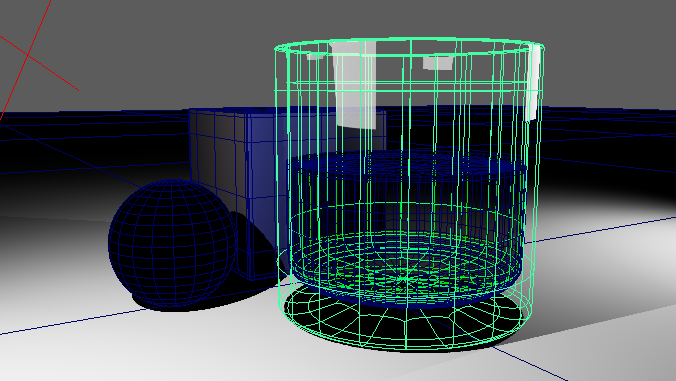
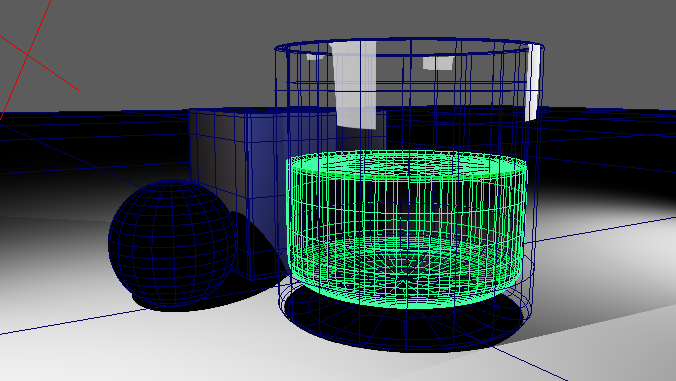
- Secret sauce: the top of the liquid is never flat in a cup, because surface tension forces the liquid to “climb” the surface it’s in contact with. Create a micro-bevel and raise this edge slightly to create the proper light effect.
Lighting
When lights are placed fairly close to the objects being lit, this can create noise. So for this case study, I’ve deliberately placed lights closely so that we have this problem to solve. There are two lights in the scene:
- Left light: ai Area Light
- Intensity: 100
- Light shape: quad (but wait, it’s round? The next setting is the trick)
- Roundness: 1
- Soft edge: 1
- Samples: 4
- Check on Normalize, Cast Shadows, Cast Volumetric Shadows
- Right light:
- Same as above except Intensity: 50
This is not a particularly complex lighting arrangement, but the softening and samples can be expensive. The soft edge creates very realistic shadows, though at the expense of render time. The number of samples can drive quality: too few and you’re guaranteed to have dirty, noisy shadows and specular highlights, too many and you’ll wait days for a render. Four is a decent middle ground for post-production denoising later.
Materials
Materials in our scene are also not helping us meet our rendering time goal. They contain lots of complex ray situations: reflective and refractive materials mixed with some sub-surface light scattering and interacting with bright, super-soft light sources. We’ve applied the following:
- Ground plane: simple Lambert white. Nothing to see here, folks.
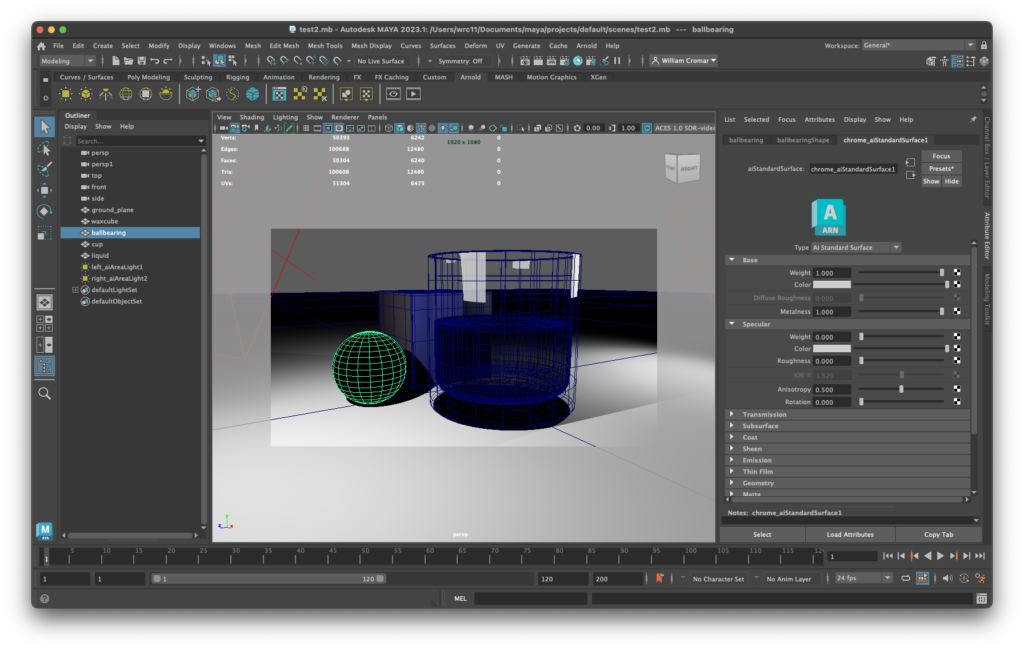
- Sphere: ai Standard Surface chrome preset with no change.
- Cube: ai Standard Surface wax preset
- Transmission color blue, Subsurface pink.
- Glass: ai Standard Surface glass preset
- Transmission: check on Transmit AOVs and Dielectric Priority: 1
- Advanced: check on Caustics and Internal Reflections.
- Liquid: ai Standard Surface clear water preset
- Base: Metalness to 0.01 for a bit of reflection control, and Color to H 27 : S 0.8 : V 0.6, a light orangey brown
- Transmission: Color and Scatter based on Base hue but change S 0.4 : V 1.0, check on Transmit AOVs, set Dielectric Priority: 2
- Advanced: check on Caustics and Internal Reflections.
The dielectric priority option helps create proper refraction of liquid when combined with the overlapping modeling trick above. It “cancels out” the overlap by prioritizing the glass over the liquid, and creates the effect of clear liquid against clear glass. Anything else creates a mess.
Render settings
Be careful here and observe the settings in the tabs Common, Arnold Renderer,AOVs. For reference, I’ve repeated them from above:
Common tab:
- Name prefix noice_raw_test to automatically name the file.
- Image format: exr (this creates a file type we can denoise).
- Check on Preserve Layer Name, Tiled, Merged AOVs
- Image size: Width 1920, Height 1080. **
Arnold Renderer tab:
- Sampling
- Camera (AA) set to 3, all others 2
- Advanced
- Check on Nested Dielectrics
- Ray Depth
- Total: 10
- Diffuse: 2
- Specular:3
- Transmission: 8
- Volume:2
- Transparency Depth: 10
AOVs tab:
- Arnold Denoiser:
- Check on Output Denoising AOVs
- AOV Browser: activate:
- N
- P
- albedo
- diffuse_direct
- diffuse_indirect
- specular_direct
- specular_indirect
- sss
- transmission
**Regarding the image size:
The high-definition video resolution is shown here, but this depends on your goal. If I wanted a medium-size print that would fit on a 16 X 10 paper stock with about a 1.5-inch border all around, I’d approximately double the pixels to 3840 X 2160. If I want a large poster-size 16 X 20 stock with a half-inch border, I need to cover 19 X 15 and need 5760 X 4500, approximately doubling the size again.
The ramifications for render time in this case study are that the HD video resolution will take about 30 minutes to render, while the medium-size print would take 4 times that long or two hours. The large print here will take about 4 times that, or about 8 hours! That seems long but these are not unreasonable rendering goals given the quality we want. But, as we’ll see, even these times are not sufficient to get rid of inevitable noise in the shadows and speculars. How can this be solved? Denoising in post-processing, as we’ll see!
Battling noise
When trying to solve noise issues, most people reach for the low hanging fruit and dial up the Sampling Camera (AA) settings. This works in the same way that using a sledgehammer can swat a fly. Your computer will hate you for making it take days of processing time just to get rid of a smudge of noise. You could be more nuanced and dial up the Diffuse and Specular settings, but this is almost just as inefficient. Just doubling the AA settings from 3 to 6 more than quadruples our render time from 30 minutes to over 2 hours! And the large poster resolution jumps from an 8 hour effort to a processor-murdering 32 hour marathon!
And there’s no real guarantee that the noise will be eliminated at this sample size. Just imagine the week-long frustration-fest you’ll endure when you realize it takes an AA setting of 10 to defeat the noise in the indirect specular highlights!
So we’re just going to leave Sampling at the defaults.
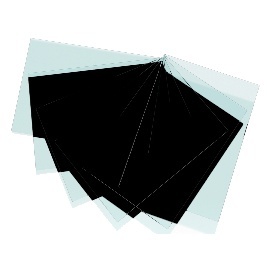
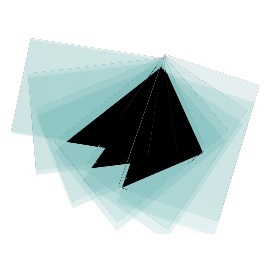
With Ray Depth on the other hand, we have no choice but to tweak higher. Why? Because this can limit what can be seen. For example, low Transmission or Transparency Depth numbers here will just block out those phenomena from rendering at all. Instead of seeing through liquid and glass, which is about 6 layers, you’d just see black. So a rule-of-thumb setting here? Get the three Ts — Total, Transmission, and Transparency Depth — somewhere around 10 or 12. See these example settings:
Opacity and AOVs
And, by the way: remember setting opacity for an object is NOT in the material node as you rightly would expect: it’s in the shape node!
AOVs (Arbitrary Output Variables) are the elements that tame Arnold’s noise. AOVs represent light rays of various kinds. The rays that travel through a medium like water are transmission rays, for example. What do the activated AOVs do for us? The first three are the denoising AOVs, while the others allow observation of various ray types in Arnold RenderView.
Using Arnold RenderView to troubleshoot
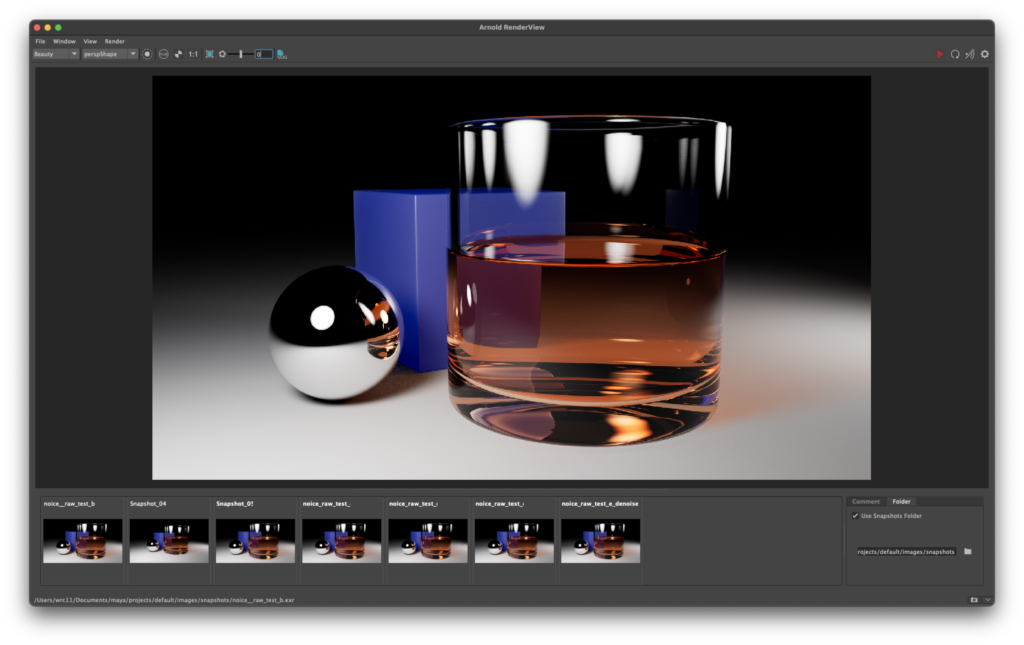
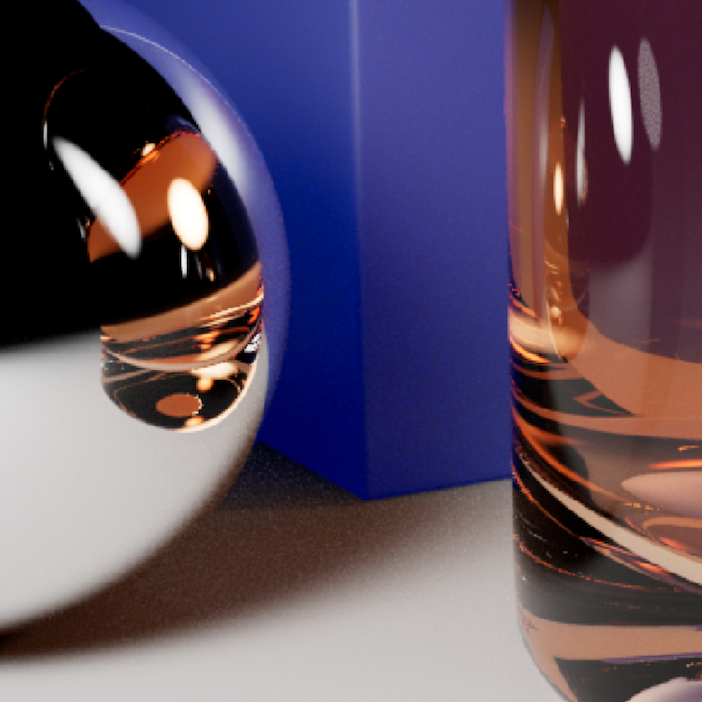
Arnold RenderView is a nice window that allows you to continue work on the file in real time and see the render update. My only criticism of Arnold RenderView is that it exaggerates saturation of color, so understanding this you know to really inspect color by opening any file you create in an image editing program. By using the dropout under the window menu, you can inspect the different AOVs you loaded above to determine where your noise problems are. In our case study, it’s evident that the diffuse indirect and specular indirect are the culprits. We run a test render here at 50% size and the noise is evident. It’s a 15 minute diagnostic move that saves time later.
We could use this intelligence to raise the sample numbers for Diffuse and Specular, but let’s try an even bigger time-saver instead. We’ll use NOICE!
Using Maya Render View to create the .exr file
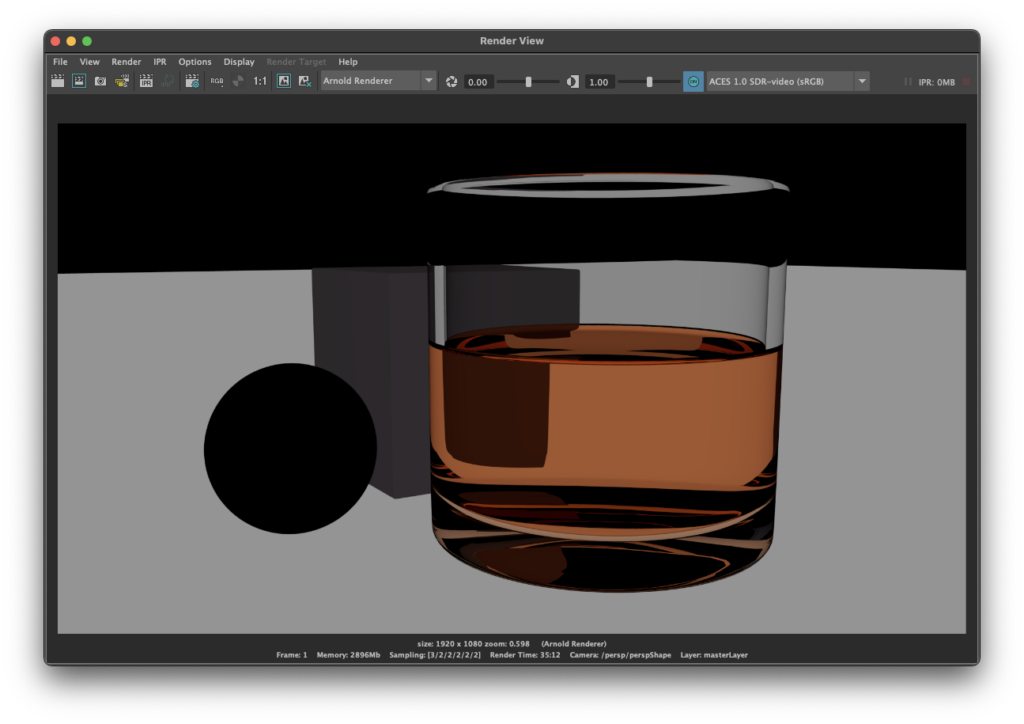
To use NOICE, we need an .exr file. While it’s possible to create an .exr file in Arnold RenderVew, it annoyingly won’t create one that can be used in the denoiser. Instead, we are forced to generate the .exr in Maya Render View. This takes the same amount of time that a full-size render takes in Arnold RenderView, just about a half-hour. Don’t be fooled by the cartoonish render preview in the window. Instead, open the file it created.
NOICE magic
In the menu, find Arnold > Utilities > Arnold Denoiser (noice) and select it. In the dialog box that opens, browse for your .exr file and select. NOICE will automatically generate an output, appending the file name with _denoised.
Go ahead and click on Denoise with the default values unchanged. NOICE is shockingly fast. Open the file it creates and inspect it. If any noise is still present, you can quickly change the defaults and rerun, increasing Variance to 0.75 and Pixel Search to 16 (don’t stray too far from the defaults!).
The bottom line here is: by using essentially lower sample values at or near the defaults of 2 or 3, then applying NOICE, you can save massive amounts of time, getting to the same quality as a high sample rate with almost no additional investment in time.
Finish in Photoshop
If you’re working with the Maya background instead of a skydome or an interior backdrop, the environment will render as an alpha channel in our .exr file (recall the .exr preview above). This is fixed very simply in Photoshop by opening the .exr file, adding a layer underneath, and filling the layer with black. From there, you can save a .tiff file, and for presentation, you can export a .png or .jpg. such as the one we see at the top of this title.
Earlier in this title I mentioned a preference to render darker and tweak the results to the actual exposure level in Photoshop. This is roughly analogous to the “push and pull” darkroom techniques of photography. “Pulling” your film reduces contrast and brings out details in shadows and retaining highlights, which can then be manipulated creatively in the darkroom to the desired result. If the rendering process is like shooting a roll of film, the tweaks in Photoshop are like developing and printing the images.
The logic of lower exposure
The logic is that lower exposure renderings tend to have more information in them, particularly in the lighter areas of the render such as specular highlights. It’s really difficult to restore information to a pure white or pure black space, so setting materials and exposures to avoid these extremes helps. Still, the tweaking that goes into a render setup can seem to be endless, and there is a diminishing return in attempting to perfect the settings in Arnold alone.
After finishing the rendered sample images above in Photoshop, I manipulated them as follows:
- In Image > Adjustments > Exposure… adding a Plus 1.0 preset
- In Image > Adjustments > Curves… pulling the white curve anchor down from 255 to 245
- In Filter > Noise > Add Noise… adding a tiny value (0.6 in sample)
- In Filter > Blur > Surface Blur… add low Radius (1 in sample) and low Threshold (10 in sample) if I need to reduce noise but keep sharp edges
- For printing only: Filter > Sharpen > Unsharp Mask… to compensate for ink spread at edges in a print. Values for this sample would be about 50% Amount, Radius 2 pixels, and Threshold of about 5 levels. Unsharp Mask always looks a bit alarming on the monitor, but it helps keep a print crisp by increasing edge contrast.
These refinements might take forever in a rendering engine if they are even possible. In Photoshop, they take minutes.
Your turn
Return to the Maya scene file in the scenes folder of your Nine Square Grid exercise. COPY IT, rename the file yourname_nineSquareGrid_materials.mb, and open it to apply a variety of uniform materials. Use or modify the values in the charts above to generate at least one instance of the following:
- Clear, reflective object with refraction (like glass, crystal, gemstones)
- Mirror-finished metallic (like a chrome-plated or polished metal object)
- Anisotropic (like brushed-metallic finish, carbon fiber, ribbed vinyl)
- Matte-finish (like felt, flat paint, rubber)
- Shiny plastic (like kitchen utensils, packaging, toys)
Although you are free to base your materials on the values in the tables above, feel free to experiment. Think about—and, in real life, observe—the qualities various uniform materials possess, and how the values above may be adopted to those materials.
Once you are satisfied with your material modeling, use the denoising techniques described in our case study to generate a fast 1920 X1080 rendering to embed at your process journal or blog.
More resources on noise
This case study is based on a mashup of knowledge from the following sources. Visit each for a deeper dive:


