

In the cloud


Build your own intranet
Own your work
With the web, an artist can be their own archivist, project manager, and publisher, by taking advantage of different kinds of management and publishing platforms available there. For this wiki, these can be classified as:
- Cloud Management
… where we do Archiving and Collaboration - Publishing
… where work is made available through Content Management, Hosting, Sharing, and Promotion
How does a working artist use the web? Using this scheme, my ecosystem includes:
CLOUD MANAGEMENT
- Archiving
- Collaboration Sharing
- Same as above
- File settings set for sharing
PUBLISHING
- Content Management
- www.williamcromar.com, a portfolio hosted on a personal server
- cromarbaile, a blog on the same server
- newMediaWiki, this wiki on the same server
- Abington ∞ MakerSpace, a website on a school server
- newMediaAbington, a blog on the same school server
- Content Hosting: a partial list including…
- Sharing through discussion boards and sandboxes including …
- Promotion through social media** and professional communities including…
** Around mid-2020 I concluded many social media platforms had become a toxic social liability, not an asset. I deleted my Facebook, Instagram, WhatsApp, Messenger, and Twitter accounts. If you share this concern, speak to me! I will not force anyone to travel in shark-infested waters that I avoid.
Cloud archive and backup
You probably use one or more of the cloud archiving services I listed, and you should of course use whatever you’re comfortable with. But, for our studios at school, we use the limitless free storage available at OneDrive. It’s hard to beat free, right? If you otherwise don’t have access to an institutional account, you can string together all the free-level storage at various services. Altogether, in the list above, minus OneDrive, I have about 100GB of free cloud storage.
Working with OneDrive
OneDrive can host a Digital Archive as a long-term, publicly-facing retrieval system for your files.
Notice three things about this archive:
- 1 Logical folder structure | Open a few folders. Note how each folder contains all the work for one project, with some containing sub-folders.
- 2 Rich file naming | Note the names of folders and files. These names serve an important archiving purpose: to reveal the contents before you open something. It’s a survival skill. You won’t regret a good file name, ever. Some good conventions for rich file naming include:
- The digits: these indicate the date created
- lastname and projectname are self-explanatory
- .ext is a file extension like .jpg or .pdf
- Alphanumerics only. Avoid special characters !“:;<=>?@[]^`{|}~
- NO spaces. Use an underscore _ or a hyphen – instead, or use a camelBack convention
- Use lowercase letters only (for consistency) unless camelBacking
- 3 Completeness | Specifically this means to keep all the files associated with a work. One will be the original authoring file, like a .ai file in Adobe Illustrator. From this, you may have exported versions to a .jpg or .png image. Archive all versions and file extensions! In some studios, files in certain software are cloud-based and live on a server. To “archive” cloud-based works, you can create a link in OneDrive. Click the +New button and select the Link icon to open a field where you can paste a link.
3-2-1 Backup strategy
This digital archive is also a backup device. There are three kinds of people:
- People who have lost work because they didn’t back it up…
- Those who will lose work because they haven’t backed it up, and…
- Folks who don’t lose work because they back it up.
Be that third person! Backup is essential to protect from loss or file corruption. Lost work is like the digital dog eating your homework, so it won’t get you off the hook for a project deadline. A good digital discipline uses this 3-2-1 Backup Strategy:
- Keep 3 independent copies of any important file
- Use 2 different media types for storage
- Keep 1 copy off-site (outside of your home or studio)
A combination of cloud-based and physical options will make this a snap:
1

- OneDrive is our primary backup at our school, and the only required platform in our studios. The archive here is evaluated as part of coursework.
- Set the archive folder to share with Anyone with the link. Visit this link to learn how. Sharing the archive folder allows files or sub-folders within to be seen, so only the share at the root folder of the archive is required.
2

- Secondary backup options include services like Google Drive, DropBox, or Box. If you’re at my school, don’t use them as primary backup for the class. However, at other schools, one of these might be the institutional cloud archive of choice.

3
- Physical drives also count as tertiary backup, and options include laptops, external hard drives, or flash drives.**


**PRO TIP | Flash and external drives are storage solutions only, NOT working drives like a computer’s internal drive. Do not work on a file directly on an external drive as this can create file corruption and directory problems. Instead, copy files to your computer’s drive, work on them there, and copy the completed work back to the backup drive.
Collaboration Shares
The cloud generally allows two ways of sharing:
- Sharing a file to be downloaded by someone with access privileges (usually defined by the uploader).
- Sharing a file to be worked on directly by multiple people with access privileges (usually defined by the originating author).
Both represent collaboration. The key to effective sharing lies in how you set access privileges. For non-sensitive files, set access so anyone with the link can view it. More sensitive data is shared with increasingly restricted access, perhaps with people who belong to an institution or who have a certain email domain. Setting privileges insensitively can lead to frustration.
Your Task: Create a Digital Archive
Open OneDrive:
- Find and select the blue +New button, and in the dropout options select Folder.
- In the dialog box, name the folder lastname_ART_XYZ_archive, replacing lastname with your name and XYZ with your course number.
- Click on the folder name or icon to enter.
- Find and select the Share button (under the main header Search function) to open dropout options and:
- Then click on “Anyone with the link can edit” — and the dropout options now give you new choices. Find Other Settings, make sure “Allow editing” is UNCHECKED, and select Apply.
- Finally, submit the URL from the Share dialog box (not the browser address bar).
If your institution uses a different cloud archive, the process will be similar, but consult with an appropriate party for specifics.
Process Journal in a Blog
You might think the process of creating a website is intimidating… and it is. But, with a web content management system, a person with very little knowledge of coding can create a beautiful and functional web presence. There are dozens of CMS offerings, which vary in their expectations for user’s technical savvy.
So, out of all of these CMS options, we like WordPress for several reasons:
- WordPress accommodates a range of users, from novice authors to advanced coders
- It’s free and open source, providing wide latitude for use
- And it’s popular: nearly a third of the top 1 million websites in the world use it as a CMS, so when potential employers see WP as a skill listed on your resume, they take notice!
As with any other CMS, there are some downsides. People confuse WordPress.org (the site for acquiring the software for use on a personal server) with WordPress.com (a hosting site for blogs), and the difference between the word-processor-ish Classic Editor and the block-based Gutenberg Editor has created a stir in the community. WordPress can be frustrating to an advanced coder who wishes for greater customization opportunities. And it has a bit of a learning curve for beginners. For all that, every one of the sites I created and listed above — including this one — is built with WordPress and hosted on a server.
But the server is the tricky part! Fortunately, if you’re in school, you often don’t have to worry about setting up and maintaining a server. At our school, we have a dedicated WordPress solution that offers themes that use the Classic Editor.
Hello WordPress
If you have taken one of my live digital studios before, you may already have a site for publishing work. If not, you’ll make one now. We work with WordPress as a content management system at Sites @ PSU.

With Sites open, let’s create and customize a site!
Your Task: Create your Process Journal UI
Using WordPress at Sites, we’ll create a site to use as a Process Journal to document our process and submit work through Canvas. After the creative projects, your site is the single most important artifact in our studio.
STEP 1: New site
You may be creating a new site, or you may use an existing site (in which case skip to the next step). With Sites open, find and select the Create a Site button to start a fresh site:
- Type in a Site Address (a.k.a. the URL). Choose wisely as this cannot change! We recommend choosing a flexible name, not one specific to this course. There are thousands of sites under the sites.psu.edu domain, so be prepared with a logical alternate if it warns Sorry, that site already exists!
- Type in a Site Title. Unlike the URL, this can change later.
- Under Privacy, select Yes to allow search engines to display.
STEP 2: Customizing
Your site is not too exciting yet. While still logged in, go to the Dashboard by finding this option in the black admin bar at the top of the browser window:
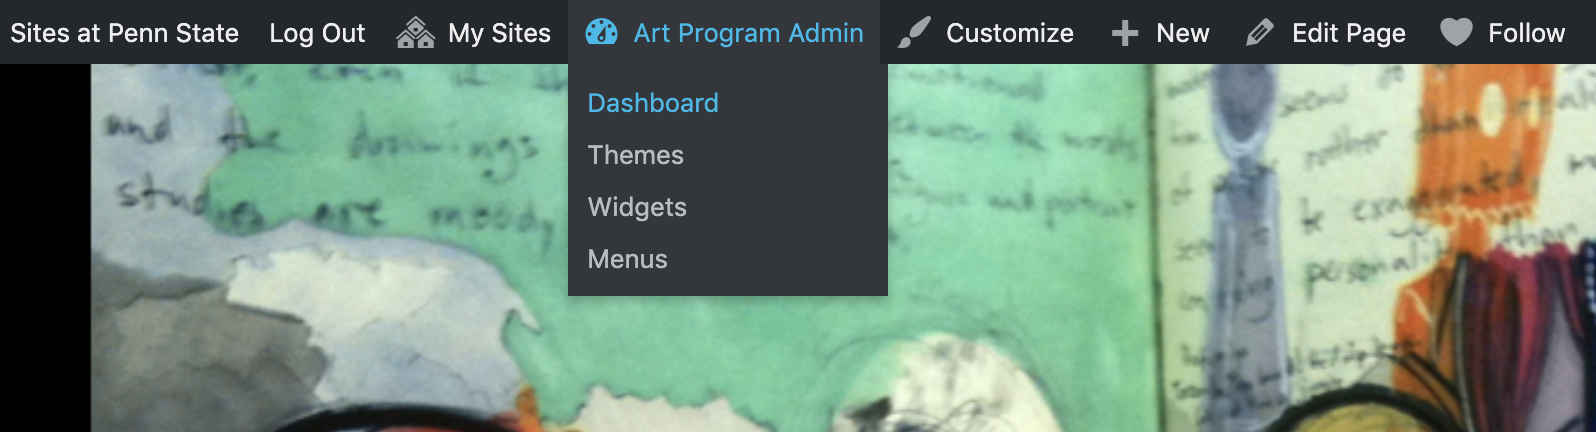
The Dashboard opens a left-sidebar menu. Here, we will customize. Customizing means you are designing the User Interface, or UI, of the site:
CHOOSE A THEME
- Select Dashboard > Appearance > Themes to open the selector window and choose a theme.
- Avoid older themes like Twenty Sixteen that have limited functionality. Don’t worry, you can change anytime!
- Look for a simple theme that won’t compete with your content.
CUSTOMIZE THE THEME
- Select Dashboard > Appearance > Customize to open a special new dashboard menu. This menu changes from theme to theme.
- Under Site Identity, confirm your blog’s Site Title (you can change it anytime), and change the Tagline to something more personal than the “Just another whatever” boilerplate text.
- Select Dashboard > Appearance > Widgets and observe widgets—blocks of functionality adjacent to the main content—which your theme has installed by default. Available widgets are to the left, and installed widgets are to the right. We don’t need a lot:
- Keep Meta and Categories, and delete all the other widgets. Open a widget by clicking on its arrow, and selecting Delete.
- Among the available widgets, find and select Links and add it to the area adjacent to your Meta widget.
- If you have the option of placing widgets in a Footer area, always do this. Avoid the clutter of Sidebars whenever possible.
ELIMINATE “BOILERPLATE”
- Select Dashboard > Posts > All Posts and observe a list of posts. You’ll see one named “Hello World!” Delete this post or change it to private!
- Now select Dashboard > Pages > All Pages and observe a list of pages. You’ll see one named “Sample Page.” Delete this page or change it to private!
CREATE A TEST POST
- Select Dashboard > Posts > Add New. This will open a new post editor window, where you can create an “About Me” post:
- Under Add Title, write a logical title.
- In the main content area, observe two tabs: Visual and Text. Using the Visual tab allows you to write like a simple word processor, with familiar text formatting options. Write a text to introduce yourself very briefly to your audience.
- Look for a function called Categories to the right (or below) the content editor. Find and select + Add New Category and type About, then select the Add New Category button below that. This will automatically select your newly created About category.
- Find and select the Publish tab.
- Submit the blog URL in Canvas. It will look something like this: https://sites.psu.edu/yourblogname.
Hosting, sharing, and promoting
Recall the long list of hosting platforms, discussion boards, and social media sites we started with at the beginning of this title. There are hundreds of options for image or video hosting, finding and sharing code snippets, or showing off your newest work online. How do you choose intelligently?
There’s no one-size-fits-all answer to that question. But, whatever you choose, there will be more than one, and together with the digital archive and process journal created above, you’ll soon have a little corner of the web to call your own.

Own your search
So: when people search for you, can they find you? Do you own your search?
It sounds narcissistic but it’s not: open up an Incognito window and do a Google search for your name. How much of this search do you “own?” Do YOU show up, or does some impostor who shares your name? How can you stand out, especially if you have a common name like Smith? You need some personal SEO (search engine optimization), and creating your web presence is the best way to do this. Visit this article at College Raptor to learn more.
So now that you have some motivation to own it, let’s create a web presence. You’ll use a lot of accounts and platforms, and while none of them cost money, their professional value is priceless!
Your Task: Create a personal web presence
This task requires some personal choice, but I have some strong recommendations for what works best in each course, which I typically discuss in class. Generally, at minimum, you want (1) a place to host images, (2) one to host videos, (3) a place to make slide decks, and (4) a social media feed. Here’s a broad, incomplete list of hosting and social sites for specific tasks, most with a free level of service:
**WP Media Library is limited to 500MB for Sites@PSU. This can run out quickly, especially if you use sound files! It does NOT support video.
Cautions
If it’s not on the list, that doesn’t mean you can’t use it. However, there are some to stay away from. Sites like Imgur and Giphy are great, but they resample your content to save server space. Not good for original artwork! And: don’t get me started on the horrors of Powerpoint Online in a sharing environment. Please: just use Google Slides!
A note on social media for content promotion
Social media is how most of us interact with the Web. It’s so pervasive that some people think Facebook is the internet. Powerful portals like Facebook have come under scrutiny of late for scandalous practices relating to data sharing and privacy, a debate rages about the threat social media poses to democracy, and discussions of regulation will no doubt lead to changes in the way we interact with social media.
But there is no doubt that social media is here to stay as a cultural force. Social media is reinventing the terms of exchange between the artist and their audience. An artist can use this arm of the web in many ways. Social media platforms can propagate your work. A Facebook Page (as opposed to your personal feed) is recommended for creators who want a professional presence. LinkedIn may feel a bit unhip, but people get gigs there — I got my job at PSU that way!
Social media is a very personal choice, so I won’t prescribe or recommend anything here. I will disclose that I recently permanently deleted anything to do with Mark Zuckerberg — a hard choice for a new media artist. For this course, integrating social media into your intranet will help promote your site and work. However: if you find social media to be too toxic to handle, or have personal reasons not to engage with it, just let me know that. You don’t need to tell me why.
Putting it all together
For my intranet, I made sure that all these things talk to each other by creating links from each one to all the others. From my image hosting platform, I have a link to my portfolio site, and vice versa. I’ve created a mini-web crisscrossing the internet that we can call an intranet. This little intranet allows me to be seen as a professional anytime anyone searches for content like mine.
Your Task: Link up your intranet
Once you’ve made decisions about hosting and social sites to include in your intranet, do the following:
- Log in to your new process journal blog in Sites@PSU and open the Dashboard.
- In the Dashboard find Links and open All Links.
- You’ll see a bunch of propaganda links for Edublogs. Select all and, under Bulk Actions, choose Delete!
- Find and select the Add New button.
- In the field Name, type Digital Archive.
- Under Web Address, copy and paste the link for your Digital Archive root folder. Open that folder and use the Share function we tested earlier, being sure to UNCHECK “Allow editing!”
- For Target select _blank.
- Select the Add Link button.
- Repeat the above process for each hosting site and social media platform you want to use for material in this course.
Not done yet. You’ve created the links, but you now need to find a place to display them on your site:
- In the Dashboard find Appearance and open Widgets.
- To the left, you’ll see a long, button-like list of available widgets: find Links and select it.
- A pop-up menu will open, listing places on a webpage where you can put the widget. The options here are dependent on the theme you’ve applied to your site, but most themes will have a place like Sidebar or Footer. I recommend Footer if available. Select the place and then select the button Add Widget.
- Go back to the public site and inspect your work. If successful, you’ll see your link list including the archive, hosting, and social sites.
4D Media ONLY: Website
HTML vs CMS
Keeping up with the complexities of website creation and maintenance can be a big barrier to success. An all-in-one host and content management system (CMS) is one option we’ve already explored. A well-coded, HTML-based, server-hosted website is another we’ll look at here.
We see some crossover between these worlds; WordPress, for example, makes a CMS solution one can host on a personal server as a standalone site, while SquareSpace or Wix allows robust template customization for those who know how to code.

Your process journal has been developed in a school-hosted CMS, so to secure a different skill set we will develop a so-called “static” coded site on a school-based personal server. This will introduce you to HTML5, the first of three “languages” you’ll learn to speak in web coding.
Hello Server
Your first little website will be developed on your personal computer and loaded up to the school server, a process that can have a lot of variation based on the institution, so I won’t detail that here. But generally, you’ll need a server account set up for you and a way to get your site from your computer to the server.
FileZilla is a free, open source program that allows you to upload files to a server using the File Transfer Protocol, or FTP. Some may prefer (or require) a Secure FTP or SFTP. Configuration of the connection varies from setup to setup, so this is something you’ll go over in class.
Hello TEMPLATED
Once you have a server account and an FTP uploader, you can develop your site. But wait: some of you don’t know how to code!
Doesn’t matter. Whether this is your first time creating a site from scratch, or you’ve written HTML before, using a template is a smart move.
First, let’s take a look at a sample website that was created using a template:
I acquired this template at a website that offers Creative Commons licensed free templates:
At Templated, I selected Visualize as a simple, one-page gallery-style page. You may choose the same one if you want to emulate the instructions below in a precise step-by-step fashion, or you can be more adventurous and try a different one — the process will be similar either way. If you have difficulty accessing Templated, download Visualize directly here:
It will download as a .zip file, and unzip as a folder called visualize or something similar to your chosen template.
Creating a local root directory
Where do you keep this folder? You’ll establish ONE folder where all your website work will live, and this is called the root folder or root directory. You know all those slashes you see in a URL? They indicate a directory structure. The root is the “//” in the URL.
Establish the root on your local machine and move your folder there:
- On a Mac, you’ll move it to Macintosh HD > Users > yourusername > sites. Move your unzipped folder into sites, and rename the unzipped folder public. That will be the root of your site from now on.
- If on a PC, create a folder with a logical, simple, lower-case-and-no-spaces name anywhere you like, but make sure it’s in a place it will always stay. In other words, if you put it on your Desktop, make sure it always stays there. Move your unzipped folder into this, and rename the unzipped folder public. That will be the root of your site from now on.
Now let’s transform the template. You can do it even if you don’t know HTML!
Your Task: From the template you YOUR site
Seeing extensions
Before we begin, you’ll want to set things up so you can see the full file name, including the extension… that .jpg or .html at the end of the name.
- On Windows computers, you might have trouble seeing the extensions, because Windows has an option called Hide extensions for known file types turned on by default. Generally, you can turn this off by going to Windows Explorer, selecting the Folder options… option, unchecking the Hide extensions for known file types check box, and then clicking OK.
- in MacOS, extensions are hidden by default but you can show them:
- To show globally, open Finder and in the Menu choose Finder > Settings, then click the Advanced tab to select Show all filename extensions.
- To show individually, click once on the file so as to select but not open it, the hit COMMAND+I (the capital letter “I”) to open Info. Under Name & Extension, uncheck the Hide extension option.
Image tricks
Change the background image
Our first image trick will be to change the background image:
- Open the root folder, double-click on the index.html file, and it opens in a browser window. Observe the file looks the same as the demo on the web.
- Return to the root folder, open the images folder and note the presence of files with names like avatar.jpg or bg.jpg, and sub-folders with names like fulls or thumbs.
- The background image is named bg.jpg in the Visualize package; it may be something similar in another template. Find a suitable image among your own work and make a copy of it in the images folder, then delete the background image file and rename your new image the same name as that deleted file.
- Return to the browser window and hit refresh. If you did it correctly, you’ll see the new background image. If not, go back and check the name you gave it.
Change the contents of the image folder
Our second image trick will be to change the folder of images:
- Open the sub-folder with images (named fulls in the Visualize package). You’ll see a group of images with numerical or similarly ordered names (01.jpg, 02.jpg, etc., in Visualize). Find images of your own work to copy into this folder, and rename your images with exactly the same names as the existing images, which you will delete.
- Return to the Images folder and determine if there is a thumbnails folder (it’s called thumbs in Visualize). Open it and you’ll see the same images with the same names as you found in the fulls folder (or equivalent in your template). Return to the images folder and delete the thumbs folder altogether.
- Copy the fulls folder (or its equivalent) and rename it thumbs.
- Return to the browser window and refresh. All your images have changed, and when you click on them, a lightbox image pops open.
- Our final image trick will be to change any other images you find in the template in the same manner.
Text tricks
Now, to change text:
- On a Mac. you don’t have a lightweight text editor to work on .html, visit and download TextMate at https://macromates.com/. It’s free and open source! On Windows, use the old reliable Notepad.
- TextEdit Users: if you are using Mac TextEdit, to see HTML files as code, in the menu TextEdit>Preferences, select the Open and Save tab, and check ON “Display HTML files as HTML code etc.”
- Find index.html again, right-click and in the contextual dropout menu select Open With>TextMate or other text editor software.
- If you are new to code, this looks really intimidating, but it’s pretty simple as we won’t be changing any code—we’ll only be changing the text the code is marking up. Look in the browser window at the first text displayed (in Visualize, it’s “This is Visualize, a responsive site…” etc.).
- Return to the TextEdit window with the code and use COMMAND+F to open a Find field. In this field, type in the first couple of words you saw in the browser. TextEdit will reveal its location.
- Select the entire block of original text in this first area, and replace it with your name. Save the file (COMMAND+S), return to the browser window, hit refresh, and if done correctly, your name will replace the text.
- Find any other text areas you want to replace and do the same thing. In the modified footer, we kept the link back to TEMPLATED, which we are required to do according to our CC-BY license.
Hiding stuff and wrapping up
Final option for the adventurous who wish to “hide” stuff:
- Lastly, if you wish, find any content areas you wish to “delete” from view. In Visualize, there are a group of social media icons we don’t want to use quite yet. Instead of finding all this code and deleting it, we’re going to use a simple trick to hide it. Look for a special code called a comment that looks like this:
<!--- Copy the
<!--and paste it in front of the element you wish to hide. In Visualize, we pasted it in front of a line of code:<ul class="icons"> - Now go search for another special code that closes comment and looks like this:
--> - Copy it, and paste it behind the last element you wish to hide. In Visualize, we pasted it after a line of code:
</ul> - Save and return to the browser and hit return. The icons disappear!
- Copy the
- If you “break” the code at any time, don’t worry. Simply unzip the download and replace the index.html for a fresh start.
FileZilla
When finished, we’ll use FileZilla to upload the new site to your new server. The variables here can be vast, so we’ll go over the specifics of this live in the studio. For those not taking a class with me, consult with your institution about configuring FileZilla for FTP or SFTP access.