Concatenation
From Maya to Premier
This demonstration illustrates a typical workflow for taking a batch render from frames to finished audio/video magic. This process goes by the fancy name concatenation, the act of putting things together in a logical series or sequence. We use Adobe Premier to concatenate the animation we built in Maya. And we’ll add titles and sound for a professional level of finish.
From frames to motion
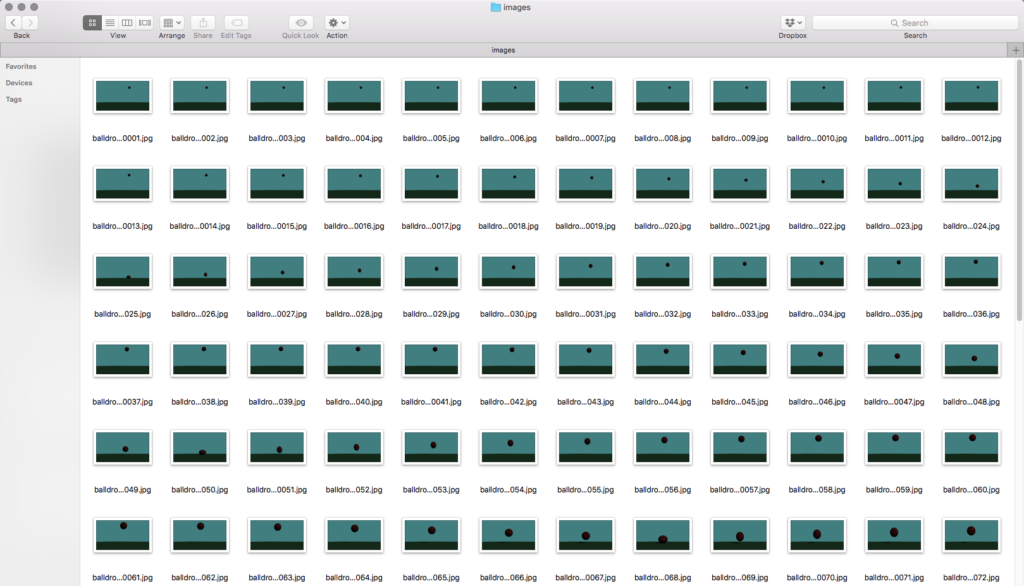
Your modeling program may or may not allow you to generate a movie file in the rendering process. Often, it will provide you with a massive series of still images. Here we can see the images folder in a Maya project. There are hundreds of 1920 x 1080 .jpg files waiting to be activated into animation.
This seems like such a hassle! Why can’t Maya just make a movie file?
There are actually many advantages to not creating a movie right in the modeling app. If the rendering process is interrupted, you don’t lose a big movie file in mid-render. You can batch render in blocks of time that are feasible if rendered locally. And you can define exactly which frames you want to render if a timeline has more information on it than you want to render out. Anything that gives you finer grain control at the same time you save time is a great advantage.
Create the Premier project
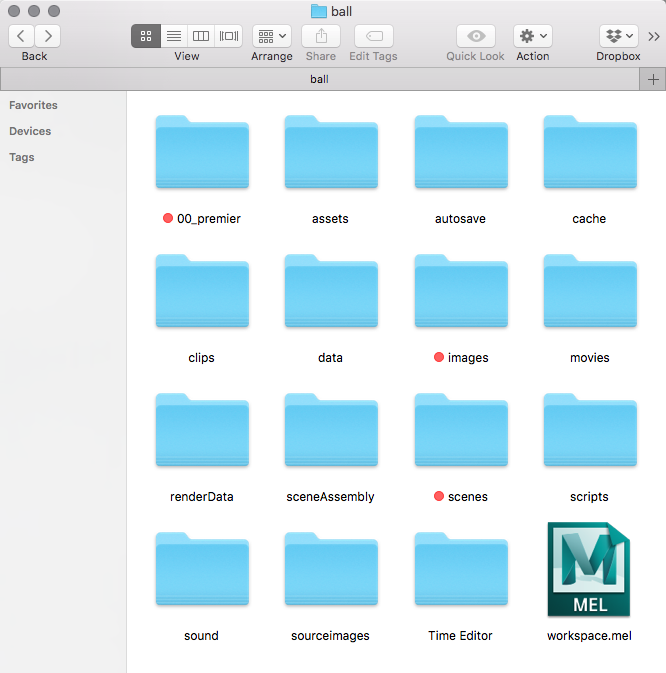
The Maya project folder is a self-contained ecosystem. It houses a scenes folder containing the .mb files, an image folder containing rendered frames, and other asset folders that will house other items as your projects get more complex.
To this Maya folder, let’s add a folder called 00_premier. We will keep the Premier project here so that it becomes part of the Maya project folder. Here, observe the contents of a Maya project named ball, with three asset folders that are important to us highlighted with a red dot.
Open the Adobe Premier application, which on a Mac will be located in your Applications folder. Video editing software typically hogs monitor real estate, and Premier is no exception. We’ll take a tour of this expansive workspace in a moment, but first, let’s go to the Menu and find File>Import.
In the dialog that opens, navigate to your Maya project images folder. Select the first frame only, which in our sample is named balldrop_2018.0001.jpg. Click on the Options button at the lower left of the dialog, revealing the Image Sequence checkbox, which you will check on.
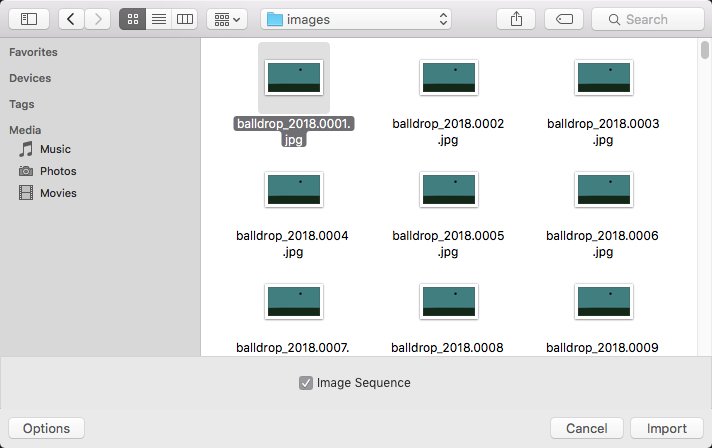
This is a terribly important thing to get right, and the interface hides it in an unfortunate manner. Newbies will sometimes innocently select all the frames and import them individually. This just results in a bloody mess, so mind the Options button and checkbox!
The Premier workspace
Hit the Import button, and you will see your image sequence show up in the Project Window. Let’s have a quick tour of the interface while we’re here. In the illustration below, we have set up a workspace that will allow us to quickly access everything we need. If your Premier workspace doesn’t look like the illustration, go to the Menu and select Window > Workspaces > Editing (CS5.5). This is a legacy workspace from an earlier version of Premier, but it’s quite useful for this kind of small, quick project.
The imported image sequence (in our sample, named balldrop_2018.0001.jpg) can be dragged from the Project panel to the Timeline to create a new Sequence automatically. Once you’ve done that, your workspace should look like this:
A tour of the Editing Workspace
PROJECT PANEL
At upper right, contains all externally referenced audio, video, or image sequence assets, and Premier assets like Titles and Sequences.
EFFECTS CONTROL
At the upper center grouped among other tabs, contains basic effects controls for motion and opacity, as well as transitions and effects applied from the Effects Panel.
PROGRAM MONITOR
In the upper left, this panel shows a preview of the timeline, with video motion controls, frame data, view zoom, and manipulation tools whenever timeline objects are selected.
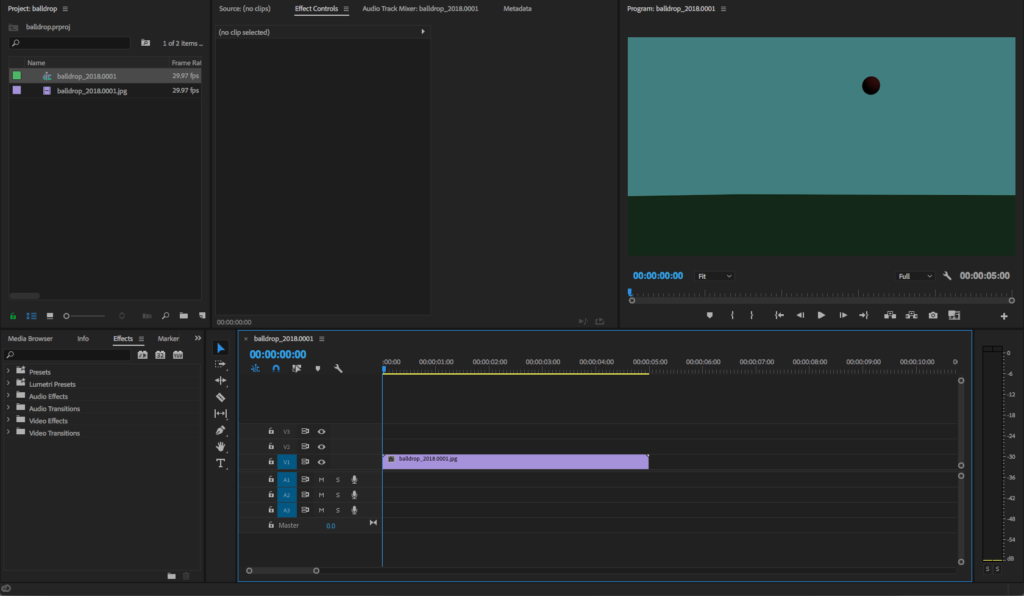
EFFECTS PANEL
At the lower left, and grouped among other tabs, this contains audio and video effects and transitions. Once added, the controls for these effects are displayed in the Effects Control panel at the upper center.
TIMELINE
Spanning the majority of the lower right half of the UI, this panel displays Premier Sequences, expressed as duration in hours : minutes : seconds : frames. Video tracks at the top and audio tracks at the bottom are analogous to layers in Photoshop or Illustrator.
Flanking the Timeline are:
- At left, a TOOLBAR with basic editing tools.
- At right, an AUDIO METER that graphically expresses the volume of sound.
Different workspaces may show these in different organizations. Some workspaces will not show them at all by default. If yours is different, change your workspace, or optionally seek the panels out in the main menu.
Add titles
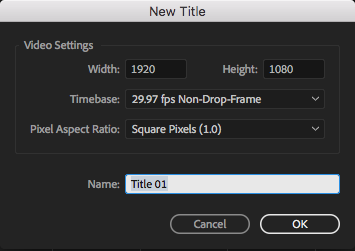
To add title text, go to Menu and find File > New > Legacy Title… to open the dialog seen here. In a tiny project we don’t need to be fussy, so click OK.
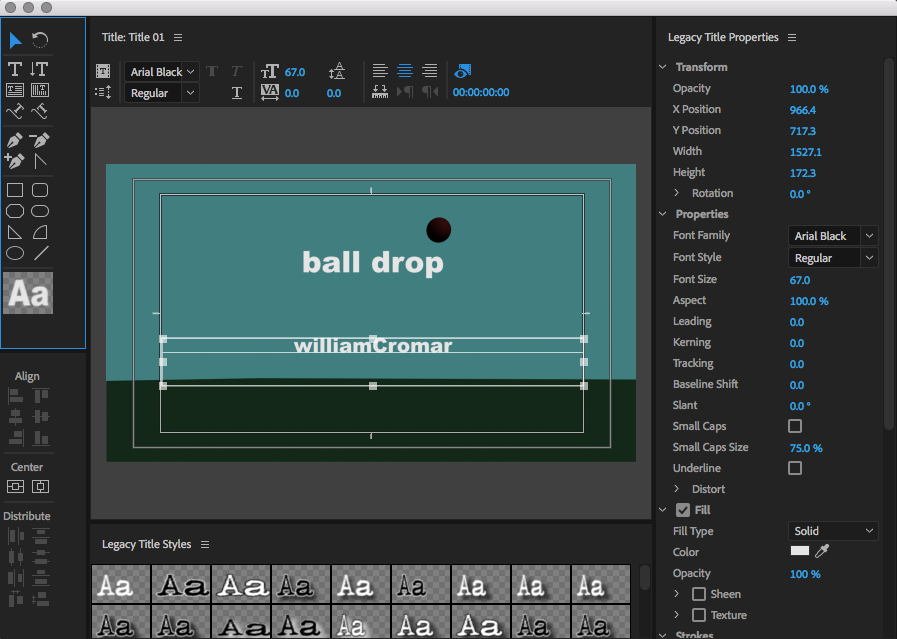
This opens the Legacy Title dialog, illustrated here.
This is a pretty straightforward vector-centric text editor with all of the expected functionality of text boxes, font selection, etc. In a small project, we’ll combine the title and the author’s name in one title sequence as illustrated above. A couple of features to note are the two thin guide frames in the preview area. The interior one is the Safe Title Margin, and it helps to place title text so that if your work shows up on a non-HD screen, it will not be clipped. In the sample, this Margin is used to create a text box width, to which a center justification is applied, and this automatically centers all the text.
Opening and closing credits
You’ll start with two Title sequences: the opening credit including your name and title as mentioned, and a closing credit which will include licensing information. We know we are going to add some Creative Commons-licensed sound assets later, so we supply the text
2018 | Creative Commons Attribution-ShareAlike 4.0 International License
in our closing Title sequence.
After creating the Title sequences, observe them in the Project panel. Click-hold-drag them down into the Timeline to add them before and after the basic footage. Add them to the V2, the second Video Track, to avoid overwriting the footage.
By default, Titles will display a duration of 5 seconds. These are simple titles and can be read in about 2-3 seconds, so change the duration by right-clicking on the bar in the Timeline and selecting Speed/Duration… from the dropout options. In this little dialog, change the Duration to 3 seconds and select OK. Note the change in the Timeline.
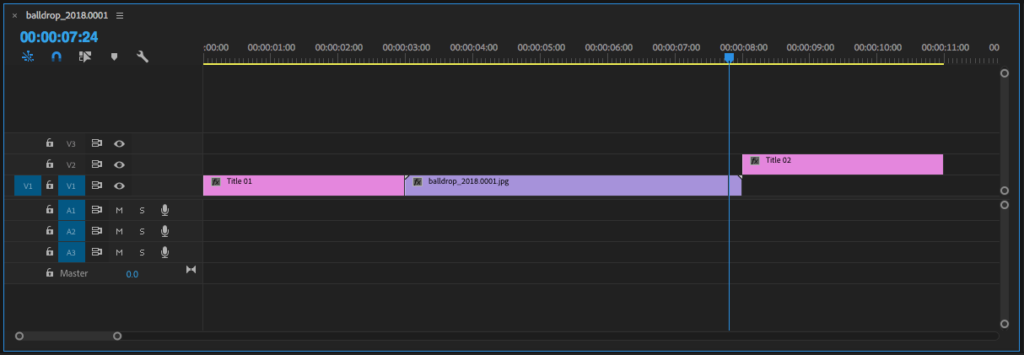
By click-hold-dragging the bars in the Timeline, you can shift them around. With the opening title sequence at the start of the Timeline in V2, drag and snap the start of the footage to the end of the title, then move the title down into V1. Do the same for the closing title. The illustration shows the first tile in place, and the second title snapped and about to be moved down.
Zooming the Timeline
You will find it necessary to zoom in and out on the Timeline to perform these functions. Observe the bar at the bottom of the panel, which looks like two light gray circles connected by a darker gray bar. Grab a circle, and click-hold-drag to zoom in and out. Grab the darker bar to scrub the zoom area along the Timeline. Notice that as we zoom in, the zoom centers on the locator bar indicating the active frame. Practice working with this zooming tool a bit.
Add transitions
Scrub the Timeline by dragging the position indicator, or hitting the Play arrow in the Program Monitor, and you’ll see the titles added to the basic footage. It seems a bit jarring, so we’ll add a basic cross-dissolve effect to develop smoother transitions among the clips.
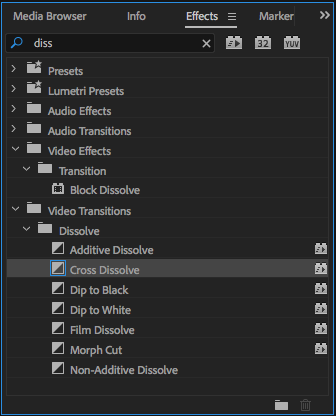
Find the Effects panel tab in the panel stack at the lower left of the UI, and navigate to Video Transitions > Dissolve > Cross Dissolve.
Often it’s faster to search if you know a term. In our illustration, you can see “diss” typed into the search field at the upper left, and this quickly displayed the Cross Dissolve transition we need.
It’s a simple affair to click-hold-drag the Cross Dissolve to the Timeline and apply it to the start or end of a clip by releasing. Notice a green highlight when hovering near the beginning or end of a clip, indicating you may apply the transition. We’ll add the effect:
- To the front of the opening credit
- Between this credit and the start of the footage
- Between the end of the footage and closing credit
- To the end of the closing credit
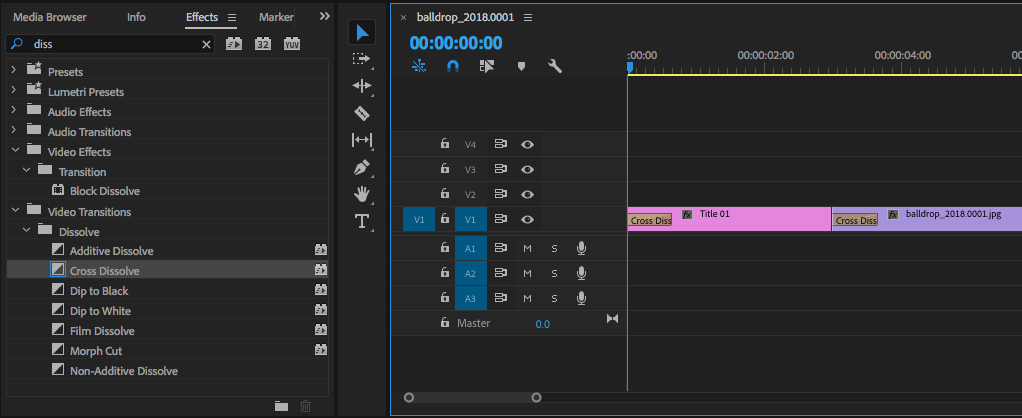
Play the Timeline and note the smoother interaction between clips. In our sample, we were not satisfied with the interaction between the ball rolling to a stop and the closing credit. There are two options: 1) to change the default duration of the effect, or 2) edit the footage to increase the amount of time the ball is standing still. We like the default duration for the effect, so we opted for the second choice.
Razor Tool edit
We start by removing the transition from the end of the footage, then inspecting this area frame by frame to detect the number of frames where the ball is still. We noticed that about 6 frames from the end is a good choice for our edit.
Inspect the Toolbar to the immediate left of the Timeline panel. You’ll see some familiar tools here like the Selection Tool, but you’re looking for a small razor blade icon to activate the Razor Tool. This tool is a metaphorical reference to the old days of physical film splicing, which was done with a razor blade and clear adhesive tape.
After thanking your lucky stars we aren’t working that way anymore, select the tool and apply it about 5 or six frames from the end. To do this accurately, you’ll need to zoom in on the Timeline.
Move the closing credits up to V2, and select the small clip you just razored off the larger footage. We’re going to make this much longer.
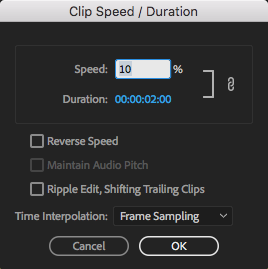
Right-click the tiny clip and select Speed/Duration… from the dropout options. In the dialog, reducing the Speed to 10% increases the Duration of a 6-frame clip to 60 frames, or 2 seconds. Select OK.
With this comfort zone added to the end of the footage, snap the closing credits to the end of this, and reapply the Cross Dissolve. It should look something like this:
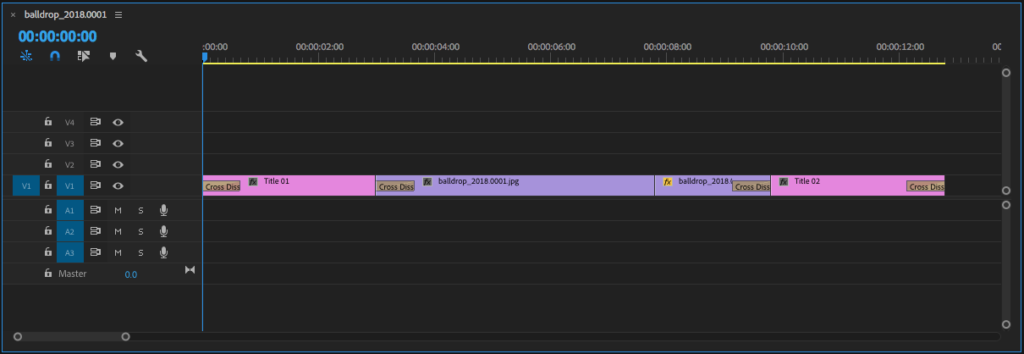
Add sound
Scrub the Timeline, and visually it’s great. But without sound, it seems a bit abstract. We can record a ball bounce, edit, and use the sound clip to drive our animation, a strategy that is more often the case. In this instance, the animation came first, so we needed to fit the sound into the animation.
Search for sound
It will be very time-consuming to create our own sound file for something as simple as a ball bounce. It’s just as effective to find a sound that has the proper license to allow our use. So we’ll search for a Creative Commons-licensed sound file.
Generally, authors are looking for two kinds of sound: 1) a soundtrack or ambient noise that overlays the scene, or 2) in-the-scene sound effects, which are known as Foley sounds, named in honor of pioneering sound effects artist Jack Foley. Pretty clearly we are after some Foley sound. Where to begin?
Found Sound | Popular sites for found sound include:
- SoundEffects+
- Freesound
- FindSounds
- SoundCloud (CC search)
- Free Music Archive
- Jamendo
- Internet Archive
We found our sound file Soccer ball kick.mp3 using FindSounds, an audio file search engine; the file was in reality located at Universal Soundbank. We don’t credit the search engine, but we do credit unversal-soundbank.com and apply the CC license we knew we would need earlier.
Import to Project
After downloading our free, appropriately-licensed sound, we place it in our 00_premier folder. As we did with the video footage, we use File > Import… to bring the asset into the Projects panel, and from there we will drag it into the Audio portion of the Timeline. We can’t simply and randomly place the sound, however. It has to sync up.
Adding Markers
It’s easy to inspect the Timeline by using the arrow keys to move frame-by-frame and find the individual frames where the ball squash-bounces. As we observe these frames, we can create markers at each bounce. Markers are a special function located at the upper left of the Timeline panel, highlighted by the red circle in the illustration below. When you place the locator bar at the frame you wish to mark, click on the marker icon, and a green marker appears on that frame.
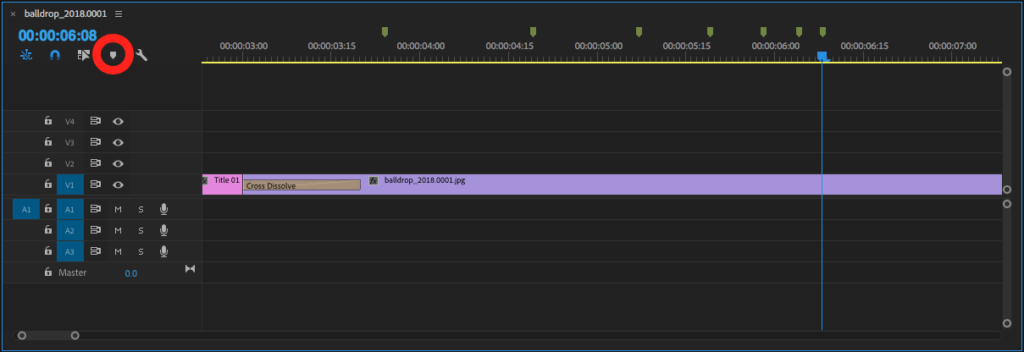
With the markers in place, you can now drag sound from Project to Timeline audio track and align the bounce frame marker with the high point on the waveform that indicates the loud *pop* of a ball striking a surface. We need to stagger these among various audio tracks as the sounds are spaced closer together.
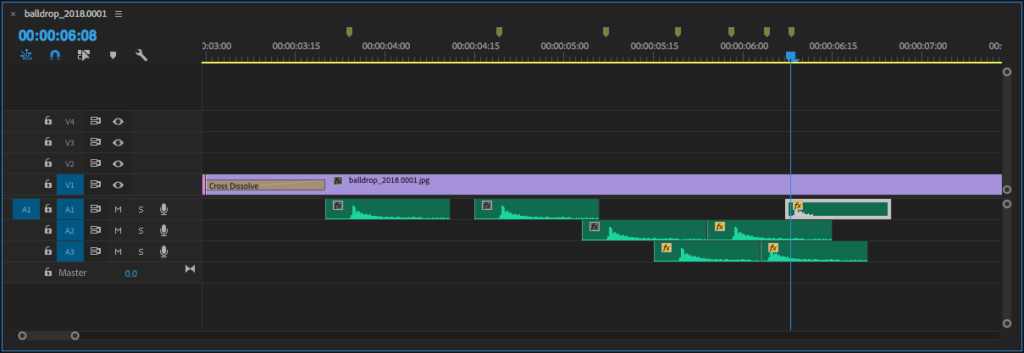
Changing db levels
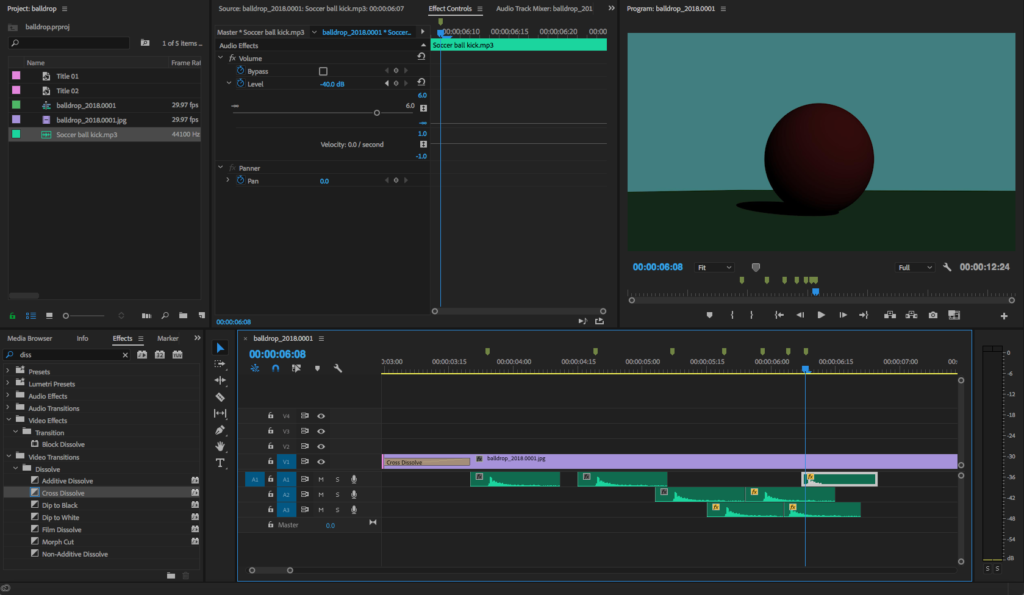
After placing the sounds, play the Timeline to see and hear. Notice it sounds great at the beginning bounces, but it sounds awful at the end. We need to change the volume of the bounces to decrease as the bounce reduces in height. Select one of the final waveforms in an Audio track and go to the Effects Controls panel. Under Audio Effects, note the Volume, then Level, which is measured by decibels—the default level is 0db but don’t be fooled into thinking that’s no sound. It’s a datum: it means the loudest level at which the sound is recorded, and we reduce the volume from there. We are not changing the Level dynamically, so look for the little stopwatch icon next to Level and deactivate it. If it is bright blue, it’s active, and if it’s gray, it’s inactive.
After experimenting with Level for a bit, we determined that the final four bounces should decrease by 10db with each bounce. The final bounce level is -40db, the next-to-last is -30db, and so on. Playing the Timeline now yields a satisfyingly real decrease in bounce sound intensity as the bounce degrades and stops.
Credit the sound
We need to add a credit Title to cite the source of our CC-licensed sound. We use the text
ball bounce foley sound
http://www.universal-soundbank.com
to create the new Title.
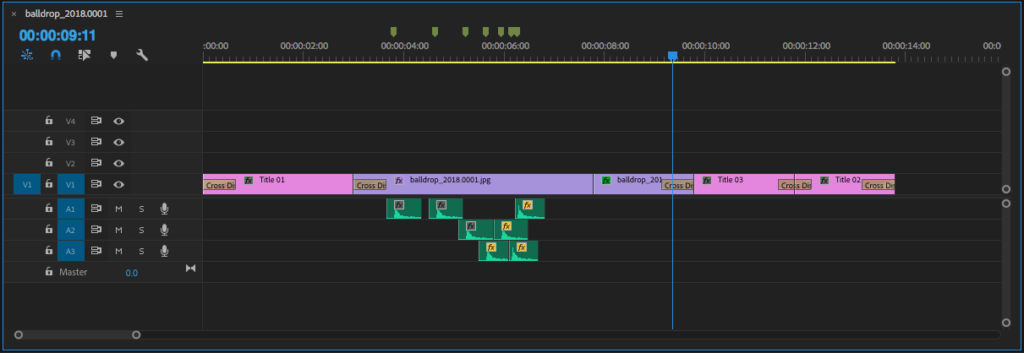
Delete the Cross Dissolve transition from the end of the footage and move the closing credit title up to V2. Drag the new Title into V3, and adjust the Speed/Duration if needed. Here, we decide each of the two closing credit titles should be about 2 seconds apiece.
Snap-align these and drag them back down to V1, where we can reapply the Cross Dissolve transition as illustrated.
Add video effects
We notice that the video rendering seems a bit dark. This can be quickly fixed by adding a Video Effect.
Go to the Effects panel and search for “brightness,” and you’ll see Video Effects > Brightness and Contrast display. Select the footage clip, and double-click on the effect name.
Head up to the Effects Control panel and you’ll see Brightness and Contrast has been added under the standard Motion and Opacity under Video Effects. Increase the Brightness by about 10 to 15%.
Because we have split the footage into two clips, we need the same effect applied to the second piece. Not to worry: simply select the name of the Brightness and Contrast effect applied to the first clip and Copy, then select the second clip. In the Effects Control panel for the second clip, Paste, and the whole effect, including the values you set, will apply to the second clip.
Export to .mp4
Export settings
The editing is done and we can now unleash our animation to the world.
In the Menu go to File > Export > Media… to open the Export Settings dialog.
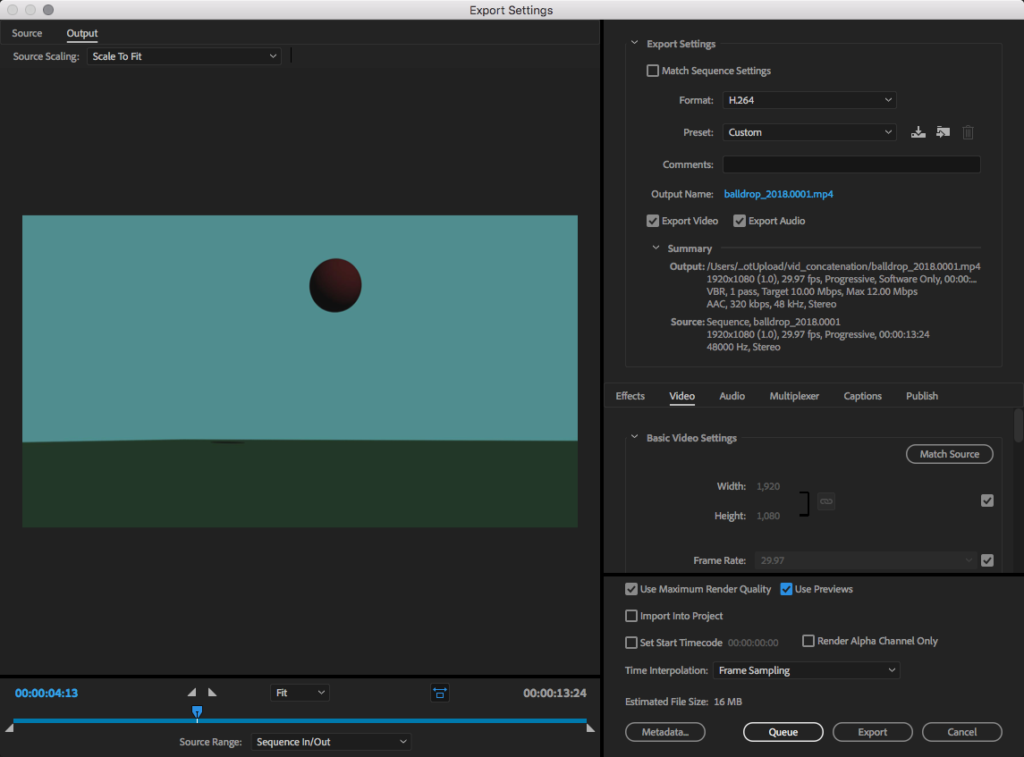
Here we do the following:
- Select Format: H.264
- Check Export Video and Export Audio
- Check Use Maximum Render Quality and Use Previews
- Hit Queue
This opens Adobe’s Media Encoder software. The advantage of rendering the video outside of Premier? It renders in the background, allowing you to continue working in Premier (or anywhere else for that matter) as long as you have an adequate processor.
Media Encoder
The disadvantage of Media Encoder is its rather ungainly UI, but we don’t need to spend a lot of time here. Observe the Queue panel in the UI window:
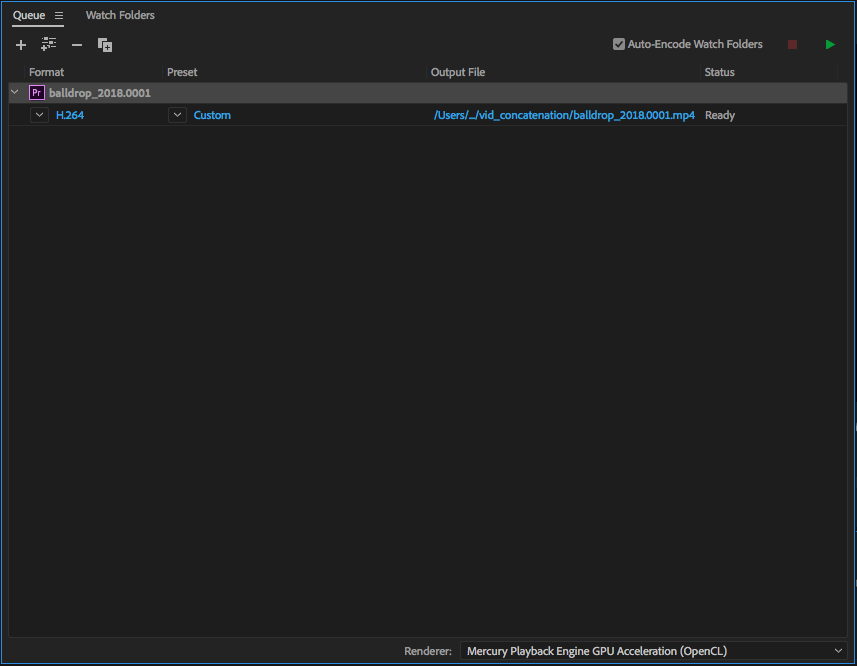
In the Queue panel, click on the bright blue directory under the Output File heading. In the dialog, define the file name and output destination folder. When done, back in the Queue panel, highlight the project name, then hit the green arrow at the upper right-hand corner of the panel.
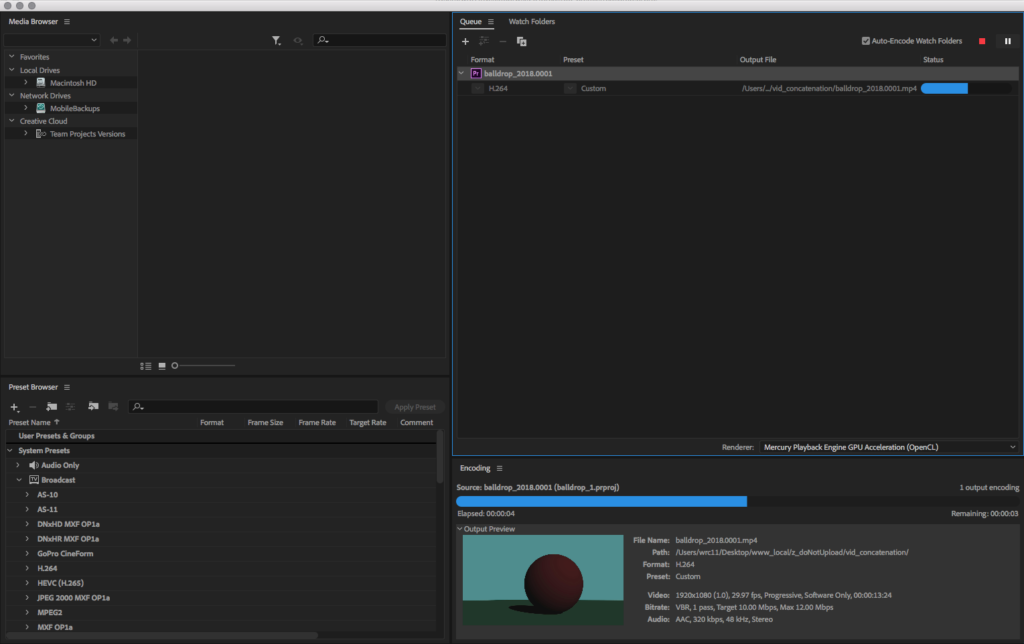
As the project encodes, you can observe the progress in the Encoding panel, illustrated here—for big projects, this is coffee time.
Share the final file
Uploaded the movie to a video-sharing service and post to your blog or website through iframes or shortcodes. We shared our sample below via YouTube:
NOTE: The information below is no longer entirely accurate. YouTube announced the deprecation of certain parameters in September 2018, claiming…
Titles, channel information, and related videos are an important part of YouTube’s core user experience, and these changes help to make the YouTube viewing experience consistent across different platforms.
I call BS: This pushy ploy does NOT improve the UX! YouTube suits simply insist THEIR branding and so-called “core experience” will be applied to YOUR hosted content, which you now no longer control. Vimeo, anyone?
You might notice this player is different than the standard, over-busy YouTube player. Look at the source code for the iframe:
<iframe width="580" height="326" src="https://www.youtube-nocookie.com/embed/xw_vkNUv4uU?rel=0&version=3&controls=0&modestbranding=1&showinfo=0&autohide=1&loop=1&playlist=xw_vkNUv4uU" frameborder="0" allowfullscreen></iframe>Player parameters
YouTube Embedded Players and Player Parameters permit granular control over what is and is not allowed in your embedding. You can manage a raft of undesirable behaviors as follows:
- nocookie added to the URL is a privacy option which means YouTube will NOT generate a cookie in the browser of a user who does not click on the “play” button to view the video.
- rel=0 means YouTube will NOT display the related videos feature when playback ends.
- controls=0 means YouTube will NOT display the player controls. Replacing this is a simple play button in the center of the frame.
- modestbranding=0 means YouTube will NOT display a persistent logo in the control bar. Note it WILL still display a modest logo and link at the lower right when the player is paused.
- showinfo=0 means YouTube will NOT display the video title and uploader identity before the video starts.
- autohide=1 means YouTube WILL automatically hide controls after a video starts.
- loop=1 means the video will play the video over and over until paused. This works in conjunction with the playlist parameter, so to loop a single video, add playlist=VID_ID, where VID_ID is the video ID found in the embed URL. In our example, the video ID is xw_vkNUv4uU.
With YouTube’s more annoying embed functionality out of the way and other non-standard functionality added, your iframe embed is cleaner and more professional on your blog or website.
