Ball drop
That’s the way the ball bounces
We’ll use a classic animation exercise to get a confident start in Maya… the bouncing ball. You will learn the basic software workflow and understand how to model timing using reference videos. Conclude by creating a playblast, a short video produced directly from the Maya viewport.
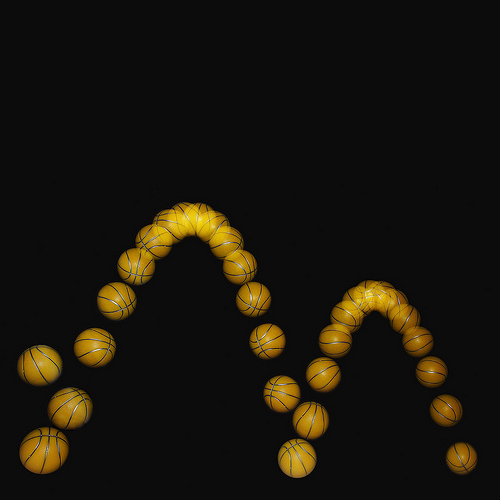
At 25 frames per second, the image at right captures very closely the amount of movement from one keyframe to the next in a bounce animation. What do you notice about the rate of change from ball image to ball image?
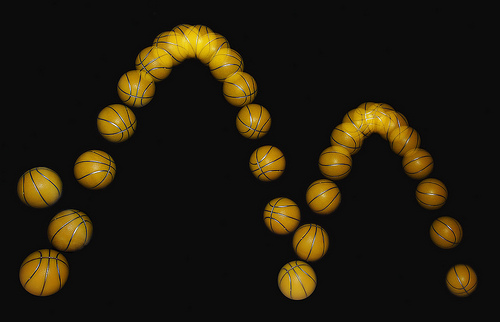
Bouncing Ball Strobe, 2007
Demo preview
Your finished product will be a “playblast” video similar to this sample:
Maya essential skills
If you have not yet completed the LinkedIn Learning tutorials for Maya Essential Skills in References prior to starting this exercise, you need to go back and do so. Skipping the tutorials will not be a time-saver!
Why is a ball drop the “hello world” project of every animator? For starters, it’s a great introduction to the Maya interface, in particular the Graph Editor. But more importantly, it’s the best way to introduce a new animator to the principles that govern animation.
Principles of animation
Two out of Nine Old Men
Frank Thomas and Ollie Johnson were two of Walt Disney’s “Nine Old Men,” the original Disney animators. In their book Disney Animation: the Illusion of Life, Frank and Ollie articulate the 12 principles of animation.
Although these principles were worked out in the days of 2D hand-drawn cels, they apply to animation in any medium. This is why we’ve included The 12 Principles of Animation, Updated for the Modern Age by Gene Turnbow in our parallelUniverses readings for this project. The backbone of Gene’s text is Frank and Ollie’s work.
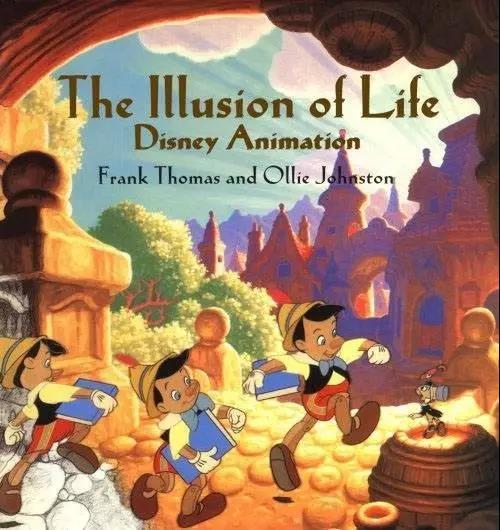
Four out of twelve principles
The Illusion of Life contains a detailed explanation of the 12 principles of animation, but they are paraphrased on Frank and Ollie’s website.
In our ball drop, we will focus on the principles of Squash & Stretch, Exaggeration, Timing, and Slow-in|Slow-out: which you can read about at the link. How we see these principles guide the creation of a ball drop is as follows:
- Squash & Stretch | Perhaps the most important of all principles, squash & stretch gives entities a sense of flexibility without significant loss or gain of volume. In our example, when the ball squashes as it hits the ground, it not only scales down but also out to maintain volume.
- Exaggeration | Rather than referring to extreme distortion, exaggeration pushes the observation of a live reference in subtle ways to make it appear less mechanical and more natural. In our example, when the ball hits the ground, we squash it slightly more than we would observe, to give it a more natural rubbery quality. It is a case of “a lie that allows us to see the truth,” if we may repurpose Picasso’s definition of art.
- Timing | Video and live-action references were observed to understand the duration of the bounce.
- Slow In + Slow Out | The ball slows at the top of the bounce, accelerates when dropping, and slows to a stop when rolling.
12 PRINCIPLES OF ANIMATION
- Squash & Stretch
- Anticipation
- Staging
- Straight Ahead Action + Pose to Pose
- Follow-through + Overlapping Action
- Slow In + Slow Out
- Arcs
- Secondary Action
- Timing
- Exaggeration
- Solid Drawing
- Appeal
Find a description of each at Frank & Ollie’s website, archived here >
Additional principles
However, it’s hard to just isolate a few principles, so we also integrate others such as:
- Anticipation | The ball does not immediately start bouncing but waits a half-second.
- Staging | We use a dramatic camera angle focused on the ball rolling into the foreground.
- Pose to Pose | Planning ahead keeps the volume of the ball consistent when scaling.
- Follow Through | The ball keeps rolling after it’s finished bouncing.
- Arcs | Arcs control the bounce parabola, but also control a slight curve in the horizontal trajectory.
Because the ball drop uses most of the animation principles in a scene that does not require a lot of technical complexity or know-how, we now know why it’s the animator’s most important first exercise!
How to Cheat
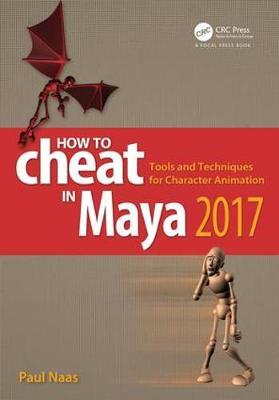
That said, even a technically simple task can be technically burdensome in a sophisticated program like Maya. A highly recommended resource for animators, How to Cheat in Maya is not a software manual, but rather an animator’s bible that happens to use Maya. It is organized per the principles of animation.
More than a book, it’s a website containing downloadable scene files to allow a direct experience of the animation principles. In a preview chapter available from the publisher, we will be able to reference Chapter 1: Animation Principles and download files for squash & stretch, exaggeration, timing, and slow-in-slow-out out of the project_files.zip, found under Support Materials at the companion site for the book.
Note: Historically, since about 2010, this book updated about every 3 years or so. We are still waiting on an update from 2017.
Try the downloadable files referenced in Chapter 1. As of this writing, they still function in Maya 2022. But even if the files eventually no longer function, there’s still a lot to learn from the readings and illustrations alone. Because the book is organized by principles and workflow rather than interface, it’s still a valid standard reference. Here’s hoping for an update!
Ball drop references
Modeling from references is like drawing from life: you use observation of the world to inform your work. Below we have two examples of references.
Cheat sheet
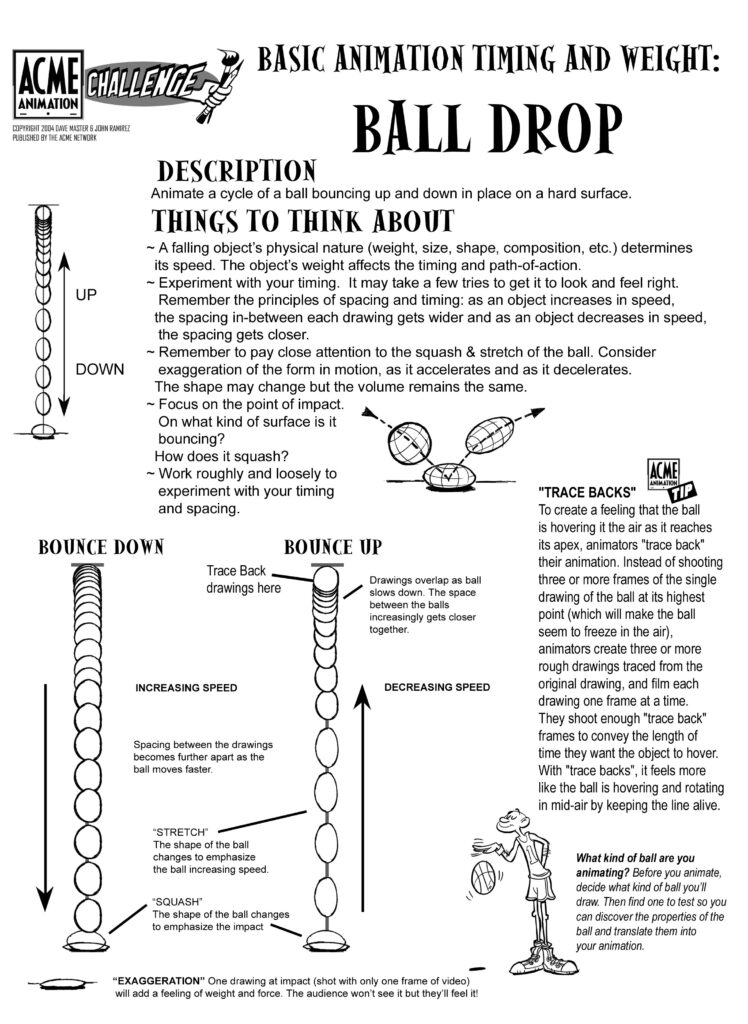
Take a look at the Acme Animation Challenge guide to help you visualize dynamics. Click on the image for a larger view:
Video references
All ball bounces are not created equal. The Acme guide suggests you figure out what kind of ball to animate before you begin. Once you decide, you can find a video reference for timing and observation. Many exist and can be found by keywording ball drop in a search engine, but Michele Schottenbauer’s compilation seen here is excellent. The football, rugby ball, and hackeysack are funny, but probably outside of our scope of choice.
Compare the balls you see in the video with the one in our demo preview. What kind of ball did we model in that demo?
Three forces
We’ve been discussing the ball from an animation perspective, but because there are no innate laws of physics in a modeling program, we do need to understand something about the physics of the ball so that we can bring that to our project.
A bouncing ball can be analyzed and broken down into three fundamental forces:
- A horizontal trajectory vector
- A vertical trajectory vector
- Internal reactions to forces applied (the squash & stretch part!)
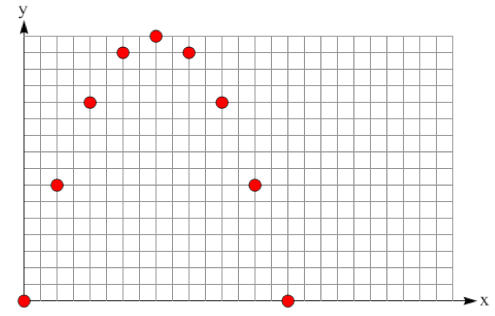
In other words, through clever use of the timeline, set keys, and Graph Editor, it’s possible to solve the horizontal vector first, apply the vertical vector next, and refine by applying squash and stretch principles to illustrate the internal reactions of the ball when striking the ground last.
In the illustration above, what difference do you see between the vertical velocity and the horizontal velocity?
Horizontal and vertical
The horizontal trajectory and velocity are controlled primarily by moving the ball along the X-axis. To create some natural sense of motion, we will use a minor amount of Z-axis motion to create a horizontal arc to the trajectory — as if the ball has a small bit of spin bending it toward the south while it’s traveling primarily toward the west.
The vertical trajectory is more complex, and we apply it to the simpler horizontal movement. While the horizontal velocity is a constant but gradual deceleration as it loses energy to the bouncing, the vertical is a pattern of acceleration (at the base of the bounce) and deceleration (at the apex), slowly decaying until the pattern stops after a few bounces. The Graph Editor makes easy, if a bit tedious, work of this interplay.
Internal reactions
Where the horizontal and vertical motions are handled by translation (movement), the ball’s internal reactions are handled by scaling and rotation.
In the slow-motion loop at right, observe the internal reactions a tennis ball has when it strikes the ground.
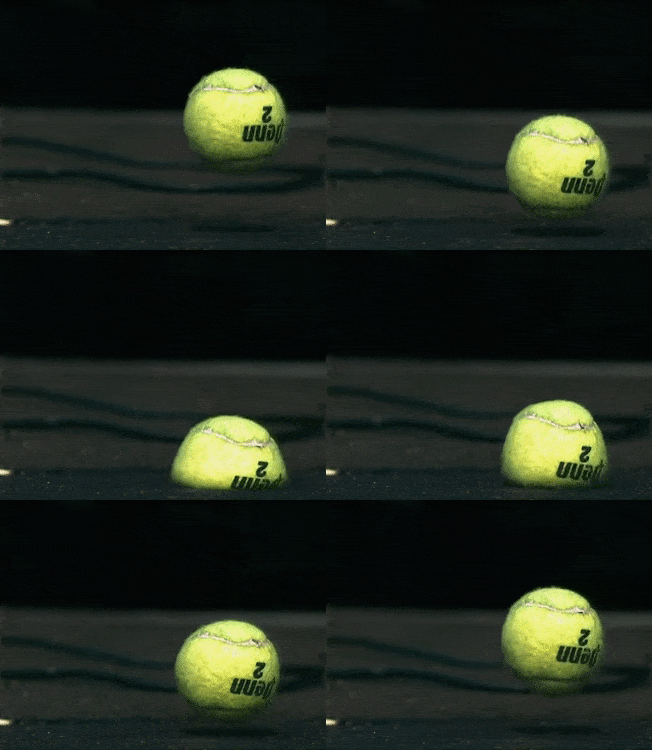
There are two phenomena we can use to inform our squash & stretch and exaggeration solutions:
- When the ball strikes, it deforms by losing height: squashing. At the same time, horizontal diameter increases uniformly, because the ball cannot lose overall volume.
- In a counter-reaction to the first reaction, when the ball moves up it stretches vertically and decreases slightly but uniformly in horizontal diameter.
These reactions happen so fast that they last only a frame or two on either side of the bounce, but look at your animation withwithout these manipulations as you work to see the big difference they make. You and your audience cannot see them without slo-mo, but you can sense them.
Making the ball drop, bounce by bounce
Make your own version of the ball drop. This project creates no externally referenced files, so we do not need to create a Maya Project folder. As you follow the steps below, you have two resources beyond the text description: the demo file above, and the full screenshots adjacent to text that follows. All screenshots can be seen larger by clicking on them, to open full scale in a new window.
Setting the scene
- From any Maya menu set, select File>New Scene.
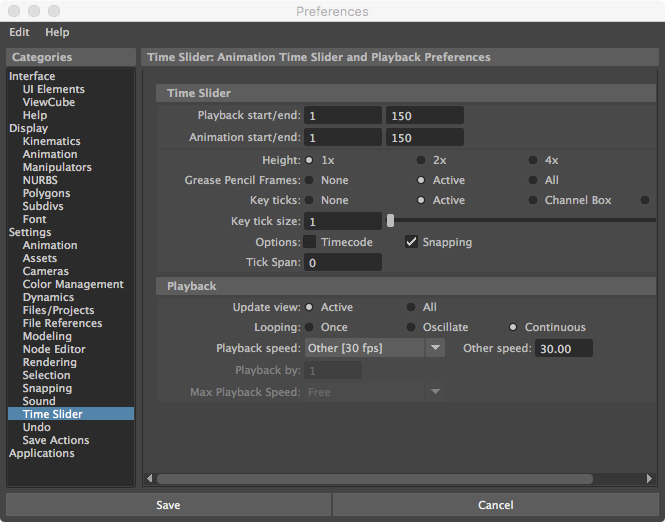
- In the new scene, open Time Slider Preferences (the gear with running figure icon at lower right of interface). Set Playback and Animation start/end for 5 or 6 seconds. In the sample, to get 5 seconds at 30 frames per second, we set them at 150. Set the playback speed to 30fps by choosing Other from the dropout and entering 30.00 in the field that activates.
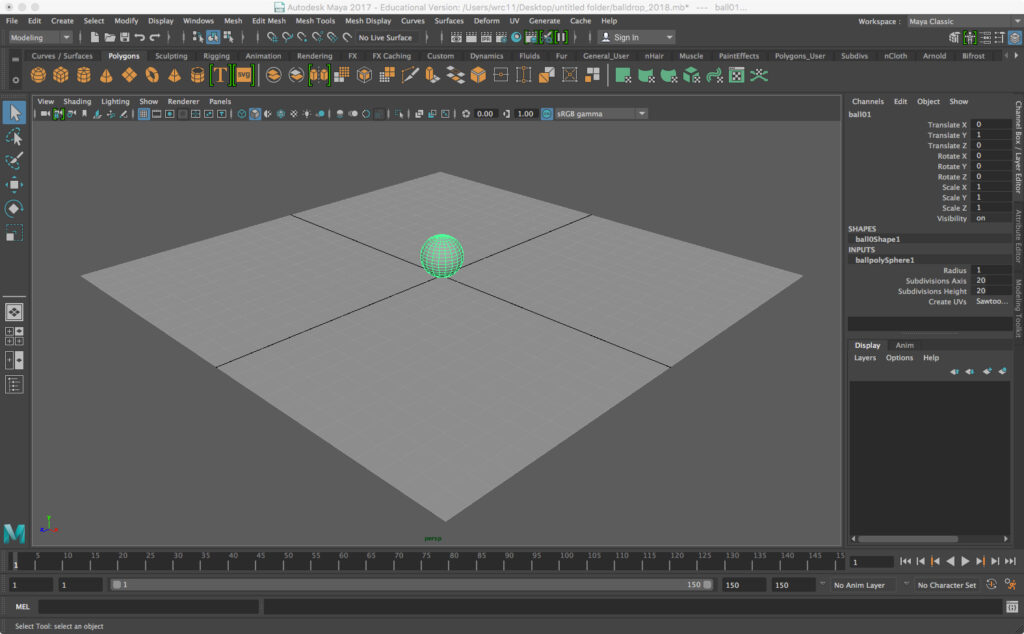
- Create a ball by making a polygon sphere with a small, whole number radius, and move it vertically equal to that radius. In the sample we created a sphere of radius = 1 (the default), and translated with Move Tool so that Translate Y = 1 in the Channel Box (you can also just enter the data there). Name it ball01.
- Create a ground plane by making a poly plane of equal height and width. In the sample we made the plane width and height 24 in the Channel Box inputs, but we’ll make it bigger later on. Name it floor01.
Solve the roll: x-motion
First we create a “rolling” ball with no bounce. In other words, find a solution for the horizontal or X-direction motion of the ball.
Create anticipation
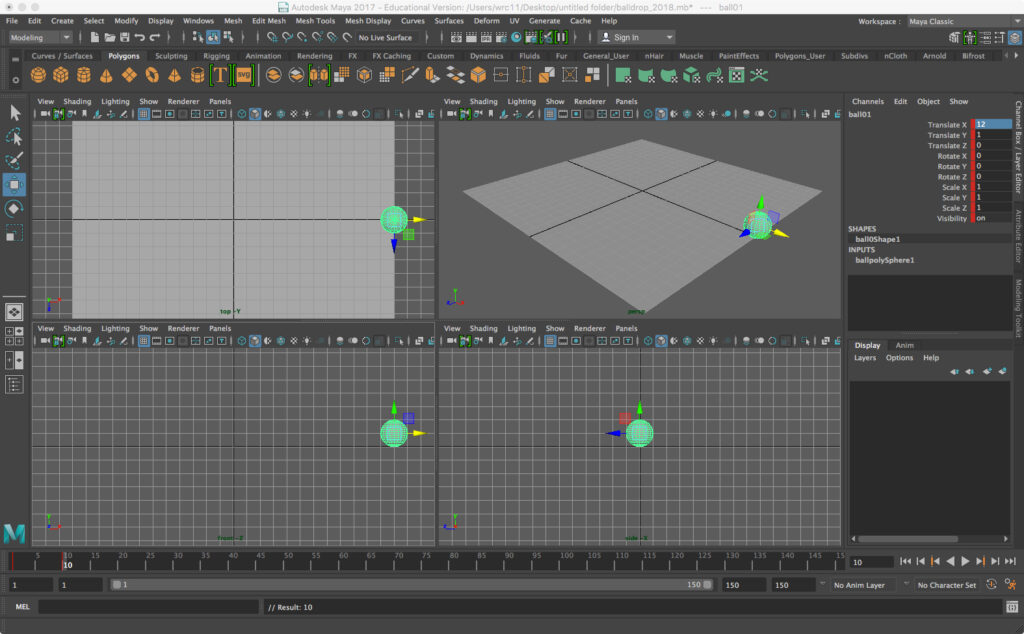
- At Frame 1, move ball01 to a whole number position on the X axis, and hit S on the keyboard to set a key. Note the red line indicating a key has been set. In the sample, we set Translate X = 12 in the Channel Box.
- Set another key at another frame somewhere within one second. In the sample, we set the second key at Frame 10. This will create a small delay at the start of the video that helps your audience anticipate the motion.
Create follow-through
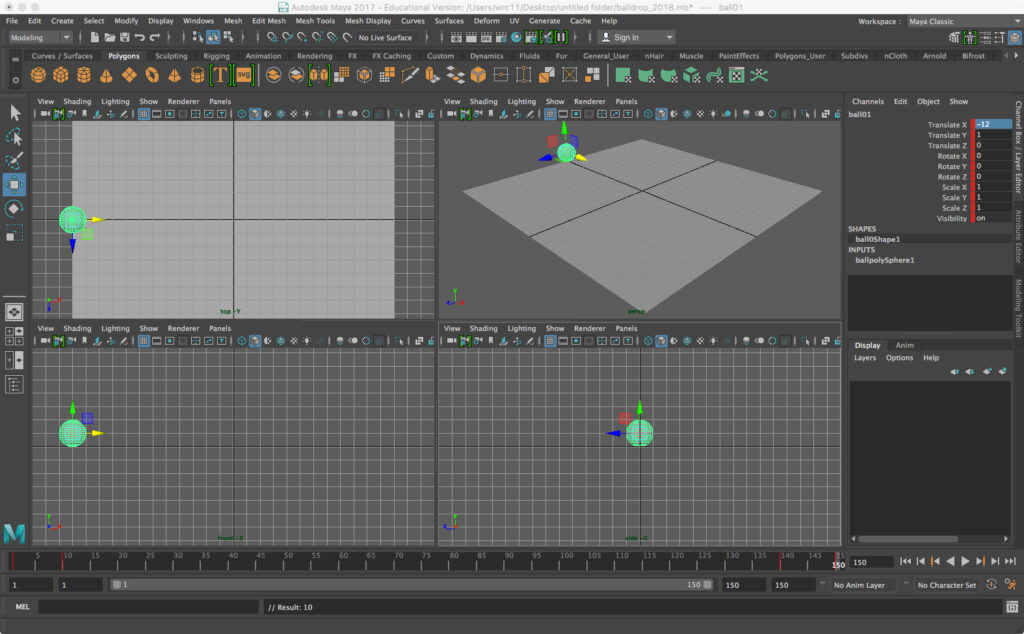
- At a frame around a half second or so from the end of the timeline, move ball01 to a position in negative territory on the X axis, a similar distance from the Z axis as the first one, and set a key. In the sample, at Frame 140, we set we set Translate X = -12 in the Channel Box.
- At your final frame, set another key at the same X axis position. In the sample, it’s Frame 150.
Run the timeline using the video-payer button at lower right to observe the motion of the ball. Notice that it has been auto-smoothed to create an acceleration (slow-in) and deceleration (slow-out) at the beginning and end. We need to adjust this.
Refine acceleration and deceleration
- At the upper left of the interface, select the Animation menu set, then select Windows>Animation Editors>Graph Editor. The Graph Editor is much improved in recent versions of Maya, and it is the best place to manage refinements to established set keys.
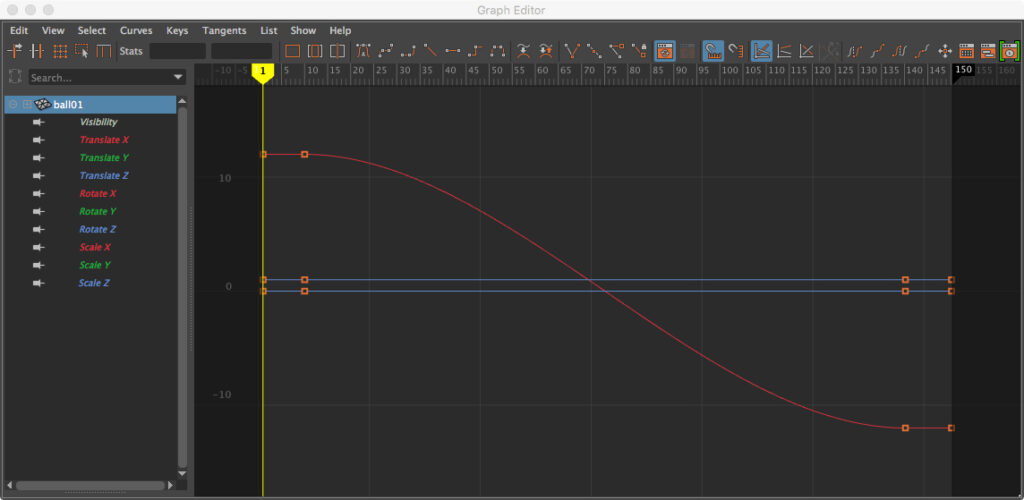
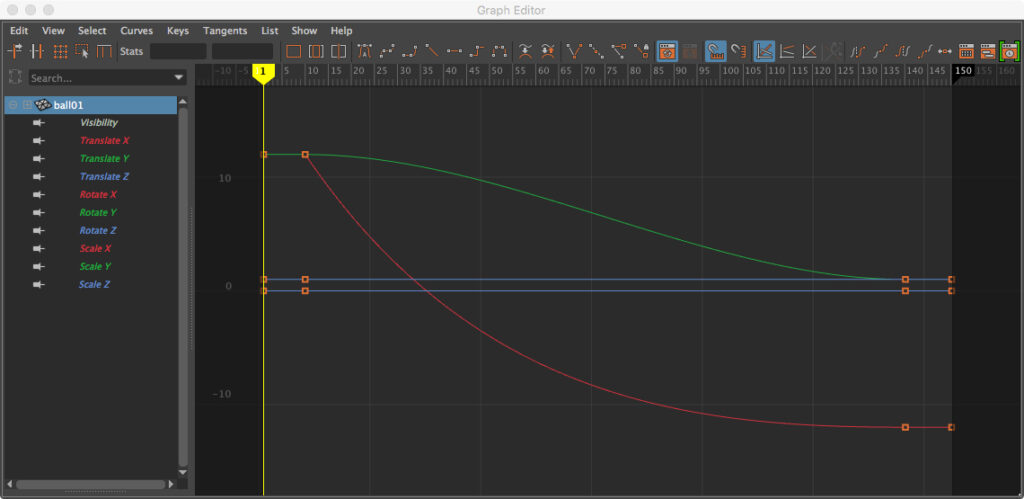
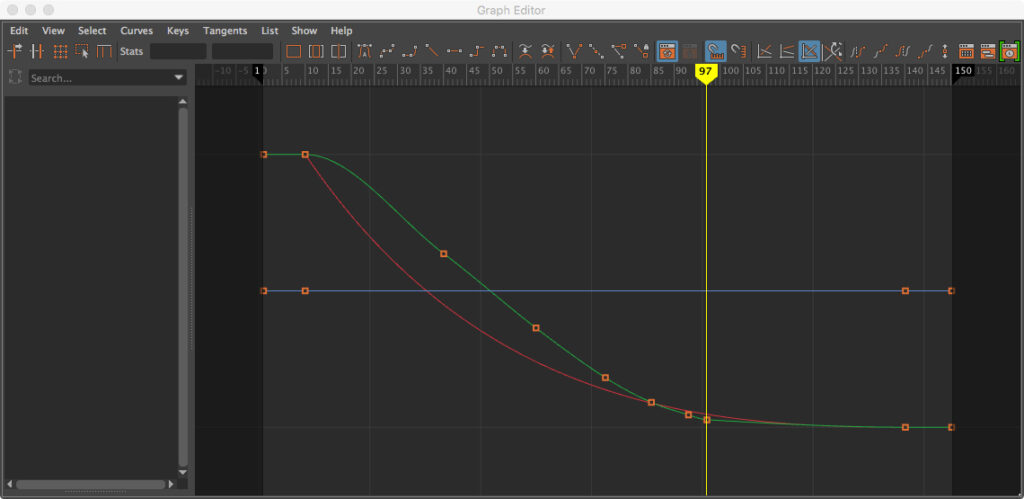
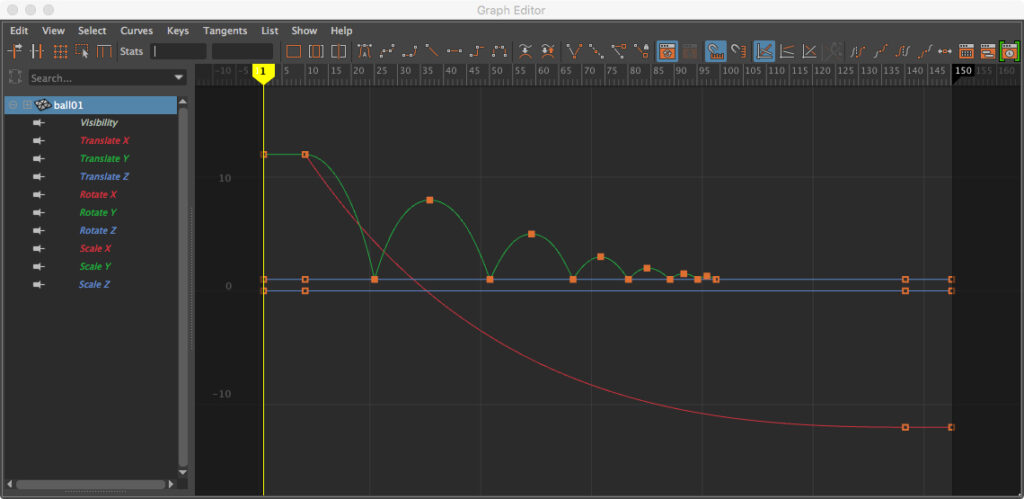
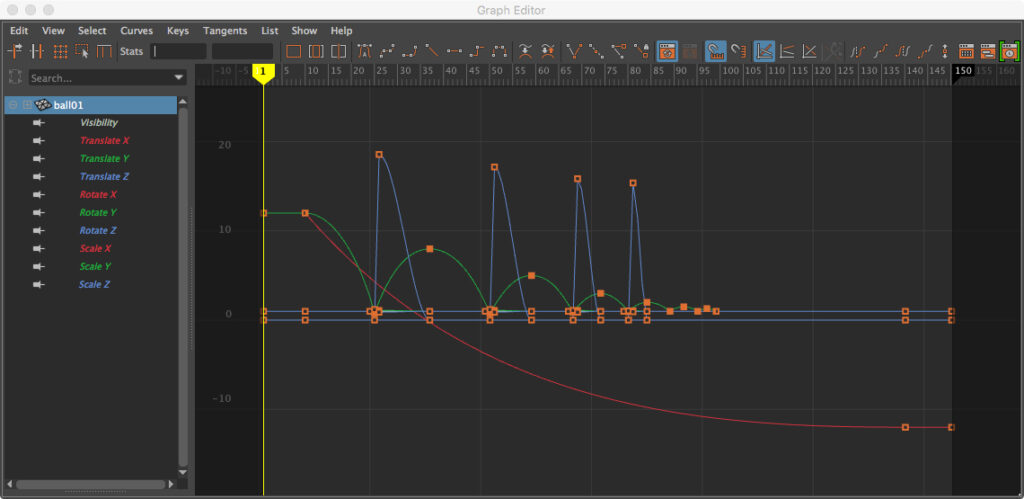
- Notice the large red curve with small orange squares in the graph. This is the Translate X path, and it shows the rate of change from 12 to 12 along the X axis direction. It shows where the path is anchored by set keys with the orange square.
- Select the Translate X path and you’ll see a small red square highlight in the left side menu of the window.
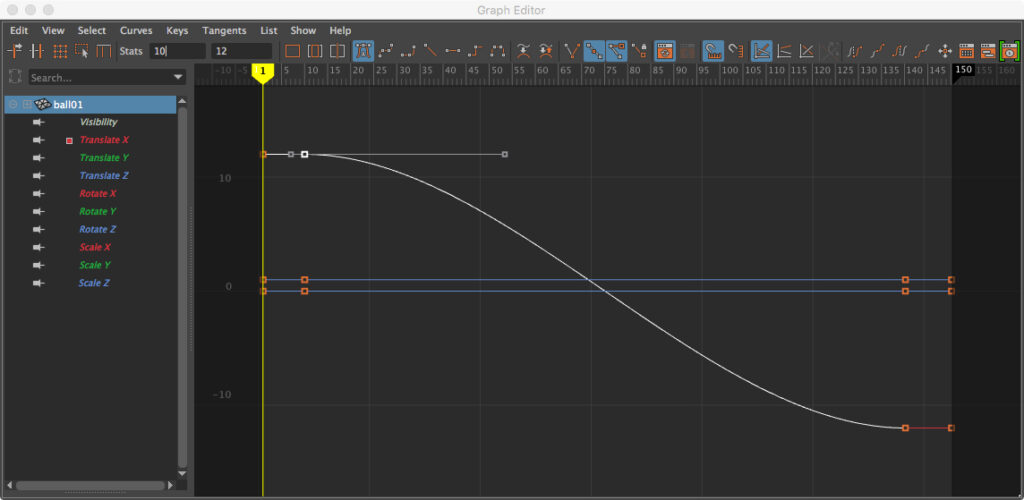
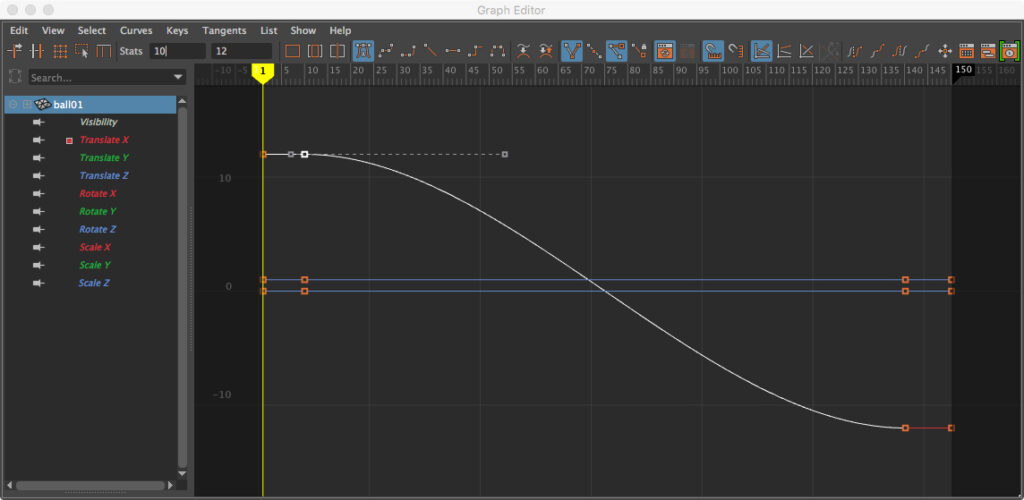
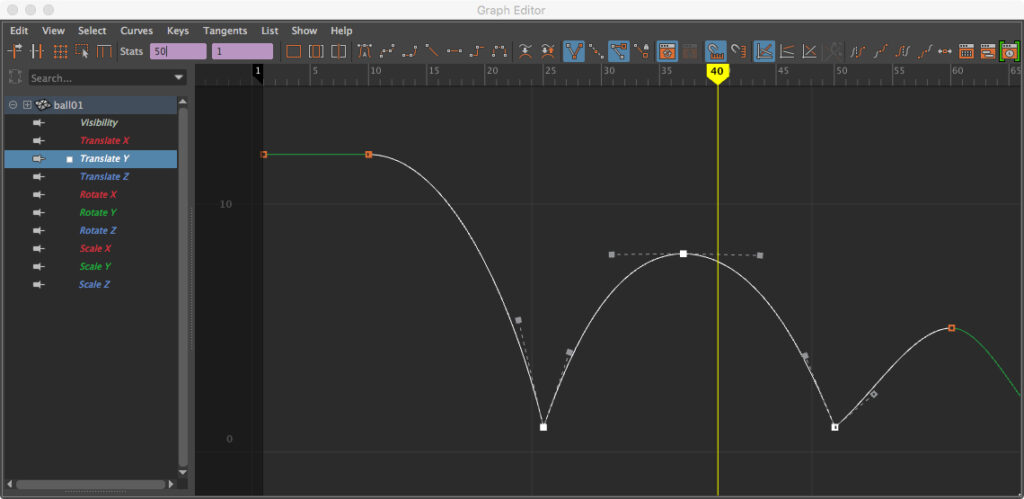
- Along the top of this window are a set of icons that manipulate tangents. Tangents are similar to Bezier curves in Illustrator: an anchor point (where the set keys are) and handles that manipulate the intensity of a curve. Hover over icons to see a balloon label. Look for the Break Tangents icon (about midway along the set of icons). With the second set key anchor selected, use Break Tangent to force the handles to work independently. The handle vector turns into a dashed line.
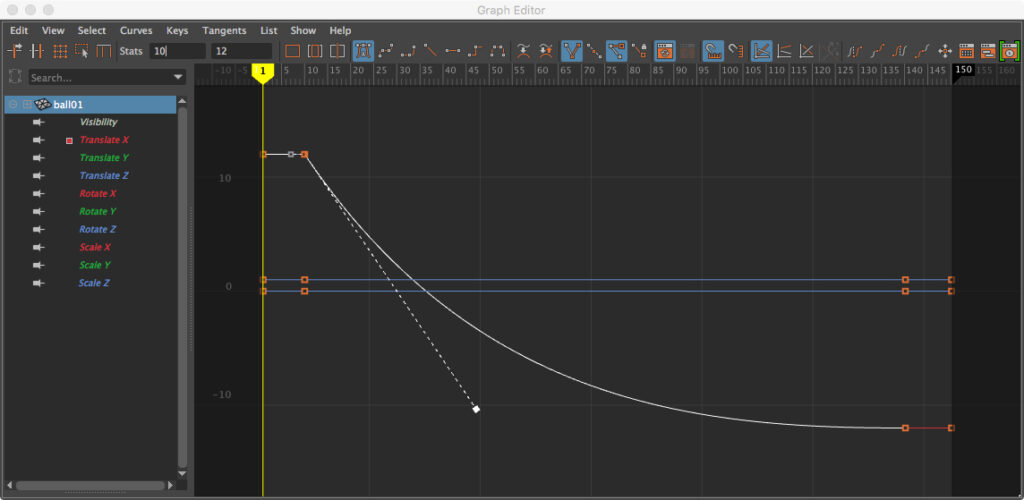
- Select the handle to the right of the set key and rotate it down (clockwise) visually to ~60˚ or so.
Run the timeline to see that the basic X axis motion is solved!
We will add a bit of Z axis motion later, to give this straight line a bit of horizontal arc.
Solve the bounce: y-motion
The vertical pattern of acceleration and deceleration as the ball bounces can be complex, but let’s break it down into to classes of event: an apex, where the ball reaches it height, and a base, where it strikes the ground. We’ll use a generic rate of decay of ~⅔—where a distance traveled or bounced from a keyframe is about ⅔ the value of the preceding keyframe.
If your ball is a bowling ball, by the way, the decay is extreme—like ~¼ or smaller. The higher that denominator gets, the less bouncy. If it’s a superball, decay is maybe ~¾ or greater. The closer the numerator and denominator get, the more bouncy.
If this doesn’t make sense yet, follow the tutorial and it will click!
Create high and low
- At Frame 1, select ball01 and translate it vertically to a whole number value in the Y axis direction, and set a key. In the sample, we set the value for Translate Y = 12 in the Channel Box. The higher your Y value, the more extreme your bounce, so remember we want this to be done in around 5-6 seconds. Take a look at the Translate Y curve in the Graph Editor.
- Repeat this at your second established set key, as we did for the X axis values above. This will hold the ball steady in one place. Recall in the sample this was at Frame 10.
- Staple the ball back to the ground by setting keys with Translate Y = 1 at your two endpoint keys. Recall in the sample these were Frames 140 and 150.
- Take a look at the Translate Y curve in the Graph Editor.
Create apex pattern and decay rate
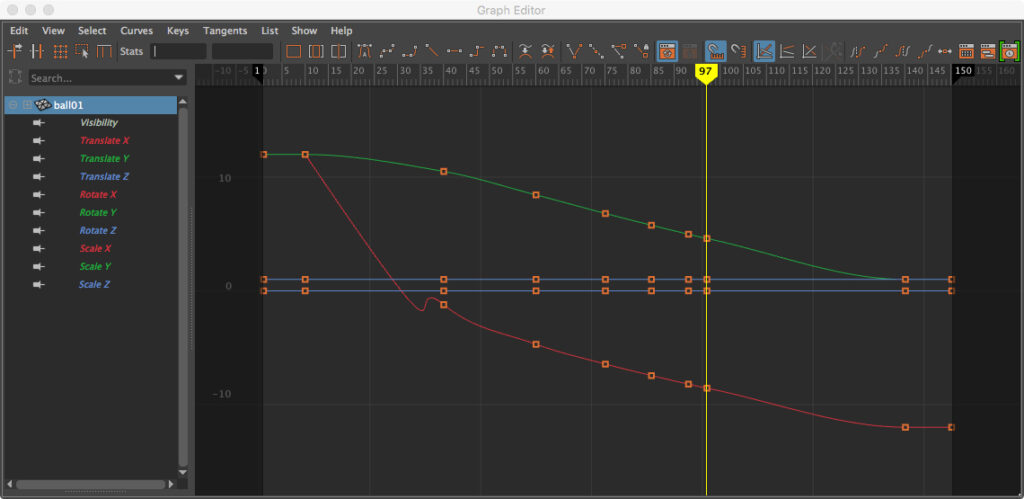
- As mentioned, the duration between set keys should decay by a factor of ~⅔ from key to key. For example if the first bounce is ~1 second or ~30 frames in duration, the next bounce should decay to ~20 frames, and so on. In the sample, we set keys at Frames 40, 60, 75, 85, 93,97 (any smaller frame distance is pretty meaningless, so this is where we say the ball is now just rolling on the ground). These will be used to create apex heights. Determine your own set key pattern and decay rate, or use these values.
Delete errant keys
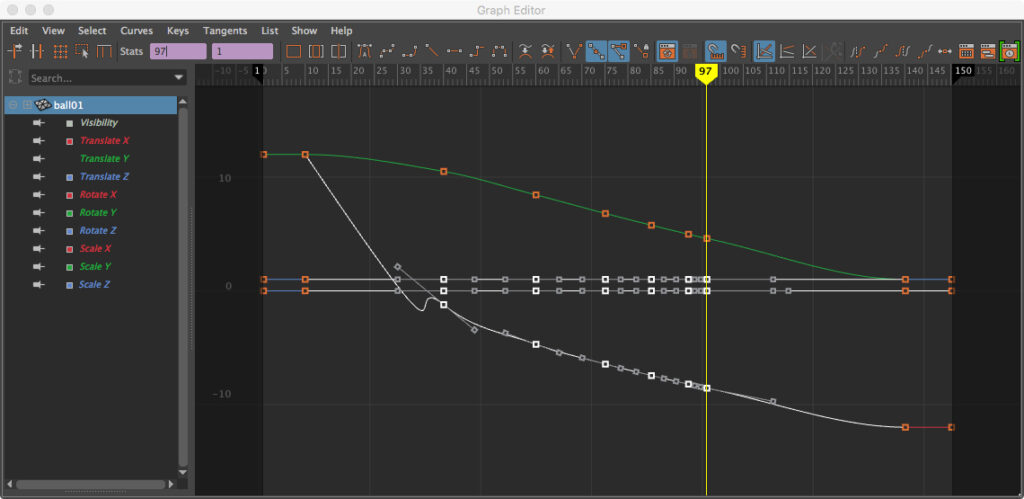
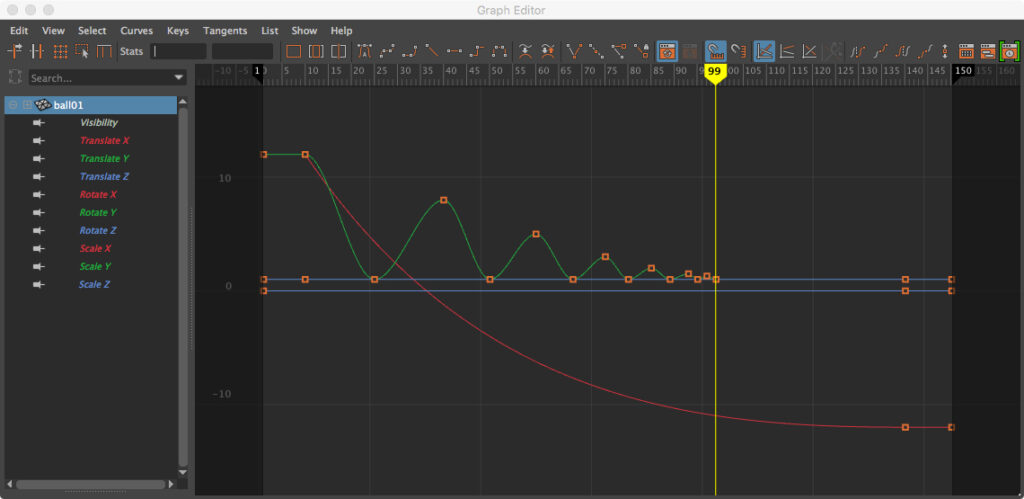
- Open the Graph Editor and notice setting the apex key pattern seems to hopelessly break the Translate X graph by adding lots of keys to it and forcing it into a non-smooth shape. There are also worthless apex keys on every other graph.
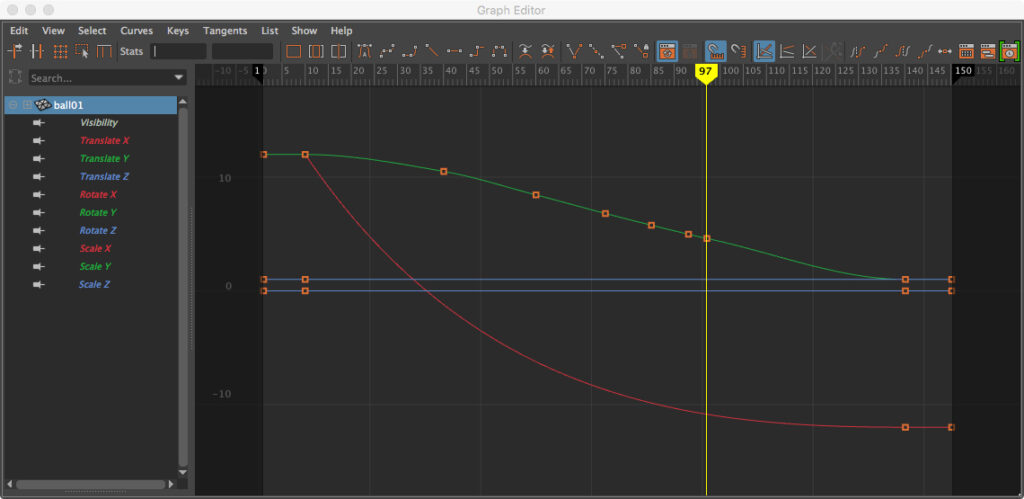
- Select all apex keys NOT on the Translate Y graph and delete them. The cleaned-up graph will show apex keys ONLY where they are meaningful: on the Translate Y graph.
It is a is a common occurrence for keys to be set on graphs where you don’t want them, so you’ll do this periodically. It’s always good practice to delete keys you don’t need after you’ve developed some manipulation on a graph where you intend them to be.
Set heights for apex keys
- Set Y axis heigh values for each of the set keys on the Translate Y graph. Differences in height from key to key should decay ~⅔, just as the durations did. In the sample, our values decay as follows:
- Key 10, Translate Y = 12
- Key 40, Translate Y = 8
- Key 60, Translate Y = 5
- Key 75, Translate Y = 3
- Key 85, Translate Y = 2
- Key 93, Translate Y = 1.5
- Key 97, Translate Y = 1.3
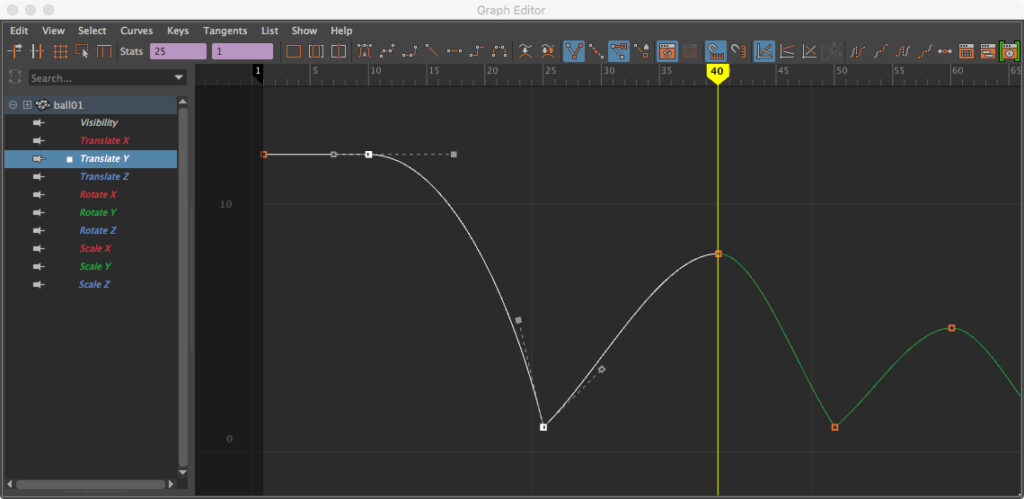
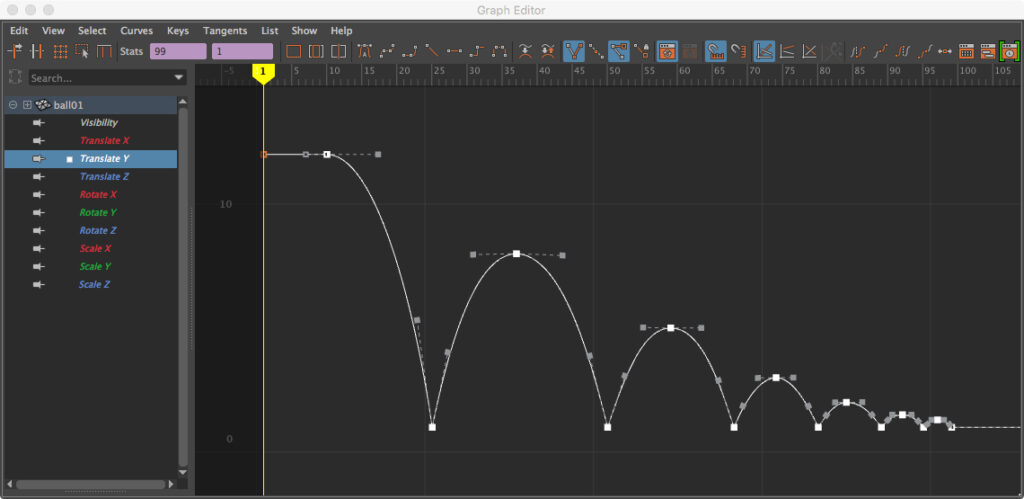
One interesting thing to note about the Graph Editor: if you hit the F key it will zoom in on the pertinent graph, making it more legible, as we see at right.
Run the timeline and you’ll see the ball float in air and come to a slow landing at the end. We need to establish points of contact with the ground to make a bounce pattern.
Create base pattern
- Find frame midpoints between the apex keys. For example, if you have 30 frames between a pair of apex keys, the midpoint will be 15 frames from each. In the sample, the values for these midpoints are:
- Between Frames 10 and 40: 25
- Between Frames 40 and 60: 50
- Between Frames 60 and 75: 68
- Between Frames 75 and 85: 80
- Between Frames 85 and 93: 89
- Between Frames 93 and 97: 95
- … and a final base at 99 to bring it back to earth.
- At each midpoint frame, set a key.
- Set the height for each of these base keys to Translate Y = 1.
- Clean up errant keys on all but the Translate Y graph in the Graph Editor.
Run the timeline, and instead of floating steadily through the air, the ball will travel in a decaying sine wave pattern. This is an improvement, but we need to make the ball smack the ground hard!
Adjust base tangents
- In the Graph Editor, select the Translate Y curve.
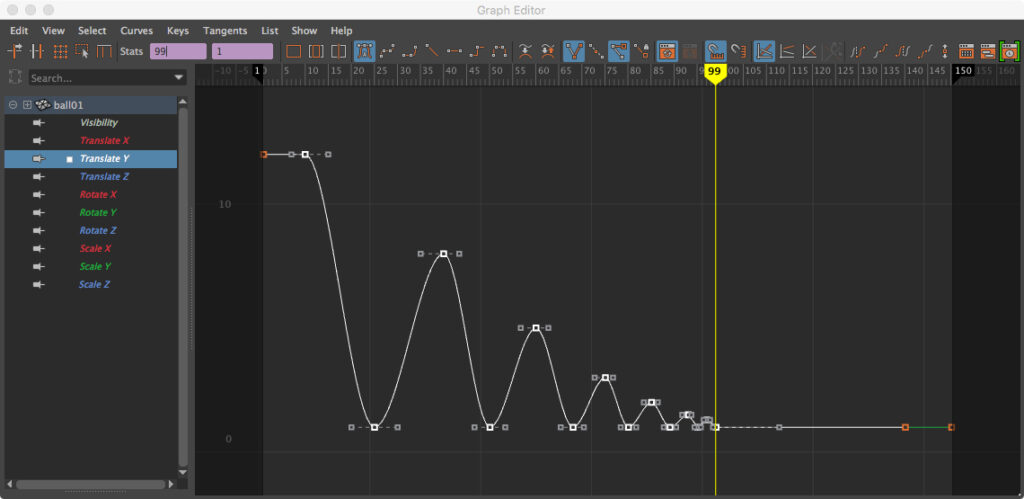
- Find the Break Tangents icon and apply to break all tangents on the Y curve.
- On all base keys, find the Linear Tangents icon and apply to create sharp points downward.
- On all apex keys, find the Flat Tangents icon and apply to keep these rounded.
Run the timeline. The ball smacks the ground now but these aren’t crisp, parabolic curves yet.
Refine timing
- In the Graph Editor, notice the spacing of apex keys needs some tweaking. Even though we set midpoints before, the tangent adjustments reveal the apices are off by a frame or two.
- Limit motion to the X direction so height does not change by using the Constrain Movement icon, the fourth icon from the end. Notice this will toggle between no constraint, constraining to X, or constraining to Y. Set for constraining X.
- Tweak each apex key until it visually centers between base keys in the X axis direction.
- Make curves look like parabolas by:
- First, stretching apex handles slightly in the X axis direction.
- Second, rotating base handles up until they are slightly higher (that is, slightly on the convex side) than the curve. That is, the handles should appear slightly on the convex side of the curve, and not on the underside in the concave portion.
Run the timeline to see the basic Y motion is solved!
Solve squash & stretch: scale & rotate
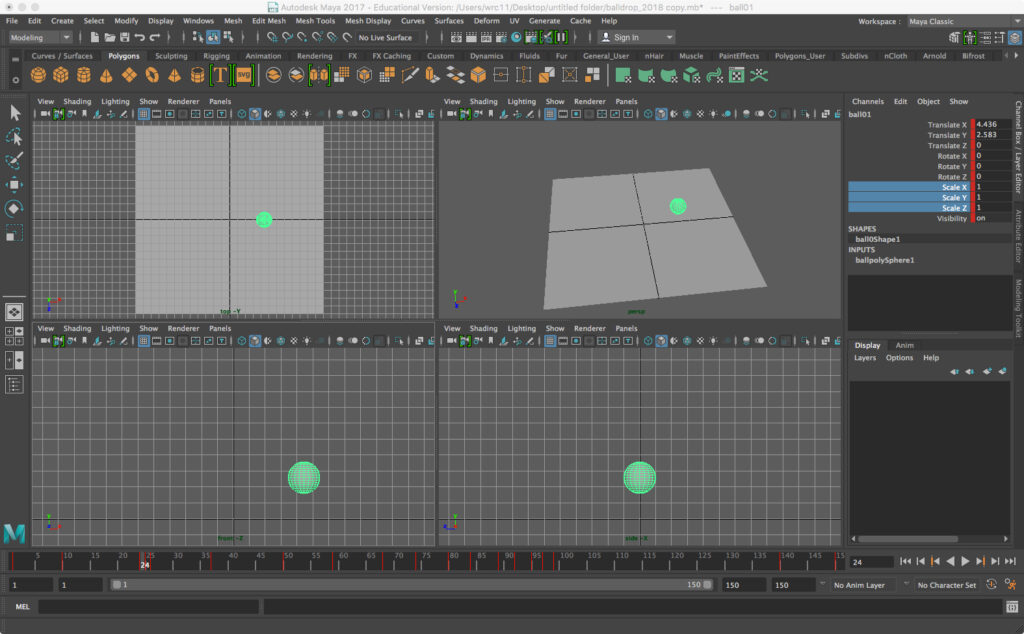
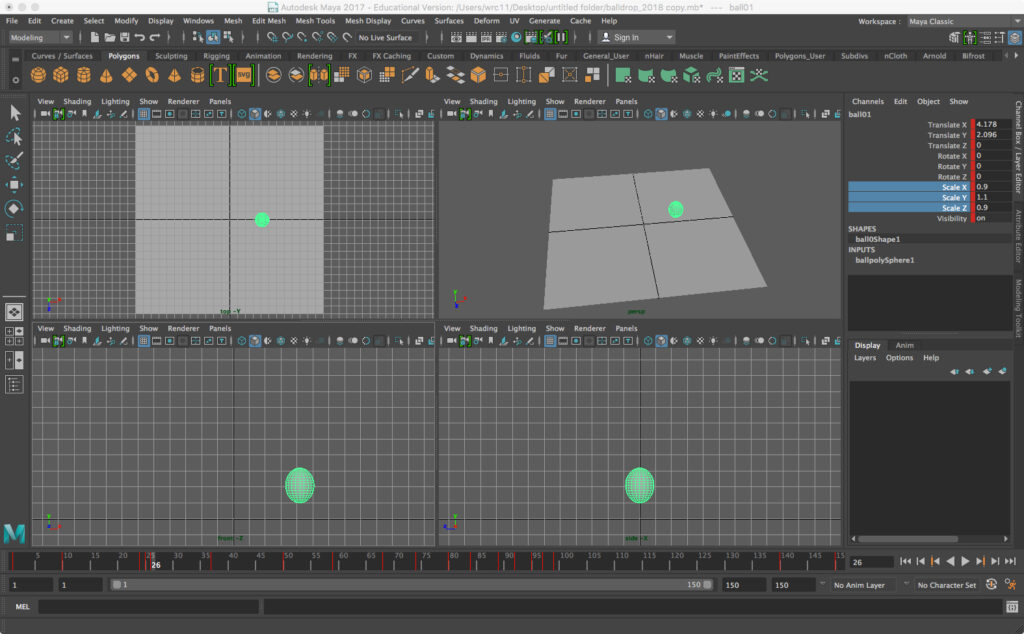
You’ll need to create a squash & stretch at each base. Here, we will illustrate the one at the first base frame. In the sample, we find that at Frame 25.
Create squash
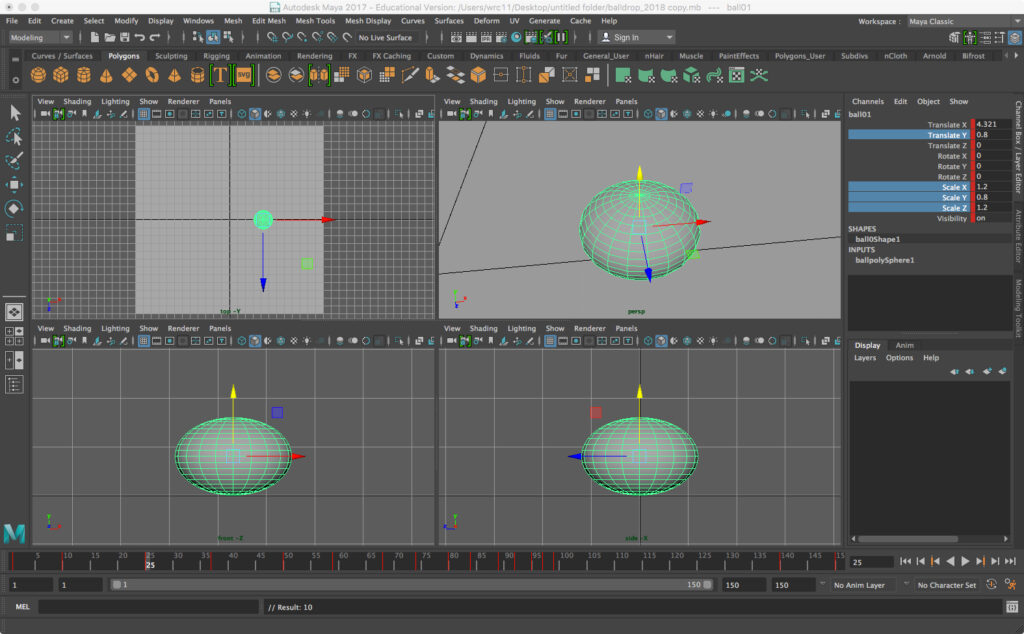
- At the first base key, select ball01 and use the Channel Box to enter new Scale X, Y, and Z values. These seem small but they are actually exaggerations of how most balls deform when bouncing. In the sample these values are:
- Scale Y = 0.8
- Scale X and Scale Z = 1.2 for a uniform horizontal scale
- When done, set a key.
- Next, set Translate Y = 0.8 to it back on the ground and set key again.
Run the timeline. The squash looks great, but notice that it starts to happen, impossibly, before the contact, and then stays constant for the remainder of the path. We need to isolate the squash!
Isolate squash and create stretch
- At one frame after the base key frame, set the scales so that we see the reaction to the squash. The values should almost reverse the values of the squash, but reduce them slightly. In the sample, at Frame 26, we set Scale Y = 1.1, and Scale X and Scale Z = 0.9 for uniform horizontal scale. Set a key.
- Return the normal scale at the apex, so at the apex key after this base key (Frame 37 in the sample), reset all scales to 1 and set a key.
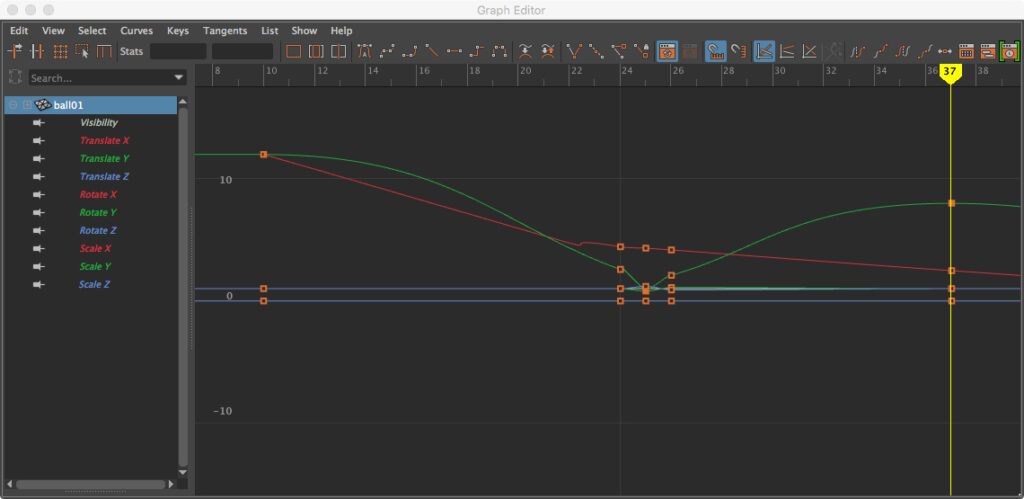
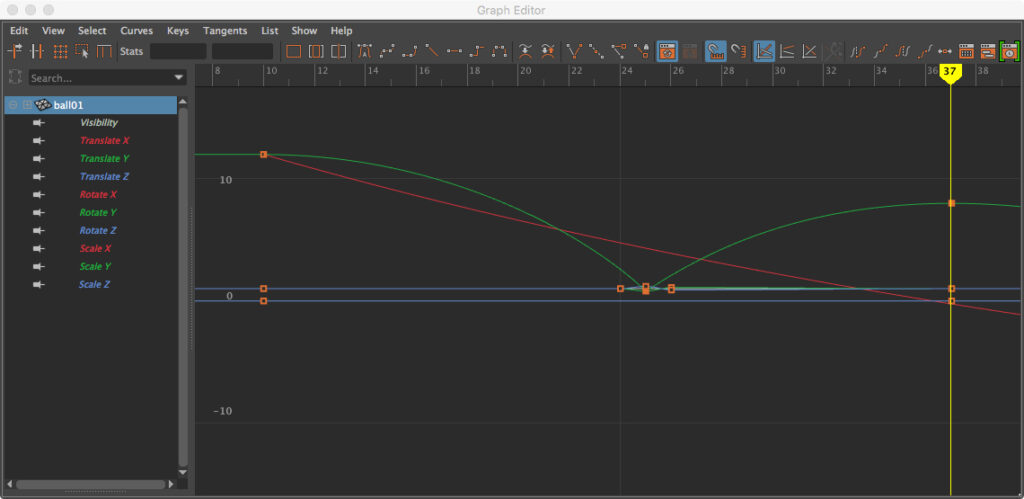
- By this stage, there are lots of errant keys on other graphs, so in the Graph Editor:
- Eliminate all errant keys on Translate X, Y,Z.
- Eliminate all errant keys on Rotate X, Y,Z.
- Keep all the Scale X, Y, and Z keys!
Run the timeline. The squash and stretch look pretty good at the first bounce, but notice the orientation of the stretch. We must rotate it to follow the path of motion! This seems nearly impossible, but there is a tool that can help.
Orient stretch to Motion Trail
- In the Animation menu set, select Animation>Visualize>Create Editable Motion Trail—but do not edit with it. We simply use it as a rotation reference.
- At one frame after the base key (Frame 26 in the sample), rotate ball01 about the Z axis to align the axis of the stretch with the motion trail, and set a key.
- At the base key (Frame 25 in the sample), return rotation to 0 and set a key.
- The motion trail “breaks” because of errant keys. Open Graph Editor and clean up, especially on the Translate X and Y graphs.
Run timeline to see the fully complete and correct squash and stretch for the first base key!
Repeat for all bounces
- Repeat the procedure for creating the squash and stretch for the remaining bounces—at least the ones that can handle reasonably meaningful deformation. In the sample, we squash and stretch at the next three bounces, with the final bounces left without deformation. We also decay the intensity of the deformation accordingly, using these figures:
- At Frame 50, Scale Y = 0.8, Scale X and Z = 1.2
- At Frame 68, Scale Y = 0.9, Scale X and Z = 1.1
- At Frame 80, Scale Y = 0.95, Scale X and Z = 1.05
- Frames 89, 95 and 99 receive no deformation
- Watch for errant keys and clean as you go
When done with the final deformation, run the timeline and witness your solved squash and stretch!
Refinements for a professional playblast
The ball drop is essentially complete, but to take it to the next level we can add these refinements. These are the small things that separate the excellent from the competent!
Arc in horizontal trajectory
- Make a small wiggle in the Z axis at its end for a more natural follow through.
- Set key about one third of the way in to the timeline. In the sample, we set a key at Frame 50.
- Select the next-to-last frame (Frame 140 in the sample), and in the Channel Box change the value of Translate Z = 2, then set a key.
- Repeat this action in the final frame (Frame 150 in the sample).
- Clean any errant frames and run the timeline to view.
Staging
- Resize the floor to make a convincing ground plane. In the sample, we increased it to 48 wide by 48 deep.
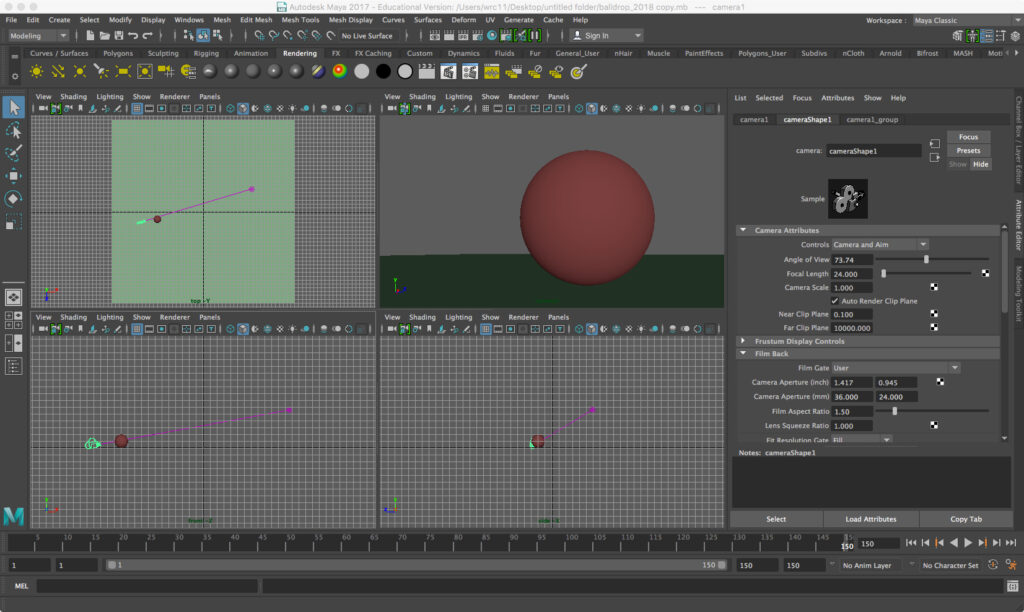
- Create a dramatic point of view and composition using the Camera and Aim for better control.
- Add a simple Lambert color scheme as a New Material. In the sample, we used a Lambert Red and Lambert Green, both desaturated and brightness reduced, each by around 50%.
- In Camera Attributes, the Environment color parameter was set to a mid-saturation, mid-value color. In the sample, cyan was used.
Playblast away
- Turn off Heads-Up Display items in Display menu.
- Hide the Camera Target (Display>Hide Selection).
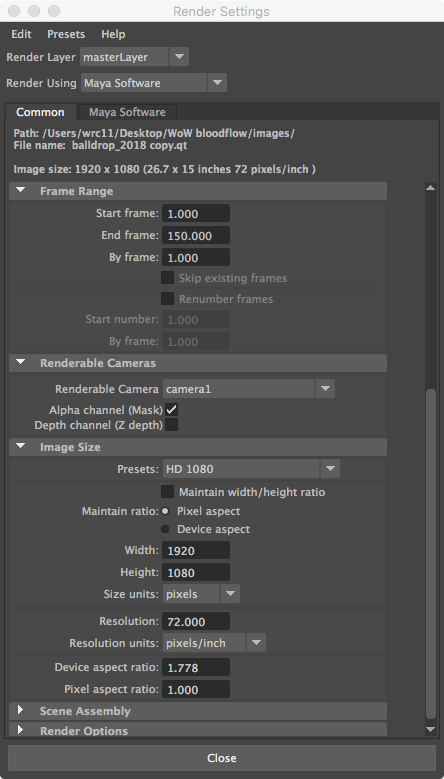
- In Render Settings Preferences, set up with a Preset of HD 1080.
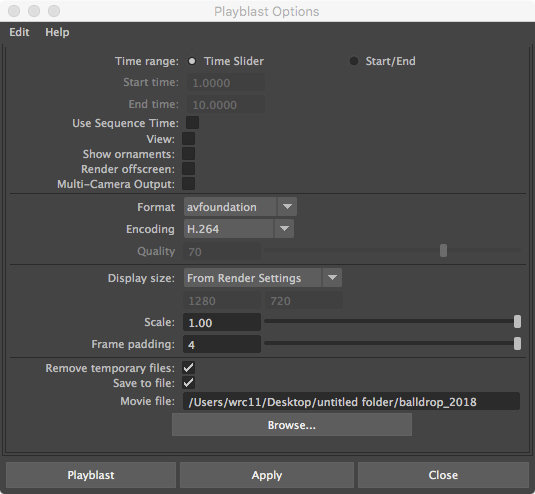
- From the Windows menu, find and open the Playblast dialog box:
- Uncheck all the check boxes (Show ornaments especially).
- Set Display size dropout to From Render Settings.
When you are satisfied with your playblast, upload to your YouTube or Vimeo account and post to your blog. You’ll have a lot to write about for your experience with animation!


